In previous lesson Introduction Of Raspberry Pi GPIO , we learned what is GPIO pins ,GPIO naming and location map in Raspberry Pi. Now we start to learn how to program GPIO pins and control outside device through GPIO.
Introduction for WiringPi
If you want to use Raspberry Pi to control other devices such as sensors, motors, LEDs etc, you need to exchange signal with these devices. This is called Input/Output(I/O). That is the job of GPIO pins.
In order to send/get data from GPIO pins, theoretically people can use ARM Assembly or C language to directly access the I/O address, registers, memories or trigger related I/O interrupt. However, such programming practice is super complicated, inconvenient and requires deep understanding about ARM CPU hardware detail.
Fortunately, experts invented a developing tool called “utility” or “library”. With the help of utility/library, complicated I/O detail programming are sealed into some black boxes called “Functions” which makes GPIO programming simple and easy.
There are many free Open source GPIO libraries in the Internet. In this lesson, we will teach you how to install “wiringPi” library which is very popular among C programmers.
We don’t want to talk much of the technical detail about wiringPi. If you want to get more wiringPi information , please read following link:
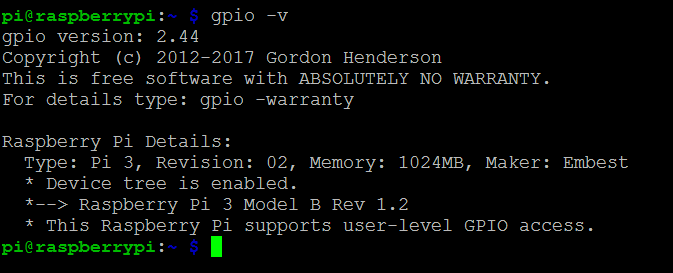
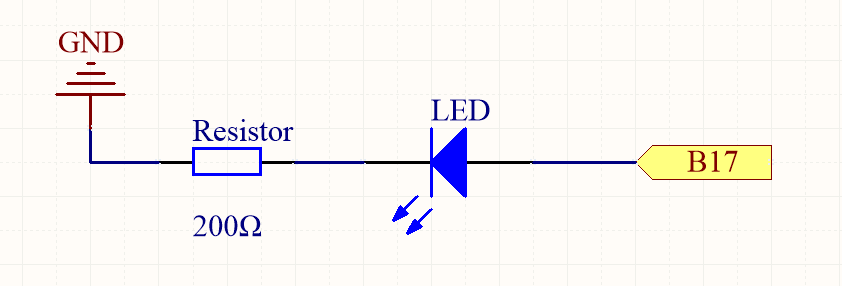
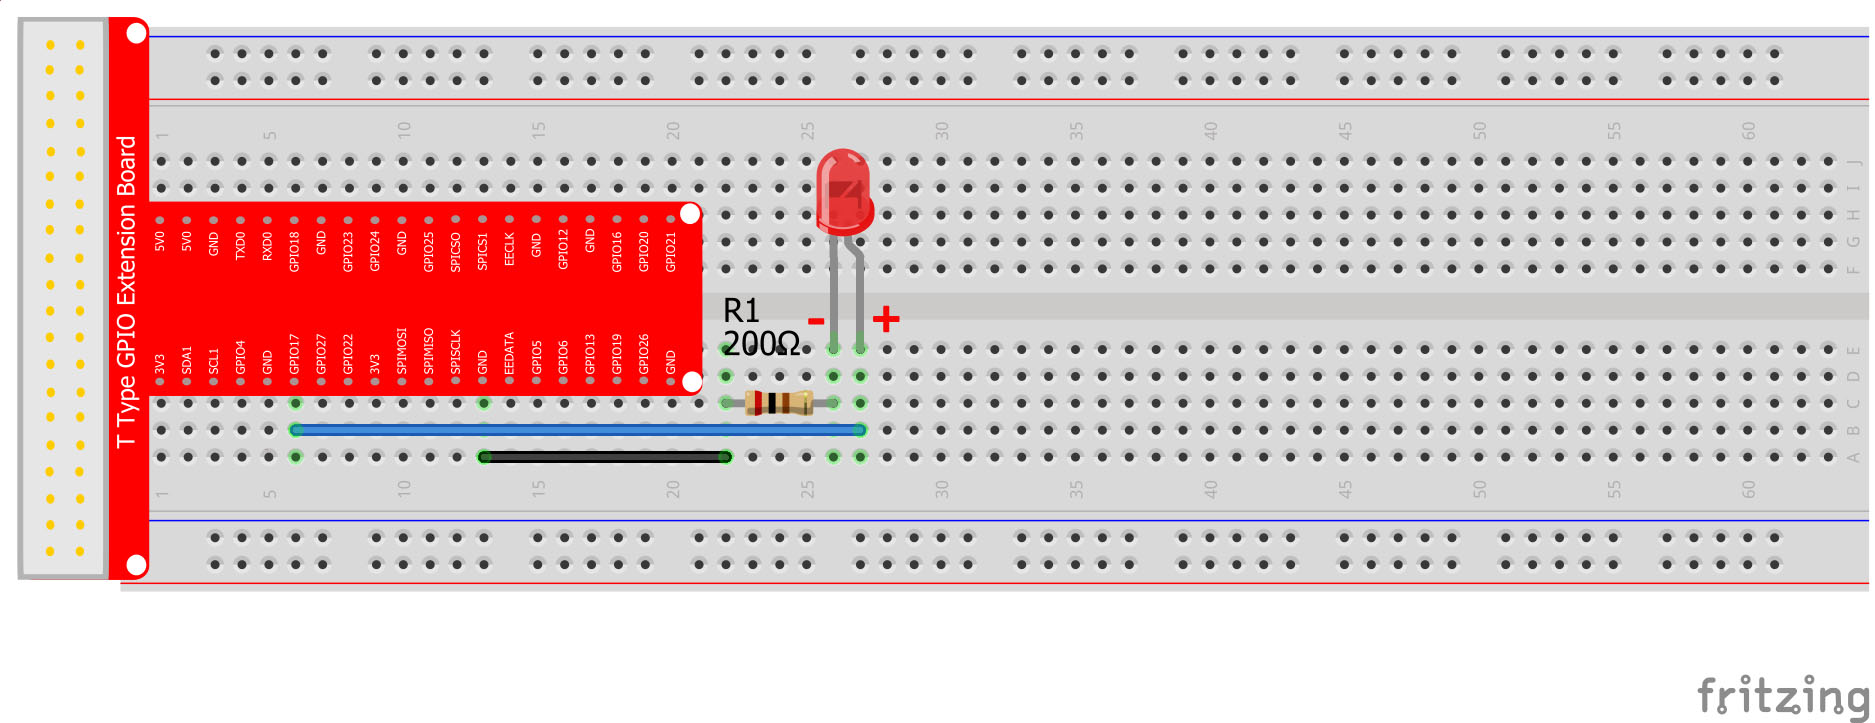
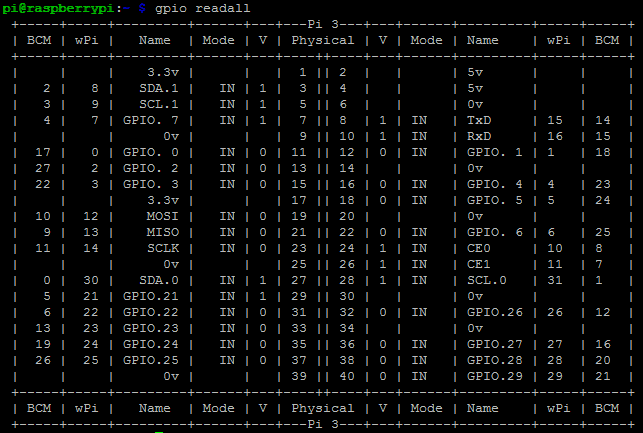
Add wiringPi and stdio file which is used in this project at the beginning of the code. the LED connect with wPi#0 (physical pin#11 or GPIO/BCM 17). There are three ways of naming including physical, wiringPi and BCM. To learn more information about raspberry Pi GPIO, please visit: https://osoyoo.com/2017/06/26/raspberry-pi-basic-tutorial-introduction-of-raspberry-pi-gpio/. You can enter the following command to see the GPIO layout
gpio readall
Above pin map shows Raspberry Pi actually has 3 pin number system. Physical Pin number, WPI(WiringPi) pin number and BCM pin number. For example , Physical Pin#7 in BCM system is called GPIO 17 while in WPI system , it is called GPIO 0(zero).
So how can we know which number system applies to our program? Here are some simple rules: In python:
If you decide use Physical Pin number system, you need use add following statement
GPIO.setmode(GPIO.BOARD)
If you want use BCM pin number system, you need add following statement:
GPIO.setmode(GPIO.BCM)
In C or C++:
C/C++ use wiringPi library to access GPIO pins and WiringPi library uses WPI number system.
4)Download C sample code from our website with following command
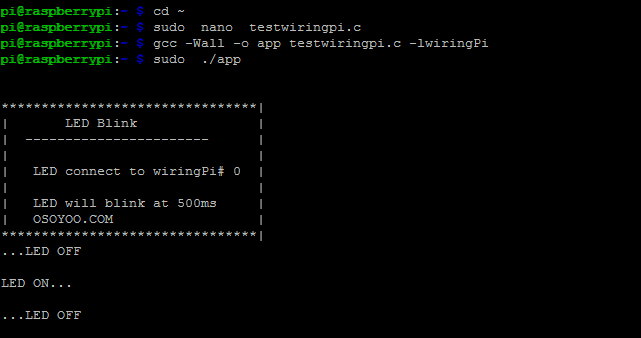
cd ~
wget http://osoyoo.com/driver/pi3_start_learning_kit_lesson_3/testwiringpi.c
5)Compile Code with following command:
gcc -Wall -o app testwiringpi.c -lwiringPi
Explanation: C language is high level language. Before running the project, the code need to compile as an executable file. gcc: is GNU Compiler Collection. If you want to write your own C code and compile to run it, you need to master gcc. -Wall: to get more error when compile the code -o: to name the compiled file. You can name the file as your like. here we name as app testwiringpi.c: means the original file which is compiled -lwiringPi: is to load the library wiringPi (l is short for library)
4)Run Project, enter the following command and press “enter” to run the project
sudo ./app
5)After running the code, your terminal will show print message as codef firstly, and then the LED blink and the ternimal will show LED status.


Hi,
I have tried this “testwiringpi.c” program. The Program works fine, however the LED does not light up. Any ideas how I can troubleshoot it?
Hi, Check if you did connect the LED in the correct polarity. If it isn’t working try to change the connecting legs.