In this lesson, we will use black/white tracking sensors to guide robot car to trace a black track in the white ground. If you have not completed installation in Lesson 1, please review Lesson 1.
(Note: in lesson 1, 5 black/white tracking sensors have been installed and connected to Raspberry Pi to prepare for lesson 2)
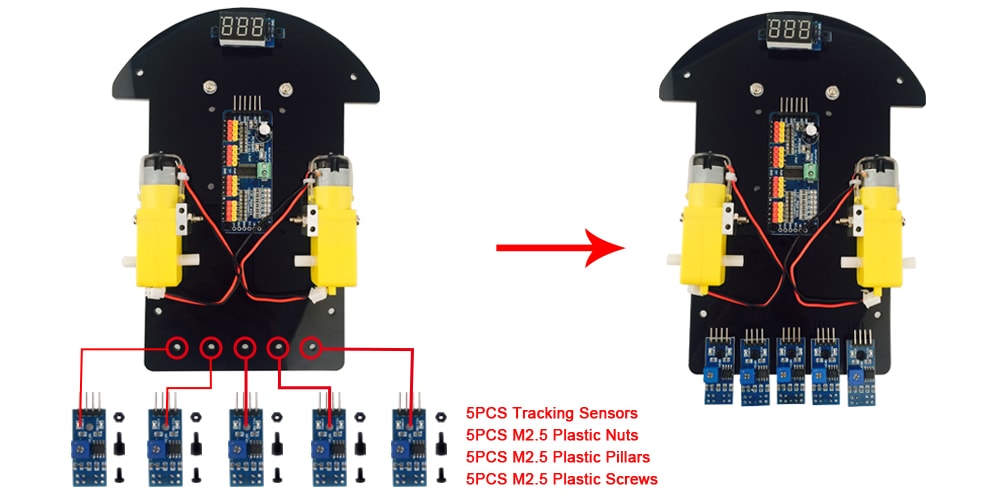
Hardware Installation
If you don’t install 5 tracking sensor modules in lesson1, please install and connect these modules as following pictures. If you have already installed and connected these, please skip this step.
Software Installation
Note:
1. if you use our image as OS system as lesson1, please skip Software Installation and go to Step2 to adjust the sensitivity of tracking sensor module or the step “test tracking line”
2. Please keep the raspberry Pi on power when using SSH to send command to Raspberry Pi terminal remotely.
Step 1:Download line-tracking sample code with following terminal command(skip this step if your micro SD card has pre-installed Osoyoo Robot Image): cd ~/osoyoo-robot/ wget http://osoyoo.com/driver/lf.tar.gz tar -zxvf lf.tar.gz
Note: Above commands will download sample code file to osoyoo-robot/lf directory
Step 2: Test Black/White Tracking sensors
There are 5 black/white tracking sensors in the forehead of the car. Each sensor has two LED lights . The red LED indicates power. The green LED indicates black/white. When black is detected, Green LED will turn off and a “1” will be sent to Raspberry Pi GPIO pin, otherwise LED will ON and a “0” will be sent.
* To make sensors working properly, you need use a screw driver to adjust the sensitivity screw on each sensor and make sure Green LED will ON when it is over White and Off when it is over Black.
If you want to learn more about adjust tracking module, please follow the next vedio:
Following python code and experiment will tell you if the sensors are installed correctly.
First, put a 2 cm black track on white ground, then put your car over the track and turn on battery.
Next, use SSH to connect your Raspberry Pi remotely from your PC(use Putty if you are using Windows), and type following terminal command: cd ~/osoyoo-robot/lf python test.py
When your put the first sensor(from right) on the black track, the green LED will turn off and your will see Putty terminal window show 00001 as following:
This means Raspberry Pi detected WHITE(0) from 4 sensors in the left and Black(1) from the right edge sensor. You can change the position of the black track from right to left sensors one by one and make the result change from 00001 to 00010,00100,01000,10000.If your result is not showed as above, you might need to double check if the sensor sensitivity and connection to the Pi is correct.
Testing line tracking
First, make a black track on white ground. The track can be round or curve , but the turning angle of each curve should not be too sharp. We suggest user use 2cm width black tape sticking on white ceramic tile and make a nice track.
Next put your car over the track and turn on the power switch on battery box.
Last, use SSH to connect Raspberry Pi through your PC and typing following commands: cd ~/osoyoo-robot/lf
python line_follow.py
After above command is sent to raspberry Pi, your car will start moving along the black track automatically.