In this lesson, we will use the Osoyoo UNO board to control a 1-channel relay and turn on/off a LED lamp.
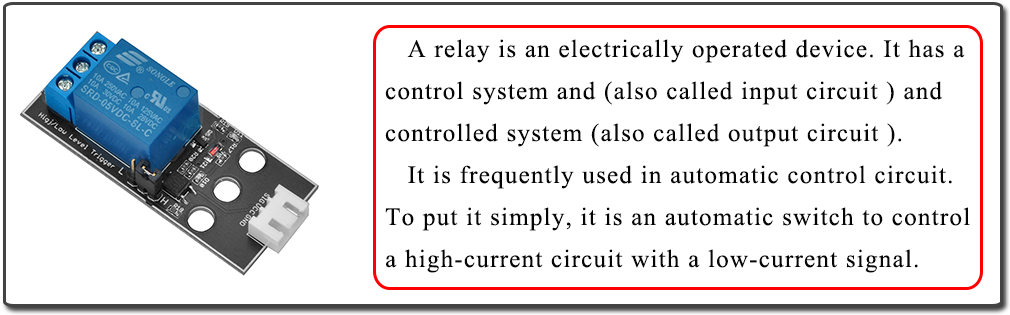
Relay is an electronically controlled switch which can use a low-voltage signal to turn on/off a high voltage circuit connection.
Relays are used to protect the electrical system and to minimize the damage to the equipment connected in the system due to over currents/voltages. The relay is used for the purpose of protection of the equipment connected with it.
INPUT
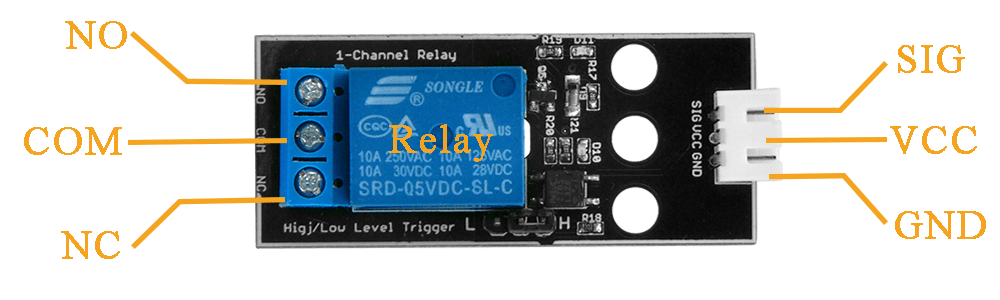
It has a 1×3 pin header for connecting power (5V and 0V), and for controlling the relay.
GND – Connect 0V to this pin.
SIG – Input Controls signal. In this project, our relay is Active Low which means this Relay is Active when input SIG signal is LOW(zero).
VCC – Connect 5V to this pin.
OUTPUT
The 1 channel relay module could be considered like a series switches: 1 normally Open (NO), 1 normally closed (NC) and 1 common Pins (COM).
COM– Common pin
NC– Normally Connected(closed) Pin. NC pin is connected with COM pin when SIG input is LOW(active) and disconnected when SIG is high
NO– Normally Open Pin. NO pin is disconnected(open) with COM pin when SIG pin is LOW and connected when SIG is high
OSOYOO Basic Board for Arduino (Fully compatible with Arduino UNO rev.3) x 1
OSOYOO Magic I/O board for Arduino
OSOYOO 1-Channel Active LOW Relay Module x 1
OSOYOO LED Module x1
OSOYOO 3-Pin PNP Cable x 1
USB Cable x 1
PC x 1
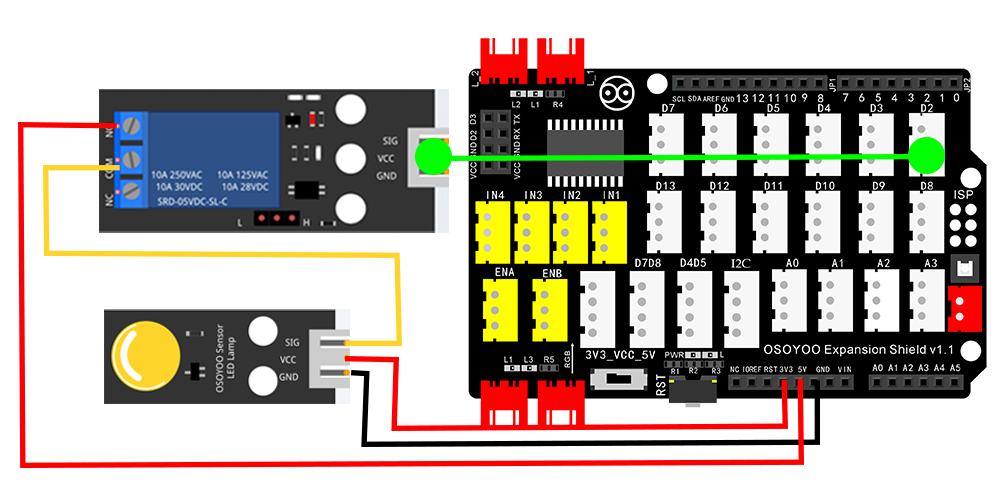
Please plug OSOYOO magic I/O board onto OSOYOO Basic Board for Arduino First. Then connect LED module and Relay Module to the Magic I/O board with 3-pin PNP cable and jumper wires as following picture:
Notice: Shut off your battery or Unplug your power adapter when upload sketch code to OSOYOO Basic Board for Arduino.
You can download the code directly, then click “Open” in Mixly to choose the code you download:
After above operations are completed, connect the OSOYOO Basic Board for Arduino to your computer using the USB cable. The green power LED (labelled PWR) should go on. Open the Graphical Programming softwareMixly and do following operations:
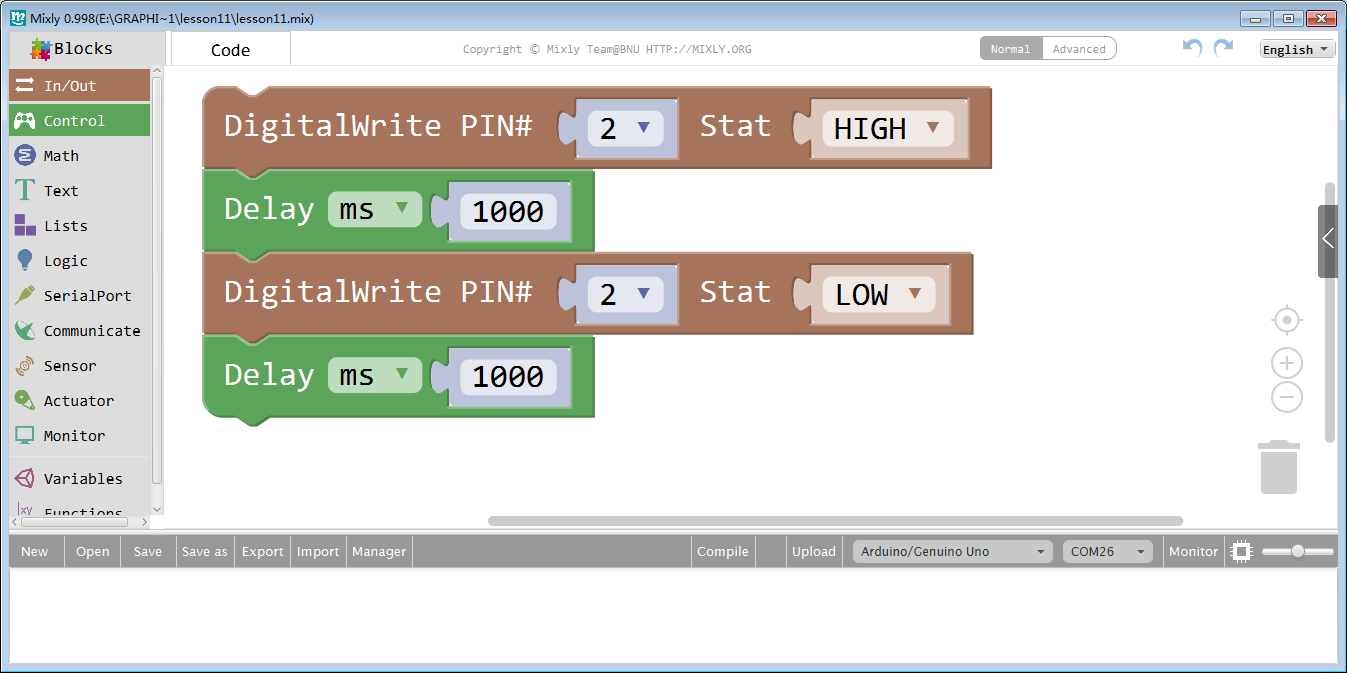
Drag out a DigitalWrite block in In/Out category and a Delay block in Control category.
Set the pin2 as output, and the stat to HIGH , and keep the relay closed for 1s; Set the pin2 to LOW to break the relay open for 1s.
Save and upload program to OSOYOO Basic Board for Arduino
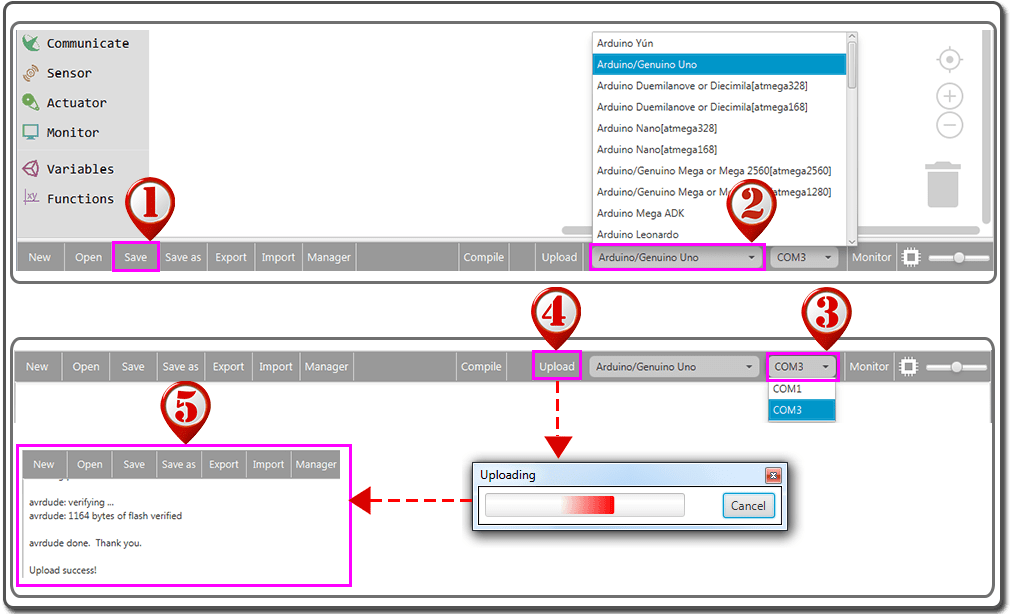
(1)Click Save after programming is done.
(2) Select the board type and serial port before uploading. In our case, we are using OSOYOO Basic Board for Arduino, so just select Arduino/Genuino Uno.
(3) Select the serial device of the OSOYOO Basic Board for Arduino from the COM menu.
(4)Next,upload the code. If the uploading fails, check connection according to the prompts.
(5)Finally, the status will change to ‘Upload success!’.
When OSOYOO Basic Board for Arduino program is running, the UNO board will send a HIGH signal to Relay SIG which turn off the LED power for one seconds and then send a LOW signal to Relay and turn on LED. In addition, you can hear a tick-tock noise generated by the switch actions.
HOW RELAY WORKS?
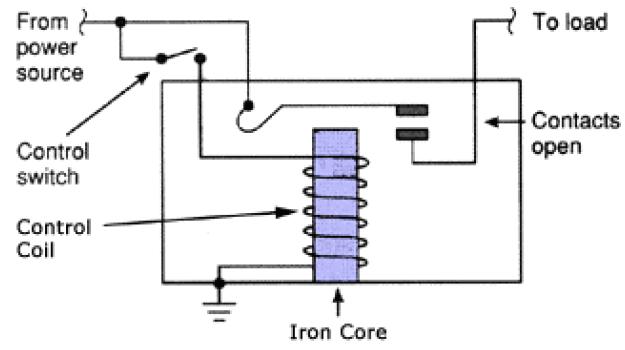
The working of a relay can be better understood by explaining the following diagram given below.
There are 5 parts in every relay:
1. Electromagnet – It consists of an iron core wounded by coil of wires. When electricity is passed through, it becomes magnetic. Therefore, it is called electromagnet.
2. Armature – The movable magnetic strip is known as armature. When current flows through them, the coil is it energized thus producing a magnetic field which is used to make or break the normally open (N/O) or normally close (N/C) points. And the armature can be moved with direct current (DC) as well as alternating current (AC).
3. Spring – When no currents flow through the coil on the electromagnet, the spring pulls the armature away so the circuit cannot be completed.
4. Set of electrical contacts – There are two contact points:
.Normally open – connected when the relay is activated, and disconnected when it is inactive.
.Normally close – not connected when the relay is activated, and connected when it is inactive.
5. Molded frame – Relays are covered with plastic for protection.
Principle
The diagram shows an inner section diagram of a relay. An iron core is surrounded by a control coil. As shown, the power source is given to the electromagnet through a control switch and through contacts to the load. When current starts flowing through the control coil, the electromagnet starts energizing and thus intensifies the magnetic field. Thus the upper contact arm starts to be attracted to the lower fixed arm and thus closes the contacts causing a short circuit for the power to the load. On the other hand, if the relay was already de-energized when the contacts were closed, then the contact move oppositely and make an open circuit.
As soon as the coil current is off, the movable armature will be returned by a force back to its initial position. This force will be almost equal to half the strength of the magnetic force. This force is mainly provided by two factors. They are the spring and also gravity.
Relays are mainly made for two basic operations. One is low voltage application and the other is high voltage. For low voltage applications, more preference will be given to reduce the noise of the whole circuit. For high voltage applications, they are mainly designed to reduce a phenomenon called arcing.