Welcome to the first lesson of Osoyoo Model-3 Robot Learning Kit!
In this “Hello World” version lesson, we will install the most important framework of the robot car and program the car to do some simple movements. If you have passed the test movement of this lesson, it means OSOYOO basic board, motor control module, motors, batteries, chassis and wire connections between these parts are all functioning well.
As your experiments in future lessons are all based on the frame work of Lesson 1, it is very important to test the installation and sample code in this Lesson properly.
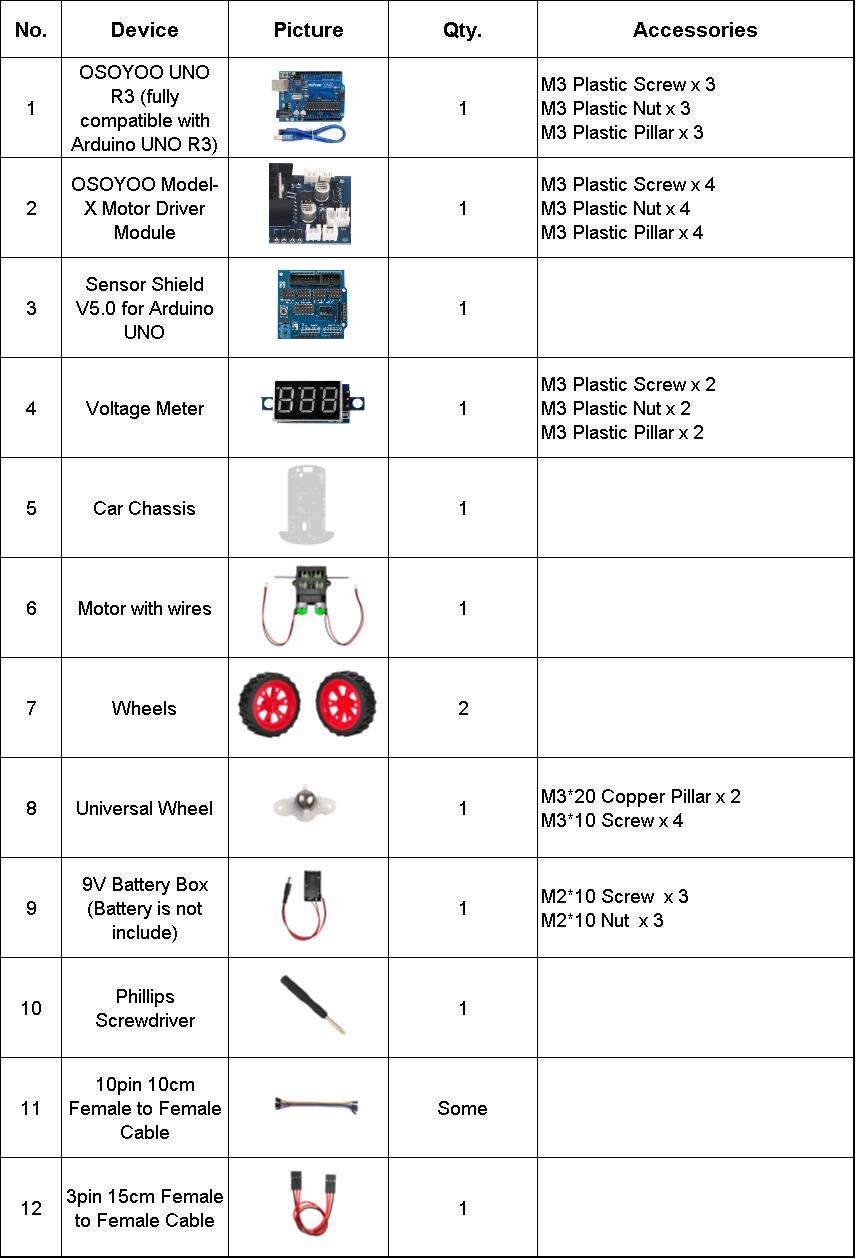
Parts and Devices
Hardware Installation
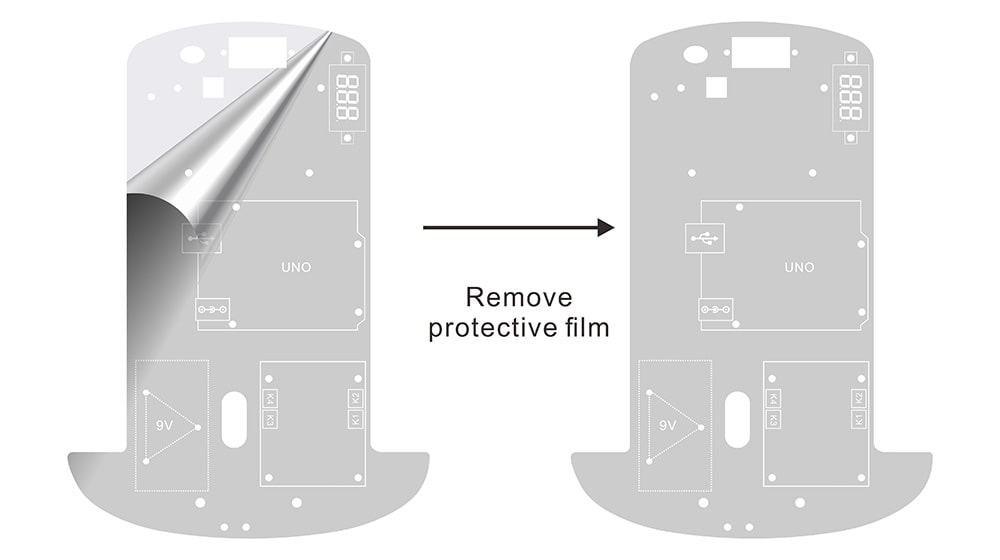
1. Remove the protective film from the chassis:
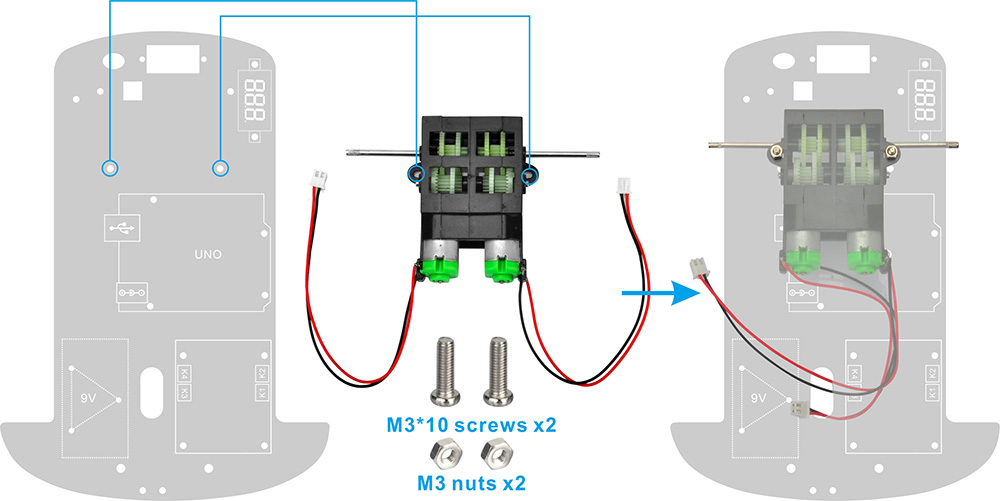
2. Install the motor under the chassis with M3 screws and nuts as follow:
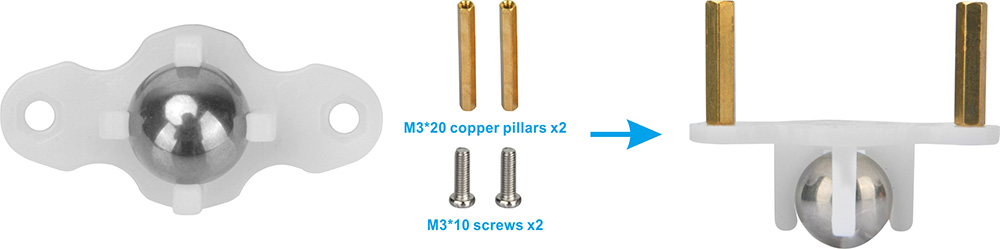
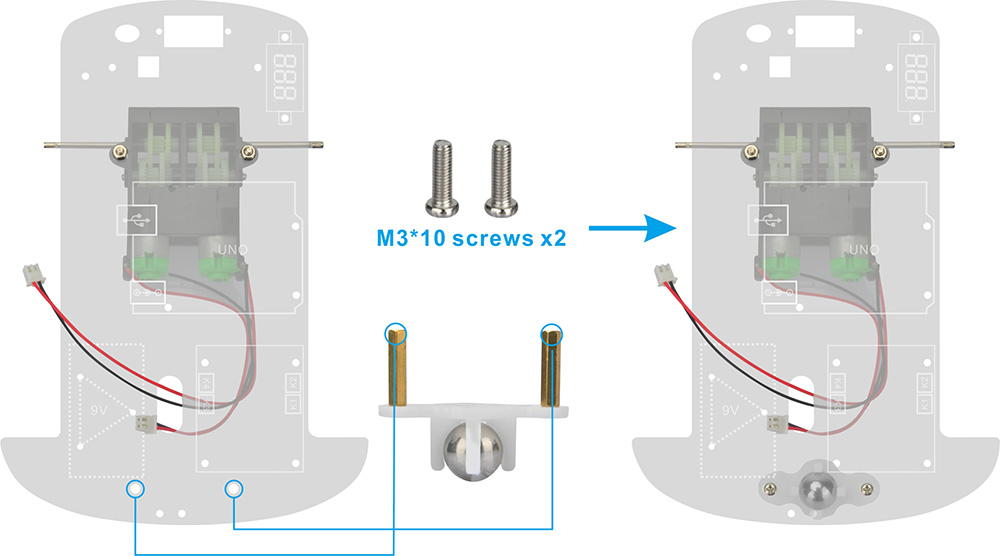
3. Install the universal wheel with the M3 screws and copper pillars:
4. Install the universal wheel under the chassis with the M3 screws:
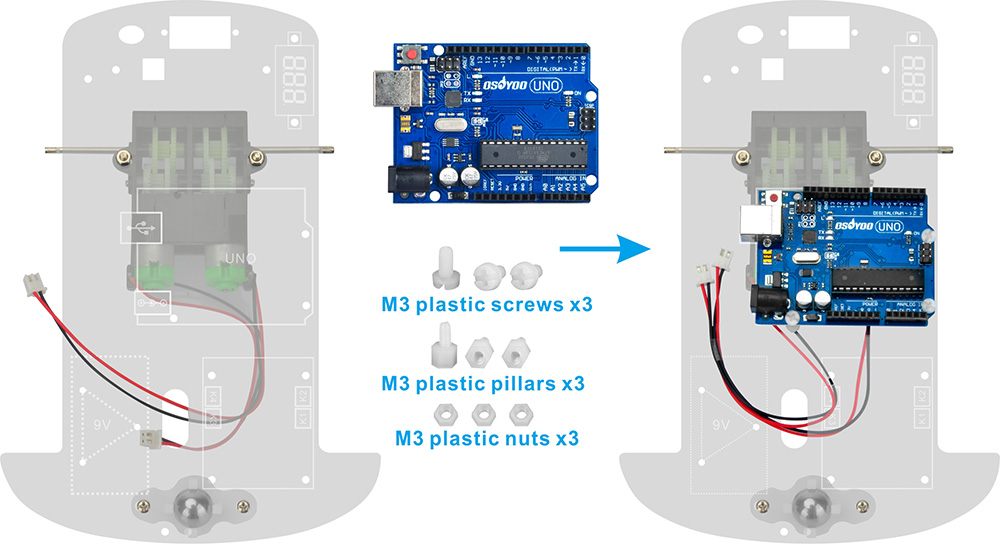
5. Install OSOYOO basic Board on the chassis with M3 plastic screws, pillars and nuts:
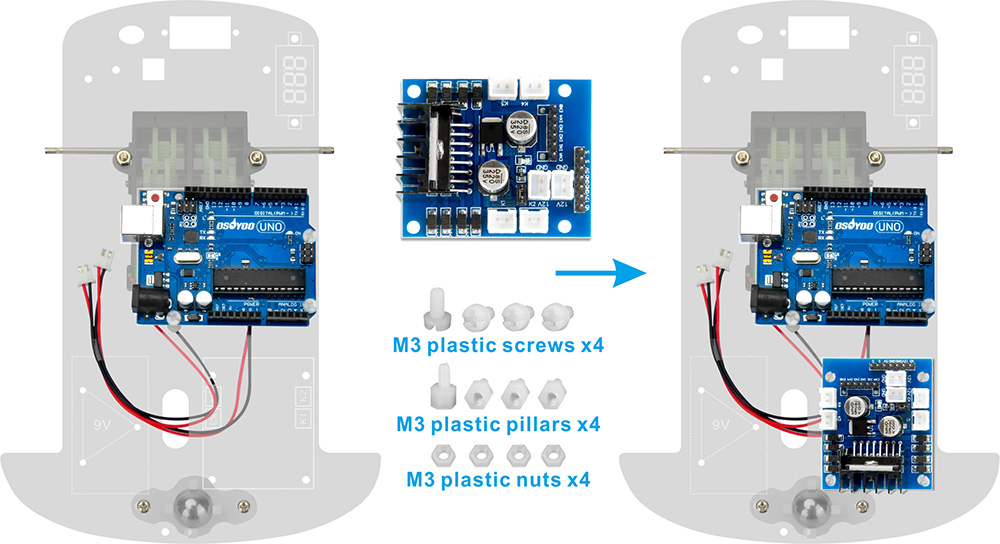
6. Install OSOYOO MODEL X Motor Driver Module on the chassis with M3 plastic screws, pillars and nuts:
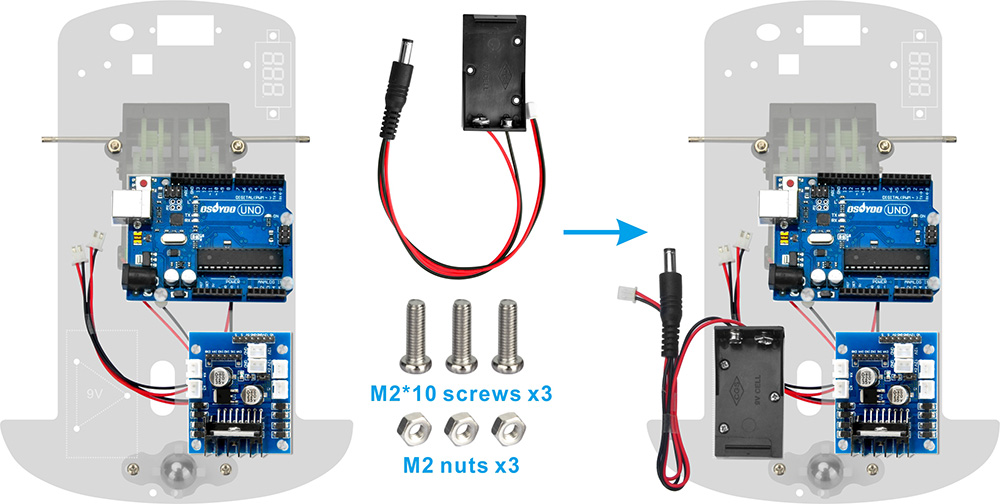
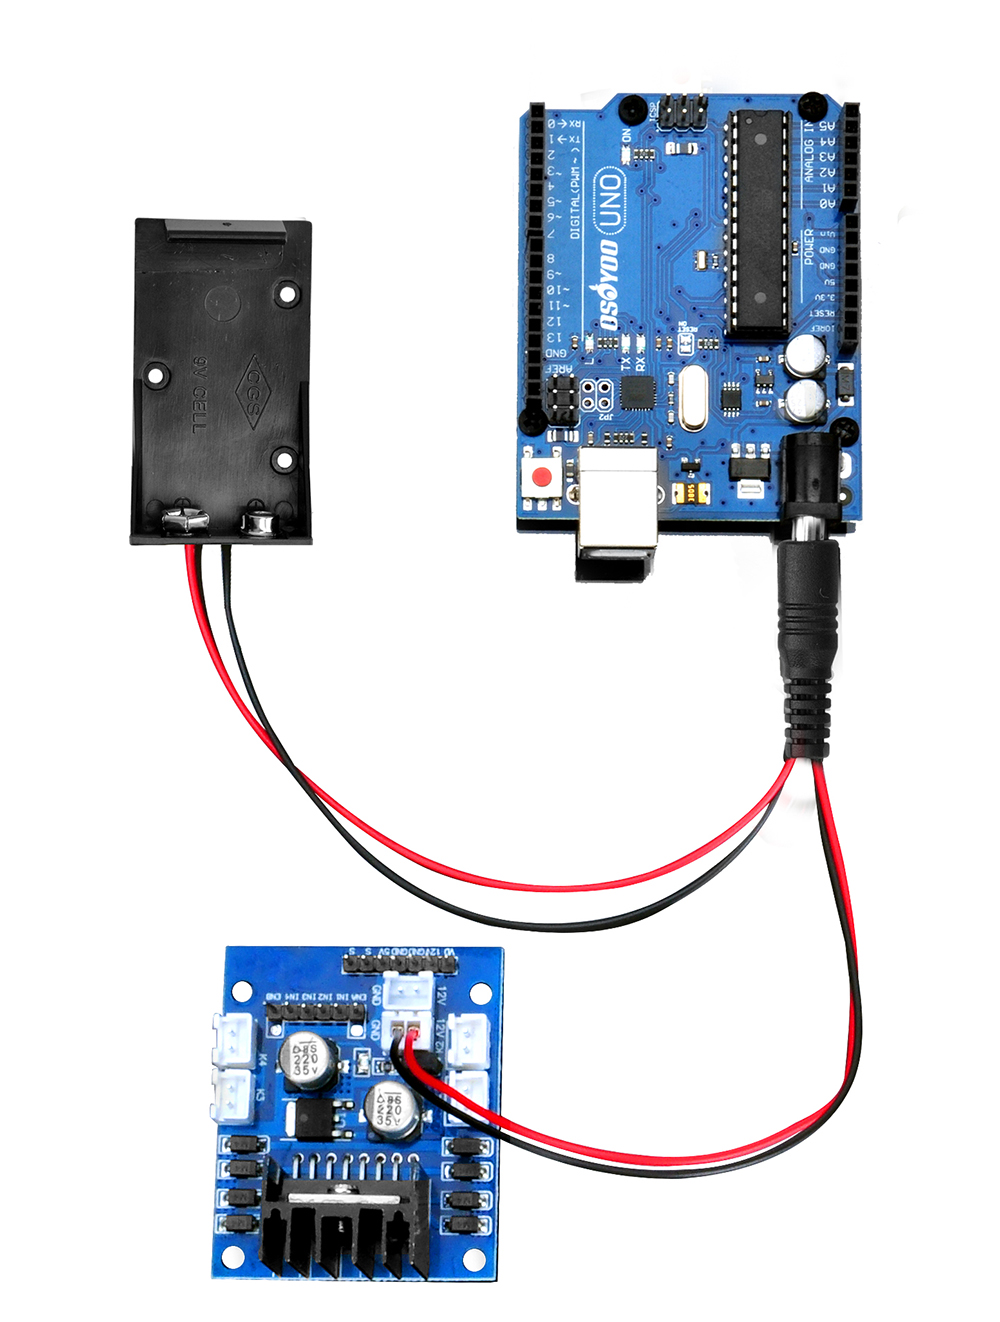
7. Install the battery box on the chassis with M2 screws and nuts:
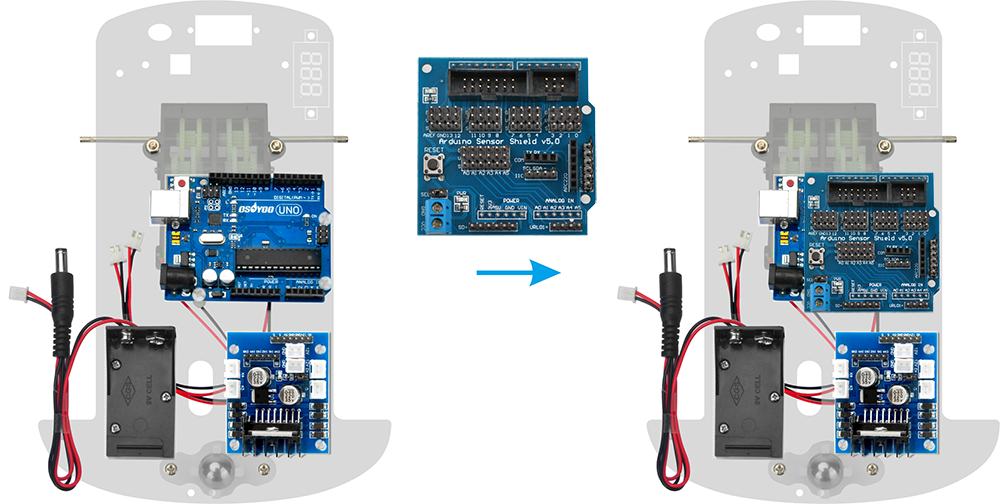
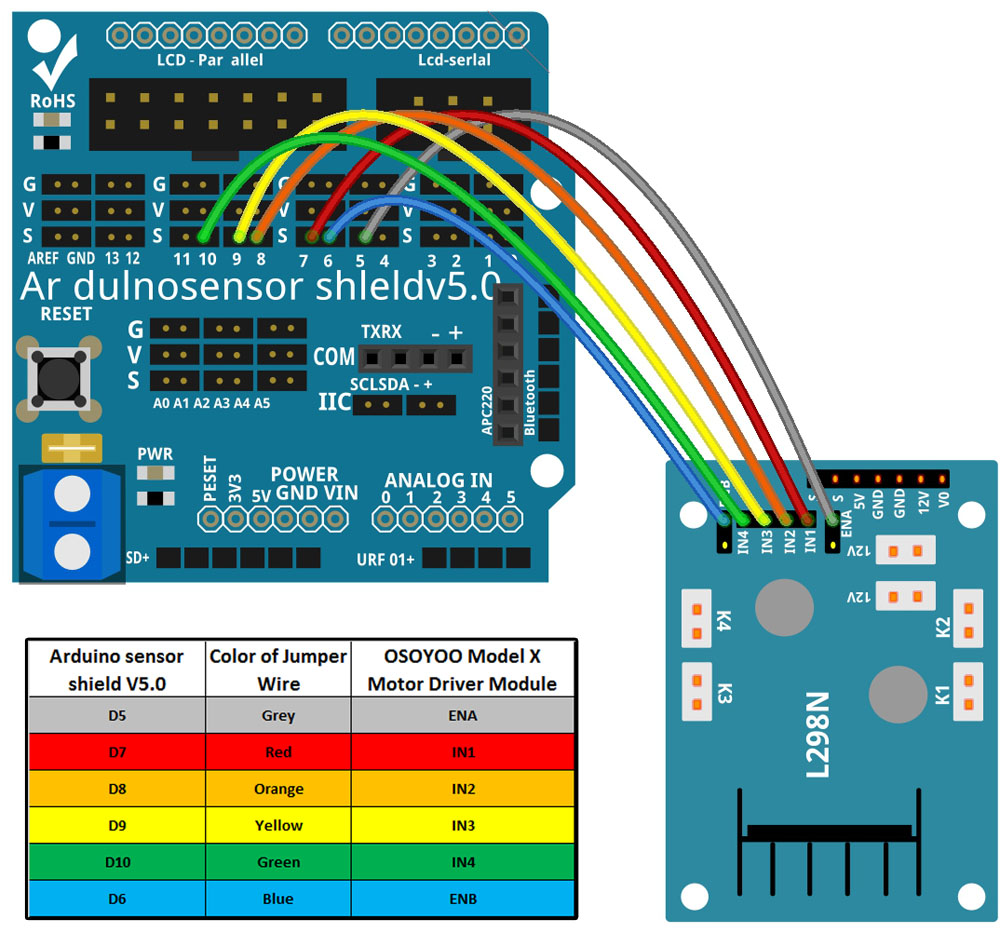
8. Plug the Sensor Shield V5.0 for Arduino UNO in OSOYOO basic board:
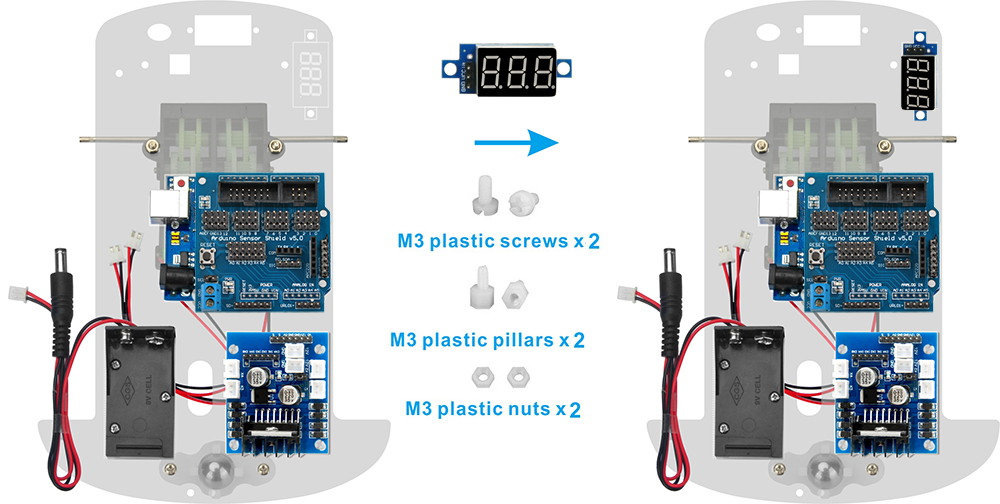
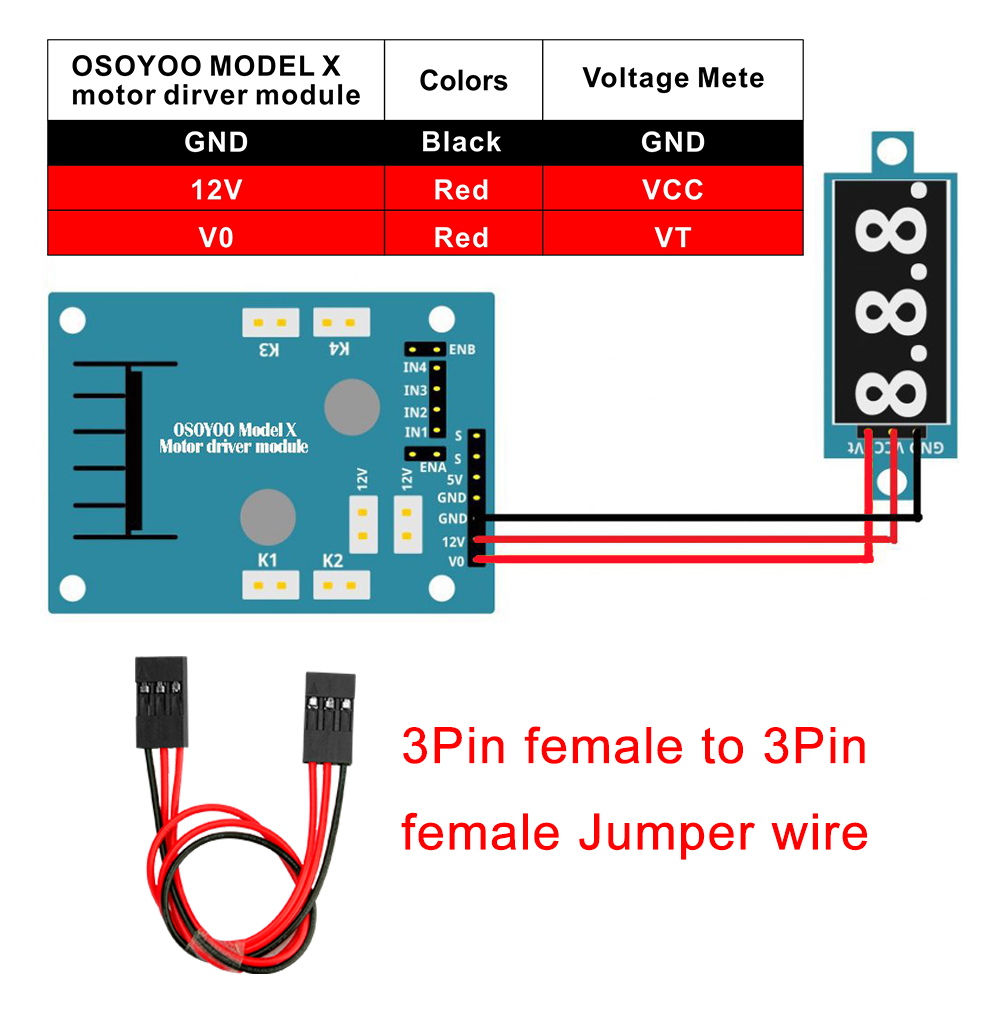
9. Install the voltage meter on the chassis with M3 plastic screws, pillars and nuts:
Connection
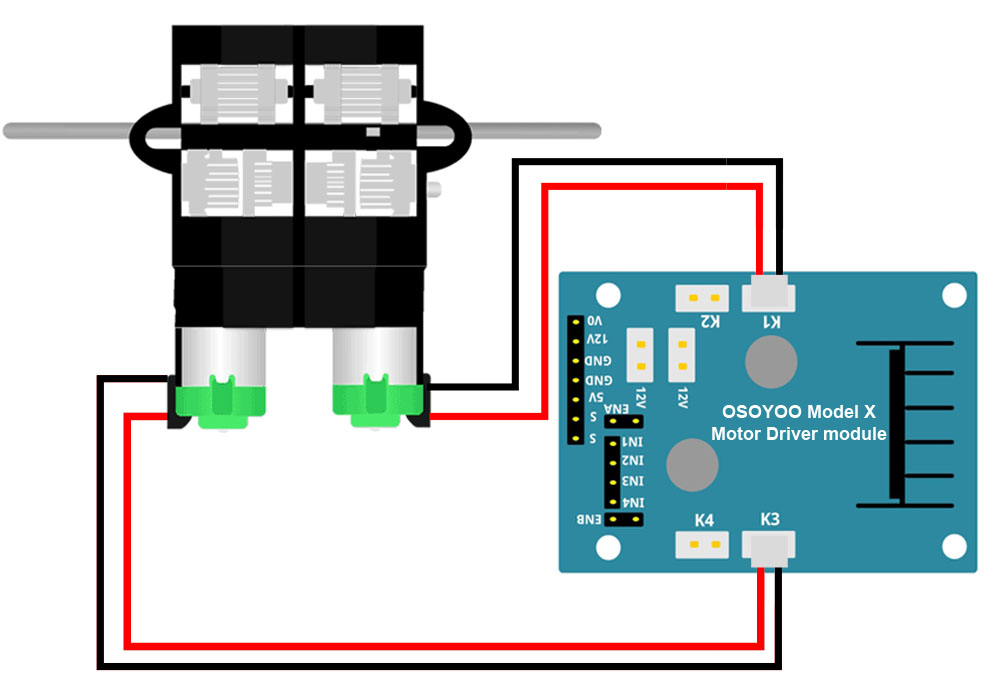
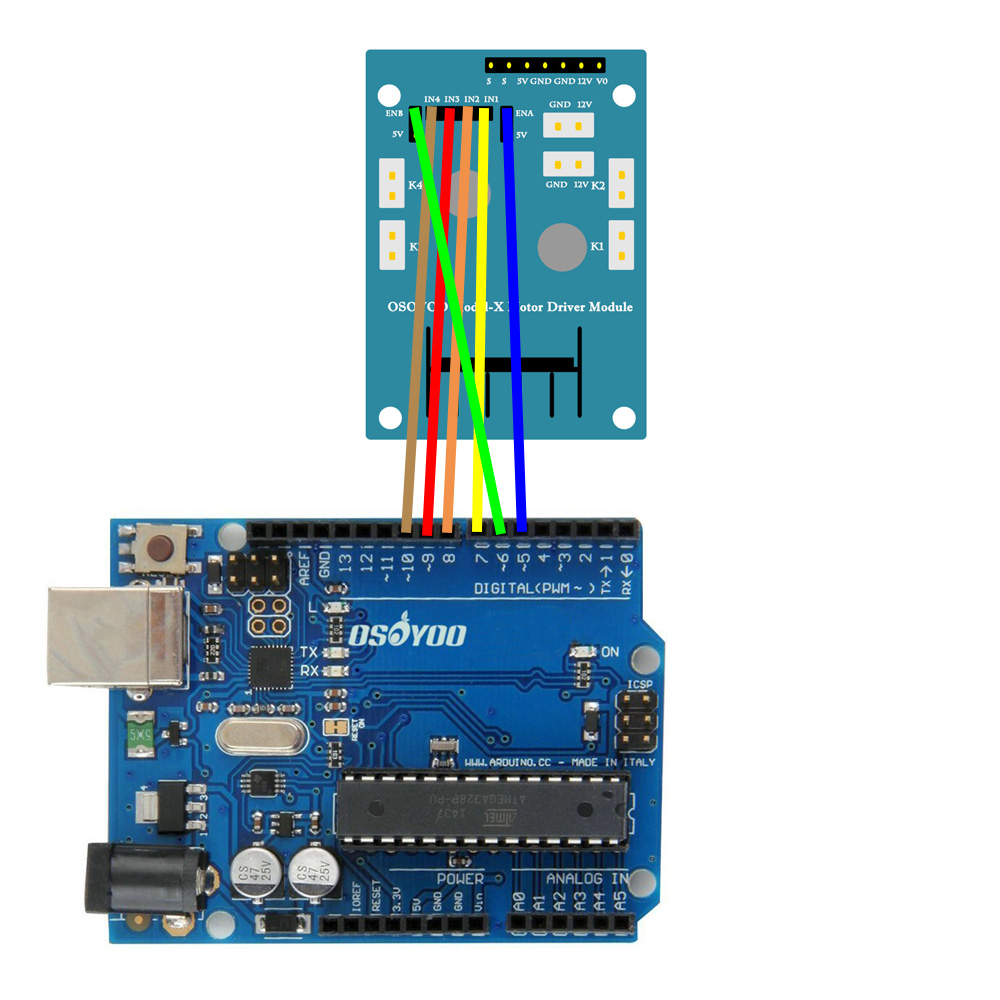
1)Connect OSOYOO Model-X Motor Driver Module with the motor:
More detail about OSOYOO Model-X please refer to this link:
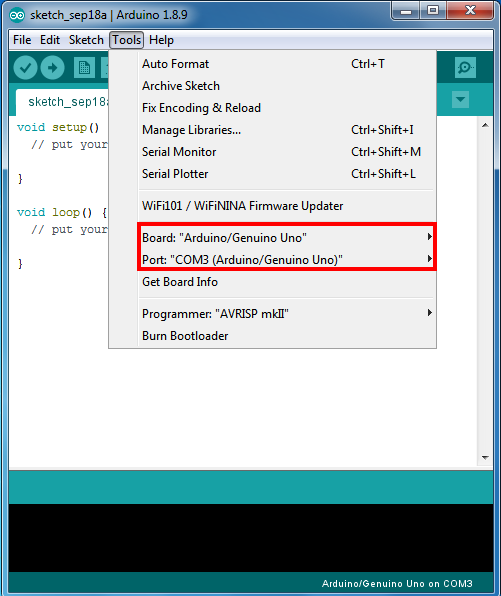
Connect board to PC with USB cable, open Arduino IDE, choose corresponding board/port for your project
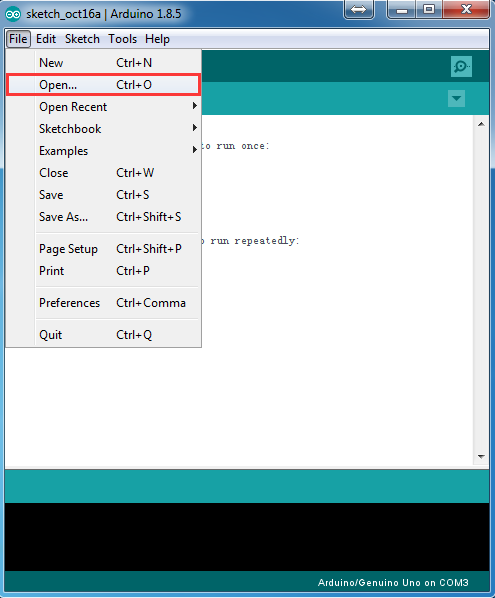
Step 4:
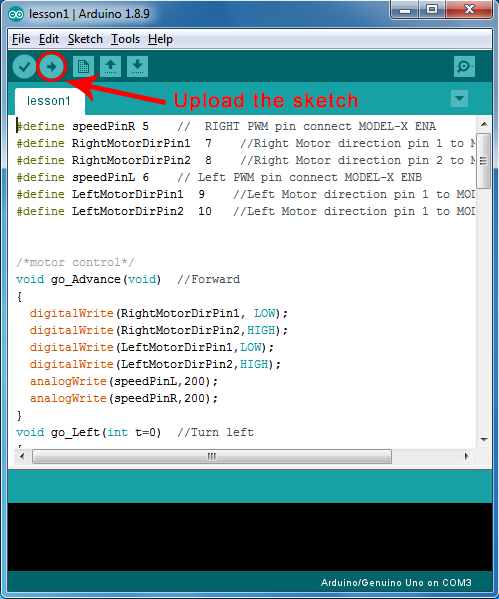
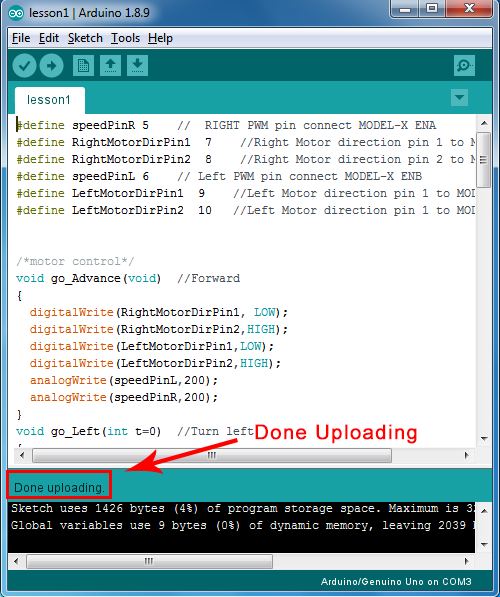
Click file -> click Open -> choose code “lesson-1.ino”, load the code into Arduin, and then upload the sketch to the board.
Testing
Disconnect the car from PC, put a 9V battery into battery box (make sure polar direction is correct, otherwise it can destroy your device and cause fire hazard).
Put the car on the ground, the car should go forward 2 seconds, then go backward 2 seconds, then left turn for 2 seconds, then right turn for 2 seconds, then stop.
If the car does not move as per above mentioned result, you should check your wire connection, battery voltage(must over 7.2v).
How do i get support? I cannot get Lesson 1 working. Car does not move at all even after checking and following exact steps mentioned here. Please HELP.
Hi, does the indicate LED on? And can you see your battery voltage on the voltage meter? Could you please check the wire connection, especially the connection of the battery?
I uploaded the 1st lesson. I checked the wiring. The robot still not working.
Battery is above 7.2. LED on the sensor shield right next to the LCD parallel port keeps pulsing with sounding a little beep.
Any thought of why this is happening?
Hi,kaditech,
Could take the wiring photo and send it to my eamil ([email protected]),I will reply you as soon as possible…Of course, you can attach more details.
Arduino: 1.8.9 (Mac OS X), Board: “Arduino/Genuino Uno”
fork/exec /private/var/folders/sm/k_sst8h16413mprft21wjd680000gn/T/AppTranslocation/1279D937-8A1C-41B4-A085-595015D4140D/d/Arduino.app/Contents/Java/hardware/tools/avr/bin/avr-g++: bad CPU type in executable
Error compiling for board Arduino/Genuino Uno.
This report would have more information with
“Show verbose output during compilation”
option enabled in File -> Preferences.
Sketch uses 444 bytes (1%) of program storage space. Maximum is 32256 bytes.
Global variables use 9 bytes (0%) of dynamic memory, leaving 2039 bytes for local variables. Maximum is 2048 bytes.


How do i get support? I cannot get Lesson 1 working. Car does not move at all even after checking and following exact steps mentioned here. Please HELP.
Hi, does the indicate LED on? And can you see your battery voltage on the voltage meter? Could you please check the wire connection, especially the connection of the battery?
I did all the steps as mentioned. The car does not move
I uploaded the 1st lesson. I checked the wiring. The robot still not working.
Battery is above 7.2. LED on the sensor shield right next to the LCD parallel port keeps pulsing with sounding a little beep.
Any thought of why this is happening?
Hi,kaditech,
Could take the wiring photo and send it to my eamil ([email protected]),I will reply you as soon as possible…Of course, you can attach more details.
Hello, when I tried to upload the sketch I have an error:
Arduino:1.8.13 (Windows 10), Tarjeta:”Arduino Uno”
El Sketch usa 4714 bytes (14%) del espacio de almacenamiento de programa. El máximo es 32256 bytes.
Las variables Globales usan 229 bytes (11%) de la memoria dinámica, dejando 1819 bytes para las variables locales. El máximo es 2048 bytes.
Ha ocurrido un error mientras se enviaba el sketch
Este informe podría contener más información con
“Mostrar salida detallada durante la compilación”
opción habilitada en Archivo -> Preferencias.
Please unplug the Arduino UNO board , then reconnect and upload the code again. If still not working, then you need to replace a new UNO board.
The test. run does not work. Can you guide me about the software. thank you.
The test run does not work. In the Arduino software I have found only Arduino Uno. Not Genuino Uno. Does it matter?
It’s better to take a screenshot, you can contact me by [email protected]
Arduino: 1.8.9 (Mac OS X), Board: “Arduino/Genuino Uno”
fork/exec /private/var/folders/sm/k_sst8h16413mprft21wjd680000gn/T/AppTranslocation/1279D937-8A1C-41B4-A085-595015D4140D/d/Arduino.app/Contents/Java/hardware/tools/avr/bin/avr-g++: bad CPU type in executable
Error compiling for board Arduino/Genuino Uno.
This report would have more information with
“Show verbose output during compilation”
option enabled in File -> Preferences.
Sketch uses 444 bytes (1%) of program storage space. Maximum is 32256 bytes.
Global variables use 9 bytes (0%) of dynamic memory, leaving 2039 bytes for local variables. Maximum is 2048 bytes.
Please check the wires, and then you can run the “Hello World” sketch to test if the UNO board is normal.
how can i do that?
Hello World and Blink works.