


Authorized Online Retailers:
Purchase from US Purchase from Japan


Introduction
In this lesson, we will show how to use the Osoyoo Yun IoT Kit with the Blynk APP to control a LED.
Preparations
HARDWARE
- Arduino(Osoyoo Mega2560 here) x 1
- Dragino Yun Shield x 1
- Breadboard x 1
- LED x 1
- 200Ω Resistor x 1
- Jumpers
SOFTWARE
Connection
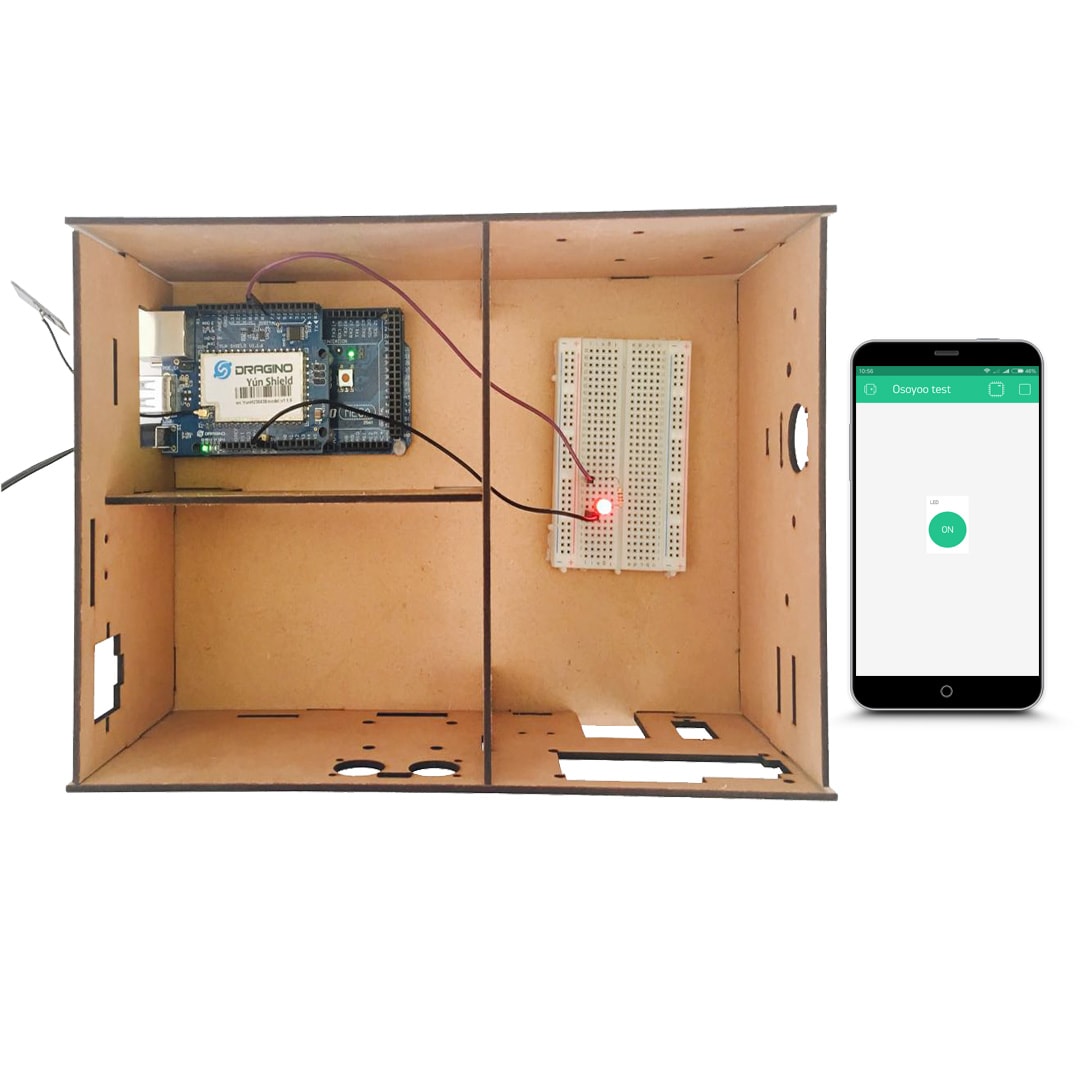
Build the circuit as below:
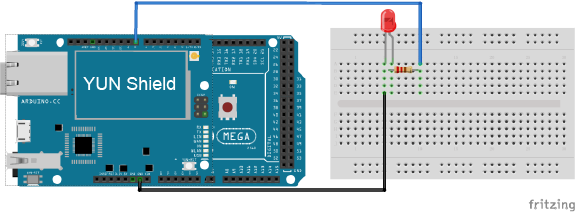
Here we connect the LED to digital pin D8.
Code Program
After above operations are completed, make sure that the Yun Shield is on the same network with the computer. Open the Arduino IDE and choose corresponding board type and port type for you project. Then load up the following sketch onto your Arduino.
You can find the Arduino sketch here.
In this example sketch, find this line:
char auth[] =”YourAuthToken”;
This is the Auth Token that you emailed yourself. Please check your email and copy it, then paste it inside the quotation marks.
It should look similar to this:
char auth[] = “f45626c103a94983b469637978b0c78a”;
Upload the sketch to the board. Wait until you see something like this:
avrdude done. Thank you.
Congrats! You are all set! Now your hardware is connected to the Blynk Cloud!
Add a Widget
Your project canvas is empty, let’s add a button to control our LED.
Tap anywhere on the canvas to open the widget box. All the available widgets are located here. Now pick a button.
Widget Box


Drag-n-Drop – Tap and hold the Widget to drag it to the new position.
Widget Settings – Each Widget has it’s own settings. Tap on the widget to get to them.

The most important parameter to set is PIN . The list of pins reflects physical pins defined by your hardware. If your LED is connected to Digital Pin 8 – then select D8 (D – stands for Digital).

Running Result
After you finished all above operations,open the Serial Monitor and you will see the connection situation,then open the Blynk APP, press the PLAY button. This will switch you from EDIT mode to PLAY mode where you can interact with the hardware. While in PLAY mode, you won’t be able to drag or set up new widgets, press STOP and get back to EDIT mode.

At the same time, you can see the hardware side as below:
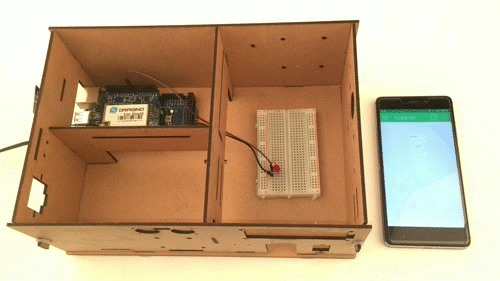
So, you just have completed a LED remote control experiment.


How to connect YUN wifi to the internet,It shows it is offline in my project
You can check this link: https://osoyoo.com/?p=31213
Hello,
I try to control the LED with Blynk.
Since today, I’ve got this message when i try to compil on my IDE 1.8.12:
fatal error: pins_arduino.h: No such file or directory
#include “pins_arduino.h”
^~~~~~~~~~~~~~~~
compilation terminated.
exit status 1
Error compiling for board Dragino Yún + Mega 2560.
I tried to update my IDE to 1.8.12, but the problem is still the same…This is the code :
#define BLYNK_PRINT Console
#include
#include
#include
// You should get Auth Token in the Blynk App.
// Go to the Project Settings (nut icon).
char auth[] = “Your Auth Token”;
void setup()
{
Blynk.begin(auth);
// Debug console
Bridge.begin();
Console.begin();
while (!Console);{}
// You can also specify server:
//Blynk.begin(auth, “blynk-cloud.com”, 8442);
//Blynk.begin(auth, IPAddress(192,168,1,100), 8442);
}
void loop()
{
Blynk.run();
// You can inject your own code or combine it with other sketches.
// Check other examples on how to communicate with Blynk. Remember
// to avoid delay() function!
}
Actually, even with only this small part of program I’ve got the same problem…
void setup()
{
}
void loop()
{
At the first, you need to install the Blynk libraries on your PC: https://github.com/osoyoo/Osoyoo-development-kits/blob/master/Osoyoo%20Yun%20IoT%20Smarthome%20Kit/Libraries/Blynk.zip
Then click this link: https://github.com/osoyoo/Osoyoo-development-kits/blob/master/Osoyoo%20Yun%20IoT%20Smarthome%20Kit/Blynk_control/Blynk_control.ino
Copy the code to a new sktech page, try it again.
Please make sure that you have successfully installed the library files, Click this link for How to install additional Arduino Libraries https://osoyoo.com/2017/05/08/how-to-install-additional-arduino-libraries/
Hello,
I checked the Blynk libraries on my PC, all is ok. I still have the same error message :
In file included from sketch\Led.ino.cpp:1:0:
C:\Users\xxx\AppData\Local\Arduino15\packages\arduino\hardware\avr\1.8.3\cores\arduino/Arduino.h:258:10: fatal error: pins_arduino.h: No such file or directory
#include “pins_arduino.h”
^~~~~~~~~~~~~~~~
compilation terminated.
exit status 1
Error compiling for board Dragino Yún + Mega 2560.
Do you have another idea ?
pins_arduino.h is a board-specific file and if the compiler can’t find it this could be because the board type hasn’t been defined correctly. The boards.txt entry should include a build.variant property that names a directory under arduino/variants that contains the corresponding pins_arduino.h.
By the way, the Installation & Troubleshooting section of arduino.cc is a more appropriate place for problems like this relating to the IDE itself.
There,you can try to unistall the Arduino IDE and re-install a fresh version or an old version:https://www.arduino.cc/en/Main/OldSoftwareReleases#previous