In previous lesson – Prepare GPIO tool-WiringPi utility , We learned how to use WiringPi and C langugage to control GPIO and light a LED. In this lesson, we will do same job through another powerful programming language – Python.
Python is a programming language which can run Linux, Windows, Mac iOS. To learn more about Python, please visit Python official website.
RPi.GPIO API (library)
For a C programmer, the most frequently used GPIO library is WiringPi which is taught in our previous lesson. If programming language changes to Python, normally we use another GPIO library called RPi.GPIO which comes with Raspbian Jessie OS .
*RPi.GPIO pin definition is different from wiringPi. To learn the RPi.GPIO pin definition detail, please read our Lesson Two Introduction Of Raspberry Pi GPIO carefully.
The Raspbian Jessie 2015-05-27 release or above has RPi.GPIO pre-installed, and you can use it directly. In the subsequent tutorials, the RPi.GPIO will be used to program Raspberry pi GPIO from time to time. To learn more about RPi.GPIO, please visit here.
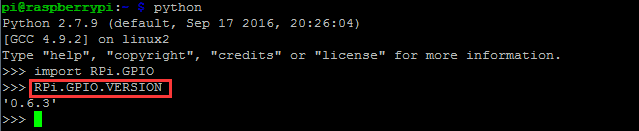
To test whether Python RPi.GPIO library is installed , you need start python by typing python in terminal (see following picture)
And then, type import RPi.GPIO. If no error prompts, it means RPi.GPIO is installed.
At last, type RPi.GPIO.VERSION. If it shows its version like below, your Pi is ready to go!
Python IDLE
In above testing Python examples, we run Python program through terminal commands. This kind of primitive programming method is not convenient to manage and debug our code.
Thanks to the Python experts’ effort, we now have an advance tool called Development and Learning Environment(IDLE) for Python. You no need remember any running and compiling command. It is a Graphic User Interface(GUI) which is easy to use and convenient for debug.
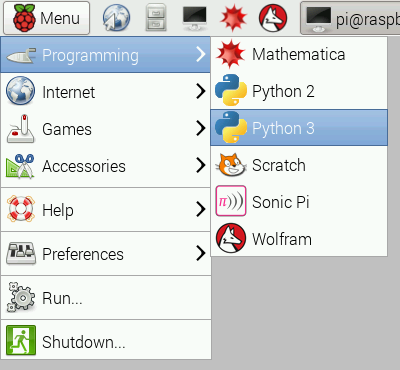
Raspbian Jessie PIXEL Operation System comes with python IDLE . You can open IDLE from applications menu -> Programming -> Python 3(IDLE) as following picture:
There are two version IDLE, python2 and python3. Recommend the new version-python 3, because program via python3 can’t run via python2. To Learn more about IDLE, please visit here
Sample Project to use RPi.GPIO
In following tutorial, we use IDLE to make a Python program to control a LED which was done through C language in our previous Lesson 3 .
1)Experimental Principle
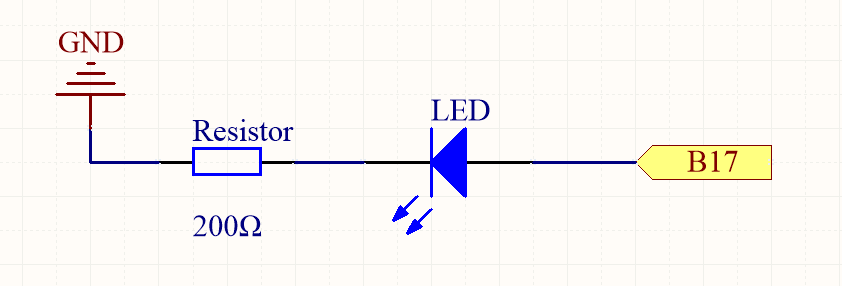
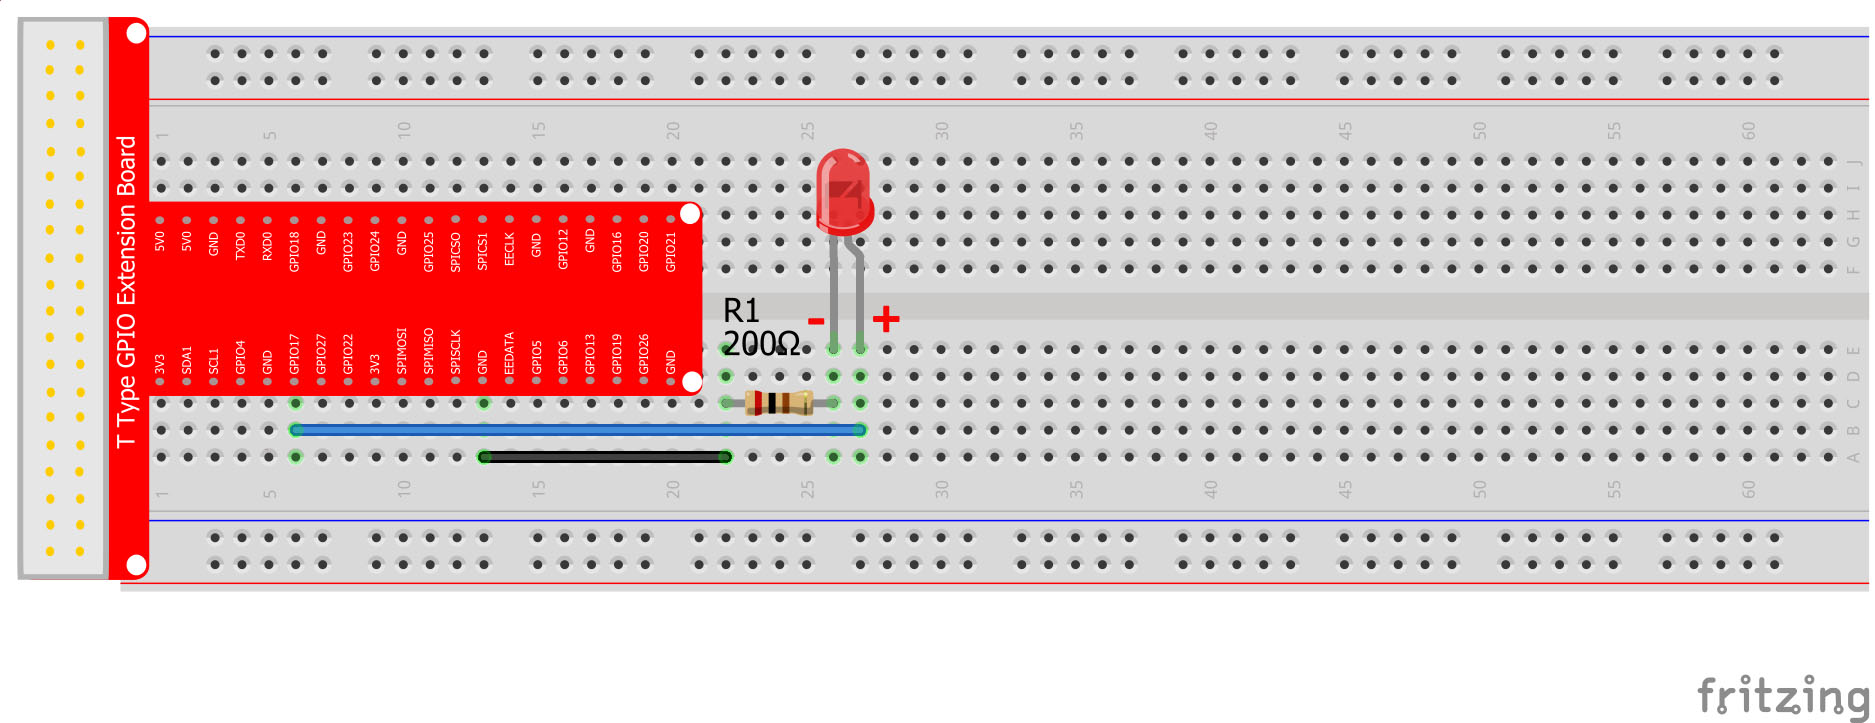
Connect LED to raspberry Pi GPIO, and then the program output high or low level to this GPIO to control the LED blink.
**B17 in above graph is the physical pin#11, wiringPi Pin# 0,BCM pin# 17
3) Running the Python program Method A: Running Python code in IDLE If Raspberry pi connects to a monitor, you’re recommended to take the following steps.
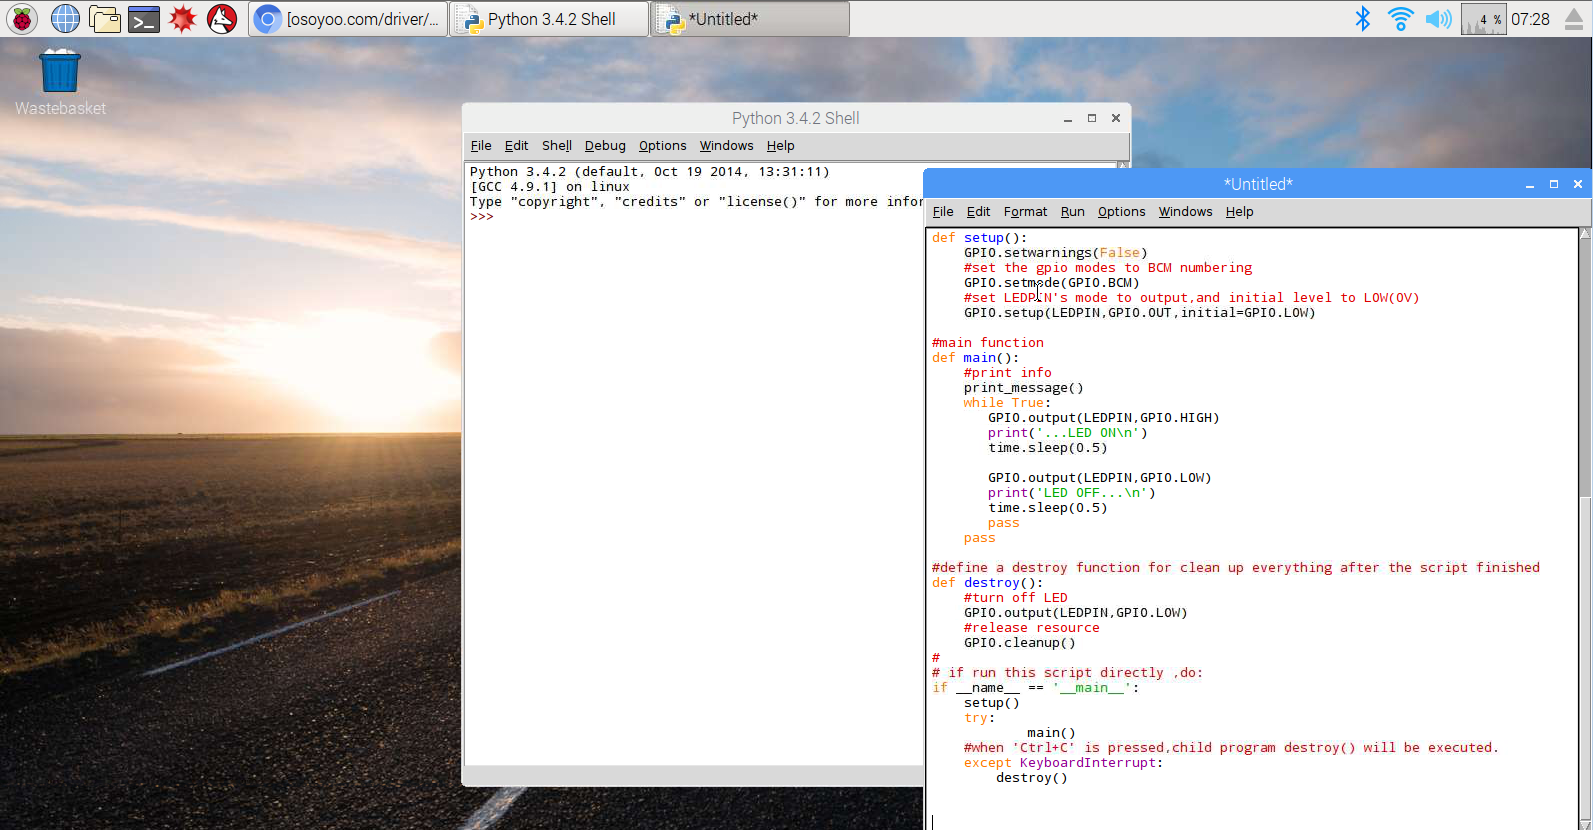
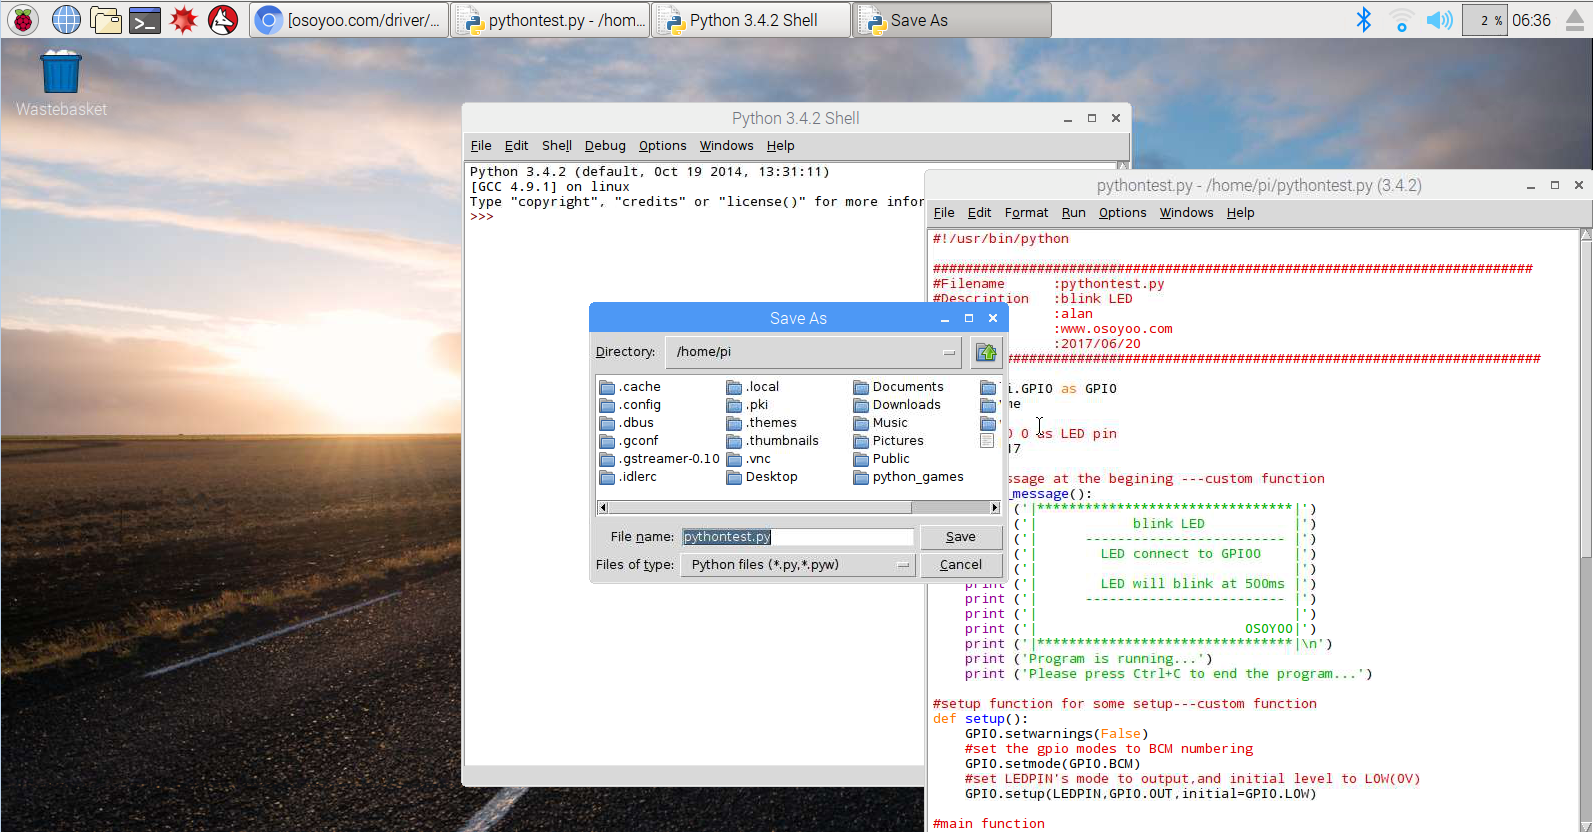
a) Open IDLE,click File->New File to open a new window, and copy the code in this window. Or donwload the pythontest.py file and double click it to open
b)Press “ctrl” + “S” to save the program in the path /home/pi(default) or other path as you like. Keep the file extension(.py or pyw) and name the file as you like when saving the file. For example, the file is named as pythontest.py in the following photo:
c) After saving the file, please click F5 or clickRun->Run Module F5 to run this project
Method B) Running Python code in command line If your Pi is not connected to monitor or you are accessing Raspberry Pi remotely, you can running the Python program as following steps:
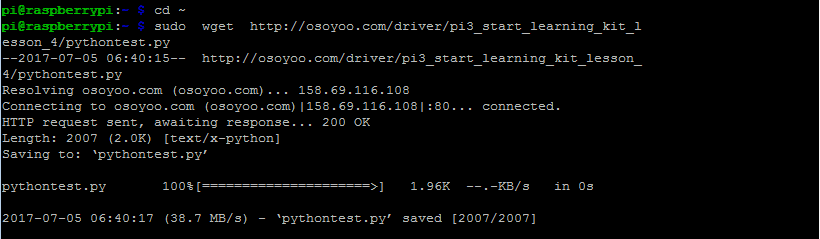
a) Run the following command to download /pythontest.py code wget http://osoyoo.com/driver/pi3_start_learning_kit_lesson_4/pythontest.py
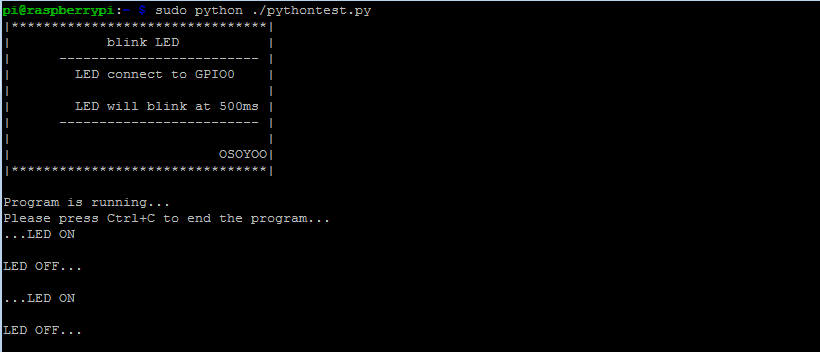
b) Run the following command to run the project python pythontest.py
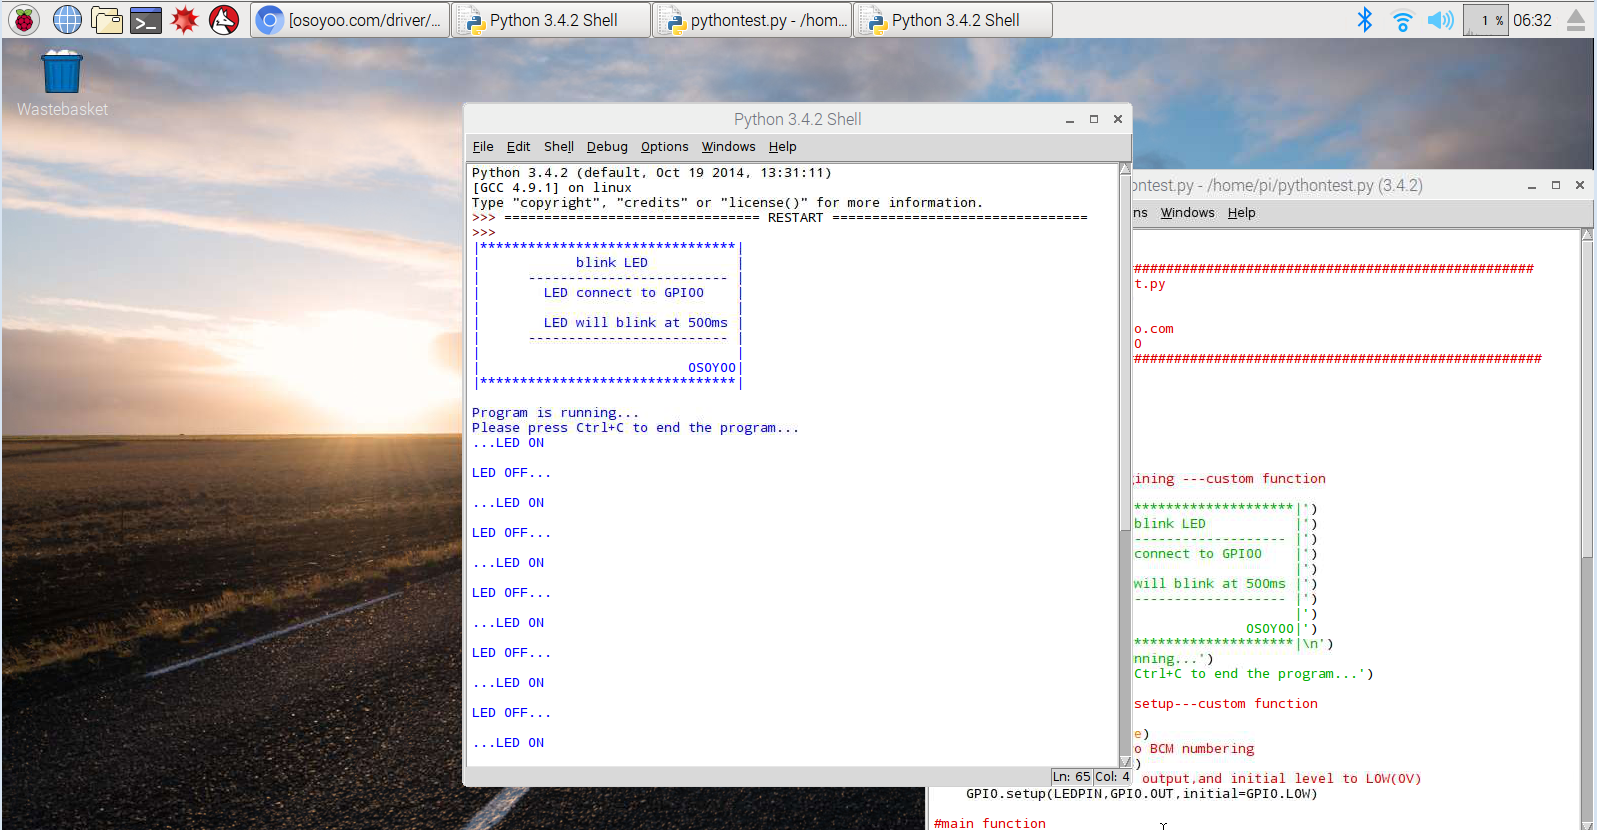
5) Python code running result After running the code, your terminal will show print message as codef firstly, and then the LED blink and the ternimal will show LED status. Python Code explanation
import RPi.GPIO as GPIO
import time
# set GPIO 0 as LED pin
LEDPIN = 17
Import is keyword which adds a specific library into Python environment, “import RPi.GPIO as GPIO” will add RPi.GPIO library and “Import time” will add time module library.
Python RPi.GPIO use BCM naming system, “LEDPIN = 17 ” we will use BCM pin#17 to send signal.
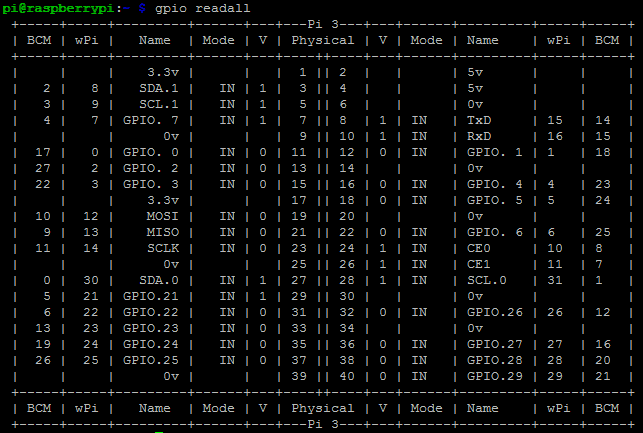
BCM Pin#17, physical pin# is 11, in wiringPi, its name is GPIO. 0 or pin# 0. Learn more information about Raspberry Pi GPIO. You can run the command gpio readallto see the GPIO layout.
#print message at the beginning ---custom function
def print_message():
    print ('|*********************************|')
    print ('|            blink LED            |')
    print ('|   -------------------------     |')
    print ('|      LED connect to GPIO        |')
    print ('|                                 |')
    print ('|      LED will blink at 500ms    |')
    print ('|   -------------------------     |')
    print ('|                                 |')
    print ('|                          OSOYOO |')
    print ('**********************************\n')
    print ('Program is running...')
    print ('Please press Ctrl+C to end the program...')
Def means definition of a function.
Print_message is a custom (edited by yourself) function, and show print message on the terminal. To learn more information about function definition, please click here.
#setup function for some setup---custom function
def setup():
    GPIO.setwarnings(False)
    #set the gpio modes to BCM numbering
    GPIO.setmode(GPIO.BCM)
    #set LedPin's mode to output,and initial level to LOW(0V)
    GPIO.setup(LEDPIN,GPIO.OUT,initial=GPIO.LOW)
GPIO.setmode(GPIO.BCM) function sets up BCM numbering method as GPIO numbering method. GPIO.setup(LedPin,GPIO.OUT,initial=GPIO.LOW) function sets up LedPin as output mode and set low level as LedPin’s initial level.
#main function
def main():
    #print info
    print_message()
    while True:
       GPIO.output(LEDPIN,GPIO.HIGH)
       print('...LED ON\n')
       time.sleep(0.5)

       GPIO.output(LEDPIN,GPIO.LOW)
       print('LED OFF...\n')
       time.sleep(0.5)
       pass
    pass
Main function will change Led pin level times and times to make the LED blink and send print message to terminal.
Alternative Python Solution by gpiozero
Above solution use basic GPIO library to send signal to Pi. The aActually there is a simpler solution with gpiozero library. You just take following steps is your Pi.
1)Install gpiozero python library if you don’t have it.
gpiozero normally comes with latest Raspberry Pi python. However, if you don’t have it in your OS, please simply run following command to install it:
sudo apt update
sudo apt install python3-gpiozero
2)Download and run the python code by following commands: