Robot Tank Car Kit Lesson 6:Obstacle Avoidance Robot Tank Car

| Buy from US |
Buy from UK |
Buy from DE |
Buy from IT |
Buy from FR |
Buy from ES |
 |
 |
 |
 |
 |
 |
I. Objective:
In this lesson, we will use a servo motor, an ultrasonic module and a buzzer to detect the obstacle and measure the distance. If the distance is less than predefined threshold value, the buzzer will beep and the car will turn around from the obstacle automatically.
II. How it work:
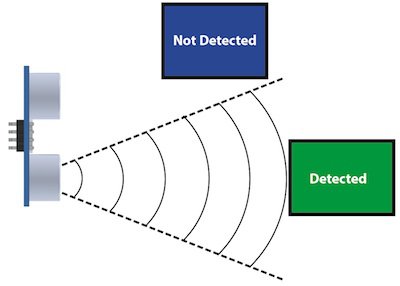
The ultrasonic sensor module have two parts of ultrasonic transmitter and receiver. It uses ultrasonic echo and reflection of the time difference to measure the distance test.
The ultrasonic sensor is to be installed on SG90 servo motor, the sensor can detect obstacles in the range of 0-180 degree. When the obstacles detected, the car will stop to alarm and the SG90 servo motor will rotate around. Then the car will run to the direction without obstacles.
III. Software Installation:
The SG90 Servo can rotate approximately 180 degrees. Firstly we make the servo motor go to 90 degree position(middle position), then manually adjust the ultasonic sensor to straight forward direction. Thus to make sure the ultrasonic module can rotate to the left 90 degrees and also can rotate to the right 90 degrees. Download the servo adjust program from link:
http://www.kookye.com/download/car/servo_adjust.zip
Download and unzip, then upload the code to Uno board using Arduino IDE, turn on the power switch on the battery box. the servo motor will go to 90 degree position(middle position), At this time, if the ultrasonic sensor is not facing front direction of the car, you need manually adjust the sensor to straight forward direction.
Step 1:Download Lesson 6 sample code from http://www.kookye.com/download/car/tank_robot_lesson6.zip, unzip the download zip file tank_robot_lesson6.zip, you will see a folder called tank_robot_lesson6.
Step 2: Connect UNO R3 board to PC with USB cable, Open Arduino IDE -> click file -> click Open -> choose code “tank_robot_lesson6.ino” in tank_robot_lesson6 folder, load the code into arduino.

Step 3: Choose corresponding board and port for your project,upload the sketch to the board.

IV. Understand the Code:
Step 1: Define the pinout of SG90 servo motor, IR receiver and ultrasonic sensor and buzzer.
#define SERVO     11  //servo connect to D11
#define IRPIN  13 //IR receiver Signal pin connect to Arduino pin 13
#define echo    A3 // Ultrasonic Echo pin connect to A2
#define trig    A2  // Ultrasonic Trig pin connect to A3
#define buzzer     7 //buzzer connect to D7
Step 2: Define the variable to store the value of the distance in different direction and tha maxium value of the distance between the car and the obstacle.
int leftscanval, centerscanval, rightscanval, ldiagonalscanval, rdiagonalscanval;
const int distancelimit = 30; //distance limit for obstacles in front
const int sidedistancelimit = 18; //minimum distance in cm to obstacles at both sides (the car will allow a shorter distance sideways)
Step 3: The structure to test the distance between the car and the obstacle.
/*detection of ultrasonic distance*/
int watch() {
  long howfar;
  digitalWrite(trig, LOW);
  delayMicroseconds(5);
  digitalWrite(trig, HIGH);
  delayMicroseconds(15);
  digitalWrite(trig, LOW);
  howfar = pulseIn(echo, HIGH);
  howfar = howfar * 0.01657; //how far away is the object in cm
  Serial.println((int)howfar);
  return round(howfar);
}
Step 4:Rotate the servo motor and call the structure of what() in the structure of auto_avoidance(), it can detect and test the distance between the car and the obstacle to avoid obstacles.
void auto_avoidance() {
  head.write(90);
  delay(100);
  centerscanval = watch();
  if (centerscanval >= distancelimit) {
    set_motorspeed(LSPEED, RSPEED);
    go_ahead();
  }
  else {
    go_stop();
    alarm();
    head.write(120);
    delay(150);
    ldiagonalscanval = watch();

    head.write(180);
    delay(150);
    leftscanval = watch();

    head.write(90);
    delay(150);

    head.write(60);
    delay(150);
    rdiagonalscanval = watch();

    head.write(0);
    delay(150);
    rightscanval = watch();

    head.write(90);
    if (ldiagonalscanval >= sidedistancelimit && leftscanval >= sidedistancelimit) {
      set_motorspeed(LSPEED, RSPEED);
      go_back();
      delay(200);
      turn_left();
      delay(500);
    }
    else if (rdiagonalscanval >= sidedistancelimit && rightscanval >= sidedistancelimit) {
      set_motorspeed(LSPEED, RSPEED);
      go_back();
      delay(200);
      turn_right();
      delay(500);
    }
  }
}
V. Hardware Installation:
Step 1: Install ESP8266 Expansion Board on UNO R3 board.

Step 2: Turn the switch of esp8266 to “1” and “2” position, as the following photo shows.

Step 3: Move the wire connected to pinout(GND,VCC,S) in IR recevier to the counterpart pin in ESP8266 wifi Board as the following picture.

Step 4: Put two 12865 batteries into battery box and turn the swith of box to “ON”.
(If you have finished the above steps on lesson one, please skip these step)
Step 5: Press the button of “OK” to make the car avoid obstacles and press the button of “0” to make the car stop.
Step 6: Testing.Please check the wire connection if the car can not be run as expected.
Your browser does not support the video tag.
Youtube link–https://youtu.be/HkbfSEp-WhA


