In previous posts We’ve driven 16×2 LCD screens with the Raspberry Pi. That project was easy to set up, however, it needs to solder many jump wires and occupy lots of GPIO ports which are valuable resources to the Pi.
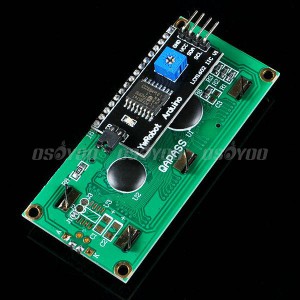
To save our GPIO port resources, in this project we will connect the Pi with an I2C enabled LCD screen which only has 4 pins as shown below.
Caution: To make sure this project works properly, you should use a MicroSD card with fresh-installed Raspbian OS.
Step 1: Circuit Connection Graph:
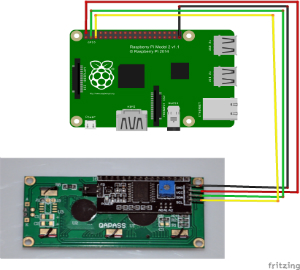 |
PiI2C Pin
| GND(Pin 39 or Pin 9) |
GND |
| 5V(Pin 2) |
VCC |
| SDA(Pin 3/GPIO 2) |
SDA |
| SCL(Pin 5/GPIO 3) |
SCL |
|
Step 2: Enable i2c using raspi-config utility
In terminal, type the following command:
sudo raspi-config
Select Advanced Option -> I2C -> Enable I2C ->Finish
The Pi will reboot after you click the Finish Button
After rebooting the Pi, we need to modify the module’s config file. Type the following command in terminal:
sudo nano /etc/modules
Add following two lines in modules file if they do not exist:
i2c-bcm2708
i2c-dev
Then Type Ctrl X and Yes to save the file.
Step 3: Step 3 – Install smbus and i2c python library
Type following command in terminal:
sudo apt-get update
sudo apt-get install -y python-smbus i2c-tools
sudo reboot
After rebooting the system, type the following command in order to check software installation:
lsmod | grep i2c_
You should see i2c_bcm2708 in a list, this means the library has been installed successfully. Otherwise you might need to find another Raspbian OS MicroSD card and repeat Step 2 and 3.
Step 4:Testing Hardware
Depending on your Raspberry Pi version, please run one of following commands in terminal:
sudo i2cdetect -y 1
or
sudo i2cdetect -y 0
You should see something as follows:
0 1 2 3 4 5 6 7 8 9 a b c d e f
00: — — — — — — — — — — — — —
10: — — — — — — — — — — — — — — — —
20: — — — — — — — — — — — — — — — —
30: — — — — — — — — — — — — — — — 27
40: — — — — — — — — — — — — — — — —
50: — — — — — — — — — — — — — — — —
60: — — — — — — — — — — — — — — — —
70: — — — — — — — —
If you can only see “– — –” sign in the list without any numbers, it means either your circuit connection is wrong or your software is not properly installed.
Step 5: Download Python Code and run the project:
in terminal window, type the following commands:
wget http://osoyoo.com/driver/i2clcda.py
sudo python i2clcda.py
If there is any runtime writing error, it might be caused by the LCD I/O address mismatching. try the following commands:
wget http://osoyoo.com/driver/i2clcdb.py
sudo python i2clcdb.py
Now your LCD should display the following messages:
Created by
Osoyoo.com
> Tutorial Url:
> https://osoyoo.com
If your Pi does not show any runtime error but LCD still does not display any messages, you can use a screw driver to adjust the contrast screw on the back of the LCD until you see the message.


Why does my i2clcda.py or i2clcdb.py cause an error in line 109 and line 57 ERRno 5 input/output error?
I test the LCD according to the tutorial, and it works without error.
Do you add following two lines in modules file if they do not exist at step 2:
i2c-bcm2708
i2c-dev
Do you see “– — –” sign in the list with any numbers?
Pls confirm.
I am receiving the same errors as tarmbrester (line 57 and 109: Error no 5). The config file has: i2c-bcm2708 and i2c-dev. I also did get the matrix of”00: —” with number for the “sudo i2cdetect – y 1”.
The black integrated circuit (next to the potentiometer)is hot to the touch. Does your chip in your setup get very hot?
pls confirm the VCC and GND connect correct
I doubled checked the wiring before I turned it on the first time. Pin 2 (+5V) and pin 39 (gnd).
Do you have other LCD to test?
I afraid not. If “tarmbrester” (the original commenter) has solved his/her problem then I must have a bad board.
Does your LCD has backlight when you connect with the board?
If not, pls confirm whether there is a jumper cap at the I2C driver board.
Partial Solution:
I made a wiring mistake. I had the header numbering wrong, VCC and GND reversed. On raspberry PI 3 with the usb pointing down the top left pin is number 2.
When I run the program it runs but nothing appears. Adjusting the contrast quickly show some blocks but they then fade. When I disconnect one of the data lines the program errors out as expected. Any ideas? Is it possible there is damage from the voltage reversal?
The short circuit may defect the LCD.
Hi,
I followed the process, at step 4 the result is very similar to what you have described, I also noticed that the backlight flashes when I run the command, which I presume the detection is successful.
Step 5
Downloaded both python codes but when I try to run I get the following:
Traceback (most recent call last):
file “i2clcda.py”, line 57, in lcd_byte
bus.write_byte(I2C_ADDR, bits_high)
IOError: [Errno 5] Input/output error
Same happens both files ending with a and b. Seems both have LCD address incorrectly for my device.
Is there a utility you can provide so that I can fidn out the LCD module address? It will be very useful.
Thanks
I managed to find out LCD module address using a small script with Arduino UNO. All good now.
I am getting the following error when running the python code.
Traceback (most recent call last):
File “i2clcdb.py”, line 109, in
lcd_byte(0x01, LCD_CMD)
File “i2clcdb.py”, line 57, in lcd_byte
bus.write_byte(I2C_ADDR, bits_high)
IOError: [Errno 5] Input/output error
Nevermind, I changed the address and it works now.
Does script have function to turn off the backlight?
Hello,
I’m new here.
I use your example to show different temperatures for a pool control unit with node red an Raspberry PI.
I changed the main program as follow:
def main():
# Main program block
# Initialise display
lcd_init()
while True:
T1 = “10°C”
T2 = “20°C”
T3 = “30°C”
T4 = “40°C”
# Send some test
lcd_string(“Pooltemperatur:”,LCD_LINE_1)
lcd_string(T1,LCD_LINE_2)
time.sleep(10)
lcd_string(“Ruecklauf Pool:”, LCD_LINE_1)
lcd_string(T2,LCD_LINE_2)
time.sleep(10)
lcd_string(“Solarabsorber :”,LCD_LINE_1)
lcd_string(T3,LCD_LINE_2)
time.sleep(10)
lcd_string(“Aussen :”,LCD_LINE_1)
lcd_string(T4,LCD_LINE_2)
time.sleep(10)
if __name__ == ‘__main__’:
try:
main()
except KeyboardInterrupt:
pass
finally:
lcd_byte(0x01, LCD_CMD)
Now I’m wondering how I could show variables Temeratures (T1,T2,T3,T4) on the display.
The red node T1 = parseFloat(global.get(‘T1’)) doesn’t work.
I would be happy, if someone have an idea, how can I solve the problem.
Best regards from Germany.