Note: ALL OSOYOO Products for Arduino are Third Party Board which is fully compatitable with Arduino
Authorized Online Retailers:
Content
- Introduction
- Preparations
- Upload Sketch
- Program Running Result
Introduction
A “Hello, World!” program is traditionally used to introduce novice programmers to a programming language.
“Hello, world!” is also traditionally used in a sanity test to make sure that a computer language is correctly installed, and that the operator understands how to use it, so our tutorial for Arduino begins with Hello world.
This lesson will basically get you up and running using the software and uploading a sketch to the OSOYOO Basic board. Once you’ve completed this step we can continue to the really exciting stuff, which is when we start writing our own sketches!
Preparations
Hardware
- OSOYOO Basic board (Fully compatible with Arduino UNO rev.3) x 1
- USB Cable x 1
- PC x 1
Software
IDE (version 1.6.4+)
Notice:
Not much is needed for this lesson,make sure you’ve gone through Preparation lessons first! These lessons assume you have installed IDE software and drivers!
Make sure you have a good quality syncing cable,do not pick a ‘charge only’ USB cable
Upload Sketch
Connect your Osoyoo basic board to the Computer via a A to B USB cable,then double click the software icon on your desktop.

To open up the workspace, also called the IDE. IDE stands for Integrated Development Environment. Basically, a word processor for writing code.
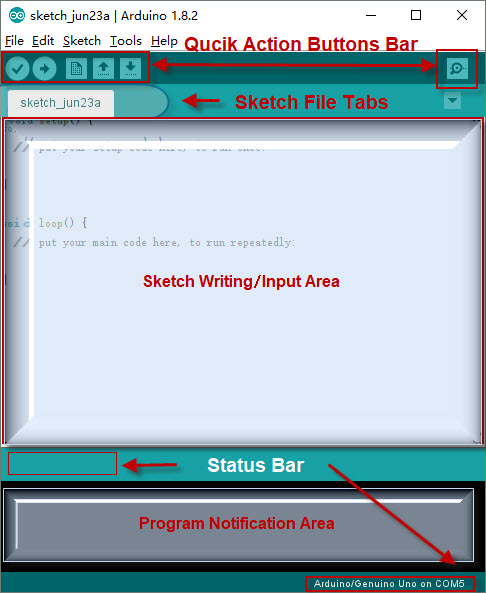
It looks like below:

The main IDE window has multiple tabs and areas, we’ll visit all of these shortly, so keep your eye on this diagram!
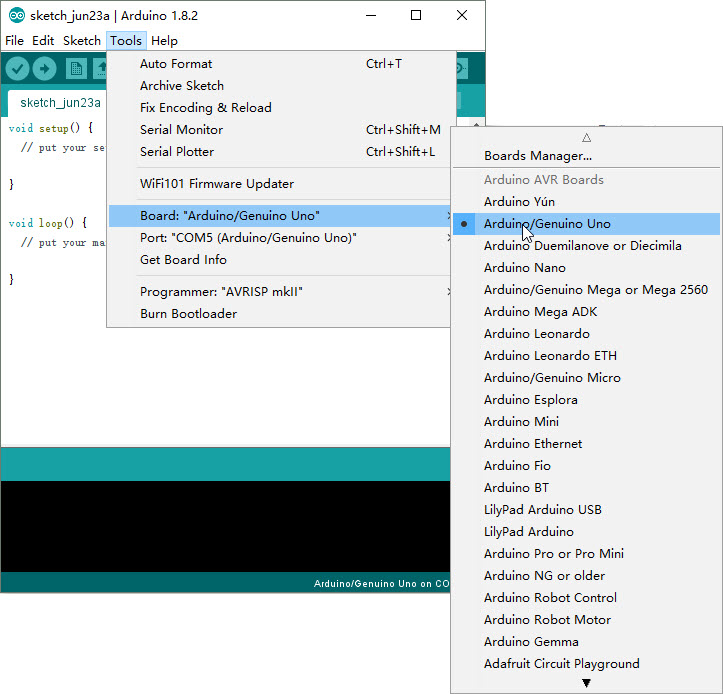
Select Board Type
Under the Tools menu, find the Board submenu and navigate that to select Arduino (Genuino) UNO.
You should use this board selection also if you are using any other Arduino UNO compatible board
Select Corresponding Serial Port
It’s very important to select the correct Serial port. This is where people can get tripped up. The good news is if you have a board compatible with Arduino UNO, the name will appear next to the serial port menu item to make it easy to pick out!
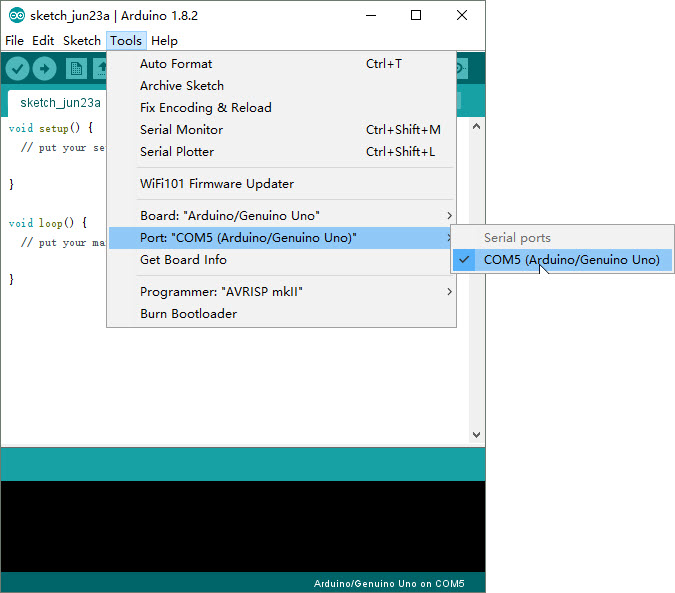
If you have another board compatible with Arduino, you may not see anything after the Serial port name, but it will still be the only option available that is not COM1 or something with Bluetooth in the name.

Notice of port selection:
Windows: The compatiable port will nerver be COM1,don’t choose this one.You should only have one other option.
Mac OS X and Linux: It will never be an option with ‘bluetooth’ in the name, look for/dev/cu.usbmodemor/dev/cu.usbserialor/dev/ttyUSBor similar!
If your computer have lots of Serial ports, try unplugging your board and seeing which port disappears next time you look at the Ports list!
Open Hello World Sketch
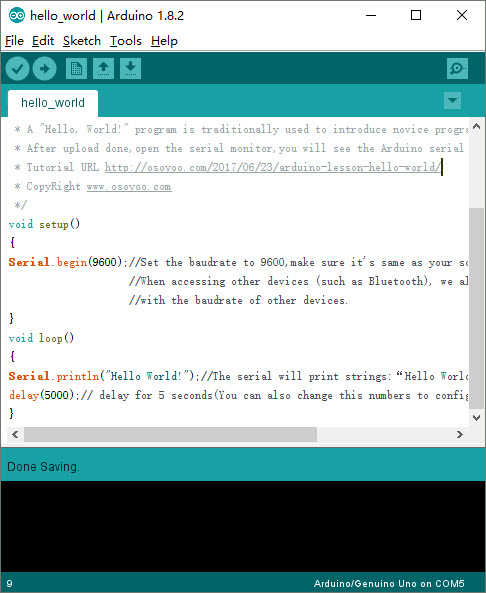
Sketches are little scripts that you can send to the board to tell it how to act. Let’s open up an Example Sketch.Download this file and unzip it,or copy below code to your new IDE window,don’t forget to save the code.
void setup()
{
Serial.begin(9600);
//Set the baudrate to 9600,make sure it's same as your software settings
//When accessing other devices (such as Bluetooth), we also have to agree
//with the baudrate of other devices.
}
void loop()
{
Serial.println("Hello World!");
//The serial will print strings:"Hello World!"
delay(5000);
// delay for 5 seconds(You can also change this numbers to config the delay time)
}
You will see the sketch windows as below:
Verify / Compile the Sketch
The first step to getting a Sketch ready for transfer over to the board is to Verify/Compile it. That means check it over for mistakes (sort of like spell-checking or grammatical editing) and then translate it into an app that is compatible with Arduino hardware.
We can start this action via the Verify button or the Sketch menu:
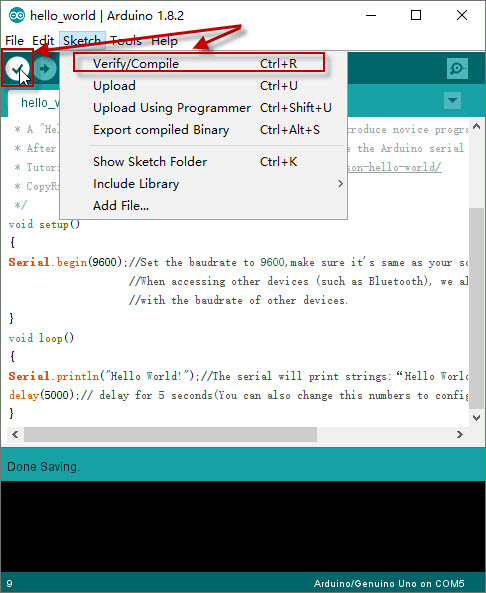
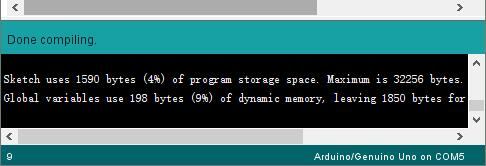
After a few seconds, you should see the messageDone compiling.in the Status Bar andSketch uses … bytes (x%) of program storage space(or something similar) in the Program Notification Area.
This means the sketch was well-written and is ready for uploading to the OSOYOO Basic board!
Upload
Now, simply click the “Upload” button in the environment. Wait a few seconds – you should see the RX and TX leds on the board flashing. If the upload is successful, the message “Done uploading.” will appear in the status bar.
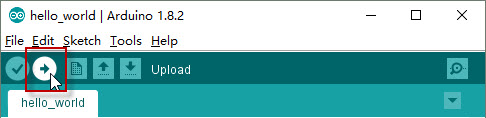
After a few seconds you should get this screen, with the message Done uploading. in the status bar.

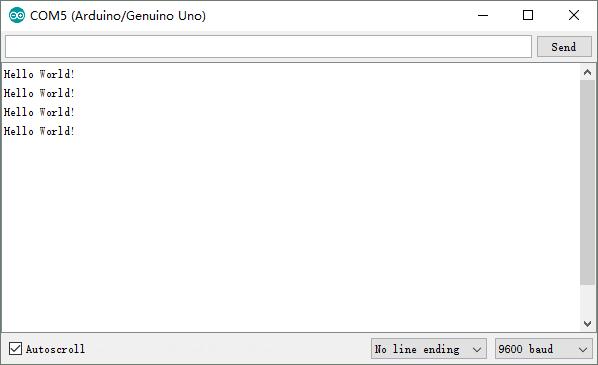
Program Running Result
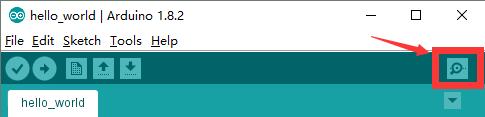
A few seconds after the upload finishes, you should see the TX LED on the board start to blink (in orange).Click the Serial Monitor button:
Make sure the serial monitor’s COM port is corresponding to your port, and check if the serial monitor Baudrate is same as your sketch setting? If yes,you will see the serial output the string “Hello World” every 5 seconds :
If you have compeleted all operations and the program running successfully,congratulations!You’ve gotten up-and-running. If you have problems, please see the troubleshooting suggestions on the www.arduino.cc.


