概述
在本课中,我们将学习如何驱动IIC接口的1602液晶显示器
所用器件
1 * Raspberry Pi
1 * Breadboard
1 * IIC 1602
Several jumper wires
工作原理
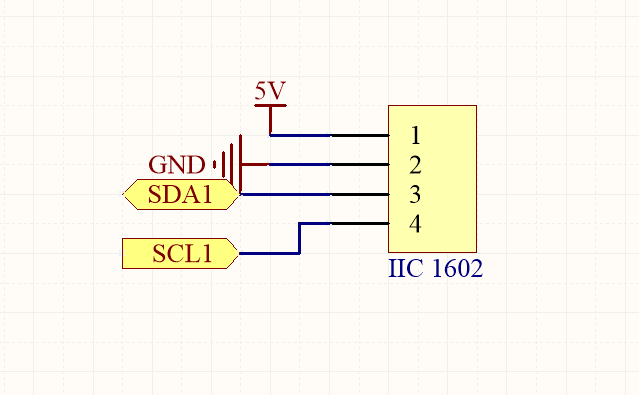
1602液晶屏能够显示2行,每行16个字符,1602因此而得名。通常1602是并行接口,为了节约GPIO资源,我们对1602屏进行了改造,在1602屏加了一个并行转串行模块PCF8574,这个模块将并行接口改成串行的IIC接口,这样驱动1602屏就只需要2个GPIO口,大大节约了GPIO资源,是Raspberry Pi能挂接更多传感器。

将IIC 1602 LCD接到pi的IIC1上,如图
实物接线
没画
软件
因为需要用到Pi的IIC接口,所以首先应该打开IIC接口,具体操作情况下面
sudo nano /boot/config.txt
打开 /boot/config.txt文件后,找到dtparam=i2c_arm,检查dtparam=i2c_arm前是否有#,如果有#将其去掉;再检查dtparam=i2c_arm后面是on还是off,如果是off,需要将off改成on

修改完成后按键盘上的Ctrl+X,按照提示输入Y,保存退出,重启Pi使修改生效。
for C language user
1) 在/home/pi下新建一个文件,文件名随意(你爱咋咋地)
cd ~
sudo nano i2c1602_lcd.c
向新建的文件中键入如下代码
#include <stdio.h>
#include <wiringPi.h>
#include <wiringPiI2C.h>
#include <string.h>

int LCDAddr = 0x3f;//IIc LCD address
int BLEN = 0;//1--open backlight.0--close backlight
int fd;//linux file descriptor

//writ a word(16 bits) to LCD
void write_word(int data){
    int temp = data;
    if ( BLEN == 1 )
        temp |= 0x08;
    else
        temp &= 0xF7;
    wiringPiI2CWrite(fd, temp);
}

//send command to lcd
void send_command(int comm){
    int buf;
    // Send bit7-4 firstly
    buf = comm & 0xF0;
    buf |= 0x04;            // RS = 0, RW = 0, EN = 1
    write_word(buf);
    delay(2);
    buf &= 0xFB;            // Make EN = 0
    write_word(buf);

    // Send bit3-0 secondly
    buf = (comm & 0x0F) << 4;
    buf |= 0x04;            // RS = 0, RW = 0, EN = 1
    write_word(buf);
    delay(2);
    buf &= 0xFB;            // Make EN = 0
    write_word(buf);
}

//send data to lcd
void send_data(int data){
    int buf;
    // Send bit7-4 firstly
    buf = data & 0xF0;
    buf |= 0x05;            // RS = 1, RW = 0, EN = 1
    write_word(buf);
    delay(2);
    buf &= 0xFB;            // Make EN = 0
    write_word(buf);

    // Send bit3-0 secondly
    buf = (data & 0x0F) << 4;
    buf |= 0x05;            // RS = 1, RW = 0, EN = 1
    write_word(buf);
    delay(2);
    buf &= 0xFB;            // Make EN = 0
    write_word(buf);
}

//initialize the lcd
void init(){
    send_command(0x33); // Must initialize to 8-line mode at first
    delay(5);
    send_command(0x32); // Then initialize to 4-line mode
    delay(5);
    send_command(0x28); // 2 Lines & 5*7 dots
    delay(5);
    send_command(0x0C); // Enable display without cursor
    delay(5);
    send_command(0x01); // Clear Screen
    wiringPiI2CWrite(fd, 0x08);
}

//clear screen
void clear(){
    send_command(0x01); //clear Screen
}

//Print the message on the lcd
void write(int x, int y, char data[]){
    int addr, i;
    int tmp;
    if (x < 0)  x = 0;
    if (x > 15) x = 15;
    if (y < 0)  y = 0;
    if (y > 1)  y = 1;

    // Move cursor
    addr = 0x80 + 0x40 * y + x;
    send_command(addr);

    tmp = strlen(data);
    for (i = 0; i < tmp; i++){
        send_data(data[i]);
    }
}

void print_info()
{
    printf("\n");
    printf("|***************************|\n");
    printf("|    IIC 1602 LCD test      |\n");
    printf("| --------------------------|\n");
    printf("| | LCD |            | Pi   |\n");
    printf("| --------------------------|\n");
    printf("| | GND | connect to | GND  |\n");
    printf("| | VCC | connect to | 5V   |\n");
    printf("| | SDA | connect to | SDA.1|\n");
    printf("| | SCL | connect to | SCL.1|\n");
    printf("| --------------------------|\n");
    printf("|                     OSOYOO|\n");
    printf("|***************************|\n");
    printf("Program is running...\n");
    printf("Press Ctrl+C to end the program\n");
}
int main(){
    //init I2C
    fd = wiringPiI2CSetup(LCDAddr);
    init();
    print_info();
    write(0, 0, "Hi man.Welcome ");
    write(0, 1, "to osoyoo.com");
    delay(3000);
    clear();
    while(1){
        write(0,0,"This is Lesson13");
        write(0,1,"IIC LCD Test");
        delay(1000);
    }
    return 0;
}
保存退出。完整的源代码,可以通过命令wget http://osoyoo.com/driver/pi3_start_learning_kit_lesson_13/i2c1602_lcd.c 下载
3) 编译
gcc -Wall -o i2c1602_lcd i2c1602_lcd.c -lwiringPi
4) 执行程序
sudo ./i2c1602_lcd
5) 最终结果
运行上面的程序,终端会输出1602液晶与pi的连接信息和其他提示信息。同时,在1602液晶上会打印出一些信息。
注意:如果液晶显示太暗,可以通过调节1602背部的可调电位器改变亮度。
for python user
1) 加载模块
sudo nano /etc/modules
打开/etc/modules后,在文件的最后添加上如下两句代码
i2c-bcm2708
i2c-dev
添加完成后,键盘输入Ctrl+X,输入Y保存退出
2) 安装 i2c python library和smbus
sudo apt-get install -y python-smbus i2c-tools
重启Pi
reboot
3) 检查库是否安装成功
lsmod | grep i2c
如果输出类似与图示信息,说明安装成功

如果没有输出类似信息,请重复上述步骤。
4) 测试硬件
sudo i2cdetect -y 1
or
sudo i2cdetect -y 0
根据Pi版本不同,选择其一执行。执行上面的命令后会打印出IIC设备的地址,如图所示
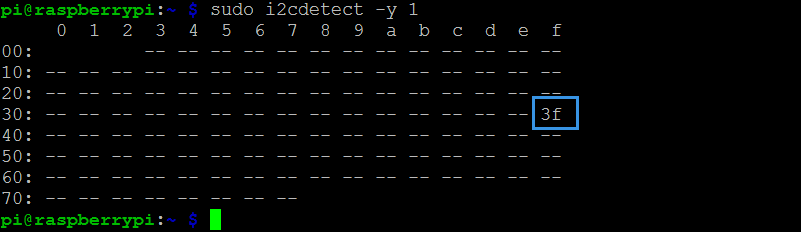
图中的3f(16进制)就是IIC 1602液晶的地址。
5) 编写python脚本控制IIC 1602
A.在/home/pi下新建一个.py脚本文件,文件名随意(你爱咋咋地)
cd ~
sudo nano i2c1602_lcd.py
B.向新建的文件中写入如下代码
import smbus
import time

# Define some device parameters
I2C_ADDR  = 0x3F # I2C device address, if any error, change this address to 0x27
LCD_WIDTH = 16   # Maximum characters per line

# Define some device constants
LCD_CHR = 1 # Mode - Sending data
LCD_CMD = 0 # Mode - Sending command

LCD_LINE_1 = 0x80 # LCD RAM address for the 1st line
LCD_LINE_2 = 0xC0 # LCD RAM address for the 2nd line
LCD_LINE_3 = 0x94 # LCD RAM address for the 3rd line
LCD_LINE_4 = 0xD4 # LCD RAM address for the 4th line

LCD_BACKLIGHT  = 0x08  # On
#LCD_BACKLIGHT = 0x00  # Off

ENABLE = 0b00000100 # Enable bit

# Timing constants
E_PULSE = 0.0005
E_DELAY = 0.0005

#Open I2C interface
#bus = smbus.SMBus(0)  # Rev 1 Pi uses 0
bus = smbus.SMBus(1) # Rev 2 Pi uses 1

def lcd_init():
  # Initialise display
  lcd_byte(0x33,LCD_CMD) # 110011 Initialise
  lcd_byte(0x32,LCD_CMD) # 110010 Initialise
  lcd_byte(0x06,LCD_CMD) # 000110 Cursor move direction
  lcd_byte(0x0C,LCD_CMD) # 001100 Display On,Cursor Off, Blink Off
  lcd_byte(0x28,LCD_CMD) # 101000 Data length, number of lines, font size
  lcd_byte(0x01,LCD_CMD) # 000001 Clear display
  time.sleep(E_DELAY)

def lcd_byte(bits, mode):
  # Send byte to data pins
  # bits = the data
  # mode = 1 for data
  #        0 for command

  bits_high = mode | (bits & 0xF0) | LCD_BACKLIGHT
  bits_low = mode | ((bits<<4) & 0xF0) | LCD_BACKLIGHT

  # High bits
  bus.write_byte(I2C_ADDR, bits_high)
  lcd_toggle_enable(bits_high)

  # Low bits
  bus.write_byte(I2C_ADDR, bits_low)
  lcd_toggle_enable(bits_low)

def lcd_toggle_enable(bits):
  # Toggle enable
  time.sleep(E_DELAY)
  bus.write_byte(I2C_ADDR, (bits | ENABLE))
  time.sleep(E_PULSE)
  bus.write_byte(I2C_ADDR,(bits & ~ENABLE))
  time.sleep(E_DELAY)

def lcd_string(message,line):
  # Send string to display

  message = message.ljust(LCD_WIDTH," ")

  lcd_byte(line, LCD_CMD)

  for i in range(LCD_WIDTH):
    lcd_byte(ord(message[i]),LCD_CHR)

def main():
  # Main program block

  # Initialise display
  lcd_init()

  while True:

    # Send some test
    lcd_string("Created by         <",LCD_LINE_1)
    lcd_string("Osoyoo.com        <",LCD_LINE_2)

    time.sleep(3)

    # Send some more text
    lcd_string("> Tutorial Url:",LCD_LINE_1)
    lcd_string("> https://osoyoo.com",LCD_LINE_2)

    time.sleep(3)

if __name__ == '__main__':

  try:
    main()
  except KeyboardInterrupt:
    pass
  finally:
    lcd_byte(0x01, LCD_CMD)
保存退出。完整代码可以通过下面命令获取
wget http://osoyoo.com/driver/pi3_start_learning_kit_lesson_13/i2c1602_lcd.py
C.执行脚本
sudo python ./i2c1602_lcd.py
D.最终结果
运行上面的脚本,1602液晶上会打印出信息。
注意:如果液晶显示太暗,可以通过调节1602背部的可调电位器改变亮度。


The LCD backlight consumes quite a lot of power. Whats the function to turn off the backlight?
You can turn around the Potentiometer at the back of LCD to adjust LCD backlight
Thats for adjusting contrast. am talking about turning the backlight off from code.
In C language code, Line 6:
“int BLEN = 0;//1–open backlight.0–close backlight”
In Python code,
“LCD_BACKLIGHT = 0x08 # On
#LCD_BACKLIGHT = 0x00 # Off”
Please change “0x08” to “0x00”