Introduction
In this project, we will show what is MQ-5 Sensor and how to use it with the Arduino board.
Preparations
HARDWARE
- Osoyoo UNO Board (Fully compatible with Arduino UNO rev.3) x 1
- MQ-5 Sensor x 1
- Jumpers
- USB Cable x 1
- PC x 1
SOFTWARE
- Arduino IDE (version 1.6.4+)
About MQ-5 Gas Sensor
The gas sensitive material used in MQ-5 gas sensor is SnO2, which is of lower electrical conductivity in clean air. When there is combustible gas in the environment where sensor resides, the electrical conductivity of the sensor increases with the increase of the combustible gas concentration in the air. The change of electrical conductivity can be converted to the output signal corresponding to that of the gas concentration by using a simple circuit.
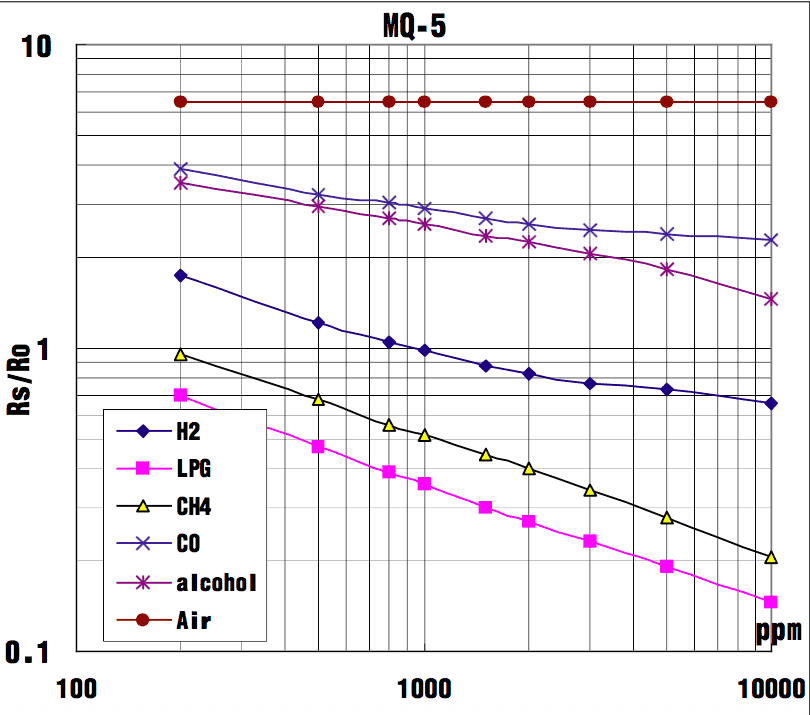
The sensitivity of MQ-5 gas sensor to propane, propane and methane is quite high, and the methane and propane can be well detected. This sensor can detect a variety of combustible gases, especially natural gas, making it a low-cost sensor for a variety of applications.

In this tutorial, we are using the MQ5 Gas sensor module (which is widely available in market) . This module has two output possibilities – an analog out (A0) and a digital out (D0). The analog out can be used to detect Gas leakage and to measure volume of Gas leakage (by doing proper calculation of the sensor output inside program) in specific units (say ppm). The digital out can be used to detect Gas leakage and hence trigger an alert system (say a sound alarm or an sms activation etc). The digital out gives only two possible outputs – High and Low (hence its more suited for detection of gas leak than to measure volume of gas presence).
Specification
- Response Time (tres) : ≤ 10S
- Recovery Time (TREC): ≤ 30S
Features
Note
The sensor value only reflects the approximated trend of gas concentration in a permissible error range, it DOES NOT represent the exact gas concentration. The detection of certain components in the air usually requires a more precise and costly instrument, which cannot be done with a single gas sensor. If your project is aimed at obtaining the gas concentration at a very precise level, then we do not recommend this gas sensor.
Example
Interfacing MQ5 Gas Sensor Module to Arduino using Digital Out Pin
This is pretty simple. Connect the D0 pin of MQ5 module to any digital pin of arduino. Lets connect D0 to pin 7 of arduino. Now we need to give power supply (Vcc) and complete the circuit by connecting to ground (Gnd). Refer the circuit diagram given below. Take a +5V connection from Arduino and connect it to Vcc of MQ5 module. Finally connect the GND pin of MQ5 module to GND of arduino. That’s all and we have finished the circuit.
Circuit Diagram of Interfacing MQ5 to Arduino (Digital Out)
| MQ-5 Sensor |
OSOYOO UNO Board |
| VCC |
+5V |
| GND |
GND |
| D0 |
D7 |
Note:- MQ5 sensor has preheating requirement. We advise to keep the sensor powered on (from arduino) for some 15 minutes before applying gas to it.
CODE
int sensor=7;
float gas_value;

void setup() {
pinMode (sensor,INPUT);
Serial.begin(9600);
}

void loop() {
gas_value=digitalRead(sensor);
Serial.println(gas_value);

}
Note:- To apply a “gas leak” to MQ5 sensor, you can simply use a cigarette or cigar lighter! Press the trigger switch of cigarette lighter gently (gentle enough so as gas leaks and spark is not triggered) to get gas leaked continuously and place the lighter near MQ5 sensor.
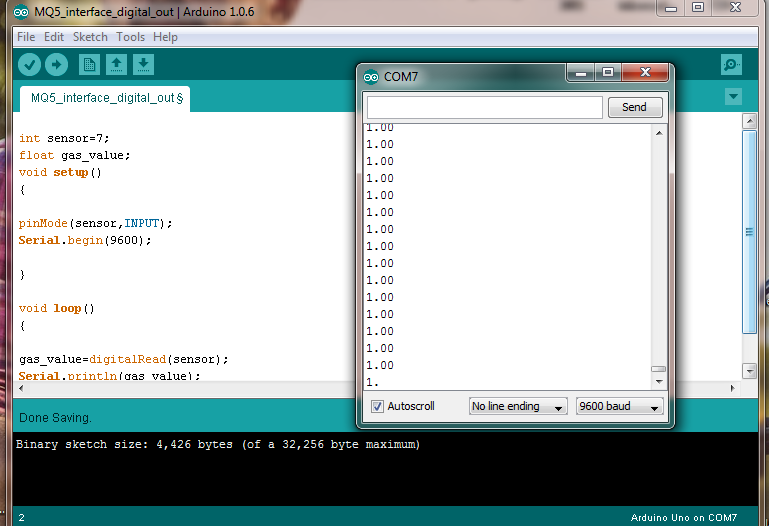
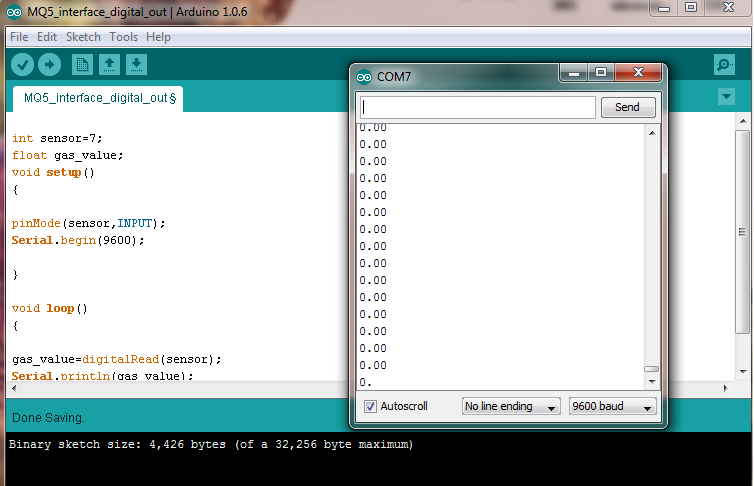
Output Screenshots!

The screenshots below shows serial monitor readings of Arduino before applying gas leak and after applying gas leak. Before applying gas leak, MQ5 captures atmospheric air concentration only (we get a HIGH in our digital out pin and is measured by Arduino as 1, as shown in serial monitor).
When we apply a “gas leak”, the heating element inside MQ5 gets heated up and output voltage varies (we get a LOW in our D0 pin and is measured by Arduino as 0, as shown in serial monitor output screenshot )
Interfacing MQ5 Gas Sensor Module to Arduino using Analog Out Pin
The connections are very simple, just like we interfaced MQ5 using digital out pin. In this method, instead of DO, connect analog out pin AO of MQ5 to any of the Arduino analog pins. In this tutorial, we are connecting analog out pin of MQ5 to A0 pin of Arduino. Connect Vcc and Ground properly as shown in circuit diagram and we are finished wiring part. Now there’s a little change in the program part. Instead of digitalRead, we need analogRead command of Arduino to read sensor values. Output values are also different, instead of 0 and 1 we have a series of integer values ranging from 0 to 1023.
Circuit Diagram – MQ5 to Arduino (Analog Out)
| MQ-5 Sensor |
OSOYOO UNO Board |
| VCC |
+5V |
| GND |
GND |
| A0 |
A0 |
CODE
int sensor=A0;
float gas_value;

void setup() {
pinMode (sensor,INPUT);
Serial.begin(9600);
}

void loop() {
gas_value=analogRead(sensor);
Serial.println(gas_value);

}
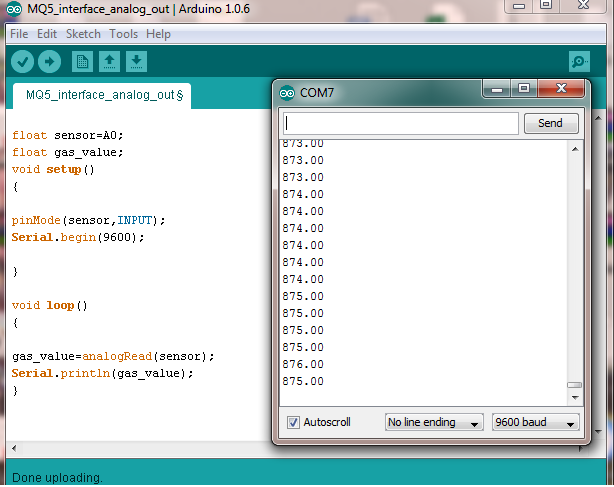
The outputs as seen in serial monitor of Arduino are given below. Let’s first see the default output values (when no gas leak is applied) where MQ5 senses atmospheric air concentration only.

Okay! Now let’s apply some “gas leak” by pressing the switch of a cigar lighter gently! You can see the output value is in the range of 800+ as opposed to very low values (in the range of 40’s) when there is no gas leak.
We have seen the sensor reading in different states – in digital out mode and in analog out mode. We know the sensor reading in different conditions for both output modes- i.e – when there is no gas leak and when there is gas leak.


