INTRODUCTION
场景图
When the temperature changes, we need to wear more clothes or take off some clothes to maintain normal body temperature; when the humidity changes, we need to use some methods to increase or reduce humidity, so that we can live more comfortably.
Next, we’ll show you how to make a compact Thermohygrometer that will give you a better understanding of your environment.
Parts Needed You will need the following parts:
带名称组合图片
- 1x micro:bit
- 1x Micro B USB Cable
- 1x micro:bit expansion board
- Jumper Wires
- 1x DHT11 Module
About DHT11
The DHT11 is a basic, ultra low-cost digital temperature and humidity sensor. It uses a capacitive humidity sensor and a thermistor to measure the surrounding air, and spits out a digital signal on the data pin (no analog input pins needed). Its fairly simple to use, but requires careful timing to grab data.
DHT11模块图片
Hardware Hookup
Ready to start hooking everything up? Check out the wiring diagram and hookup table below to see how everything is connected.
接线实物图/表格
dht11连接至P0口
Insert micro:bit into the edge connector of the expansion board.
Note:micro:bit will always stay attached to the expansion board in the following sessions.
PROGRAM
If you are not familiar to make code, don’t worry. Firstly, you can enter this link:https://makecode.microbit.org/reference to know more about microbit blocks.
Then you can directly enter the https://makecode.microbit.org/ to edit your project program. Below is an example code we have done for you.
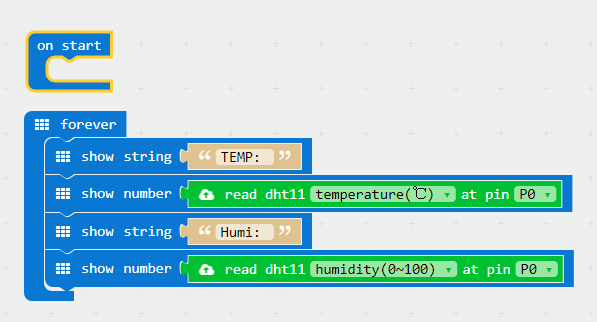
Either copy and paste, or re-create the following code into your own MakeCode editor by clicking the open icon in the upper right-hand corner of the editor window. You can also just download this example by clicking the download button in the lower right-hand corner of the code window.
https://makecode.microbit.org/_gmtcTpWobY3b
RESULT
The temperature and humidity value is scrolling on micro:bit led matrix.
实验结果图片


