Note: ALL OSOYOO Products for Arduino are Third Party Board which is fully compatitable with Arduino
Authorized Online Retailers:
Content
- Introduction
- Preparations
- About the I2C LCD 1602 Display
- Connection
- Find the I2C address
- Upload Sketch
- Program Running Result
- The Expansion Example
Introduction
During the building of your projects for Arduino, you’ll often need to read the output data directly from a LCD display. In this lesson we will show how to mount a LCD display on your Arduino using the I2C communication. Finally you will see how to program it with a simple example showing how to display text on the display.
Preparations
Hardware
- OSOYOO Basic Board (Fully compatible with Arduino UNO rev.3) x 1
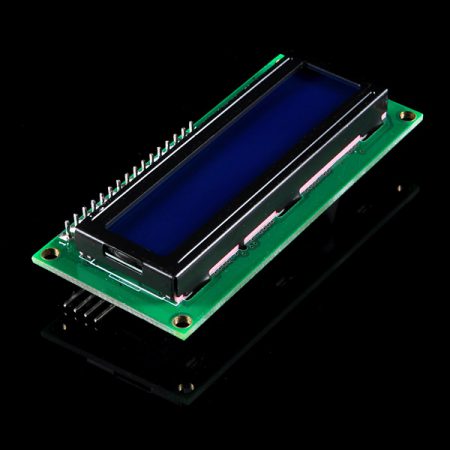
- I2C LCD 1602 Display x 1
- F/M jumpers
- USB Cable x 1
- PC x 1
Software
About I2C LCD 1602 Display
The integration of an LCD display greatly facilitates the interactivity of the project you are developing, allowing the user to directly read some output parameters. These values can be either a simple text or numerical values read by the sensors, such as temperature or pressure, or even the number of cycles that the OSOYOO Basic Board is performing.
However, these displays have a small problem. When they are connected to a microcontroller (such as Arduino for example), these displays require virtually many connection PINs occupying practically almost all available IO and leaving the multiprocessor few outputs for any other devices and sensors. This problem has been solved thanks to the communication on the I2C bus.
The LCD1602 display has an integrated microchip that manages this type of communication, and then all of the input and output information are limited to only two PINs (excluding power supply). I2C is a type of serial bus developed by Philips, which uses two bidirectional lines, called SDA (Serial Data Line) and SCL (Serial Clock Line). Both must be connected via pulled-up resistors. The usage voltages are standard as 5V and 3.3V.
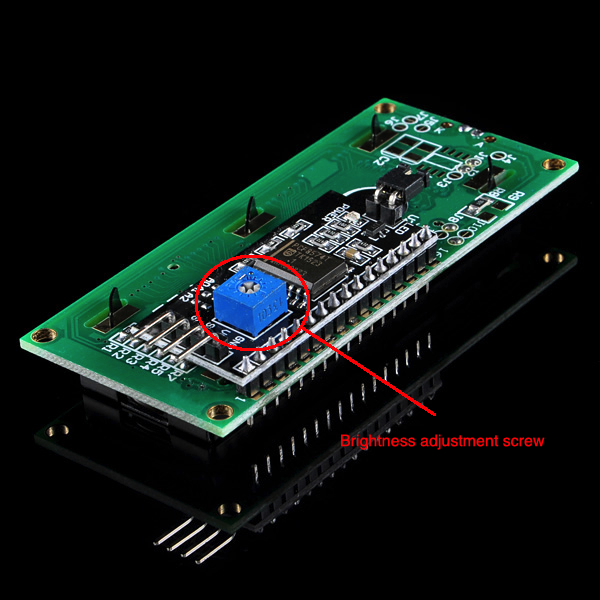
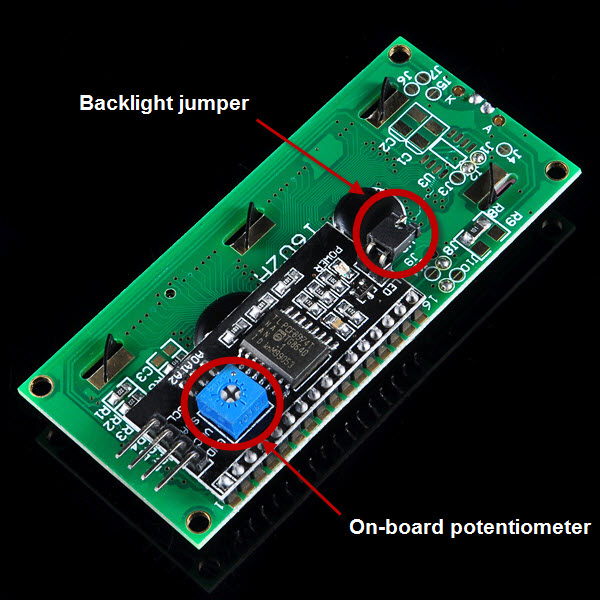
The blue potentiometer on the I2C LCD1602 (see the figure below) is used to adjust the backlight for better display.And there is a jumper on the board, if you take away this jumper , the backlight will aways be off.
For the usagage of other functions, pleae refer to the “LiquidCrystal_I2C.h” in the sourcecode of I2C LCD library.
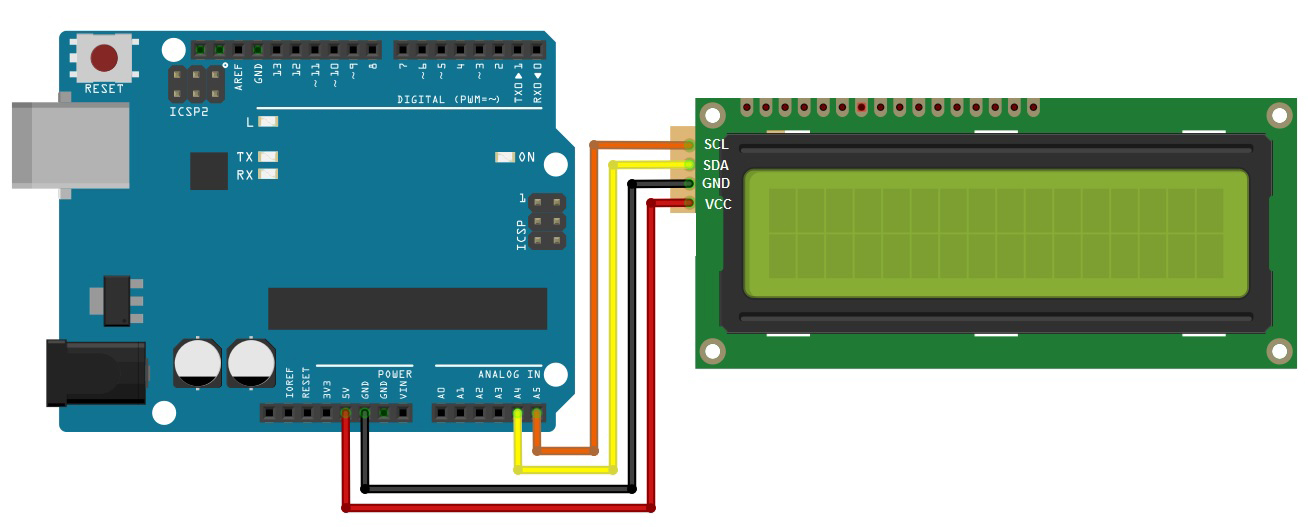
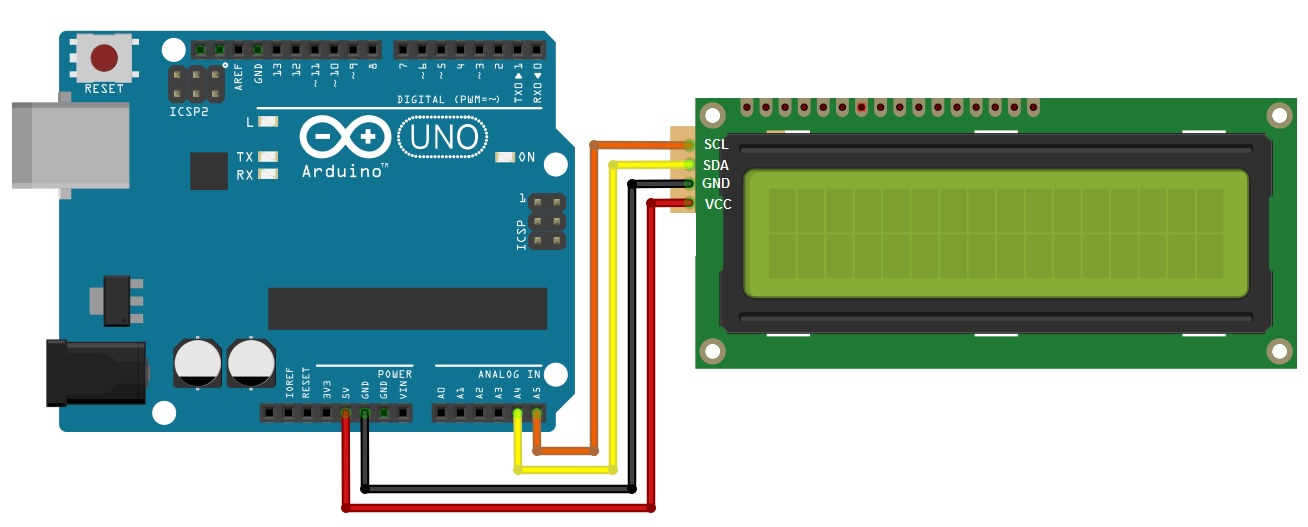
Connection
Before you write the code you have to build the circuit. To do this, connect the pins as follows:
| OSOYOO Basic Board |
LCD1602 |
| GND |
GND |
| 5V |
VCC |
| A4 |
SDA |
| A5 |
SCL |
Note:
- For Mega2560: the I2C connections are on SDA=20 and SCL=21. So go ahead and wire these up, along with the two power leads to the 5V and GND terminals.
- For Arduino Leonardo: connect SDA to digital pin 2 and SCL to digital pin 3 on your OSOYOO Basic Board .
From sketches of Fritzing, you can look at the connections to be done in a simpler way:
Find the I2C address
Each device has an I2C address that it uses to accept commands or send messages. For Uno board, this address usually is 0x27. But sometimes the address might be changed 0x37,0x24 …., So let’s go and look for the one on your device.
Download ic2_scanner sketch zip file , then unzip and load it into Arduino IDE. By opening up the serial monitor in the upright corner, OSOYOO Basic Board will scan the address range looking for a reply. Most OSOYOO Basic Board will show 0x27, however it be other number.
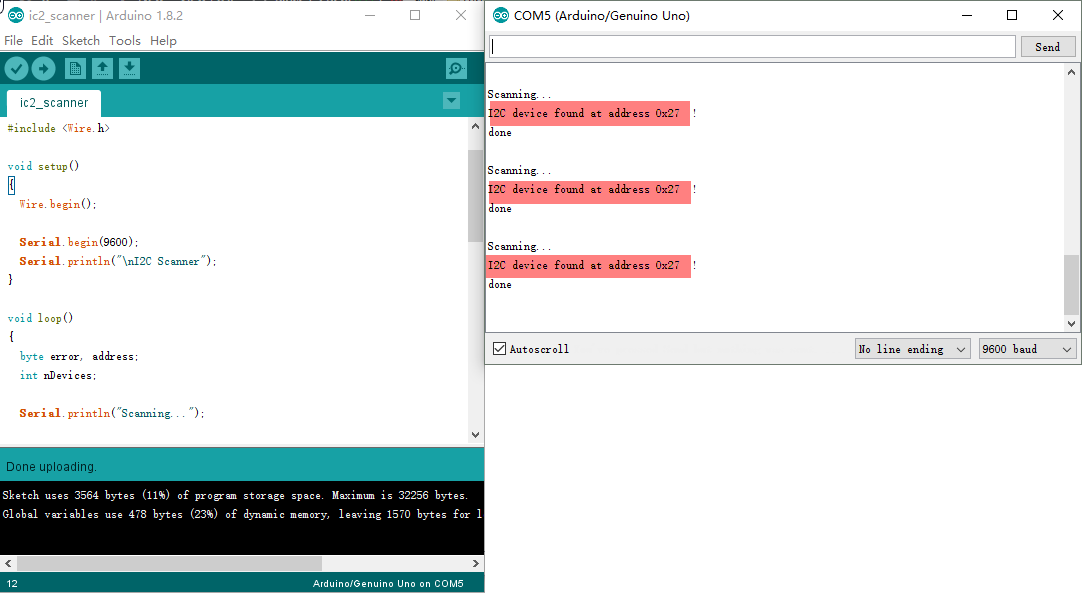
Write down the Address that you have found, you’ll need it in the next step.
Upload Sketch
After above operations are completed, connect the OSOYOO Basic Board to your computer using the USB cable. The green power LED (labelled PWR) should go on.
Install Library
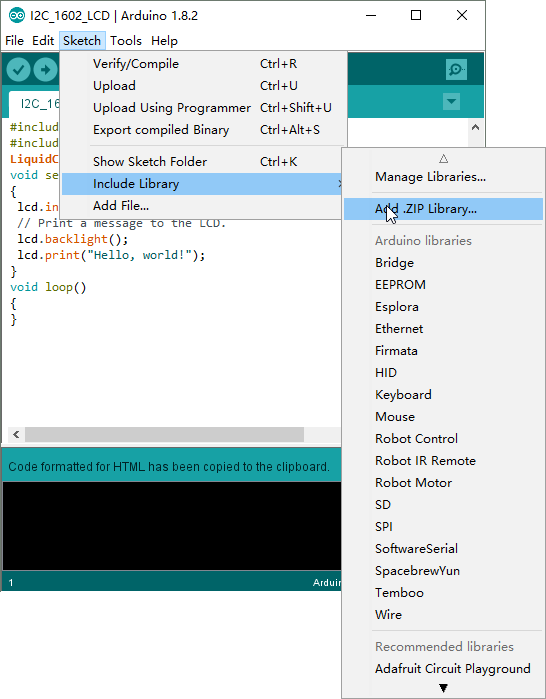
To use the I2C protocol with an LCD display and OSOYOO Basic Board , there is a special library to be downloaded and included in the code. The name of this library is Liquid Crystal I2C. Download the library, a zip file (you can download it from here) and extract the contents in the libraries folder of the Arduino IDE. You can do directly from the Arduino IDE, select Sketch > include Library > Add .ZIP library from the menu.
Library Support Functions
- LiquidCrystal_I2C() //set the LCD address for a 16 chars and 2 line display
- init() //Initialization for the LCD
- clear() //clear display, set cursor position to zero
- home() //set cursor position to zero
- createChar() //Fill the first 8 CGRAM locations with custom characters
- setCursor() //set the position of the cursor
- cursor() //Turns the underline cursor on
- noCursor() //Turns the underline cursor off
- blink() //Turn on the blinking cursor
- noBlink() //Turn off the blinking cursor
- display() //Turn the display on(quickly)
- noDisplay() //Turn the display 0ff(quickly)
- backlight() //Turn the backlight on
- noBacklight() //Turn the backlight off
- scrollDisplayLeft() //Make the display scroll left without changing the RAM
- scrollDisplayRight() //Make the display scroll right without changing the RAM
- autoscroll() //This will ‘right justify’ text from the cursor
- noAutoscroll() //This will ‘left justify’ text from the cursor
- leftToRight() //This is for text that flows Left to Right
- rightToLeft() //This is for text that flows Right to Left
Code Program
You can download the sketch from this link or copy below code to your Arduino IDE window:
#include "Wire.h"
#include "LiquidCrystal_I2C.h"
LiquidCrystal_I2C lcd(0x27,16,2);  // set the LCD address to 0x27 for a 16 chars and 2 line display
void setup()
{
 lcd.init();                      // initialize the lcd
 // Print a message to the LCD.
 lcd.backlight();
 lcd.print("Hello, world!");
}
void loop()
{
}
Compile and upload
Open the Arduino IDE and select corresponding board type and port type for your OSOYOO Basic Board .
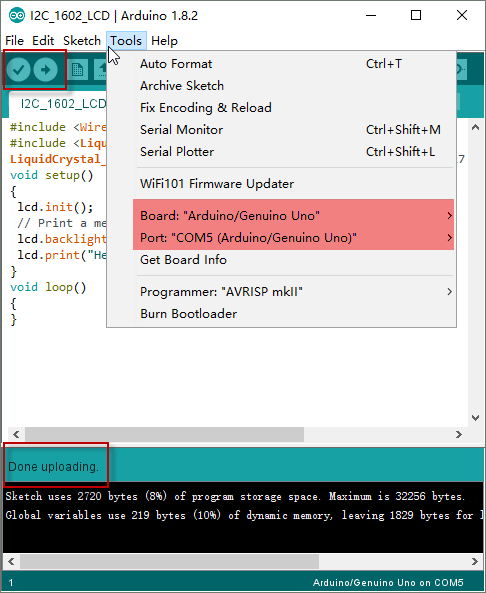
After compile this sketch, simply click the “Upload” button in the environment. Wait a few seconds – you should see the RX and TX leds on the board flashing. If the upload is successful, the message “Done uploading.” will appear in the status bar.
Running Result
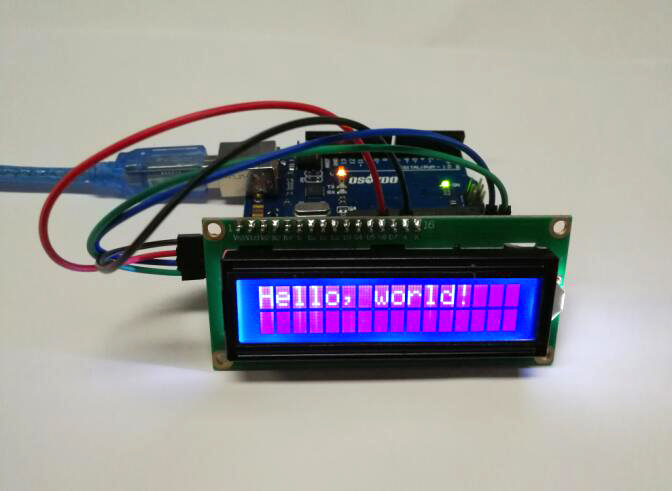
A few seconds after the upload finishes, you should now see your I2C LCD1602 display the static characters: “Hello, World!”.
Extended experiment
In this experiment, the sketch will make a connection between OSOYOO Basic Board and I2C LCD display and then print a text on two lines. The first line will display “Hello all !” and second the “Welcome to www.osoyoo.com !” message.The circuit and the board / port type settings are same as above example.
#include <Wire.h> #include <LiquidCrystal_I2C.h> char array1[]=" Hello all ! "; //the string to print on the LCD char array2[]="Welcome to www.osoyoo.com "; //the string to print on the LCD int tim = 500; //the value of delay time // initialize the library with the numbers of the interface pins LiquidCrystal_I2C lcd(0x27,16,2); // set the LCD address to 0x27 for a 16 chars and 2 line display void setup() { lcd.init(); //initialize the lcd lcd.backlight(); //open the backlight } void loop() { lcd.setCursor(15,0); // set the cursor to column 15, line 0 for (int positionCounter1 = 0; positionCounter1 < 26; positionCounter1++) { lcd.scrollDisplayLeft(); //Scrolls the contents of the display one space to the left. lcd.print(array1[positionCounter1]); // Print a message to the LCD. delay(tim); //wait for 250 microseconds } lcd.clear(); //Clears the LCD screen and positions the cursor in the upper-left corner. lcd.setCursor(15,1); // set the cursor to column 15, line 1 for (int positionCounter = 0; positionCounter < 26; positionCounter++) { lcd.scrollDisplayLeft(); //Scrolls the contents of the display one space to the left. lcd.print(array2[positionCounter]); // Print a message to the LCD. delay(tim); //wait for 250 microseconds } lcd.clear(); //Clears the LCD screen and positions the cursor in the upper-left corner. }
Compile and upload this sketch to the Osoyoo UNO board, you should now see your I2C LCD1602 display the flowing characters: “Hello all !” and “Welcome to www.osoyoo.com”.


loving these lessons. well designed, but not as informative in the sketches as I had hoped.
When I try to change the array1 to a longer message (about 40 characters), it only does the first 24 on the first line, the rest is on the second. Is this something I am doing wrong or a limitation to the I2C protocol? (ie. 16 characters on screen, and another 8 in memory?).
adjusted both code samples to include a banner visible via the serial monitor and to blink the backlight in a loop. both to make the examples a bit more dynamic for the case where the LCD darkness is not adjusted well and text cannot be seen — blinking and banner proves code is running even if text is invisible.
—–cut here—–
/* ___ ___ ___ _ _ ___ ___ ____ ___ ____
* / _ \ /___)/ _ \| | | |/ _ \ / _ \ / ___) _ \| \
*| |_| |___ | |_| | |_| | |_| | |_| ( (__| |_| | | | |
* \___/(___/ \___/ \__ |\___/ \___(_)____)___/|_|_|_|
* (____/
*In this sketch, we will show how to use your I2C LCD1602 display the
*static characters: “Hello, World!”
* Tutorial URL https://osoyoo.com/2017/07/09/arduino-lesson-i2c-lcd1602-display/
* CopyRight http://www.osoyoo.com
*/
#include
#include
LiquidCrystal_I2C lcd(0x27,16,2); // set the LCD address to 0x27 for a 16 chars and 2 line display
void setup()
{
Serial.begin(9600);
Serial.println(“\nI2C LCD”);
lcd.init(); // initialize the lcd
// Print a message to the LCD.
lcd.backlight();
lcd.print(“Hello, world!”);
}
void loop()
{
delay(1000);
lcd.noBacklight();
delay(1000);
lcd.backlight();
}
—–cut here—–
/* ___ ___ ___ _ _ ___ ___ ____ ___ ____
* / _ \ /___)/ _ \| | | |/ _ \ / _ \ / ___) _ \| \
*| |_| |___ | |_| | |_| | |_| | |_| ( (__| |_| | | | |
* \___/(___/ \___/ \__ |\___/ \___(_)____)___/|_|_|_|
* (____/
*In this experiment, the sketch will make a connection between
*Arduino and I2C LCD display and then print a text on two lines.
*The first line will display “Hello all !” and second the
*“Welcome to http://www.osoyoo.com !” message.
* Tutorial URL https://osoyoo.com/2017/07/09/arduino-lesson-i2c-lcd1602-display/
* Copyright (c) %YEARDIGITS% http://www.osoyoo.com
*/
#include
#include
// 000000000011111111112222222222
// 012345678901234567890123456789
char array1[]=” Hello all ! “; //the string to print on the LCD
char array2[]=”Welcome to http://www.osoyoo.com “; //the string to print on the LCD
int slen = 30; //max length of strings
int tim = 300; //the value of delay time
// initialize the library with the numbers of the interface pins
LiquidCrystal_I2C lcd(0x27,16,2); // set the LCD address to 0x27 for a 16 chars and 2 line display
void setup()
{
Serial.begin(9600);
Serial.println(“\nI2C Welcome”);
lcd.init(); //initialize the lcd
lcd.backlight(); //open the backlight
}
void loop()
{
lcd.setCursor(15,0); // set the cursor to column 15, line 0
for (int positionCounter1 = 0; positionCounter1 < slen; positionCounter1++)
{
lcd.scrollDisplayLeft(); //Scrolls the contents of the display one space to the left.
lcd.print(array1[positionCounter1]); // Print a message to the LCD.
delay(tim); //wait {tim} microseconds
}
lcd.clear(); //Clears the LCD screen and positions the cursor in the upper-left corner.
lcd.setCursor(15,1); // set the cursor to column 15, line 1
for (int positionCounter = 0; positionCounter < slen; positionCounter++)
{
lcd.scrollDisplayLeft(); //Scrolls the contents of the display one space to the left.
lcd.print(array2[positionCounter]); // Print a message to the LCD.
delay(tim); //wait {tim} microseconds
}
delay(1000);
lcd.clear(); //Clears the LCD screen and positions the cursor in the upper-left corner.
lcd.noBacklight();
delay(500);
lcd.backlight();
}
also corrected a typo in the i2c_scanner sketch
—–cut here—–
/* ___ ___ ___ _ _ ___ ___ ____ ___ ____
* / _ /___)/ _ | | | |/ _ / _ / ___) _ |
*| |_| |___ | |_| | |_| | |_| | |_| ( (__| |_| | | | |
* ___/(___/ ___/ __ |___/ ___(_)____)___/|_|_|_|
* (____/
*In this sketch, we will show how to find the I2C address for the I2C device.
* Tutorial URL https://osoyoo.com/2017/07/09/arduino-lesson-i2c-lcd1602-display/
* Copyright (c) %YEARDATE% http://www.osoyoo.com
*/
#include
void setup()
{
Wire.begin();
Serial.begin(9600);
Serial.println(“nI2C Scanner”);
}
void loop()
{
byte error, address;
int nDevices;
Serial.println(“Scanning…”);
nDevices = 0;
for(address = 1; address < 127; address++ )
{
// The i2c_scanner uses the return value of
// the Write.endTransmisstion to see if
// a device did acknowledge to the address.
Wire.beginTransmission(address);
error = Wire.endTransmission();
if (error == 0)
{
Serial.print("I2C device found at address 0x");
if (address<16)
Serial.print("0");
Serial.print(address,HEX);
Serial.println(" !");
nDevices++;
}
else if (error == 4)
{
Serial.print("Unknown error at address 0x");
if (address<16)
Serial.print("0");
Serial.println(address,HEX);
}
}
if (nDevices == 0)
Serial.println("No I2C devices foundn");
else
Serial.println("donen");
delay(5000); // wait 5 seconds for next scan
}