Note: ALL OSOYOO Products for Arduino are Third Party Board which is fully compatitable with Arduino
Overview
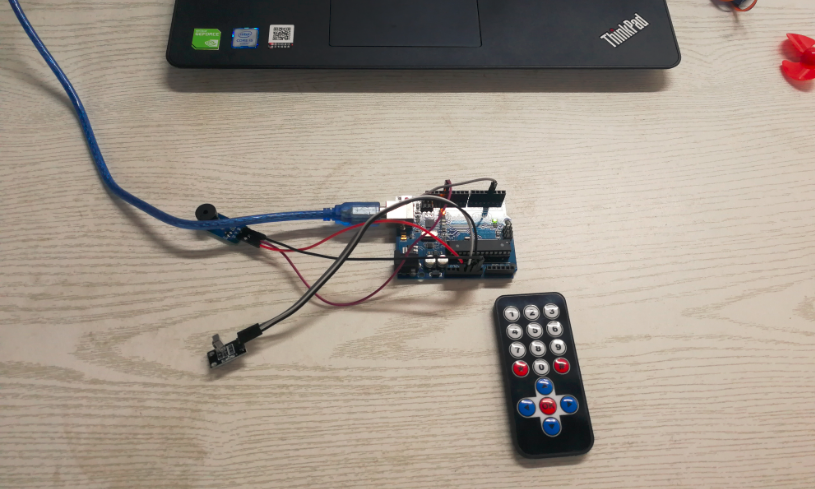
In this lesson, we will show how to use the IR control the active buzzer beep. When we press the “OK” button, the buzzer will continue to beep, and when we press the other buttons, the sound will disappear.
Preparatiom
HARDWARE
- Osoyoo basic Board (Fully compatible with Arduino UNO rev.3) x 1
- IR controller
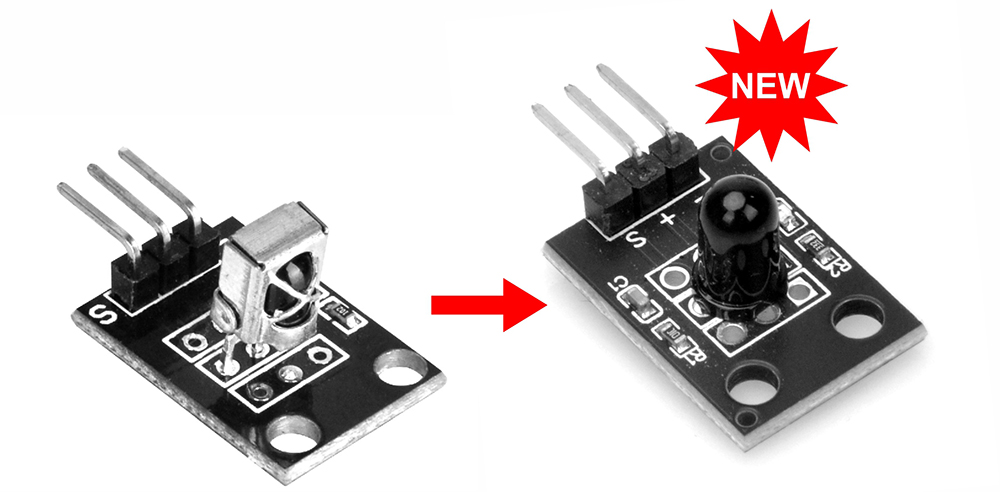
- IR receiver
- Active Bzzer module x 1
- F/M jumpers
- USB Cable x 1
- PC x 1
SOFTWARE
About Buzzer
As a type of electronic buzzer with integrated structure, buzzers, which are supplied by DC power, are widely used in computers, printers, photocopiers, alarms, electronic toys, automotive electronic devices, telephones, timers and other electronic products for voice devices. Buzzers can be categorized as active and passive ones (see the following picture). Turn the pins of two buzzers face up, and the one with a green circuit board is a passive buzzer, while the other enclosed with a black tape is an active one.
The difference between an active buzzer and a passive buzzer is:
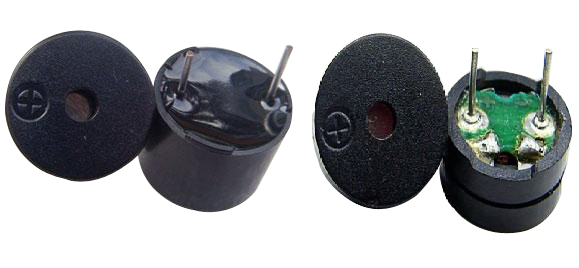
An active buzzer has a built-in oscillating source, so it will make sounds when electrified. But a passive buzzer does not have such source, so it will not tweet if DC signals are used; instead, you need to use square waves whose frequency is between 2K and 5K to drive it. The active buzzer is often more expensive than the passive one because of multiple built-in oscillating circuits.In this lesson, we use the active buzzer.
Note:
The active buzzer has built-in oscillating source, so it will beep as long as it is electrified, but it can only beep with a fixed frequency.
Connection
Connect the buzzer module with OSOYOO Basic board as below:
| OSOYOO basic |
Buzzer module |
| 3.3 V |
VCC |
| GND |
GND |
| D13 |
I/O |

Upload Sketch
Note: The following library must be installed in your installation for this to work!
CLICK HERE – IR REMOTE CONTROL: ARgithub.com/shirriff/IRremoteDUINO LIBRARY
NOTE!! If you have a late version of Arduino with a library IRRobotRemote, it may conflict and you may have to remove that library.Make sure to delete the path of Arduino(root)/libraries/RobotIRremote. Where the folder of Arduino(root) refers to the install directory of Arduino. The library RobotIRremote has similar definitions to IRremote and causes errors.
After above operations are completed, connect the board to your computer using the USB cable. The green power LED (labelled PWR) should go on.
CODE PROGRAM
You can download the sketch from this link or copy below code to your IDE window:
#include "IRremote.h"
const int irReceiverPin =3; //the SIG of receiver module attach to pin3
const int buzzerPin = 13;//pin 13 connect to a buzzer
IRrecv irrecv(irReceiverPin); //Creates a variable of type IRrecv
decode_results results;
void setup()
{
   pinMode(buzzerPin,OUTPUT);//set buzzer pin as OUTPUT
   digitalWrite(buzzerPin,HIGH);
   Serial.begin(9600);//initialize serial
   irrecv.enableIRIn(); //enable ir receiver module
}
void loop()
{
   if (irrecv.decode(&results)) //if the ir receiver module receiver data
   {
     Serial.print("irCode: "); //print"irCode: "
     Serial.print(results.value, HEX); //print the value in hexdecimal
     Serial.print(", bits: "); //print" , bits: "
     Serial.println(results.bits); //print the bits
     irrecv.resume(); // Receive the next value
    }
   delay(600); //delay 600ms
   if(results.value == 0xFF38C7)//if press "OK" button,the receiver module receive 0xFF38C7
   {
     alarm();
   }

}

void alarm() {

  for(i=0;i<150;i++) {
    digitalWrite(buzzerPin,LOW);
    delay(1);//wait for 1ms
    digitalWrite(buzzerPin,HIGH);
    delay(1);//wait for 1ms
  }

}
COMPILE AND UPLOAD
Open the IDE and select corresponding board type and port type for your board.

After compile this sketch, simply click the “Upload” button in the environment. Wait a few seconds – you should see the RX and TX leds on the board flashing. If the upload is successful, the message “Done uploading.” will appear in the status bar.
Running Result
A few seconds after the upload finishes, press the “OK” button, the buzzer will continue to beep, and when we press the other buttons, the sound will disappear.
Note again:
The active buzzer has built-in oscillating source, so it will beep as long as it is electrified, but it can only beep with a fixed frequency.


Diagram says remove the seal. I did not have a seal on my buzzer. It is also not making any noise when I run the program and hit “ok” on my remote. Is there something I am missing?
No seal will be ok. no need worry.
In order to address your problem, please reply following questions:
1) Did you upload the sketch to arduino? any compiling error?
2)When you press IR remote “OK” button, did you see any response in Arduino Serial monitor?
If yes, please copy paste your result in the the comments.
thanks
1) No errors during compiling.
2) No result was displayed in the serial monitor after pressing the button.
Please advise.
Thanks
Correction the following is being outputted.
irCode: FF38C7, bits: 32
irCode: FF38C7, bits: 32
irCode: FF38C7, bits: 32
irCode: FF38C7, bits: 32
irCode: FF38C7, bits: 32
irCode: FF38C7, bits: 32
irCode: FF38C7, bits: 32
Your IR remote and receiver are working well. Not sure if this is the buzzer problem. please download following test sketch:
https://osoyoo.com/download/buzzer.zip
You will find 3 sketches, buzzer1.ino, buzzer2.ino, buzzer3.ino
tell me which sketches can make your buzzer make noise, which sketch does not make noise.
I will give you solution after getting your answer.
buzzer1.ino worked. The other 2 did not.
Thanks for the support.
Trying to understand the sketches you sent me. It has to do something with the buzzer when it is in the low state, which is 0V being received by the buzzer?
Your test result shows the buzzer is a passive buzzer which can not be alarmed by 1 or 0. It must be alarm by 1/0 loop. So I changed the code for you, please download the sketch from following link:
https://osoyoo.com/download/irbuzzer.zip
After running the sketch, press the OK key and the buzzer should make sound.
By the way, can you tell me what is your purchase link of this kit?
Great thank you. This worked.
I purchased this kit through Amazon. Barcode reads X002BKGVW9 if that helps.
Do you have amazon purchase link? We need to know which learning kit you purchased and update the related tutorial.
thanks
https://www.amazon.com/gp/product/B07XXPW9XP/ref=ppx_yo_dt_b_asin_title_o00_s00?ie=UTF8&psc=1
Hi, Omnion43,
can you leave us a good review in above Amazon purchase link?
Thanks a lot!
The code is wrong
Here is the edited code:-
#include “IRremote.h”
const int irReceiverPin = 3; // the SIG of the receiver module attached to pin 3
const int buzzerPin = 13; // pin 13 connected to a buzzer
IRrecv irrecv(irReceiverPin); // Creates a variable of type IRrecv
decode_results results;
void setup() {
pinMode(buzzerPin, OUTPUT); // set buzzer pin as OUTPUT
digitalWrite(buzzerPin, HIGH);
Serial.begin(9600); // initialize serial
irrecv.enableIRIn(); // enable ir receiver module
}
void loop() {
if (irrecv.decode(&results)) // if the ir receiver module receives data
{
Serial.print(“irCode: “); // print “irCode: ”
Serial.print(results.value, HEX); // print the value in hexadecimal
Serial.print(“, bits: “); // print ” , bits: ”
Serial.println(results.bits); // print the bits
irrecv.resume(); // Receive the next value
}
delay(600); // delay 600ms
if (results.value == 0xFF38C7) // if the “OK” button is pressed, the receiver module will receive 0xFF38C7
{
alarm();
}
}
void alarm() {
for (int i = 0; i < 150; i++) { // declare and initialize 'i' before using it in the loop
digitalWrite(buzzerPin, LOW);
delay(1); // wait for 1ms
digitalWrite(buzzerPin, HIGH);
delay(1); // wait for 1ms
}
}
The error was that the variable 'i' was not being declared before its use in the 'alarm()' function. To fix this issue, you need to declare the variable 'i' and initialize it before using it in the 'for' loop.