In this project, we will use Raspberry Pi 2 and DS18B20 temperature sensor to get environment temperature and display it into Linux Shell Window.
Step 1: Connect Raspberry pi 2 and DS18B20 sensor as per following graph:

* the pull up resistor in the graph can be 5Kohm to 10Kohm
**The DS18S20 S pin should connected with Raspberry Pi 2 GPIO 4 pin. For detail of the GPIO connection, please read the Raspberry Pi 2 GPIO Pin Diagram
Step 2: Install One-Wire communication libary
In Rasbian Shell Terminal, run following two commands:
sudo modprobe w1-gpio
sudo modprobe w1_therm
Step 3: use following command to edit config file:
sudo nano /boot/config.txt
Above command will use nano to edit config.txt file, add following line after the last line of config.txt
dtoverlay=w1-gpio
Then press Ctrl-X and save the file.
Step 4: enter terminal command sudo reboot to restart Raspberry Pi.
Step 5: Type following command and get sensor address in the format 28-00000xxxxxx.
ls -l /sys/bus/w1/devices/
Above command will show some result as following example graph:

In above example, the circled text “28-0000050496de” is the address of our sensor.
Step 6: Test the sensor by running following command:
cat /sys/bus/w1/devices/28-0000050496de/w1_slave
* Don’t forget to substitute 28-0000050496de with your address getting from step 5
The result will shows as following:

In above example “t=22812” means the current temperature is 22.812 Celsius degree
Step 7: You can also use python to read temperature sensor data.
First, Download sample code and rename the file rasptempsensor.py, use winscp or other sftp tool to send it to raspberry pi.
*Again Don’t forget to replace 28-0000050496de in python code with your address from step 5
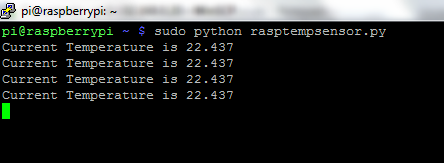
Next, run following shell command: sudo python rasptempsensor.py
Your will see temperature result in terminal window same as following example: