
In lesson 6, we learned how to install a server in Raspberry Pi and use web browser to control our Pie Car.
However, using browser to control robot car looks a little bit old-fashioned. Nowadays, the most popular and fancy way is to use Mobile APP.
In this lesson, we will teach you how to design a mobile APP UI(User Interface) to control our Pie Car through Internet.
You don’t have to know the complicated Android or iOS APP programming, the only thing you have to learn is to use a powerful IoT platform called Blynk. You can take advantage of the power of the Blynk APP and make a brilliant customized UI to control your robot or any other Things through Internet.

All the parts and installation are same as Lesson 6.

Step 1) You should have completed Lesson 6 software library installation.
Step 2) You need to download Blynk APP in your cell phone and install local Blynk Server in your Raspberry Pi or any local PC. We suggest you install Blynk Server in your Raspberry Pi.
Please read following tutorial to complete the task:
https://osoyoo.com/2021/01/15/how-to-install-a-local-blynk-server-in-your-pc-and-get-a-local-blynk-token/
After install the local Blynk Server, please write down the Server IP address and Blynk Token.
Step 3)Turn on the battery of your Pie Robot Car, open the terminal by ssh command or putty, then start the web camera service by typing following command:
bash camstart.sh
Then in your browser, visit http://your_pie_robot_car_ip:8899/?action=stream
make sure you can see your web camera video in the browser.
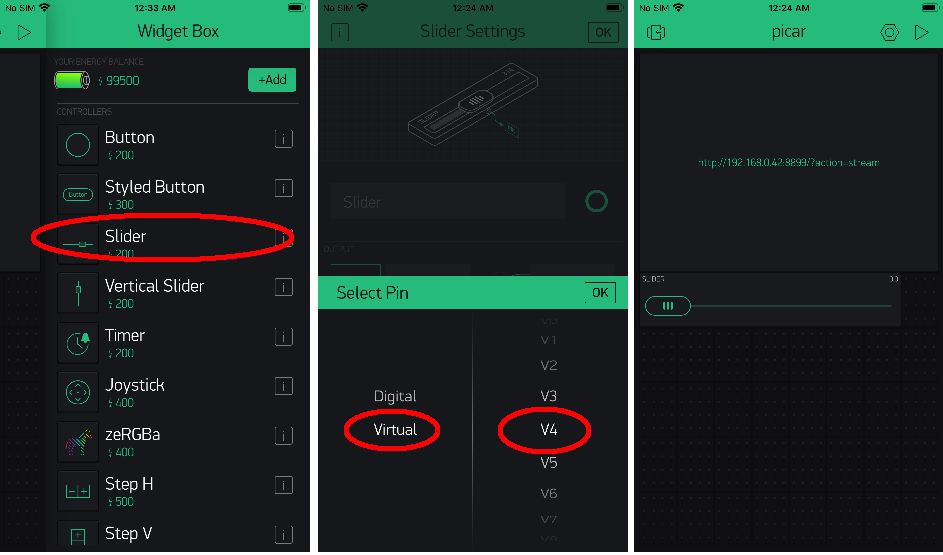
Step 4)Open your Cell phone Blynk APP new project page, click (+) button (if iOS APP, just click blank area) to add a new Widget

Now select a Video Stream widget and then set the Widget URL address to http://your_pie_robot_car_ip:8899/?action=stream
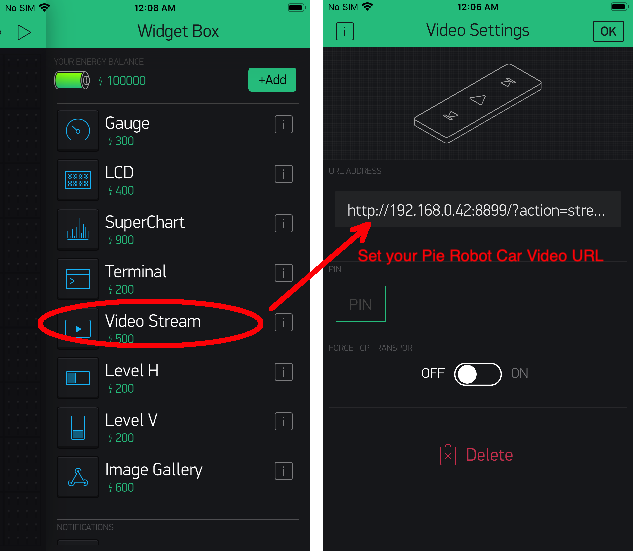
Now click OK to go back previous UI page and add another Widget called Slider, set Slider Pin to Virtual V4, your APP will look as following:
Step 5)Run python program in your Raspberry Pi
Use ssh or putty to open a new Raspberry Pi terminal(keep web camera service terminal running, do not close that window) and download sample Python code by typing following command:
wget http://osoyoo.com/driver/picar/blynk-cam.py
After the blynk_cam.py file is downloaded to your Raspberry Pi, please edit this file by typing following command:
nano blynk-cam.py
You need to replace line 40 with your local token:
BLYNK_AUTH = '***' #replace *** with your local Blynk token
You also need to replace line 45 with your local Blynk Server address:
server='192.168.0.44', # replace 192.168.0.44 with your local Blynk Server IP address
Press Ctrl-X to save above changes.
Now type following command to start the Python program:
python3 blynk-cam.py
Your will see terminal message as following:
___ __ __
/ _ )/ /_ _____ / /__
/ _ / / // / _ \/ ‘_/
/____/_/\_, /_//_/_/\_\
/___/ for Python v0.2.6
Moving servo on channel 0, press Ctrl-C to quit…
This means your Python code is running properly.
Step 6) Go back your APP, you will see following UI in your APP
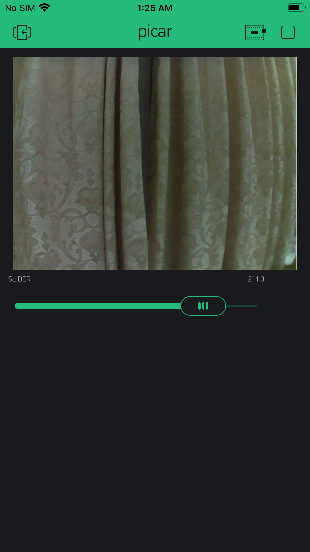
Move the bottom slider, you will rotate the Camera in your Pi robot and you will video from a new angle.
P.S. Depending on your cell phone model and memory, your Video might have some delay when you move the slider.


