If you have completed our Blynk Smart Home IoT projects, you might have noticed that we only use one email ID [email protected] to do all the projects in Blynk Legacy APP and private Blynk Server.
The reason is that Blynk company will no longer to support Blynk Legacy APP(free version) to register new user account. Blynk company wants users to get their new Blynk IoT APP and use their Cloud server(monthly fee apply).
Fortunately Blynk legacy APP will still be available in Apple store and Google Play Store, we can use this legacy APP to do IoT projects on private local Blynk Server which is open source and free.
Blynk Legacy APP now only have one default user [email protected]. However, in many cases , such as school class, we do need multiple blynk user accounts to allow students do individual projects separately.
Is there a solution to create multiple user accounts in same local Private Blynk Server?
In this tutorial, we will tell you how to create new user accounts for Blynk legacy APP and private local Blynk Server.
Prerequisite:
If you don’t know how to install local private Blynk server and how to use Blynk legacy APP, please read following article first:
https://osoyoo.com/2021/01/15/how-to-install-a-local-blynk-server-in-your-pc-and-get-a-local-blynk-token/
If you have already installed local private Blynk server in a PC and Blynk legacy APP in your cell phone, you can now start to create new users now.
Step 1)
Download a file from https://osoyoo.com/driver/blynk/newuser.zip
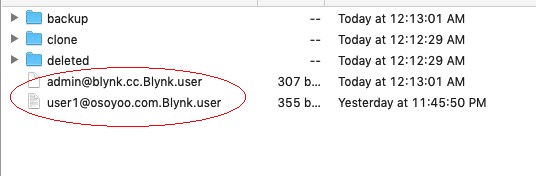
Unzip the file, you will see a file [email protected] , this file containers all data for a new user id [email protected] , please copy this file to Blynk folder which is under the same parent directory of blynk-server.jar file from which you start local Blynk server with java command. See following picture:

Now enter Blynk folder, you will see two user files : [email protected] and [email protected] .
If you use a text editor to open above two files, you will find they are actually some json data files.
Now in cmd terminal , please start the local Blynk server by running following command:
java -jar ./blynk-server.jar -dataFolder ./Blynk
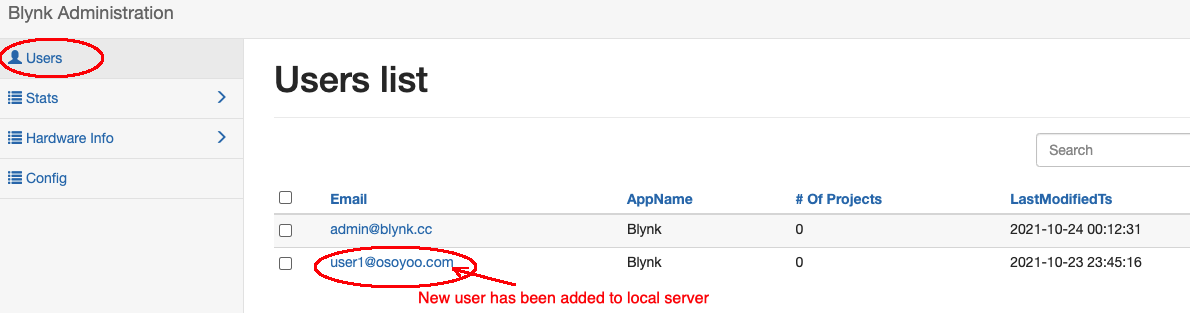
then visit the local Blynk server admin dashboard url: https://your_server_ip:9443/admin
login email is [email protected] , login password is admin
Now click Users, you will see a new Email id [email protected] has been added into local Blynk dashboard. See following picture:
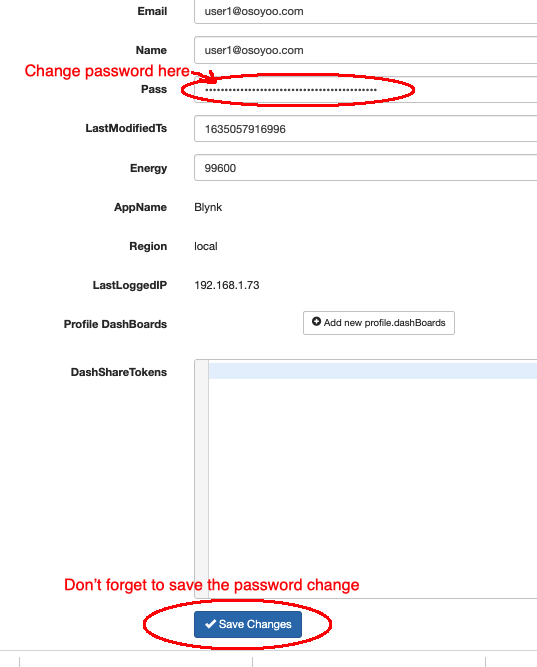
Click the Email ID [email protected], you can change its default password (default password is 123456).
You have already successfully added one new email id in local Blynk!
Now you can use new email ID [email protected] to login to Blynk legacy APP and Blynk local server admin dashboard.
What if I want to add another user (email ) to my local Blynk Server?
It is very easy! For example , you want to add another user email called [email protected]
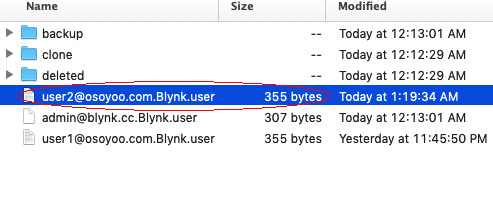
Step 1) Copy the file [email protected] to a new file and rename new file to [email protected]
Step 2) Use a text editor to open [email protected] json text file and replace all the string of [email protected] to [email protected]
then save the file.
Old file is following:

After changing, new file is as following:

Move this [email protected] file to Blynk folder,
Now user ctrl C to stop Blynk and restart it with following command:
java -jar ./blynk-server.jar -dataFolder ./Blynk
In your browser, visit admin dashboard url: https://your_server_ip:9443/admin
login email is [email protected] , login password is admin
Now click Users, you will see a new Email id [email protected] has been added into local Blynk dashboard. See following picture:
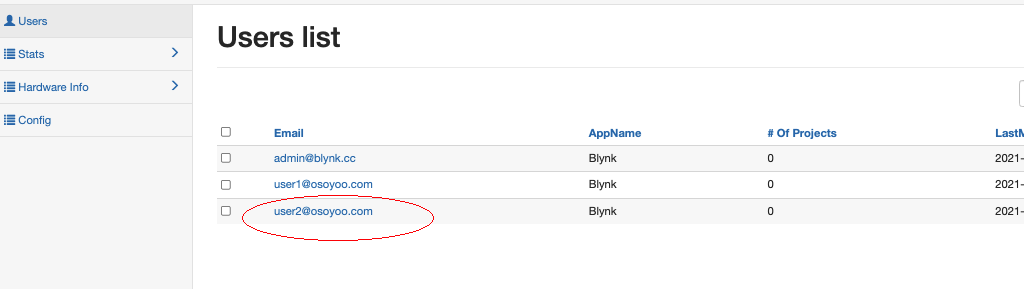
You can click to Email [email protected] and change its password.
Now you can use Email id [email protected] to login to Blynk legacy APP and make new project!


