Introduction
In this project, we will learn how to measure voltages using Arduino by interfacing a Voltage Sensor with Arduino. Using this Arduino Voltage Sensor interface, you can measure voltages up to 25V.
Warning: If you are using the same Voltage Sensor Module, then make sure that its input voltage (voltage to be measured) is restricted to 25V.

Preparations
HARDWARE
- UNO Board (Fully compatible with Arduino UNO rev.3) x 1
- Voltage Sensor Module x 1
- Breadboard x 1
- Jumpers
- USB Cable x 1
- PC x 1
SOFTWARE
- Arduino IDE (version 1.6.4+)
About Sound Detection Sensor
OVERVIEW
A simple but very useful module which uses a potential divider to reduce any input voltage by a factor of 5. This allows you to use the analogue input of a microcontroller to monitor voltages much higher than it capable of sensing. For example with a 0-5V analogue input range you are able to measure a voltage up to 25V. The module also includes convenient screw terminals for easy and secure connection of a wire.
If you want to measure external voltages using Arduino, you have to make use of the Analog Input pins of the Arduino Board. If you recall a little bit about the Arduino Analog Pins, their input voltage is limited to 5V i.e. you can measure up to 5V directly using the Analog Input Pins of the Arduino.
But what if you want to measure voltages that are greater than 5V? You cannot directly use the Analog Input Pins of the Arduino as you might fry the ATmega328P IC on the Arduino UNO board (or the relevant Microcontroller IC depending on the Arduino Board you are using).
Here comes the Voltage Sensor Module to the rescue. Using this Voltage Sensor Module, you can measure voltages up to 25V.
Pins of the Voltage Sensor
Before going into the details of the Voltage Sensor like its functionality and schematic, let me give you an overview of the available Pins of the Voltage Sensor Module.
Basically, a 25V Voltage Sensor, like the one used here, has 5 pins in total. Two of them are on the two-pin screw terminal and three are male header pins.
The Screw Terminal pins are marked as VCC and GND and they must be connected to the external source of voltage i.e. the voltage that needs to be measured.
Coming to the three male headers, they are marked as S, + and –. The S pin is the “Sense” pin and it must be connected to the Analog Input of the Arduino. The “–” pin must be connected to the GND of the Arduino. The pin marked as “+” is not connected to anything (it is an N/C Pin).
The following image shows the pins of a Voltage Sensor Module.

Inputs
- GND – This is where you connect the low side of the voltage you are measuring. Caution! : This is the same electrical point as your Arduino ground.
- VCC: The is where you connect the high side of the voltage you are measuring
Outputs
- S: This connects to your Arduino analog input.
- – (or minus): This connects to your Arduino ground.
- +: This is not connected. .
Schematic of Voltage Sensor
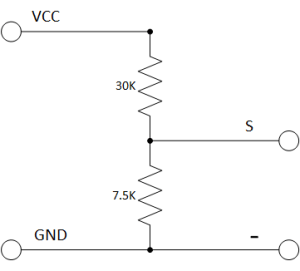
Now, let us talk about the important thing about the voltage sensor: its schematic. The Voltage Sensor is basically a Voltage Divider consisting of two resistors with resistances of 30KΩ and 7.5KΩ i.e. a 5 to 1 voltage divider.
The following image shows the schematic of the Voltage Sensor Module with an input voltage limit of 25V.

Make your Own Voltage Sensor
Using a pre-built voltage sensor module is very easy and if you don’t have one then you can easily build one yourself. All you need are two resistors.
If you want to make your own voltage sensor that can measure voltages up to 25V like this Voltage Sensor Module, then you have to get a 30KΩ and a 7.5KΩ resistor.
APPLICATIONS
- DC measurement
- Power measurement
- Power quality measurement
Example
Find yourself a 9 volt battery(or any DC device with a voltage of 0-25v.) and connect it, your voltage sensor module and Arduino as shown below.

Code Program
After above operations are completed, connect the Arduino board to your computer using the USB cable. The green power LED (labelled PWR) should go on.Open the Arduino IDE and choose corresponding board type and port type for you project. Then load up the following sketch onto your Arduino.
int analogInput = A1;
float vout = 0.0;
float vin = 0.0;
float R1 = 30000.0; //
float R2 = 7500.0; //
int value = 0;
void setup(){
   pinMode(analogInput, INPUT);
   Serial.begin(9600);
   Serial.print("DC VOLTMETER");
}
void loop(){
   // read the value at analog input
   value = analogRead(analogInput);
   vout = (value * 5.0) / 1024.0; // see text
   vin = vout / (R2/(R1+R2));

Serial.print("INPUT V= ");
Serial.println(vin,2);
delay(500);
}
Working
I think the working of the project might be understood by now. Since the Voltage Sensor module is basically a voltage divider circuit, you can calculate input voltage using the formula
Vin = Vout * (R2/(R1+R2))
Here R1 = 30000, R2 = 7500 and Vout can be calculated from Analog Input of Arduino by using Vout = (analogvalue * 5 / 1024).
Results
Here are my results with a standard 9v battery, I measured this with my multimeter and it was actually 8.9v. you could probably tweak the values in the code above, the resistor values are what these should be in an ideal world but you’ll find that resistors have a tolerance and this may be different. You can measure the resistors using multimeter but for a low cost way of measuring say a 9v battery or a 12v dc power source its not too shabby


