目的
このプロジェクトでは、ArduinoボードとHM-10モジュールを接続して、Bluetooth 4.0 プロトコルを通じで、AndroidスマホのAPPと送受信します。
必要なパーツ
1 x Bluetooth 4.0 HM-10 マスタ スレーブ モジュール
1 x Arduino UNO R3ボード (またはMEGA2560ボード)
1 x Android スマホ(Bluetooth 4.0対応)
紹介
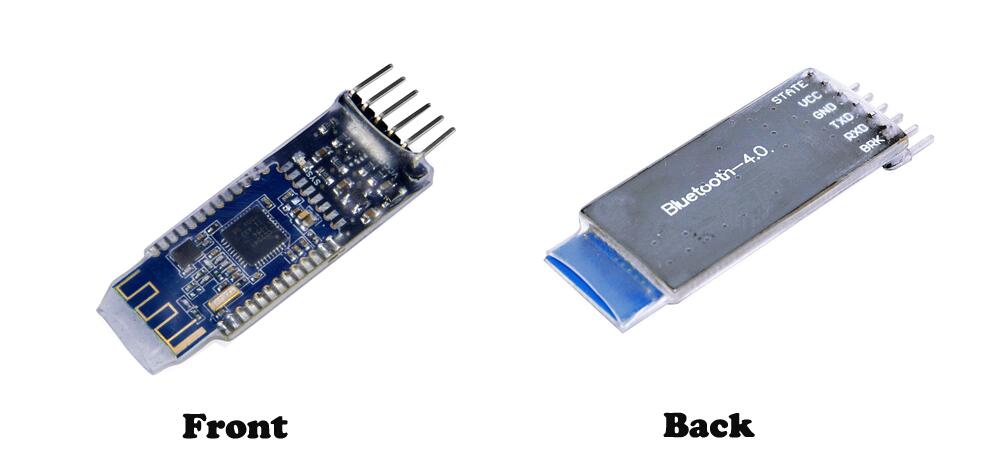
Bluetooth 4.0 HM-10 マスタ スレーブ モジュールは TI CC2541チップを採用し、 マスタとスレーブの2つの機能搭載、 トランスミッション、リモコ、PIO状態取得機能もあります。ATコマンドも対応しているので、モジュールのパラメータはより便利編集できます。 トランスミッションモードで2つのBluetooth ディバイス間のデータの伝送ができます。 リモートコントロールモードで PIO
ポートから出力の電位信号(高電位信号と低電位信号)が制御できるし、他のMCUが必要ありません。PIO状態取得 機能はPIOポートの情報を獲得(Bluetooth V2.1のみ対応)できます、他のMUCが必要ありません。
パラメーター
Bluetoothのプロトコル: Bluetooth Specification V4.0 BLE
USB プロトコル: USB V2.0
Operating 周波数: 2.4GHz ISM band
変調モード: GFSK (Gaussian Frequency Shift Keying)
出力パワー: ≤4dBm
感度: ≤-84dBm at 0.1% BER
伝送速度: Asynchronous: 6 kbps
シンクロナス: 6 kbps
セキュリティー機能: Authentication and encryption
サポートサービス: Central & Peripheral UUID FFE0, FFE1
電源: +5VDC 50mA
作動温度: -5 ~ +65 Centigrade
サイズ: 27mm x 13mm x 2.2 mm.
Pinの説明
Pin
|
説明
|
| STATE |
状態テスト用、内部LEDと接続された、普段は使用しません |
| VCC |
電源の正極 |
| GND |
グラウンド |
| TXD |
シリアルインタフェース、送信端末 |
| RXD |
シリアルインタフェース、受信端末 |
| BRK |
Bluetooth接続を切断する、普段は使用しません |
一、Arduino UNO
R3ボードを使用して、ATコマンドを送信する
Step 1: 必ずBluetoothモジュールとUNOボードを接続の前に下記のコードをArduinoIDEにロードしてくださいませ。
Download the loop.ino sketch file, then load it into Arduino UNO.
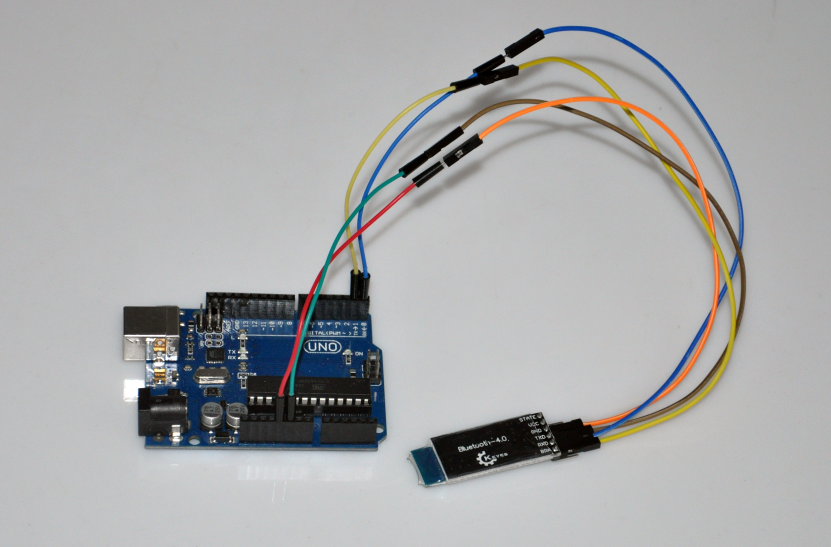
Step2: 接続表のように、BluetoothモジュールとUNOボードを接続して下さい。
| Bluetooth 4.0 |
Arduino UNO R3ボード |
| VCC |
5V |
| GND |
GND |
| TXD |
RX0(pin0) |
| RXD |
TX0(pin1) |
Step 3:Android スマホ(Bluetooth 4.0対応)で
BleSerialPortというソフトウエアをインストールして
、スマホのBluetooth機能を有効してくださいませ。
スマホのBleSerialPortソフトウエアを開いて、設定画面に入って (Fig 1)、 connect ボダン(Fig 2)をクリックして、 「HMSoft」のようなBluetooth
信号をクリックして、接続します。
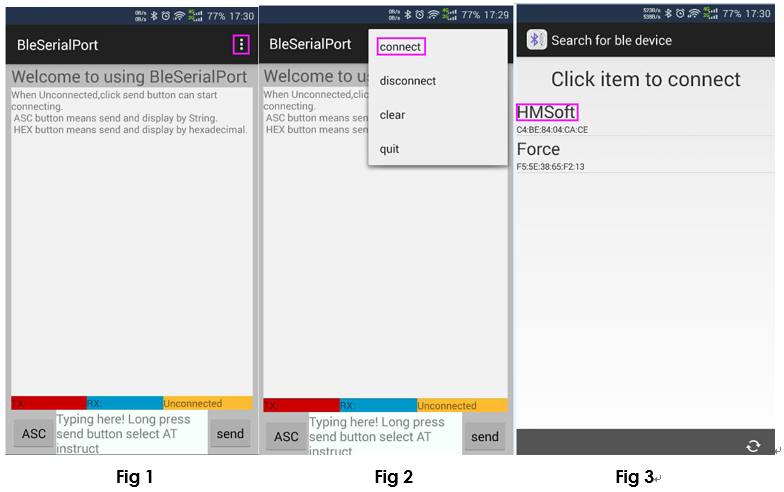
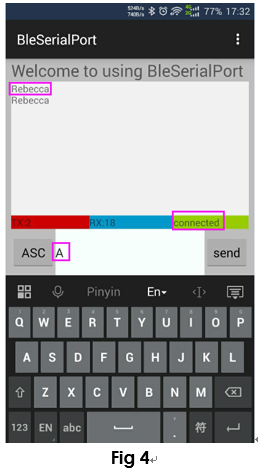
成功に接続したら、下記のように表示します。モジュールのLEDも常時点灯(点滅しない)します。
今はコマンドを送信しできます。例:ソフトウエアの入力欄にAを入力して、sendボダンをクリックして、表示欄にRebeccaを応答します。送信ボードを1回クリックして、UNOボードのLED1回点滅します。
二、通信実験
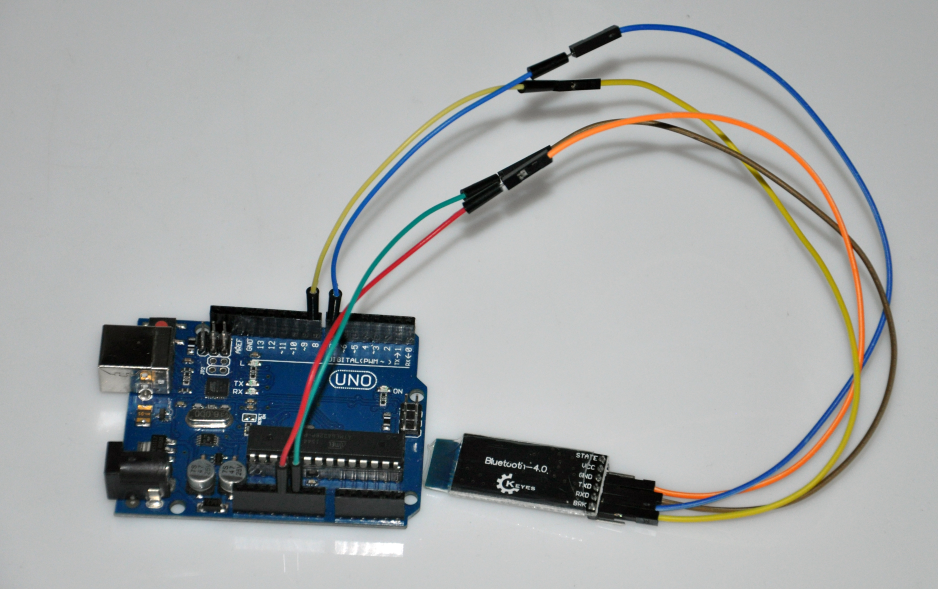
スマホとArduinoボードメッセージ送信の場合、下記のコードをArduinoIDEにロードして、 ArduinoIDEのserial monitorとスマホのBleSerialPortを開いて、メッセージを送受信しできます。
詳しくは下記の内容をご覧ください。
① Arduino Uno R3ボードを使用場合
loop.inoをダウンロードして、Arduino
IDEにロードしてくださいませ。
ご注意:ArduinoUNO R3ボードは、1のみのシリアル(D0/D1)
pinペアがあるため、シリアル印刷ターミナルウィンドウ占用されました。シリアルpinペアが足りないですので、loop.inoにD7 /
D8を使用して、模倣シリアルpinペア作成しました。
接続表:
| Bluetooth 4.0 |
Arduino UNOボード |
| VCC |
5V |
| GND |
GND |
| TXD |
pin 7 |
| RXD |
pin 8 |
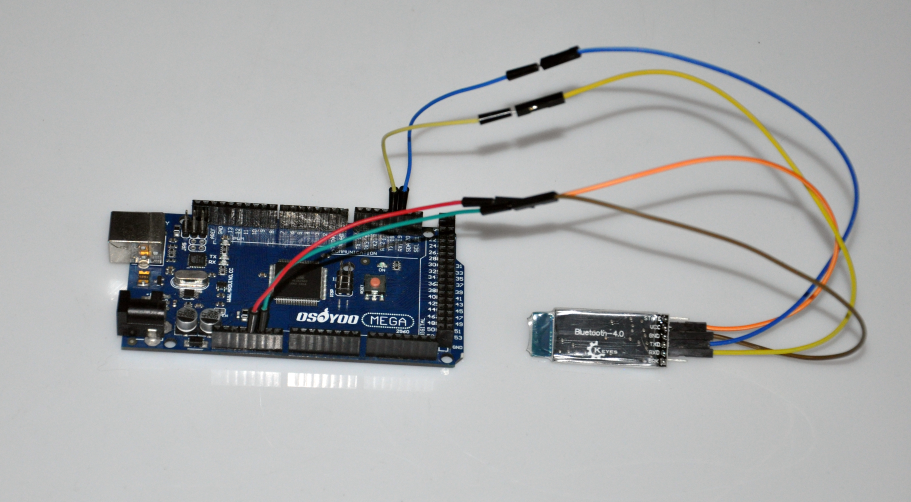
②Arduino Mega2560ボードを使用場合
Mega2560ボードは2のシリアル(D0/D1) pinペアがありますので、D7/D8
模倣シリアルpinペアが必要ありません。コードは少し簡単です、次のリンクでコードをダウンロードして、
https://osoyoo.com/wp-content/uploads/2016/10/for_mega2560.txt Arduino IDEにロードしてくださいませ。(Arduino IDE–Tools
でboardをMega2560 と選択して下さい。).
Mega2560 とHM-10 モジュールの接続表:
| HM-10 Bluetooth 4.0 モジュール |
MEGA2560ボード |
| VCC |
5V |
| GND |
GND |
| TXD |
RXD1
|
| RXD |
TXD1
|
三、AT コマンドを使用して、HM-10 Bluetooth モジュールを配置する
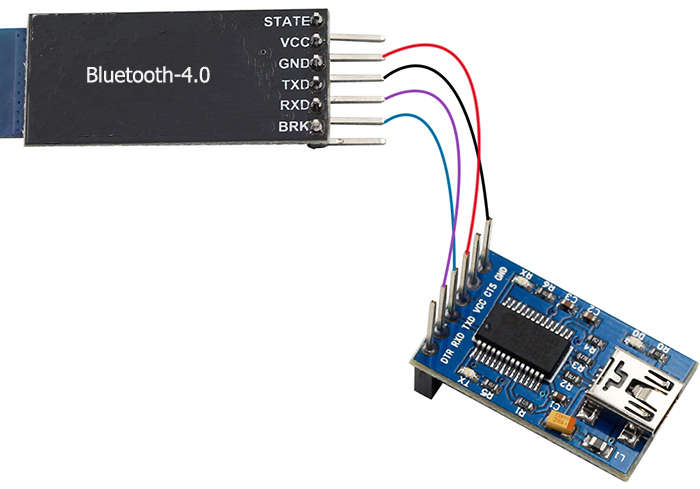
追加パーツ : 1 x USB to TTL(FT232) モジュールとパソコン
Step 1: 配線表.
Bluetooth 4.0 モジュールのTXD とPL2303モジュールのRXD を接続する
RXD とTXD
GND とGND
VCCとVCC
PL2303 はUSBtoシリアルブリッジアダプターです。FT232も使えます。
| Bluetooth 4.0 |
FT232 |
| VCC |
VCC |
| GND |
GND |
| TXD |
RX |
| RXD |
TX |
Step 2: パラメーターの設定
接続したら、パソコンでsscom32というソフトウエアをダウンロードして、下記のように設定して下さい。
1) serial portを開いて、Open Comをクリックして、ポートを選択して下さい。

2) baud rate欄に9600を選択して下さい。

Step3:「AT」入力欄に入力して、SENDボダンクリックして、 問題ない場合表示欄にOKが应答します。

AT+NAME?を送信したら、 OK+NAME:HMSoftを应答します。

AT+BAUD?を送信したら、 OK+Get:0 を应答します。

Bluetooth 4.0 AT について、詳しく情報はPDFファイルをご参照よろしくお願い致します。
他の資料
BleSerialPort
Sscom32E
OSOYOO HM-10 Bluetooth Module
How to get MAC under iOS
How to use ANCS
AppleNotificationCenterServiceSpecification


😀 im having a trouble. The HM-10 replied to my command in vertical form. When i type, AT+NAME? it replied
O
K
+
N
A
M
E
:
H
M
S
o
f
t
Is it just fine?
Pls confirm which APP you use and whether your APP can change the respond command form.
Hi, the DL link for your app BleSerialPort leads to a all chinese app. In your screenshots its English. Is there posibility to link to a English version?
/KG
We set the system Language and it shows English version but there is some Chinese advertise in this app.
Thank you for your reply! I have a tablet, its system language is English. But the app is all chinese. All the menues, buttons end text is chinese. I have figured out how to connect and so with tryal and error but if I could change the languege to English it would help alot. Can you change it in the app?
Pls try the APP link: osoyoo.com/driver/BleSerialPort.apk.
We test this APP in Android with English System Language.
According to HM-10 datasheet, VCC should be connected to +3.3VDC 50mA.
we test the item and it can work with 5V
could you please give me your android code? i want to understand how it work. Thank you very much
Do you mean the password for bluetooth?
You can try 1234, or 0000.
Hi, I am trying to have the HM-10 connected to an Arduino NANO communicate with an SH-08 connected to an Atmega2560. Both boards work with the DSD App on iPhone as expected.
The boards do pair successfully. The HM-10 is master and the SH-08 slave. When the master does serial writes the slave does not see the characters. The master initialization code is:
doCommand(F(“AT+INQ”));
doCommand(F(“AT+ROLE1”));
doCommand(F(“AT+IMME0”));
doCommand(F(“AT+MODE0”));
doCommand(F(“AT+NAME?”));
doCommand(F(“AT+ADDR?”));
doCommand(F(“AT+MODE?”));
doCommand(F(“AT+POWE?”));
doCommand(F(“AT+TYPE?”));
doCommand(F(“AT+ROLE?”));
Is this sequence incorrect? What sequence should I send? (doCommand writes the command to the bluetooth serial port)
Thanks
Doug