NodeMCUとは
NodeMCUはAP,STA,AP+STAの3つのモードが搭載している非常に人気あるマイクロコントローラです。ESP8266搭載 -Arduino IDEに完備対応し、安くて良質なチップです。ArduinoIDEに熟練者の場合、簡単にプログラムしできます。
目的
このプロジェクトでは、ステップモーターとNodeMCUボードを接続して、MQTT クライアント(スマホ app・ ブラウザ・ linux terminal プログラムなど) を使って、制御信号をNodeMCUに送信して、ステップモーターを制御します。MQTT
クライアントが「1」を送信したら、ステップモーターは時計回りに回転します。MQTTクライアントが「0」を送信したら、テップモーターは反時計回りに回転します。
ULN2003モータードライブチップを使って、NodeMCUボードとステップモーターを接続します。 ULN2003モータードライブチップについて、PDFファイルをご参照:https://osoyoo.com/wp-content/uploads/2016/12/ULN2003datasheet.pdf
ULN2003モータードライブチップとステップモーターを接続してくださいませ:
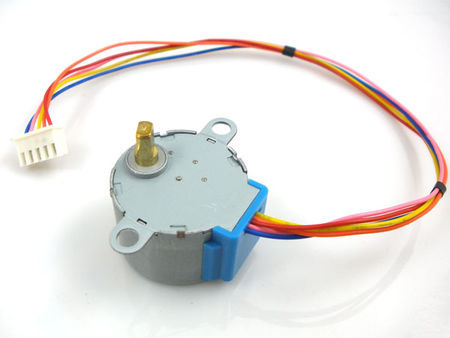
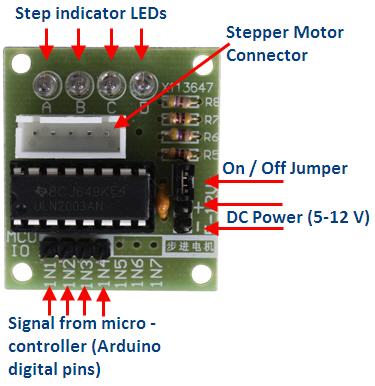
必要なパーツ
NodeMCU ボードx 1
ステップモーターとULN2003モータードライブチップ x 1
ジャンプワイヤー
ULN2003モータードライブチップとNodeMCUボードの接続:
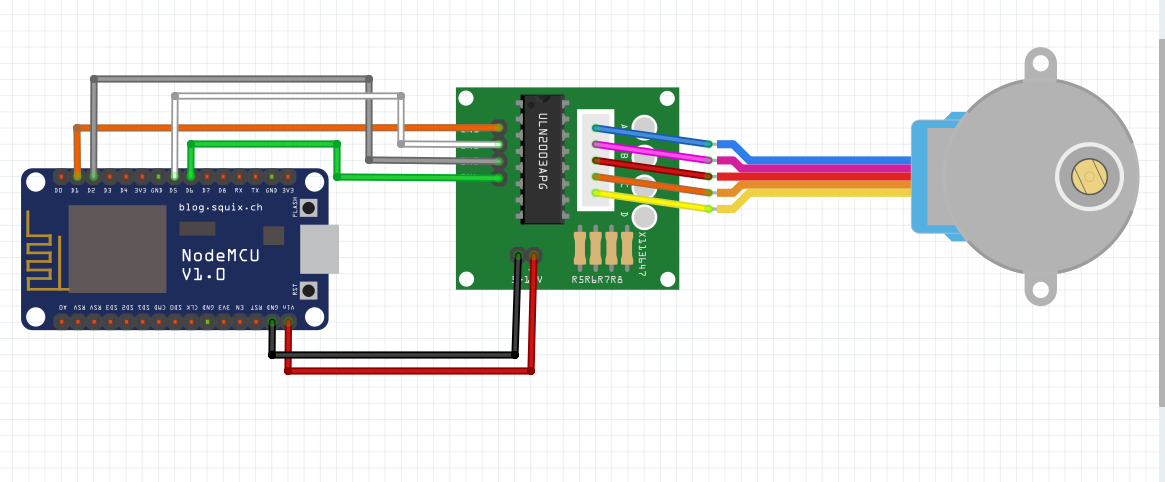
ご注意: できるだけ、ULN2003チップに専門の5V電源アダプター(5V電源アダプターとNodeMCUボードのグランドは接続してくださいませ。)を準備して下さい。電源アダプターがないの場合、VLN PINを使用して下さい。
プログラム前の準備:
Arduino IDEの設定について:
Libraryのインストール:
MQTT brokerと通信のため、ArduinoIDEにMQTT クライアントlibrary をインストールして下さい。
ステップモーターを作動のため、次のリンクでTM1637 libraryをダウンロードして下さい:
上記のリンクでのZIP(RAR)ファイルをダウンロードして、解凍したフォルダをArduino IDE library フォルダに移動して下さい。
次のリンクでサンプルコードをダウンロードして下さい。
https://osoyoo.com/wp-content/uploads/2016/12/nodemcu_stepper_motor.txt
コードをArduino IDEにコーピーして、 ロードの前に、下記のように編集して下さい。
1)Line 19 と20:
const char* ssid = “your_hotspot_ssid“
const char* password = “your_hotspot_password“
赤字の部分をお宅のルーターのSSIDとルーターのパスワードを切り替えして下さい。
2)Line 21
const char* mqtt_server = “broker.emqx.io“;
赤字も部分はお客様自弁のMQTT broker URLやIPアドレスも切り替えすることはできます。
他の無料なMQTTサーバーもお勧めます:“broker.emqx.io” ”iot.eclipse.org”
お客様自弁のMQTT brokerサーバーをUbuntu Linuxにインストールしたいの場合、次の文章をご参照下さい:
https://osoyoo.com/ja/2016/09/07/how-to-install-mosquitto-mqtt-server-on-linux
3)もし、お客様のMQTTサーバーはユーザー名とパスワードが必要の場合、Line86の内容を変更して下さい。
コードをロードして下さい
コードをロード完了しましたら、Arduino IDEのserialモニター窓を開けて下さい。
お客様のルーターのSSIDとパスワードが正しく入力されたとMQTT brokerに接続済みの場合、次のように表示します:
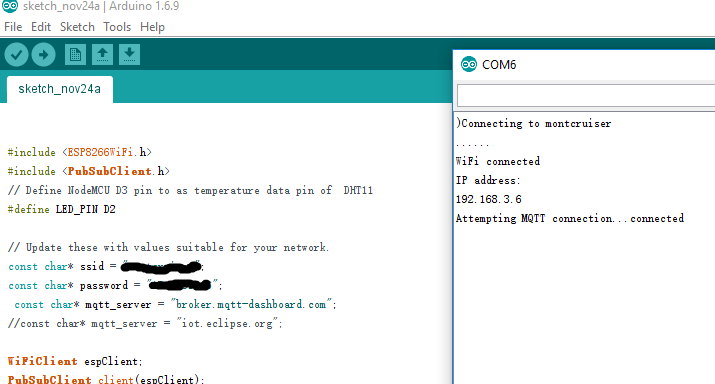
NodeMCU とWIFI、MQTT brokerサーバーに接続したら、MQTT brokerを購読して、メッセージを待ちます。MQTTクライアントを使って、メッセージを発表して、NodeMCUボードの受信テストします。
Google、AppleStore、GooglePlayで無料MQTT クライアントツール沢山ありますので、ご自由にインストールして下さい。 この文章ではMQTTBox(Windows)
を使用します。
MQTTBoxの設定について、この文章をご参照:
https://osoyoo.com/ja/2016/12/02/nodemcu-potentiometer-mqtt/

Save ボダンをクリックして、「Topic to publish」に入って、次のように設定して下さい:
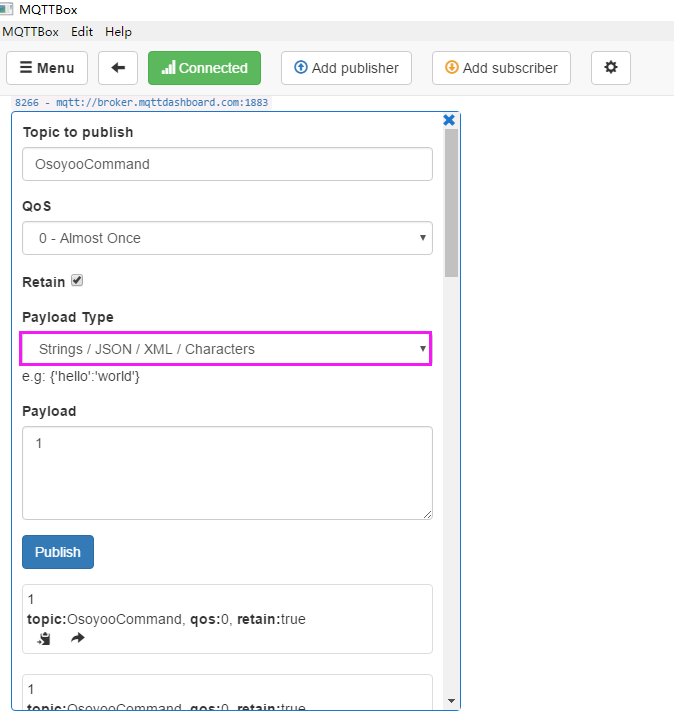
NodeMCUコードのclient.subscribe(“OsoyooCommand”) fuction とMQTTBOX Topicを統一して下さい。
payload 欄に”0″や “1” を発表したら、ステップモーターはコマンドの通り回転します。


Hi,
thanks for the great tutorial.
Unfortunately, i have a problem regarding the number of steps per revolution.
I have the same motor as described in the tutorial, but it has 512 steps per revolution.
When I change the value to an amount higher than 256 it stops working….
Do you have an idea whats wrong?
Thanks a lot,
Christian
You may need to add a external power supply for the motor
I’m having an issue that it only spins in the clockwise direction.
I’m also having the same issue as @ck1409 mentions above, anything higher than 200 for me stops it spinning..
Would you be able to tell me which exact model (even a link of where to buy it from) of the nodemcu board you have. I have a feeling mine is slightly different and may be causing some issues…
Thanks!!
you can try to change Pin 9 with Pin 10 to solve only spins in the clockwise direction.
You may need to add a external power supply for the motor for high steps per revolution
Hi, nice tutorial.
Have a some motor as picture, but got some problem. It’s setup per 200 step per rev, but when i try, it make only 20-30 degree rotation, Try to setup motor with higher steps count, but it’s don’t work.
ps. I also modify script, to take direction and count of steps from MQTT payload.
Hello,neykov,
Can you show me the code? I need more details about your project,
you can contact me by [email protected]
Cheers!
David