NodeMCUとは
NodeMCUはAP,STA,AP+STAの3つのモードが搭載している非常に人気あるマイクロコントローラです。ESP8266搭載 -Arduino IDEに完備対応し、安くて良質なチップです。ArduinoIDEに熟練者の場合、簡単にプログラムしできます。
目的
このプロジェクトでは、タクトスイッチとNodeMCUボードを接続して、 タクトスイッチを押したら、”pressed” メッセージは遠隔のMQTT
クライアントに送信します。タクトスイッチをはずしたら、 “not pressed”メッセージを遠隔のMQTT クライアントに送信します。NodeMCUボードは2秒1回にタクトスイッチの状態を更新します。
必要なパーツ
NodeMCUボードx 1
タクトスイッチx 1
1K 抵抗x 1
ブレッドボードx 1
ジャンプワイヤー
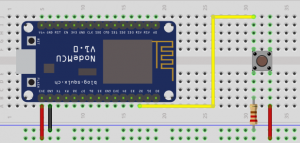
配線図

プログラム前の準備:
Arduino IDEの設定について:
Libraryのインストール:
MQTT brokerと通信のため、ArduinoIDEにMQTT クライアントlibrary をインストールして下さい
上記のリンクでのZIPファイルをダウンロードして、解凍したフォルダをArduino IDE library フォルダに移動して下さい。
次のリンクでサンプルコードをダウンロードして下さい
https://osoyoo.com/wp-content/uploads/2016/12/nodemcuiot_button_code.txt コードをArduino IDEにコーピーして、 ロードの前に、下記のように編集して下さい。
1)Line 19 と20:
const char* ssid = “your_hotspot_ssid“
const char* password = “your_hotspot_password“
赤字の部分をお宅のルーターのSSIDとルーターのパスワードを切り替えして下さい。
2)Line 21
const char* mqtt_server = “broker.emqx.io“;
赤字も部分はお客様自弁のMQTT broker URLやIPアドレスも切り替えすることはできます。他の無料なMQTTサーバーもお勧めます:“broker.emqx.io” ”iot.eclipse.org”
お客様自弁のMQTT brokerサーバーをUbuntu Linuxにインストールしたいの場合、次の文章をご参照下さい:
https://osoyoo.com/ja/2016/09/07/how-to-install-mosquitto-mqtt-server-on-linux
3)もし、お客様のMQTTサーバーはユーザー名とパスワードが必要の場合、Line86の内容を変更して下さい。
コードをロードして下さい
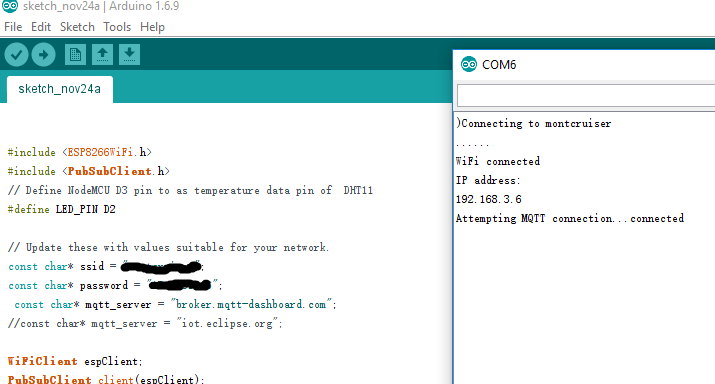
コードをロード完了しましたら、Arduino IDEのserialモニター窓を開けて下さい。
お客様のルーターのSSIDとパスワードが正しく入力されたとMQTT brokerに接続済みの場合、次のように表示します:

NodeMCU とWIFI、MQTT brokerサーバーに接続したら、「OsoyooCommand」と言うタイトルのタクトスイッチ状態のメッセージをMQTT
brokerサーバーに発表します。MQTT クライアントソフトウエアを使って、「OsoyooCommand」というタイトルのメッセージを購読して、遠隔場所でのリアルタイムの光強度値を表示します。
Google、AppleStore、GooglePlayで無料MQTT クライアントツール沢山ありますので、ご自由にインストールして下さい。 この文章ではMQTTBox(Windows)
を使用します:
MQTTBoxの設定について、下記の文章をご参照よろしくお願い致します:
https://osoyoo.com/ja/2016/12/02/nodemcu-potentiometer-mqtt/

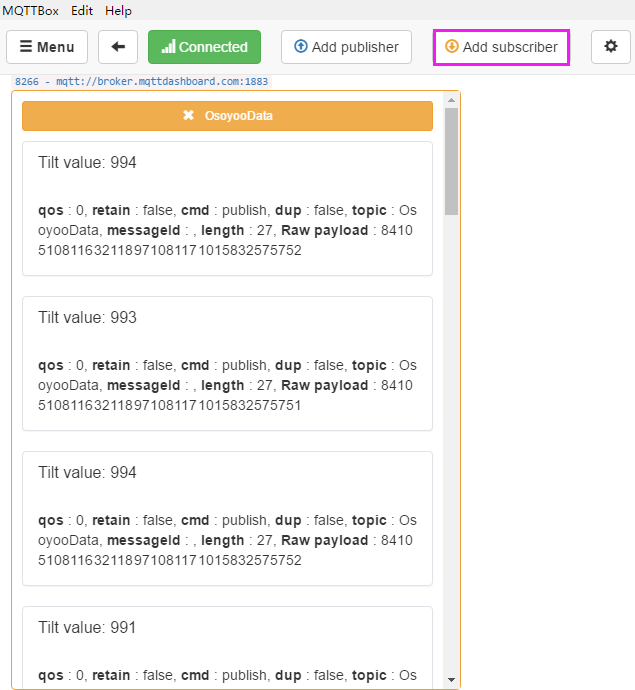
Saveをクリックして、「Add Subscriber」ボダンをクリックして、 新しいsubscriber スクリーンを作成します。タクトスイッチを押して、
リリースして、subscriber スクリーンでタクトスイッチの状態を表示します。


If i’d like to send MQTT messages to multiple topics based on which input pin, what would I need to do.
An other way around would be; how do I publish different messages to the same topic?
You can change the topic in the code.txt, but you need to match the topic in the code.txt as your mqtt APP.
You can definite the message in the code and you can publish different message to the same topic.
how can i modify the code to send a variable to the MQTT? i want to send the number of times the button was pressed rather than the state of the button. i also only want to update mqtt when the # changes rather than every 2 seconds. suggestions?
Hi,dipstick,
This link may be helpful:
https://www.arduino.cc/en/Tutorial/StateChangeDetection
If you have another questions, you can contact me by [email protected].
Best Regards,
David Guo
i sent you an email
Try to upload below code to your board, it could count the number of times
const int buttonPin = 2;
const int ledPin = 13;
int buttonPushCounter = 0;
int buttonState = 0;
int lastButtonState = 0;
void setup() {
pinMode(buttonPin, INPUT);
pinMode(ledPin, OUTPUT);
Serial.begin(9600);
}
void loop() {
buttonState = digitalRead(buttonPin);
if (buttonState != lastButtonState) {
if (buttonState == HIGH) {
buttonPushCounter++;
Serial.println(“on”);
Serial.print(“number of button pushes: “);
Serial.println(buttonPushCounter);
} else {。
Serial.println(“off”);
}
delay(50);
}
lastButtonState = buttonState;
if (buttonPushCounter % 4 == 0) {
digitalWrite(ledPin, HIGH);
} else {
digitalWrite(ledPin, LOW);
}
}
You did a phenomenal job, and saved me some time (had the exact same need to send a MQTT message when pressing a button on a NodeMCU!) so I specially registered to osoyoo to Thank You 🙂