When F208 PBX Auto Attendant mode is enabled(see user manual section 3.1), the PBX can automatically guide outside caller to dial different extensions.
F208 PBX Auto Attendant working mode needs 6 voice files for 6 scenarios. These 6 scenarios are as following:
Scenario 1 voice will be heard when caller just dials into the PBX. This voice will guide caller to call extension number or dial 0 for operator help(operator is in ext 01). File name must be 1.wav or 1.mp3.
Factory default message is ” Thank you for calling, please dial extension number, dial zero for operator”.
Scenario 2 voice will be heard when the extension just dialed is busy. File name must be 2.wav or 2.mp3.
Factory default message is “Sorry, the number you are calling is busy, please call again later.”
Scenario 3 voice will be heard when none responses the extension just dialed. File name must be 3.wav or 3.mp3.
Factory default message is “Hello, nobody answer your call, please call again later”.
Scenario 4 voice will be heard when the extension number does not exist. File name must be 4.wav or 4.mp3.
Factory default message is “Sorry, the number you are calling does not exist, please check and dial again”.
Scenario 5 voice will be heard when caller’s call is on hold or being transferred to another ext. File name must be 5.wav or 5.mp3. Factory default message is a short music.
Scenario 6 voice will be heard when PBX is set to off duty status. File name must be 6.wav or 6.mp3. Factory default message is a short music.
It is very important to remember the total size of above 6 voice files should NOT be over 2 MB.
In order to customize the 6 scenario auto attendant messages, please take following steps:
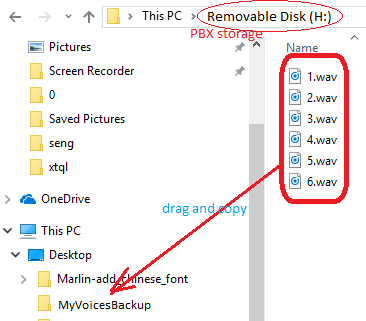
Step 1) Make a new folder called myVoicesBackup, then use a micro USB cable(most commonly used in android cell phone) connect your PC and F208 PBX, you will see a new removable storage drive in your PC. In that storage driver, you will see 6 files named 1.wav,2.wav….6.wav. Please copy these 6 files into myVoicesBackup folder as following. Then Delete All 6 files in Removable Disk(PBX flash storage).

Step 2) Find Windows Sound Recorder(or Voice Recorder) to record the 6 voice files.
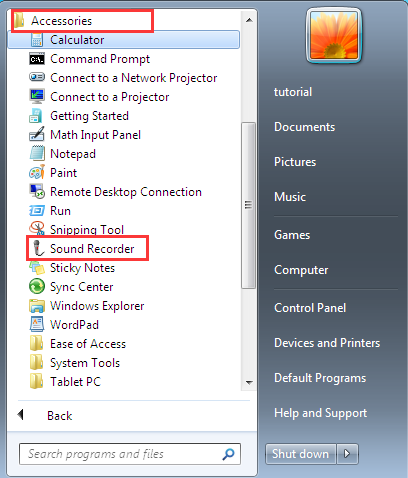
If you are using Windows XP/Vista/7, You can find Windows Sound Recorder by doing following:
Start -> All Programs -> Accessories ->Sounder Recorder

If you are using Windows 8/10, simply type “recorder” in search box (in low-left corner ) and you will see some app called “voice recorder” , click that app to start.
Step 3) Click “start record” or “record” button to your own voice file for scenario 1 . After you complete recording, click “stop record” button. Then save the file and name it as 1.m4a (you can also save it as 1.wav).
double click 1.m4a to listen the voice message you just recorded. if everything is ok, move 1.m4a to a new folder called myVoices(if myVoices folder does not exist, create one in desktop)
Repeat Step 3) and record other 5 voice files.
Step 4) Compress your voice files to mp3 format and make total size of your Auto Attendant voice files less than 2 MB as following steps.
i) Download voice compress tool Format Factory from https://osoyoo.com/driver/FFSetup4.1.0.0.exe
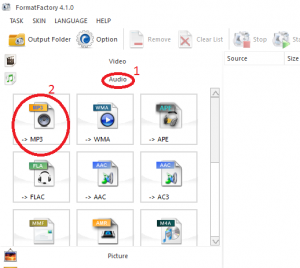
ii)Open Format Factory , click Audio->Mp3 as following:
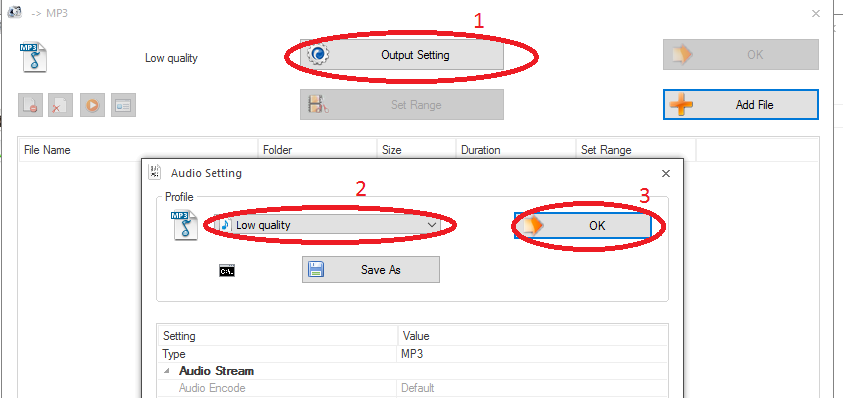
iii)Change Output setting to Low Quality as following:

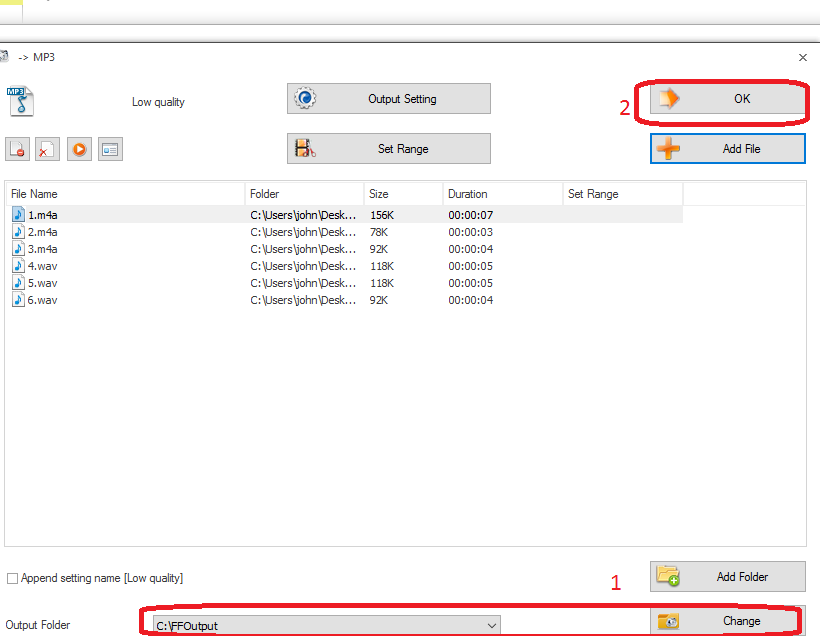
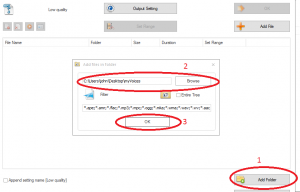
iv) Add myVoices Folder to FF as following:
v)Default output folder is C:\FFoutput, You can change folder as per following instruction:

after select output folder, click OK.
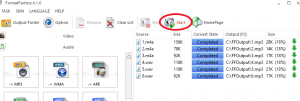
vi) lick Start button to compress the files into FFoutput folder:
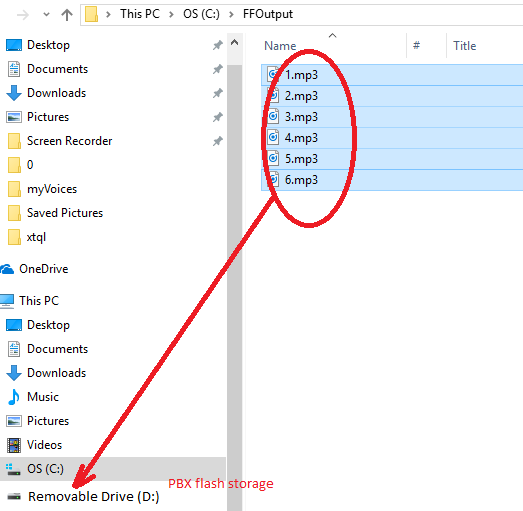
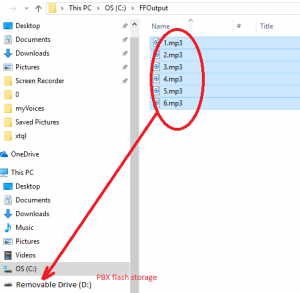
vii)Check the size of 6 voice files in C:\\FFoutput , if total size is less than 2MB (2000KB), then move it to PBX flash storage with a micro USB cable as following:
It is very important to remember to delete and replace ALL old voice files in PBX flash even if you only want customize only one voice message.
For example: If you want just change scenairo voice 1 to your own message, you need copy all 6 files in pbx FLASH into your PC, then delete all 6 files in PBX. Then record new 1.wav (or 1.mp3) file and move it with other 5 old files back to PBX.