注意:すべてのOSOYOO ARDUINO用製品はサードパーティー製品であり、ARDUINOと完全に互換性があります
認可されたオンライン小売業者:
内容
- 紹介
- 準備
- I2C LCD 1602 ディスプレイについて
- 接続
- I2C アドレスを探す
- スケッチのアップロード
- プログラムの実行結果
- 展開例
紹介
Arduinoでプロジェクトを構築する際、LCDディスプレイから直接出力データを読み取る必要があることがよくあります。このレッスンでは、I2C通信を使用してArduinoにLCDディスプレイを取り付ける方法を説明し、最終的にディスプレイにテキストを表示する方法を示す簡単な例をプログラムする方法を説明します。

準備
ハードウェア
- OSOYOO Basic Board(Arduino UNO rev.3と完全互換)×1
- I2C LCD 1602ディスプレイ×1
- F/Mジャンパー
- USBケーブル×1
- PC×1
ソフトウェア
I2C LCD 1602ディスプレイについて
LCDディスプレイを統合することは、開発中のプロジェクトの相互作用を大幅に容易にし、ユーザーが一部の出力パラメータを直接読むことを可能にします。これらの値は、温度や圧力などのセンサーで読み取られる単純なテキストまたは数値値、またはOSOYOO Basic Boardが実行するサイクル数などです。
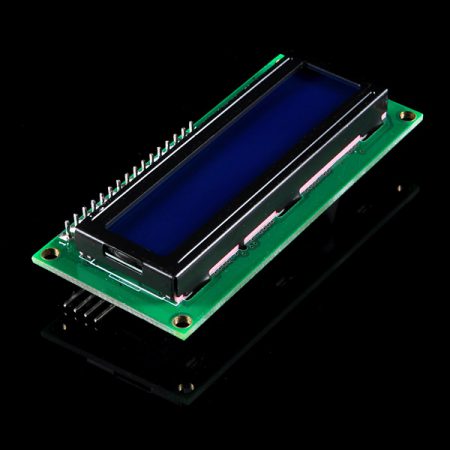
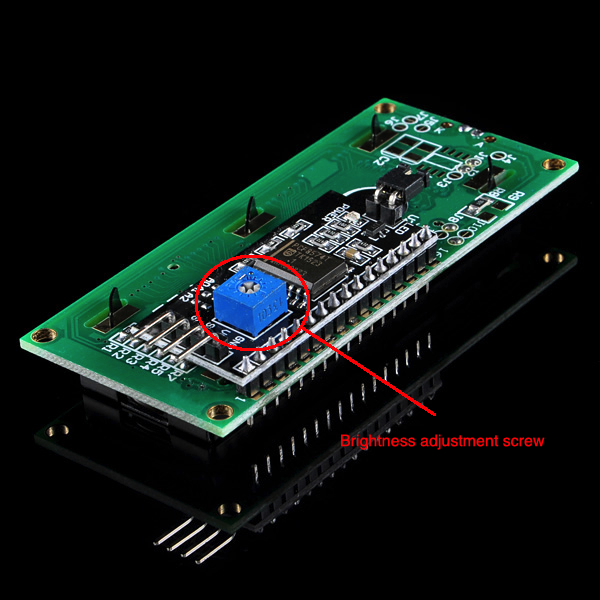
しかし、これらのディスプレイには小さな問題があります。マイクロコントローラ(たとえばArduinoなど)に接続するとき、これらのディスプレイは仮想的に多くの接続ピンを必要とし、ほとんどすべての利用可能なIOを占有し、マルチプロセッサが他のデバイスやセンサーのために出力を残す余地をほとんど残しません。この問題は、I2Cバス上での通信によって解決されています。
LCD1602ディスプレイには、このタイプの通信を処理する統合マイクロチップがあり、入出力情報はすべて2つのピンに限定されます(電源供給を除く)。I2Cは、フィリップスによって開発されたシリアルバスの一種で、2つの双方向ライン、SDA(シリアルデータライン)とSCL(シリアルクロックライン)を使用します。両方のラインは、プルアップ抵抗器を介して接続する必要があります。使用電圧は、標準の5Vおよび3.3Vです。
I2C LCD1602の青いポテンショメータ(下の図を参照)は、バックライトを調整して表示を改善するために使用されます。また、基板にジャンパーがあり、このジャンパーを外すと、バックライトが常にオフになります。
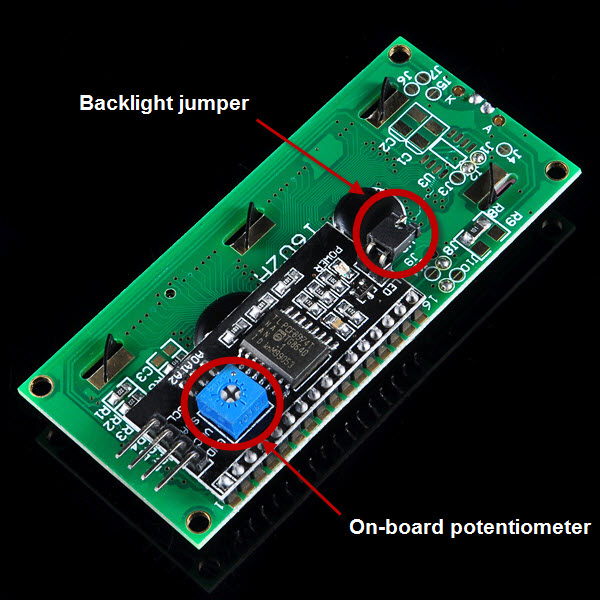
その他の機能の使用については、I2C LCDライブラリのソースコード内のI2C LCD libraryを参照してください。
接続
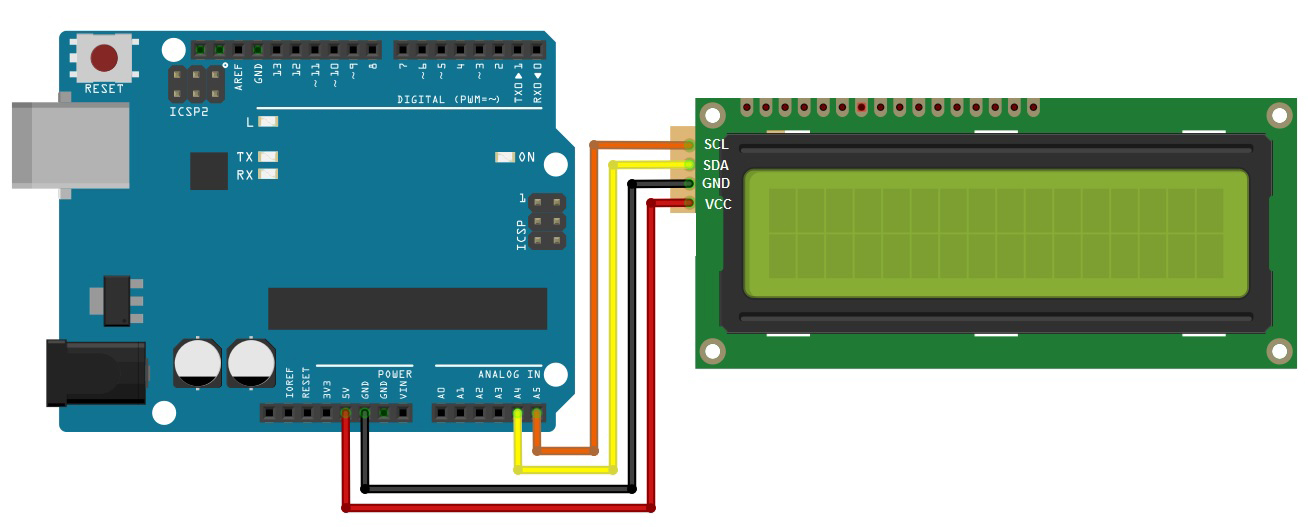
コードを書く前に、回路を構築する必要があります。以下のようにピンを接続してください。
| OSOYOO Basic Board |
LCD1602 |
| GND |
GND |
| 5V |
VCC |
| A4 |
SDA |
| A5 |
SCL |
注意:
- Mega2560の場合:I2Cの接続はSDA=20とSCL=21です。これらと、5VとGND端子に2つの電源リードを接続してください。
- Arduino Leonardoの場合:SDAをOSOYOO Basic Boardのデジタルピン2に、SCLをデジタルピン3に接続してください。
Fritzingのスケッチから、より簡単に接続を確認できます。
I2Cアドレスの検索
各デバイスには、コマンドを受け入れたり、メッセージを送信するために使用するI2Cアドレスがあります。 Unoボードの場合、このアドレスは通常0x27です。しかし、アドレスが0x37、0x24などに変更される場合があります。そのため、デバイスのアドレスを検索しましょう。
ic2_scanner スケッチのzipファイルをダウンロードし、解凍してArduino IDEにロードします。シリアルモニタを開くことで、OSOYOO Basic Boardはアドレス範囲をスキャンして応答を探します。ほとんどのOSOYOO Basic Boardは0x27を表示しますが、別の数値が表示される場合があります。
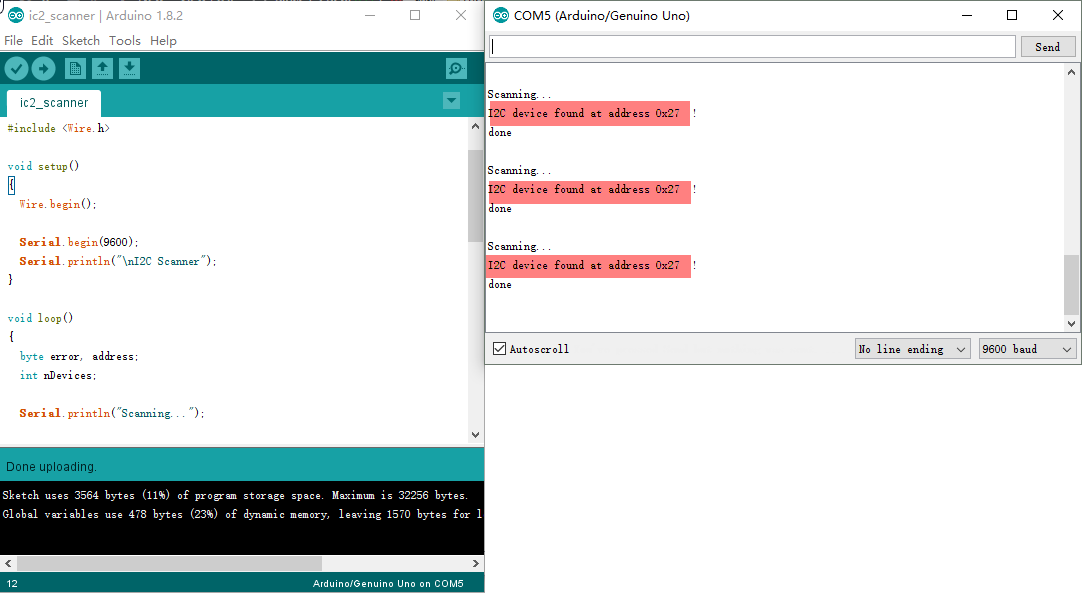
見つけたアドレスをメモしておき、次のステップで使用します。
スケッチのアップロード
上記の操作が完了したら、USBケーブルを使用してOSOYOO Basic Boardをコンピュータに接続してください。緑色の電源LED(PWRとラベルされています)が点灯するはずです。
ライブラリのインストール
OSOYOO Basic BoardとLCDディスプレイをI2Cプロトコルで使用するためには、コードに含めるための特別なライブラリが必要です。このライブラリの名前は「Liquid Crystal I2C」です。このライブラリは、Arduino IDEのlibrariesフォルダに解凍されたzipファイルとしてダウンロードできます( ここからダウンロードできます)。Arduino IDEから直接ダウンロードすることもできます。メニューから「Sketch」>「include Library」>「Add .ZIP library」を選択してください。
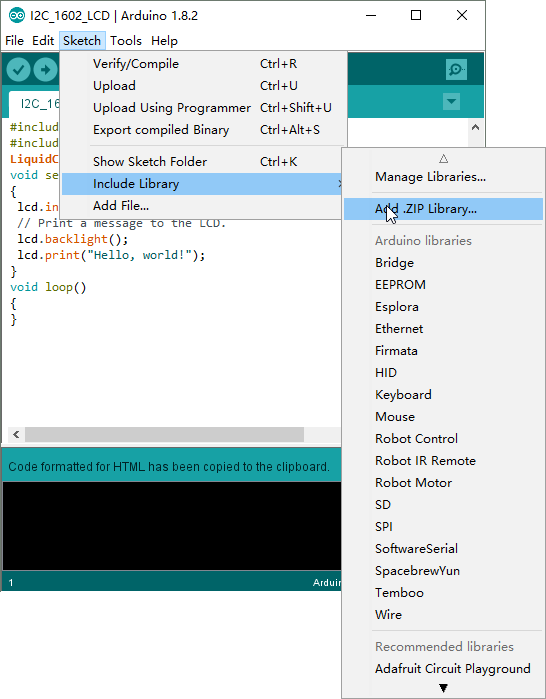
ライブラリのサポート機能
- LiquidCrystal_I2C() //16文字2行表示用のLCDアドレスを設定する
- init() //LCDの初期化
- clear() //ディスプレイをクリアし、カーソル位置を0に設定する
- home() //カーソル位置を0に設定する
- createChar() //最初の8つのCGRAM位置にカスタムキャラクタを設定する
- setCursor() //カーソルの位置を設定する
- cursor() //下線カーソルを表示する
- noCursor() //下線カーソルを非表示にする
- blink() //点滅カーソルを表示する
- noBlink() //点滅カーソルを非表示にする
- display() //ディスプレイをオンにする(素早く)
- noDisplay() //ディスプレイをオフにする(素早く)
- backlight() //バックライトをオンにする
- noBacklight() //バックライトをオフにする
- scrollDisplayLeft() //RAMを変更せずにディスプレイを左にスクロールする
- scrollDisplayRight() //RAMを変更せずにディスプレイを右にスクロールする
- autoscroll() //カーソルから右にテキストを「右揃え」にする
- noAutoscroll() //カーソルから左にテキストを「左揃え」にする
- leftToRight() //左から右に流れるテキスト用
- rightToLeft() //右から左に流れるテキスト用
コードプログラム
以下のリンクからスケッチをダウンロードするか、以下のコードをArduino IDEウィンドウにコピーできます。
#include "Wire.h"
#include "LiquidCrystal_I2C.h"
LiquidCrystal_I2C lcd(0x27,16,2);  // set the LCD address to 0x27 for a 16 chars and 2 line display
void setup()
{
 lcd.init();                      // initialize the lcd
 // Print a message to the LCD.
 lcd.backlight();
 lcd.print("Hello, world!");
}
void loop()
{
}
コンパイルとアップロード
Arduino IDE を開き、OSOYOO Basic Board に対応するボード タイプとポート タイプを選択します。

このスケッチをコンパイルした後、環境内の「アップロード」ボタンをクリックするだけです。数秒待ってください – ボード上のRXとTX LEDが点滅するはずです。アップロードが成功した場合、「アップロードが完了しました。」というメッセージがステータスバーに表示されます。
実行結果
アップロードが完了して数秒後、I2C LCD1602に静的な文字列「Hello, World!」が表示されるはずです。

拡張実験
この実験では、スケッチがOSOYOO Basic BoardとI2C LCDディスプレイの間に接続を作り、2行のテキストを印刷します。最初の行には「Hello all!」、2番目の行には「Welcome to www.osoyoo.com!」というメッセージが表示されます。回路とボード/ポートタイプの設定は、上記の例と同じです。
#include <Wire.h> #include <LiquidCrystal_I2C.h> char array1[]=" Hello all ! "; //the string to print on the LCD char array2[]="Welcome to www.osoyoo.com "; //the string to print on the LCD int tim = 500; //the value of delay time // initialize the library with the numbers of the interface pins LiquidCrystal_I2C lcd(0x27,16,2); // set the LCD address to 0x27 for a 16 chars and 2 line display void setup() { lcd.init(); //initialize the lcd lcd.backlight(); //open the backlight } void loop() { lcd.setCursor(15,0); // set the cursor to column 15, line 0 for (int positionCounter1 = 0; positionCounter1 < 26; positionCounter1++) { lcd.scrollDisplayLeft(); //Scrolls the contents of the display one space to the left. lcd.print(array1[positionCounter1]); // Print a message to the LCD. delay(tim); //wait for 250 microseconds } lcd.clear(); //Clears the LCD screen and positions the cursor in the upper-left corner. lcd.setCursor(15,1); // set the cursor to column 15, line 1 for (int positionCounter = 0; positionCounter < 26; positionCounter++) { lcd.scrollDisplayLeft(); //Scrolls the contents of the display one space to the left. lcd.print(array2[positionCounter]); // Print a message to the LCD. delay(tim); //wait for 250 microseconds } lcd.clear(); //Clears the LCD screen and positions the cursor in the upper-left corner. }
このスケッチをOsoyoo UNOボードにコンパイルしてアップロードすると、I2C LCD1602に「Hello all!」と「Welcome to www.osoyoo.com」の文字列が表示されるはずです。


loving these lessons. well designed, but not as informative in the sketches as I had hoped.
When I try to change the array1 to a longer message (about 40 characters), it only does the first 24 on the first line, the rest is on the second. Is this something I am doing wrong or a limitation to the I2C protocol? (ie. 16 characters on screen, and another 8 in memory?).
adjusted both code samples to include a banner visible via the serial monitor and to blink the backlight in a loop. both to make the examples a bit more dynamic for the case where the LCD darkness is not adjusted well and text cannot be seen — blinking and banner proves code is running even if text is invisible.
—–cut here—–
/* ___ ___ ___ _ _ ___ ___ ____ ___ ____
* / _ \ /___)/ _ \| | | |/ _ \ / _ \ / ___) _ \| \
*| |_| |___ | |_| | |_| | |_| | |_| ( (__| |_| | | | |
* \___/(___/ \___/ \__ |\___/ \___(_)____)___/|_|_|_|
* (____/
*In this sketch, we will show how to use your I2C LCD1602 display the
*static characters: “Hello, World!”
* Tutorial URL https://osoyoo.com/2017/07/09/arduino-lesson-i2c-lcd1602-display/
* CopyRight http://www.osoyoo.com
*/
#include
#include
LiquidCrystal_I2C lcd(0x27,16,2); // set the LCD address to 0x27 for a 16 chars and 2 line display
void setup()
{
Serial.begin(9600);
Serial.println(“\nI2C LCD”);
lcd.init(); // initialize the lcd
// Print a message to the LCD.
lcd.backlight();
lcd.print(“Hello, world!”);
}
void loop()
{
delay(1000);
lcd.noBacklight();
delay(1000);
lcd.backlight();
}
—–cut here—–
/* ___ ___ ___ _ _ ___ ___ ____ ___ ____
* / _ \ /___)/ _ \| | | |/ _ \ / _ \ / ___) _ \| \
*| |_| |___ | |_| | |_| | |_| | |_| ( (__| |_| | | | |
* \___/(___/ \___/ \__ |\___/ \___(_)____)___/|_|_|_|
* (____/
*In this experiment, the sketch will make a connection between
*Arduino and I2C LCD display and then print a text on two lines.
*The first line will display “Hello all !” and second the
*“Welcome to http://www.osoyoo.com !” message.
* Tutorial URL https://osoyoo.com/2017/07/09/arduino-lesson-i2c-lcd1602-display/
* Copyright (c) %YEARDIGITS% http://www.osoyoo.com
*/
#include
#include
// 000000000011111111112222222222
// 012345678901234567890123456789
char array1[]=” Hello all ! “; //the string to print on the LCD
char array2[]=”Welcome to http://www.osoyoo.com “; //the string to print on the LCD
int slen = 30; //max length of strings
int tim = 300; //the value of delay time
// initialize the library with the numbers of the interface pins
LiquidCrystal_I2C lcd(0x27,16,2); // set the LCD address to 0x27 for a 16 chars and 2 line display
void setup()
{
Serial.begin(9600);
Serial.println(“\nI2C Welcome”);
lcd.init(); //initialize the lcd
lcd.backlight(); //open the backlight
}
void loop()
{
lcd.setCursor(15,0); // set the cursor to column 15, line 0
for (int positionCounter1 = 0; positionCounter1 < slen; positionCounter1++)
{
lcd.scrollDisplayLeft(); //Scrolls the contents of the display one space to the left.
lcd.print(array1[positionCounter1]); // Print a message to the LCD.
delay(tim); //wait {tim} microseconds
}
lcd.clear(); //Clears the LCD screen and positions the cursor in the upper-left corner.
lcd.setCursor(15,1); // set the cursor to column 15, line 1
for (int positionCounter = 0; positionCounter < slen; positionCounter++)
{
lcd.scrollDisplayLeft(); //Scrolls the contents of the display one space to the left.
lcd.print(array2[positionCounter]); // Print a message to the LCD.
delay(tim); //wait {tim} microseconds
}
delay(1000);
lcd.clear(); //Clears the LCD screen and positions the cursor in the upper-left corner.
lcd.noBacklight();
delay(500);
lcd.backlight();
}
also corrected a typo in the i2c_scanner sketch
—–cut here—–
/* ___ ___ ___ _ _ ___ ___ ____ ___ ____
* / _ /___)/ _ | | | |/ _ / _ / ___) _ |
*| |_| |___ | |_| | |_| | |_| | |_| ( (__| |_| | | | |
* ___/(___/ ___/ __ |___/ ___(_)____)___/|_|_|_|
* (____/
*In this sketch, we will show how to find the I2C address for the I2C device.
* Tutorial URL https://osoyoo.com/2017/07/09/arduino-lesson-i2c-lcd1602-display/
* Copyright (c) %YEARDATE% http://www.osoyoo.com
*/
#include
void setup()
{
Wire.begin();
Serial.begin(9600);
Serial.println(“nI2C Scanner”);
}
void loop()
{
byte error, address;
int nDevices;
Serial.println(“Scanning…”);
nDevices = 0;
for(address = 1; address < 127; address++ )
{
// The i2c_scanner uses the return value of
// the Write.endTransmisstion to see if
// a device did acknowledge to the address.
Wire.beginTransmission(address);
error = Wire.endTransmission();
if (error == 0)
{
Serial.print("I2C device found at address 0x");
if (address<16)
Serial.print("0");
Serial.print(address,HEX);
Serial.println(" !");
nDevices++;
}
else if (error == 4)
{
Serial.print("Unknown error at address 0x");
if (address<16)
Serial.print("0");
Serial.println(address,HEX);
}
}
if (nDevices == 0)
Serial.println("No I2C devices foundn");
else
Serial.println("donen");
delay(5000); // wait 5 seconds for next scan
}