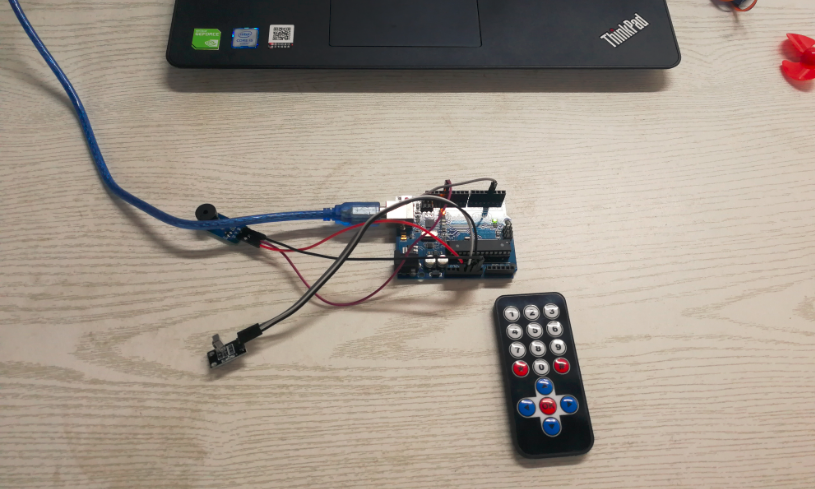
概要
このレッスンでは、アクティブブザーのビープ音を制御する赤外線の使用方法を学んでいきます。
「OK」ボタンを押すと、ブザーが鳴り続け、他のボタンを押すと、音が消えます。

準備
ハードウェア
- Osoyoo UNO Board(アルドゥイーノUNO rev.3と完全互換)x 1
- 赤外線コントローラー
- 赤外線受信機
- アクティブブザーモジュールx 1
- F/Mジャンパー
- USBケーブルx 1
- パソコン x 1
ソフトウェア
ブザーについて
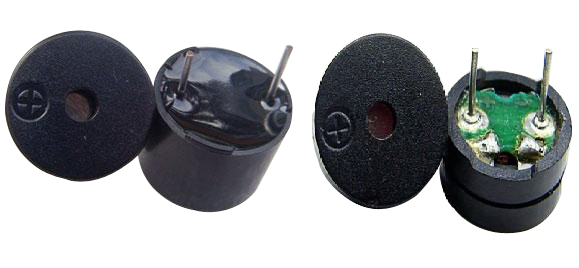
集積構造を持つ電子ブザーの一種として、DC電源から供給されるブザーは、コンピューターをはじめ、プリンター、電子玩具、電話などの幅広い電子製品に使用されています。ブザーはアクティブ/パッシブ構造に分類できます(次の図を参照)。2つのブザーのピンを上に向けると回路基板が見えるので、緑色の回路基板は受動的なブザーです。また黒いテープで囲まれた方がアクティブブザーとなります。
アクティブブザーとパッシブブザーの違いは次のとおりです。

アクティブブザーは振動源が組み込まれているため、通電することで音が発生します。ただし、パッシブブザーには振動源による音は発生しません。代わりに、周波数(2K〜5Kの方形波)を使用して音を発生させます。アクティブブザーは、複数の振動源(発振回路)が組み込まれているため、パッシブブザーよりも高価になっています。このレッスンでは、アクティブブザーを使用した実験を進めていきます。
注意:
アクティブブザーには振動源が内蔵されていることにより、通電中はビープ音が発生します。ただし固定周波数でのみ音が発生します。
接続
ブザーモジュールを下記図のようにOSOYOO UNOボードに接続します。
| OSOYOO UNO |
ブザーモジュール |
| 3.3 V |
VCC |
| GND |
GND |
| D13 |
I/O |

スケッチをアップロード
注:準備が完了したら、アルドゥイーノインストールに次のライブラリをインストールする必要があります!
こちらをクリック–赤外線リモートコントロール:ARgithub.com/shirriff/Arduino-IRremoteDUINO LIBRARY
注意!!ライブラリIRRobotRemoteを備えたアルドゥイーノの最新バージョンを使用している場合、競合する可能性があるので、ライブラリを一旦削除する必要があります。アルドゥイーノ(root)/ libraries / RobotIRremoteを必ず削除してください。アルドゥイーノ(root)はアルドゥイーノのインストールディレクトリを指します。ライブラリRobotIRremoteにはIRremoteと同様の定義があり、エラーが発生します。
上記の操作が完了したら、USBケーブルを使用してアルドゥイーノボードとコンピューターを接続します。緑色の電源LED(ラベルPWR)が点灯します。
コードプログラム
このリンク からスケッチをダウンロードするか、以下のコードをアルドゥイーノIDEウィンドウにコピーします。
#include <IRremote.h>
const int irReceiverPin =3; //受信モジュールのSIGはpin3
const int buzzerPin = 13;//13ピンをブザーに接続します
IRrecv irrecv(irReceiverPin); //IRrecv タイプの変数を作成します
decode_results results;
void setup()
{
  pinMode(buzzerPin,OUTPUT);//ブザーピンを出力として設定します
  digitalWrite(buzzerPin,HIGH);
  Serial.begin(9600);//irrecvを初期化します。
  irrecv.enableIRIn(); // ir受信機モジュールを有効にする
}
void loop()
{
  if (irrecv.decode(&results)) //赤外線受信モジュールの受信データ
  {
    Serial.print("irCode: "); //"irCode: "を送信する出力
    Serial.print(results.value, HEX); //値を16進数で出力します
    Serial.print(", bits: "); //" , bits: " を送信する
    Serial.println(results.bits); //bitsを結果に出力する
    irrecv.resume(); // Receive the next value
  }
  delay(600); //delay 600ms
  if(results.value == 0xFF38C7)//「OK」ボタンを押すと、受信モジュールは0xFF38C7を受信します
  {
    digitalWrite(buzzerPin,LOW);//ブザーのビーブ音(低音)
  }
  else
  {
    digitalWrite(buzzerPin,HIGH);//stop beep
  }
}
コンパイルとアップロード
アルドゥイーノIDEを開き、アルドゥイーノボードに対応するボードタイプとポートタイプを選択します。

スケッチをコンパイルしたら、「アップロード」ボタンをクリックします。数秒待機すると–ボード上のRXとTXのLEDが点滅します。アップロードが成功すると、ステータスバーに「アップロードが完了しました。」というメッセージが表示されます。
実行結果
アップロードが完了後、数秒間を空け「OK」ボタンを押すと、ブザーが鳴り続け、他のボタンを押すと音は消えます。
注意:
アクティブブザーには振動源が内蔵されていることにより、通電中はビープ音が発生します。ただし固定周波数でのみ音が発生します。


Diagram says remove the seal. I did not have a seal on my buzzer. It is also not making any noise when I run the program and hit “ok” on my remote. Is there something I am missing?
No seal will be ok. no need worry.
In order to address your problem, please reply following questions:
1) Did you upload the sketch to arduino? any compiling error?
2)When you press IR remote “OK” button, did you see any response in Arduino Serial monitor?
If yes, please copy paste your result in the the comments.
thanks
1) No errors during compiling.
2) No result was displayed in the serial monitor after pressing the button.
Please advise.
Thanks
Correction the following is being outputted.
irCode: FF38C7, bits: 32
irCode: FF38C7, bits: 32
irCode: FF38C7, bits: 32
irCode: FF38C7, bits: 32
irCode: FF38C7, bits: 32
irCode: FF38C7, bits: 32
irCode: FF38C7, bits: 32
Your IR remote and receiver are working well. Not sure if this is the buzzer problem. please download following test sketch:
https://osoyoo.com/download/buzzer.zip
You will find 3 sketches, buzzer1.ino, buzzer2.ino, buzzer3.ino
tell me which sketches can make your buzzer make noise, which sketch does not make noise.
I will give you solution after getting your answer.
buzzer1.ino worked. The other 2 did not.
Thanks for the support.
Trying to understand the sketches you sent me. It has to do something with the buzzer when it is in the low state, which is 0V being received by the buzzer?
Your test result shows the buzzer is a passive buzzer which can not be alarmed by 1 or 0. It must be alarm by 1/0 loop. So I changed the code for you, please download the sketch from following link:
https://osoyoo.com/download/irbuzzer.zip
After running the sketch, press the OK key and the buzzer should make sound.
By the way, can you tell me what is your purchase link of this kit?
Great thank you. This worked.
I purchased this kit through Amazon. Barcode reads X002BKGVW9 if that helps.
Do you have amazon purchase link? We need to know which learning kit you purchased and update the related tutorial.
thanks
https://www.amazon.com/gp/product/B07XXPW9XP/ref=ppx_yo_dt_b_asin_title_o00_s00?ie=UTF8&psc=1
Hi, Omnion43,
can you leave us a good review in above Amazon purchase link?
Thanks a lot!
The code is wrong
Here is the edited code:-
#include “IRremote.h”
const int irReceiverPin = 3; // the SIG of the receiver module attached to pin 3
const int buzzerPin = 13; // pin 13 connected to a buzzer
IRrecv irrecv(irReceiverPin); // Creates a variable of type IRrecv
decode_results results;
void setup() {
pinMode(buzzerPin, OUTPUT); // set buzzer pin as OUTPUT
digitalWrite(buzzerPin, HIGH);
Serial.begin(9600); // initialize serial
irrecv.enableIRIn(); // enable ir receiver module
}
void loop() {
if (irrecv.decode(&results)) // if the ir receiver module receives data
{
Serial.print(“irCode: “); // print “irCode: ”
Serial.print(results.value, HEX); // print the value in hexadecimal
Serial.print(“, bits: “); // print ” , bits: ”
Serial.println(results.bits); // print the bits
irrecv.resume(); // Receive the next value
}
delay(600); // delay 600ms
if (results.value == 0xFF38C7) // if the “OK” button is pressed, the receiver module will receive 0xFF38C7
{
alarm();
}
}
void alarm() {
for (int i = 0; i < 150; i++) { // declare and initialize 'i' before using it in the loop
digitalWrite(buzzerPin, LOW);
delay(1); // wait for 1ms
digitalWrite(buzzerPin, HIGH);
delay(1); // wait for 1ms
}
}
The error was that the variable 'i' was not being declared before its use in the 'alarm()' function. To fix this issue, you need to declare the variable 'i' and initialize it before using it in the 'for' loop.