1.ご注意
2.ご紹介
3.特長
4.仕様
5.使用方法
5.1必要なパーツ
5.2使い方
6.上手な使いかた
6.1画面を回転する方法
6.2画面を回転する方法
6.3明るさを調整する方法
1. 5inch IPS DSI screen for Raspberry Pi
| Buy from OSOYOO |
Buy from US |
Buy from UK |
Buy from DE |
Buy from IT |
Buy from FR |
Buy from ES |
Buy from JP |
 |
 |
 |
 |
 |
 |
 |
 |
2. 5inch TN DSI screen for Raspberry Pi
3. DSI cable for Raspberry Pi 5
| Buy from OSOYOO |
Buy from US |
Buy from UK |
Buy from DE |
Buy from IT |
Buy from FR |
Buy from ES |
Buy from JP |
 |
 |
 |
 |
 |
 |
 |
 |
4. DSI cable for Raspberry Pi 4
| Buy from OSOYOO |
Buy from US |
Buy from UK |
Buy from DE |
Buy from IT |
Buy from FR |
Buy from ES |
Buy from JP |
 |
 |
 |
 |
 |
 |
 |
 |

1. ご注意
- このLCDディスプレイは、Raspbian、Ubuntu MATE、Snappy Ubuntu Core、OSMC、およびWindows10 IOT Coreなどをサポートしています。 ラズベリーパイの公式ウェブサイトからOSをダウンロードしてください:https://www.raspberrypi.org/downloads/
- OSをMicroSDに書き込む際は容量を確認してから実行してください。
- 電源が入っているときや、手に静電気が帯電しているときは、ラズベリーパイボードに触れないでください(金属タップに触れることで静電気を払うことができます)。
2. はじめに
5インチLCDディスプレイは、DSIコネクタを介してラズベリーパイに接続します。ドライバをインストールする必要はなく自動で設定されます。LCDディスプレイの物理解像度は800×480です。
3. 機能
- ラズベリーパイボードへ接続するには、DSIインターフェースのみを使用します。
- 周波数は60Hz。
- 物理解像度は800×480で24ビットカラーです。800×480~1920×1080までの解像度を調整可能。
- サイズは12.1×7.63cm。
- 静電容量式で10本の指全てに対応(ラズベリーパイでは1本指だけ使用します)
- 視野角: 上-50 下-70 左-70 右-70
- 自動設定によりドライバー不要。
- システムはRaspbian、Ubuntu MATE、Snappy Ubuntu Core、OSMC、Windows10 IOT Coreなどをサポート。
- 強い混信防止能力
- データを全く損なわずに復元できるloosless圧縮方式、省エネ仕様です。
- 未使用時は自動スリープモードに移行。
- ラズベリーパイゼロ以外のすべてのラズベリーボードをサポートしています(PI A、PI BはGPIOピンにI2Cを使用する必要があります)。
4. 仕様
| 項目 |
単位 |
最小 |
タイプ |
最大 |
| サイズ |
cm |
— |
12.1×7.63 |
— |
| 物理解像度 |
— |
— |
800×480 |
— |
| 周波数 |
HZ |
— |
60 |
— |
| 定格出力 |
mw |
750 |
800 |
830 |
| バックライト電源 |
mw |
650 |
700 |
750 |
| メインチップ |
mw |
40 |
50 |
90 |
| 伝送距離 |
cm |
– |
10 |
60+ |

5. 使い方
5.1 必要な部品
以下の部品が必要になります。
- ラズベリーパイA / B / 2/3 / 3B +(PI A、PI BはGPIOピンにI2Cを使用する必要があります)×1
- 電源USBアダプタ×1
- 電源USBケーブル×1
- 5インチDSIタッチスクリーン×1
- マイクロSDカード(新型および16GBまで)×1
- TFカードリーダー×1

5.3 使うための初期設定
5インチDSIタッチスクリーンはRaspbian、Ubuntu MATE、Snappy Ubuntu Core、OSMC、Windows10 IOT CoreなどのIMGシステムをサポートしています。
①下記URLからラズベリーパイの公式ウェブサイトからイメージ化されたOSをダウンロードしてください。
https://www.raspberrypi.org/downloads/

②ダウンロードしたデータを解凍します。
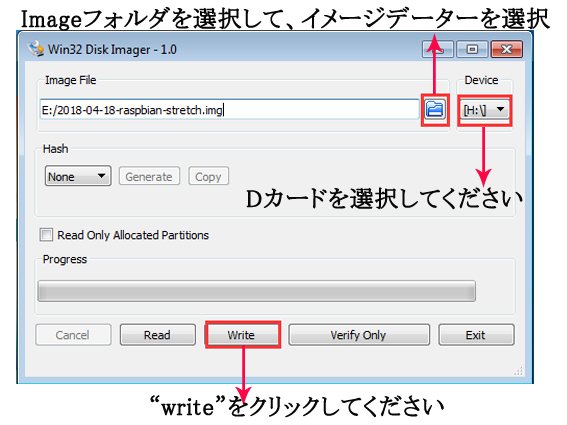
③カードリーダーにSDカードを挿入し、コンピューターに接続したら、OSイメージを書き込んでいきます。書き込み方法はファイルとSDカードを選択して「書き込み」をクリックします。
書き込みツールは下記URLからダウンロードしてください。
(https://sourceforge.net/projects/win32diskimager/)

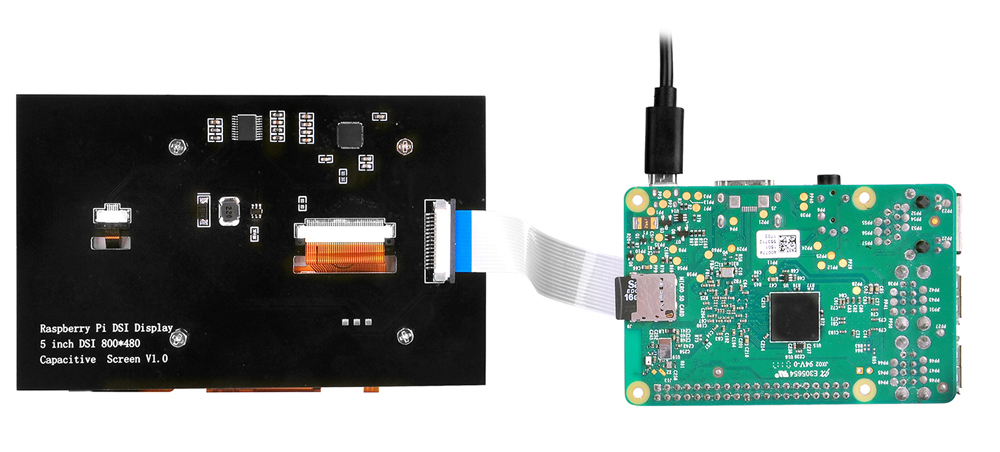
④ラズベリーパイボードにSDカードを挿入し、以下のように5インチDSIタッチスクリーンを組み立てます。

⑤電源を入れてシステムが起動するのを待ちます(注:電源が入っているときや手に静電気が帯電しているときは、ラズベリーパイボードに触れないでください)。起動したら下記画像のような画面が表示されるので、表示されたら初期設定は完了です。

6. 高度な設定
6.1 解像度を調整する方法
注意: この方法はRaspberry Pi Legacy OS のみ対応しています。Raspberry Pi BOOKWORM OS を使用する場合、DSIスクリーンの解像度は調整できません。
物理的な解像度は800×480ですが、解像度形式は800×480から1920×1080まで調整できます。OSシステムをインストールしたmicro SDカードを開き、Notepad ++で “/boot/config.txt”を開き、以下の行を見つけます。

1920×1080にする場合、以下のように調整してこのファイルを保存してください。
framebuffer_width=1920
framebuffer_height=1080
注意点:
1.半角英数字でご入力
2.# はソースコードを無効(コメント)にすることですので、必ずソースコード前の#を削除してくださいませ。
3. ラズパイ4をご使用する場合、/boot/config.txt の「dtoverlay=cv4-kms-v3d」をすべて削除してくださいませ。下記の画像をご参照よろしくお願いいたします
6.2 ディスプレイ表示の向きを調整する方法
注意: この方法はRaspberry Pi Legacy OSのみ対応しています
LCDディスプレイには最適な視野角があるので、場合によっては表示の向きを変更する必要があります。Raspberry Piのデフォルト設定では、標準表示に設定されていますので、仮にモニター本体を上下逆さまにして用いる必要があるなら、見やすいようにシステム上で画面の表示を調整する必要があります。
Terminalウィンドウで下記のコマンドを入力し作動します:
sudo nano /boot/config.txt
必要な回転角度による次の行を選択して、ファイル\ boot \ config.txtに追加します:
1) 表示画面を0°回転する:
(編集必要ありません)
2) 表示画面を90°回転する:
display_lcd_rotate=1
dtoverlay=rpi-ft5406,touchscreen-swapped-x-y=1,touchscreen-inverted-x=1
3) 表示画面を180°回転する:
display_lcd_rotate=2
dtoverlay=rpi-ft5406,touchscreen-inverted-x=1,touchscreen-inverted-y=1
4) 表示画面を270°回転する:
display_lcd_rotate=3
dtoverlay=rpi-ft5406,touchscreen-swapped-x-y=1,touchscreen-inverted-y=1
内容を入力完了すると、キーボードのCtrlとXを同時に押して、Yを入力して、ファイルを保存します。
sudo rebootを入力し作動して、ラズパイを再起動します。
6.3 明るさを調整する方法
次の設定はRaspbianに基づいています
(1)ターミナルで下記のコマンドを実行して、ユーザー権限rootにを切り替えます。
sudo su root
(2) ターミナルで次のコマンドを実行して、ディスプレイの輝度を調整します(輝度値100を0から255までの任意の数値に変更してきます)
echo 100 > /sys/class/backlight/rpi_backlight/brightness
詳しくは次の文章へどうぞ~ https://elinux.org/RPiconfig
ソフトキーボード(Raspbian 対応)のインストールについては、下記の文章をご覧ください:  https://osoyoo.com/ja/2019/04/09/osoyoo-7inch-hdmi-touchscreen-keyboard-matchbox-keyboard/


 https://osoyoo.com/ja/2019/04/09/osoyoo-7inch-hdmi-touchscreen-keyboard-matchbox-keyboard/
Dear Sirs:
H have an Osoyoo capacitive touch screen. It works fine on the raspi explorer screen. But when a user program is run, touch does not work
but an external keyboard does work.
Any suggestions?
thanks
John Moore
Please take photos or videos about the issue and send to my email address: [email protected]?
Is there any way to adjust the contrast? I am struggling to see many colors, as they blend together to easy. Any help would be a godsend. thank you
It can’t adjust the contrast. I think you can order V2.0 screen which is IPS screen.
I used the display for a media center with Kodi. Works perfectly.
Please refer
https://www.thingiverse.com/thing:4570624
Thanks for your sharing.
Hello, is there a way to increase the sensitivity of the touchscreen? I’m using Raspberry Pi OS and some times my finger is not detected and I need to touch the screen with a little more pressure.
Thanks
It can’t adjust the sensitivity now, but I’ll contact with our engineer to improve this issue.
How can I make this screen work with a Raspberry Pi 5? I have the correct cable, but when I turn the unit on there is no display.
You need to use OSOYOO MIPI cable for Pi 5. Here is the link:
https://osoyoo.store/products/raspberry-pi-5-fpc-flex-cable
Don’t use other vendor’s cable because they might not work with this screen.
following these instructions including the video of commenting the #dtoverlay=vc4-kms-v3dnline on a rpi4 causes the screen to go blank. Is there any modern instructions available. I just bought several of these screens for a prototype project. If I can get it to work , Ill be buying a lot of them for an industrial application. I have the screen working, but virtual keyboards are not working.
I think this is the OS issue, same as the virtual keyboards, if you have more questions, please contact me by [email protected], its better to give us more details..
Hello, I can only get the display to work on my Raspberry 5 under Pi OS “2023-12-05-raspios-bookworm-arm64”. The display doesn’t work with Picoreplayer 9.01
and Libreelec Omega. It doesn’t work with the latest PI OS from 2024.04.15 either. It only runs under kernel 6.1.0 or lower.
2024-03-15-raspios-bookworm-arm64.img,I just installed the lasted OS, and the display works fine with it, could you send me more details? or contact me by [email protected]