OSOYOO 3.5インチ HDMI タッチスクリーン – Bookworm & Trixie セットアップガイド
製品名: OSOYOO 3.5インチ HDMI 抵抗膜方式タッチスクリーン
対応OS: Raspberry Pi OS Bookworm & Trixie (2025-05-13 以降)
対応機種: Raspberry Pi 5, 4, 3B+, 3, 2, Zero
キャリブレーション方法: evtest + config.txt
ケース付き3.5インチ HDMIスクリーンを購入:
1はじめに
このチュートリアルでは、最新の Bookworm および Trixie オペレーティングシステムを搭載した Raspberry Pi で OSOYOO 3.5インチ HDMI 抵抗膜方式タッチスクリーン をセットアップする方法を説明します。この方法では、正確なタッチ調整のために evtest キャリブレーション手法を使用します。
主な特徴
- 解像度: 物理 480×320、最大 1920×1080 入力をサポート
- タッチ方式: XPT2046 抵抗膜方式タッチパネル
- インターフェース: 表示用HDMI、タッチデータ用GPIO
- 互換性: Raspberry Pi 5, 4, 3B+, 3, 2, Zero シリーズ
新機能: このチュートリアルでは、キャリブレーションを簡素化するために config.txt で swapxy=1 パラメータを使用し、正確なタッチ境界を測定するために evtest ツールを使用します。
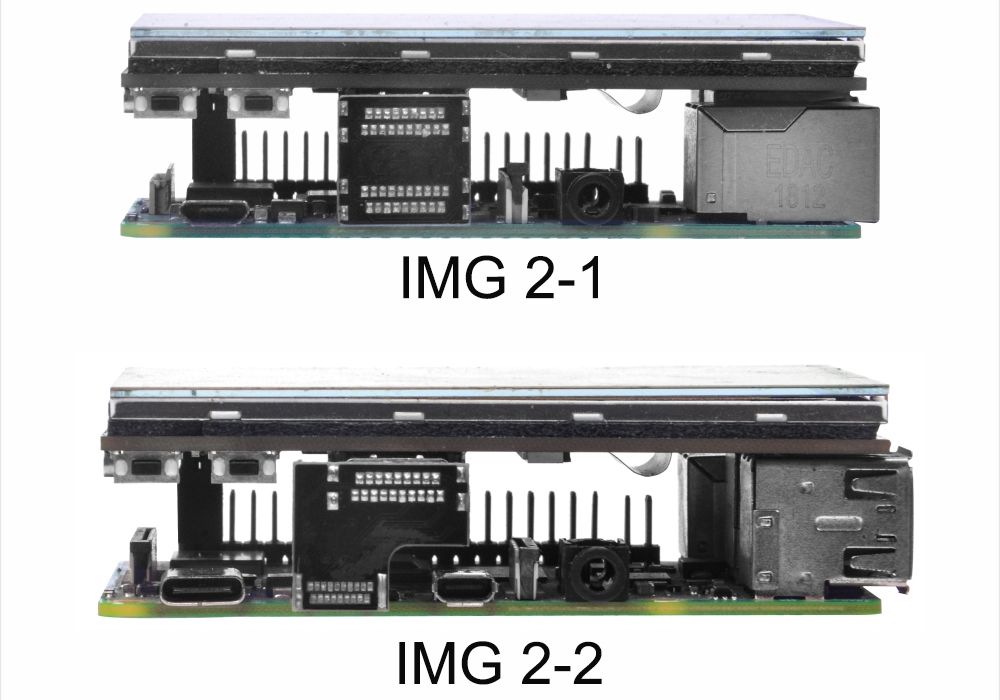
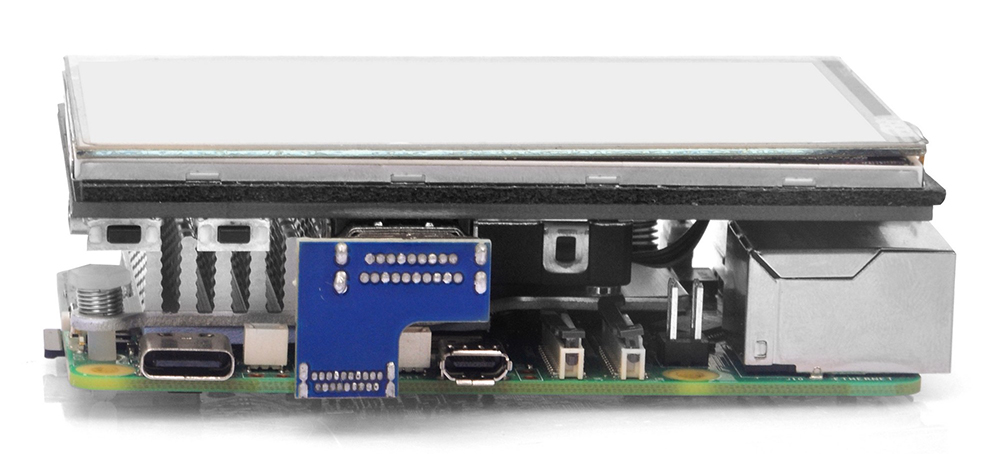
2ハードウェアの接続
1. GPIOインターフェースの接続
Raspberry Piには40本のGPIOピンがあり、スクリーンには12本のピンがあります。接続する際は、対応するピンとRaspberry Piのピンに注意してください。
2. HDMIコネクタの接続
HDMIコネクタをスクリーンのHDMIポートとPiに接続します。
注: Raspberry Pi Zero / Zero 2 Wを接続するには、別途HDMIケーブルが必要です。
ハードウェアの接続は以下の通りです (Pi3B+/Pi4/Pi5):
3イメージとドライバーのインストール
2) After the image has finished writing, open the config.txt file in the root directory of the TF card, add the following code at the end of config.txt, then save and quit the TF card safely.
hdmi_force_hotplug=1
hdmi_group=2
hdmi_mode=87
dtoverlay=bw-ads7846,penirq=25,xmin=3900,xmax=240,ymin=240,ymax=3900,speed=50000,swapxy=1
3) Download the bw-ads7846.dtbo file. Copy this file to the overlays directory (/boot/overlays/).
または、Raspberry Piをネットワークに接続した後、SSH経由で bw-ads7846.dtbo をダウンロードすることもできます:
sudo wget -O /boot/firmware/overlays/bw-ads7846.dtbo https://osoyoo.com/driver/HDMI-3.5/bw-ads7846.dtbo
4) Quit the TF card safely.
5) Insert the TF card into the Raspberry Pi, power on the Raspberry Pi, and wait for more than 10 seconds to display normally. Generally, touch functions will work normally after system restart. However, if touch inaccuracies occur, perform touch calibration following next steps.
6) Change the Screen Configuration
Raspberry Pi アイコン → 設定 → コントロールセンター → スクリーン をクリックし、新しいウィンドウで layout → screen → HDMI → resolution → 640×480 をクリックして、Apply をクリックし、ポップアップで OK をクリックします。解像度は 640×480 に設定することをお勧めします。
注: Raspberry Pi OS Bookworm ブランチのシステムでは、dtoverlay=vc4-kms-v3d がデフォルトでロードされるため、/boot/config.txt で解像度を変更しても無効です。
4タッチキャリブレーション
タッチカーソルが指の位置と一致しない場合は、config.txt で制限値をキャリブレーションする必要があります。swapxy=1 を使用しているため、ndard X and Y definitions are transposed. Use this guide to ensure perfect alignment.
ハードウェアの測定
タッチパネルには製造上の個体差がわずかにあります。evtest ツールを使用して、特定のスクリーンの Raw Absolute Values(生の絶対値) を取得します。
インストールと実行:
sudo apt-get install evtest -y
sudo evtest
デバイスの選択:
ADS7846 Touchscreen に対応する ID を選択します。(表示されるシリアル番号は、ユーザーの実際のシリアル番号によって異なる場合があります)
各端をタッチして、表示された平均値を記録します:
| 物理的な端 |
この evtest 値を記録 |
パラメータへのマッピング |
| 上端 |
ABS_Y 上部の値 |
→ xmin |
| 下端 |
ABS_Y 下部の値 |
→ xmax |
| 左端 |
ABS_X 左側の値 |
→ ymin |
| 右端 |
ABS_X 右側の値 |
→ ymax |
Config.txt テンプレート
/boot/firmware/config.txt で、このベースラインを使用します:
dtoverlay=bw-ads7846,penirq=25,xmin=[ABS_Ymax],xmax=[ABS_Ymin],ymin=[ABS_Xmin],ymax=[ABS_Xmax],speed=50000,swapxy=1
キャリブレーションの例
測定値が以下の場合:
- ABS_Xmin = 280
- ABS_Xmax = 4000
- ABS_Ymin = 200
- ABS_Ymax = 3500
設定ファイルを編集する必要があります:
sudo nano /boot/firmware/config.txt
元の設定は以下の通りでした:
dtoverlay=bw-ads7846,penirq=25,xmin=3900,xmax=240,ymin=240,ymax=3900,speed=50000,swapxy=1
上記の内容を以下に置き換えます:
dtoverlay=bw-ads7846,penirq=25,xmin=3500,xmax=200,ymin=280,ymax=4000,speed=50000,swapxy=1
保存して終了: Ctrl+O を押し、次に Enter、最後に Ctrl+X を押します。
これが現在のタッチデバイスのより正確なタッチ範囲です。最後に以下を入力して再起動し、設定を反映させます:
sudo reboot
トラブルシューティングと微調整
sudo reboot の後、カーソルがまだ端まで届かない場合は、以下の簡単なルールに従って数値を調整してください:
| カーソルが… |
対処方法 |
| 上端の手前で止まる |
増やす the xmin value |
| 下端の手前で止まる |
減らす the xmax value |
| 左端の手前で止まる |
減らす the ymin value |
| 右端の手前で止まる |
増やす the ymax value |
5画面の向きの設定
Raspberry Pi アイコン → 設定 → Screen Configuration をクリックし、新しいウィンドウで layout → screen → HDMI → orientation → 適切な方向を選択 し、Apply をクリックして、ポップアップで OK をクリックします。
重要: 回転が完了した後、上記の手順に従ってタッチを再キャリブレーションする必要があります。
6テクニカルサポート
サポートが必要な場合やフィードバックがある場合は、チケットを送信してください。当チームが1~2営業日以内に返信いたします。
営業時間: 午前9時 ~ 午後6時 GMT+8 (月曜日 ~ 金曜日)
お問い合わせ: [email protected]