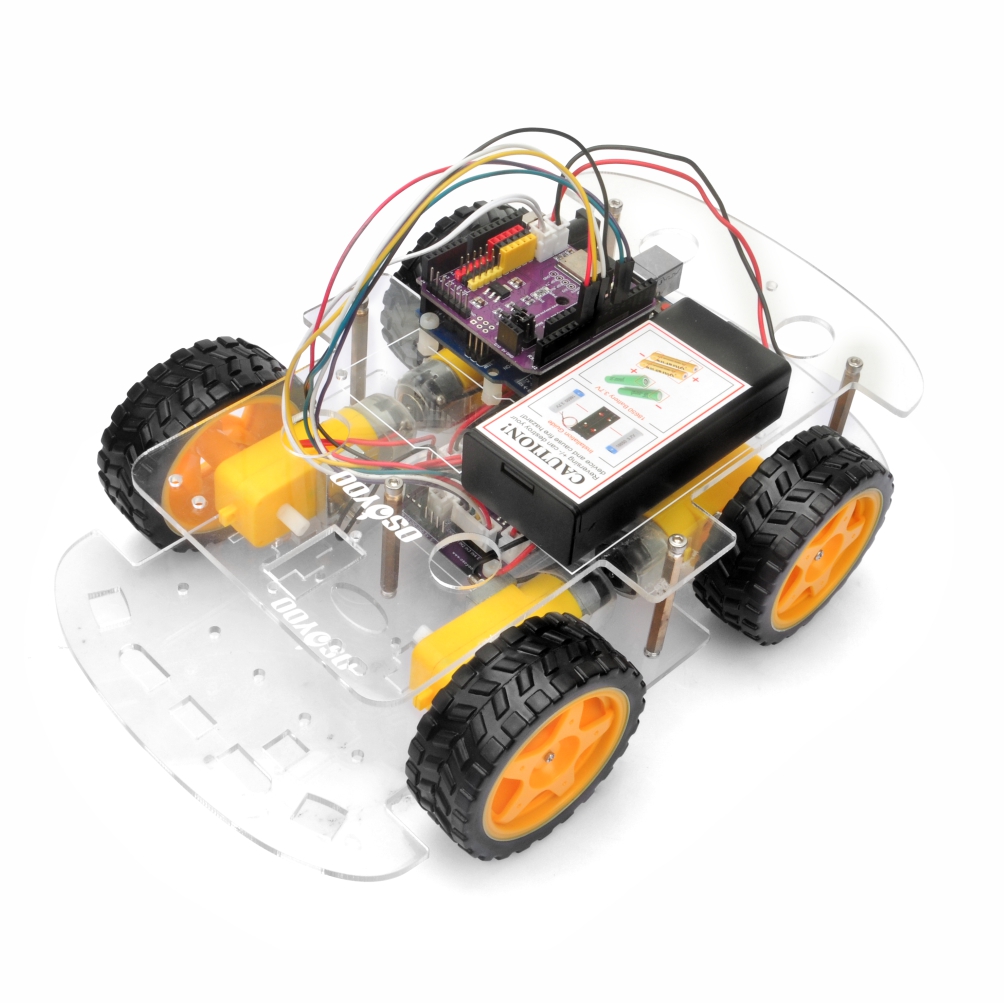
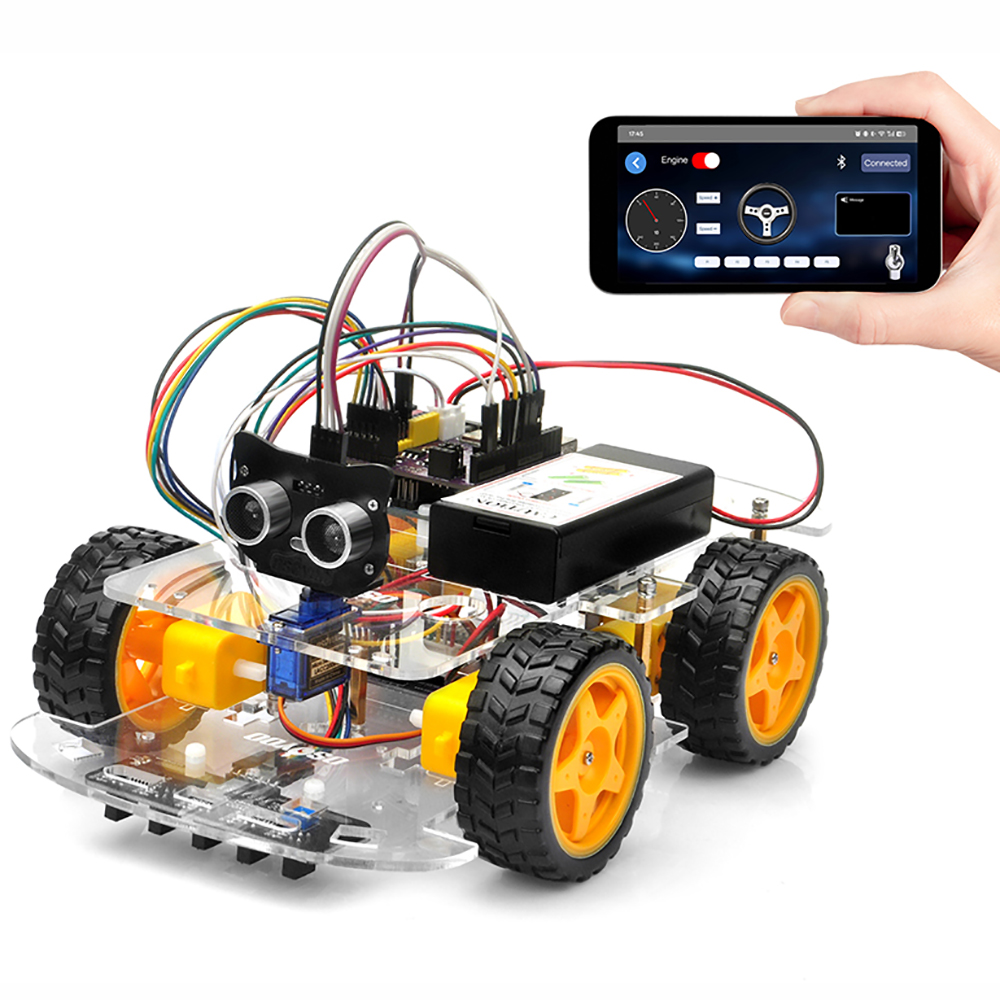
In this lesson, you will control your OSOYOO V3 Robot Car wirelessly using a Bluetooth Low Energy (BLE)-enabled smartphone and the OSOLINK WiFi/BLE I/O Shield.
Powered by the onboard ESP32-C3 wireless module, the OSOLINK Shield provides reliable BLE communication between your smartphone and the Arduino controller. Unlike WiFi communication, BLE offers a simple, low-power, and direct connection without requiring a wireless router or network configuration, making it ideal for local robot control and classroom demonstrations.
To create a more immersive driving experience, the OSOYOO Robot App features a virtual steering wheel, gear selector, and motion-based controls. By combining the smartphone’s built-in sensors with BLE communication, you can operate the robot in a way that closely resembles driving a real vehicle.
Because the OSOLINK Shield integrates both WiFi and Bluetooth Low Energy on a single ESP32-C3 module, the same hardware platform can support multiple wireless communication methods without requiring additional expansion boards. This flexible architecture makes it an ideal platform for learning embedded systems, wireless networking, and IoT robotics.
In this lesson, you will learn how modern robots use Bluetooth Low Energy technology for responsive wireless control and how the OSOLINK Shield bridges communication between the mobile application and the Arduino-based robotic platform.
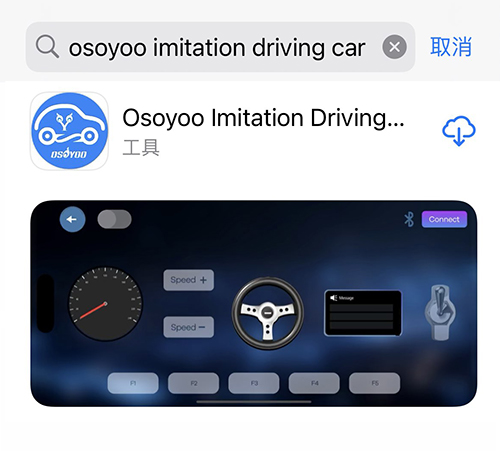
search “OSOYOO imitation driving” in
Google Play Google Play or Apple APP store
(Note: If you can not find this APP in Google Play,
you can directly download the APP from following link: https://osoyoo.com/test/mockdrive.apk )
Step 1: Install APP into your mobile device: In Google Play store or APP store search APP name “OSOYOO imitation driving”, download the APP and install it in your device
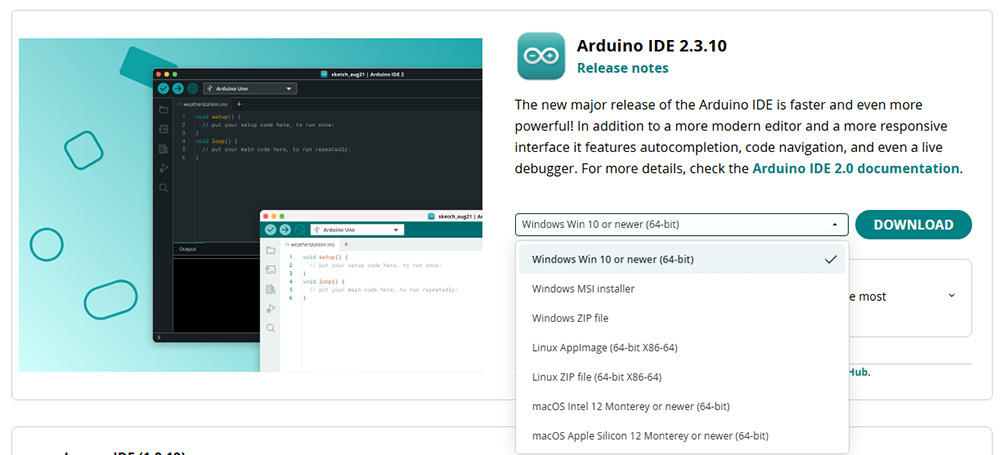
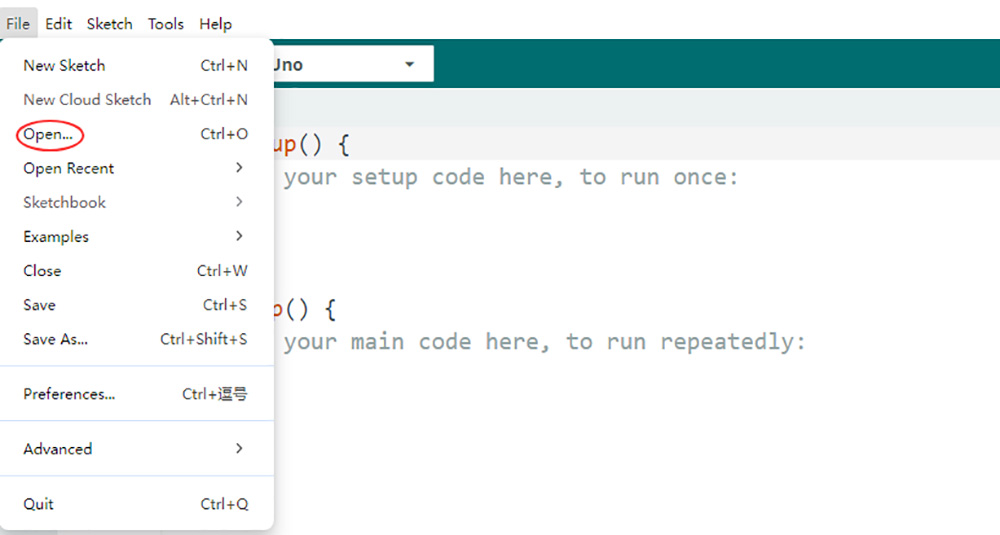
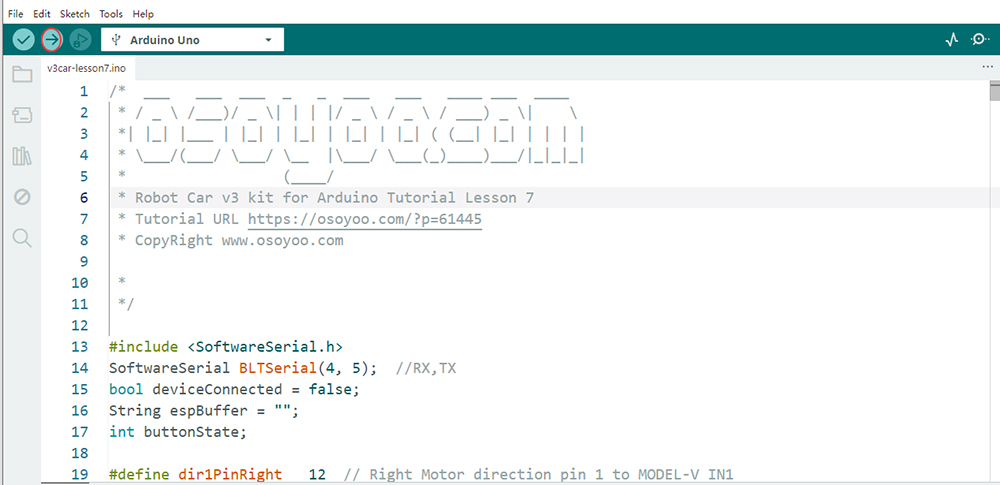
Step 3. Code Acquisition: Download the provided sample code for Lesson 7 from here. Extract the contents and you will get a v3car-lesson7.ino in the folder v3car-lesson7. Open the v3car-lesson7.ino sketch in the Arduino IDE.
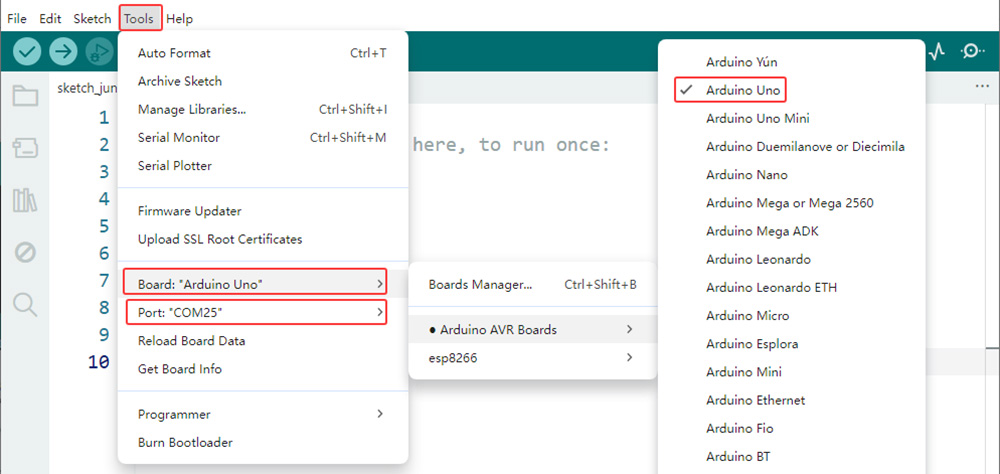
Step 4. Board and Port Selection: Connect the OSOYOO Basic Board (compatible with Arduino UNO) to your computer via a USB cable(Crucially, ensure the robot car’s power switch is OFF and the battery is disconnected before connect the board to your PC). Launch the Arduino IDE. Navigate to Tools > Board and select Arduino Uno. Then, go to Tools > Port and select the appropriate serial port. If unsure, check your operating system’s device manager for the assigned port.
Step 5. Code Upload: Click the “Upload” button (right arrow icon) to compile and transfer the sketch to OSOYOO Basic Board.
Step 6. Found the the BLE device address
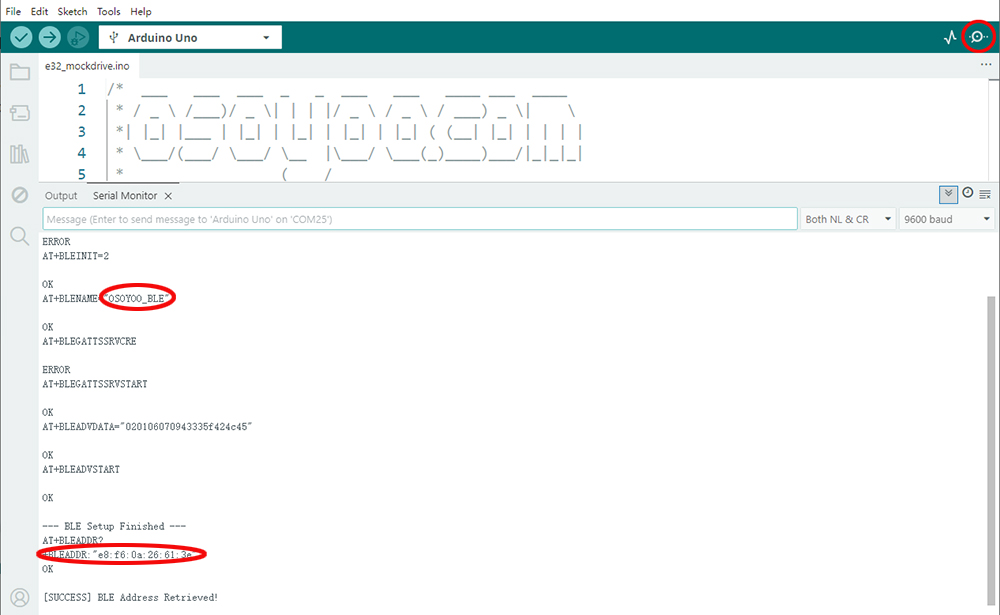
Click Serial Monitor (at right upper corner), wait a moment, then you should see as following. Write down the BLE Address shown in above red circle. You need to connect this BLE device in the Imitation Driving APP.
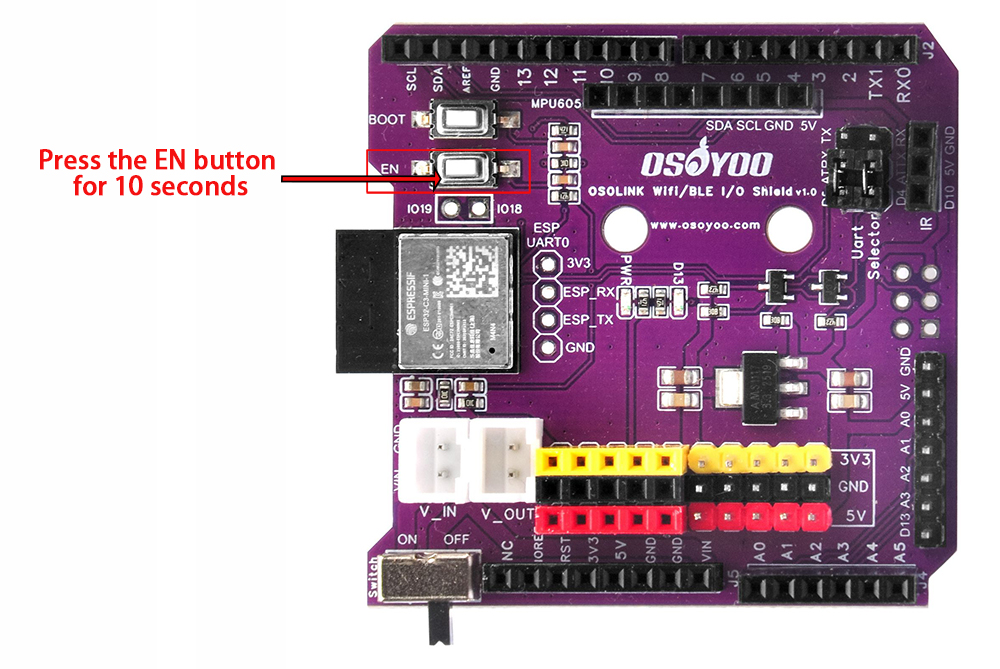
Note: If you wait for more than 1 minute and the serial monitor doesn’t show as upper, or your device don’t find the BLE deivce as APP setting, please press EN button for 10 second and click serial monitor again.
5APP setting
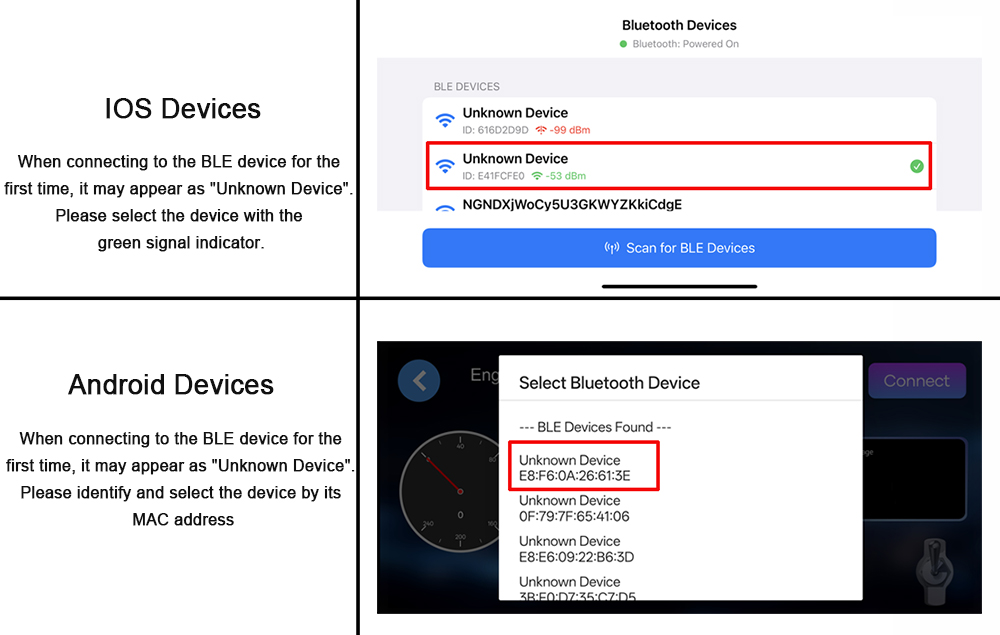
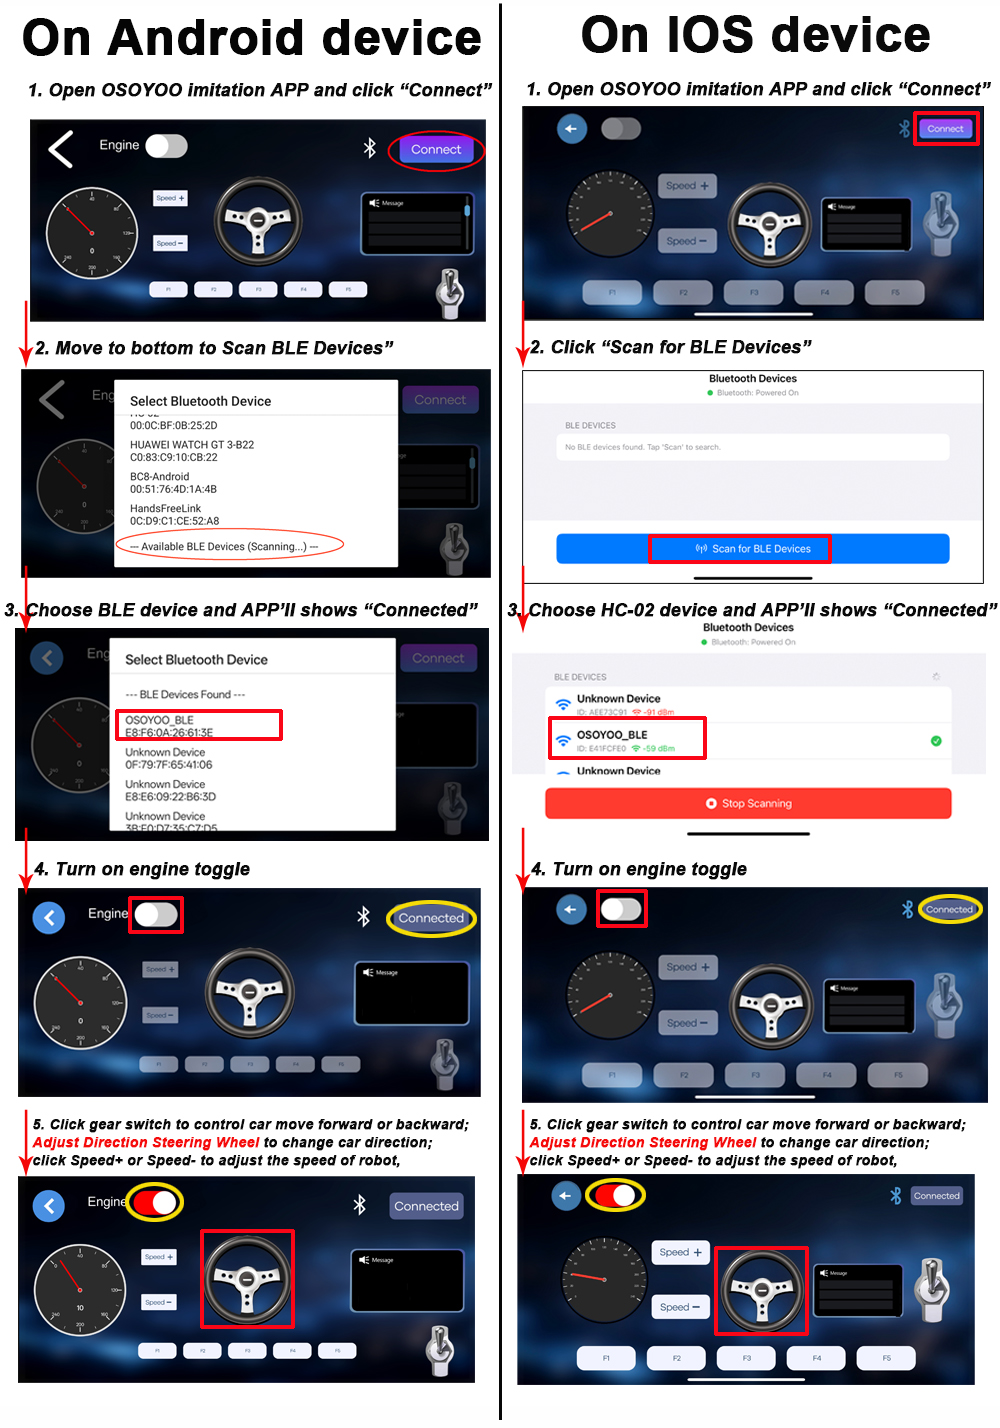
Step 1: Download and Install OSOYOO Imitation Driving APP, and install APP in your cell phone. Step 2: Please put your robot Car on the ground, turn on the battery power. Wait until the D13 LED (in the central of the ESP32 Wifi board) Blink 3 times which means E32 BLE signal is ready for connection. Step 3 : Connect with iOS/Android device. Enter the APP, and click the “connect” at the upper-right conner. When connecting to the BLE device for the first time, it may appear as “Unknown Device”.
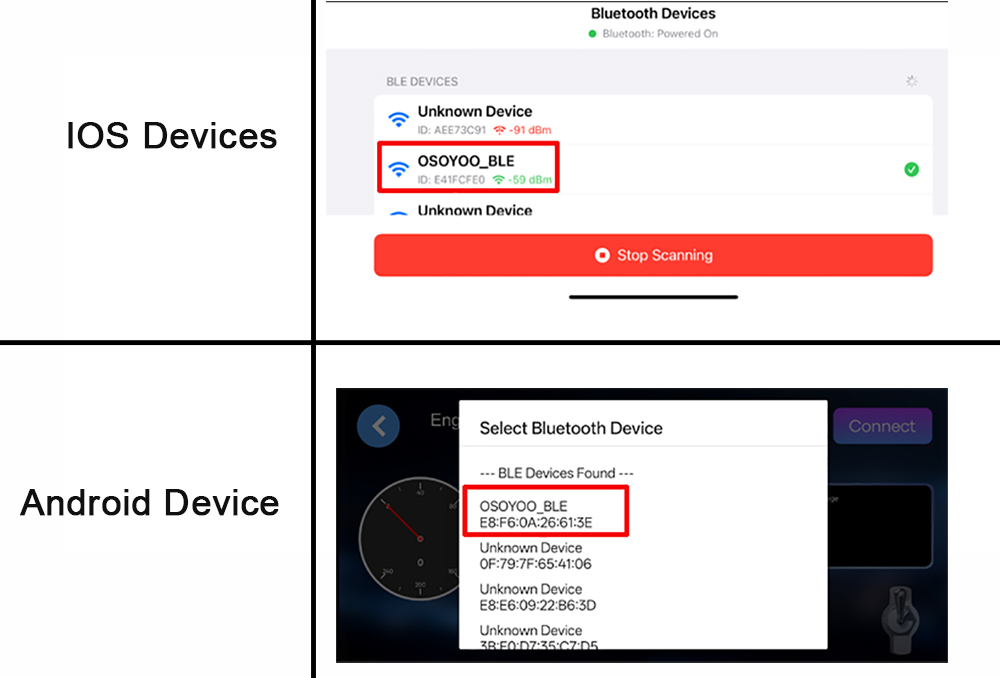
After the first successful connection, the device name will be displayed as following
Note:
When the device is powered on for the first time, your devices may temporarily display it as “Unknown Device” during Bluetooth scanning. This is a normal behavior of the Bluetooth system. Once the phone connects to the device, it reads and stores the Bluetooth name (“OSOYOO BLE”). From then on, the correct device name will be displayed in future scans.
This does not affect the Bluetooth connection or any functions of the device.
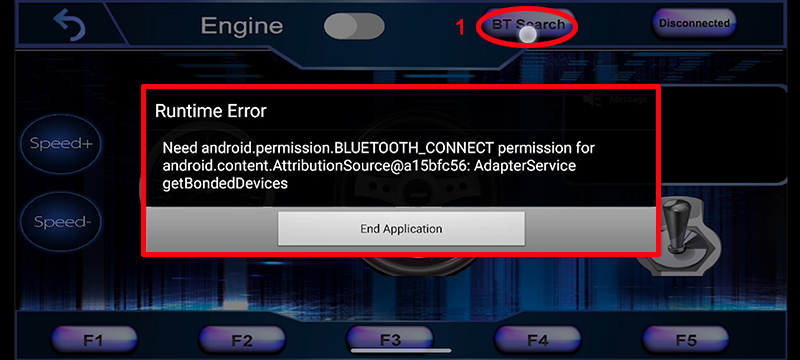
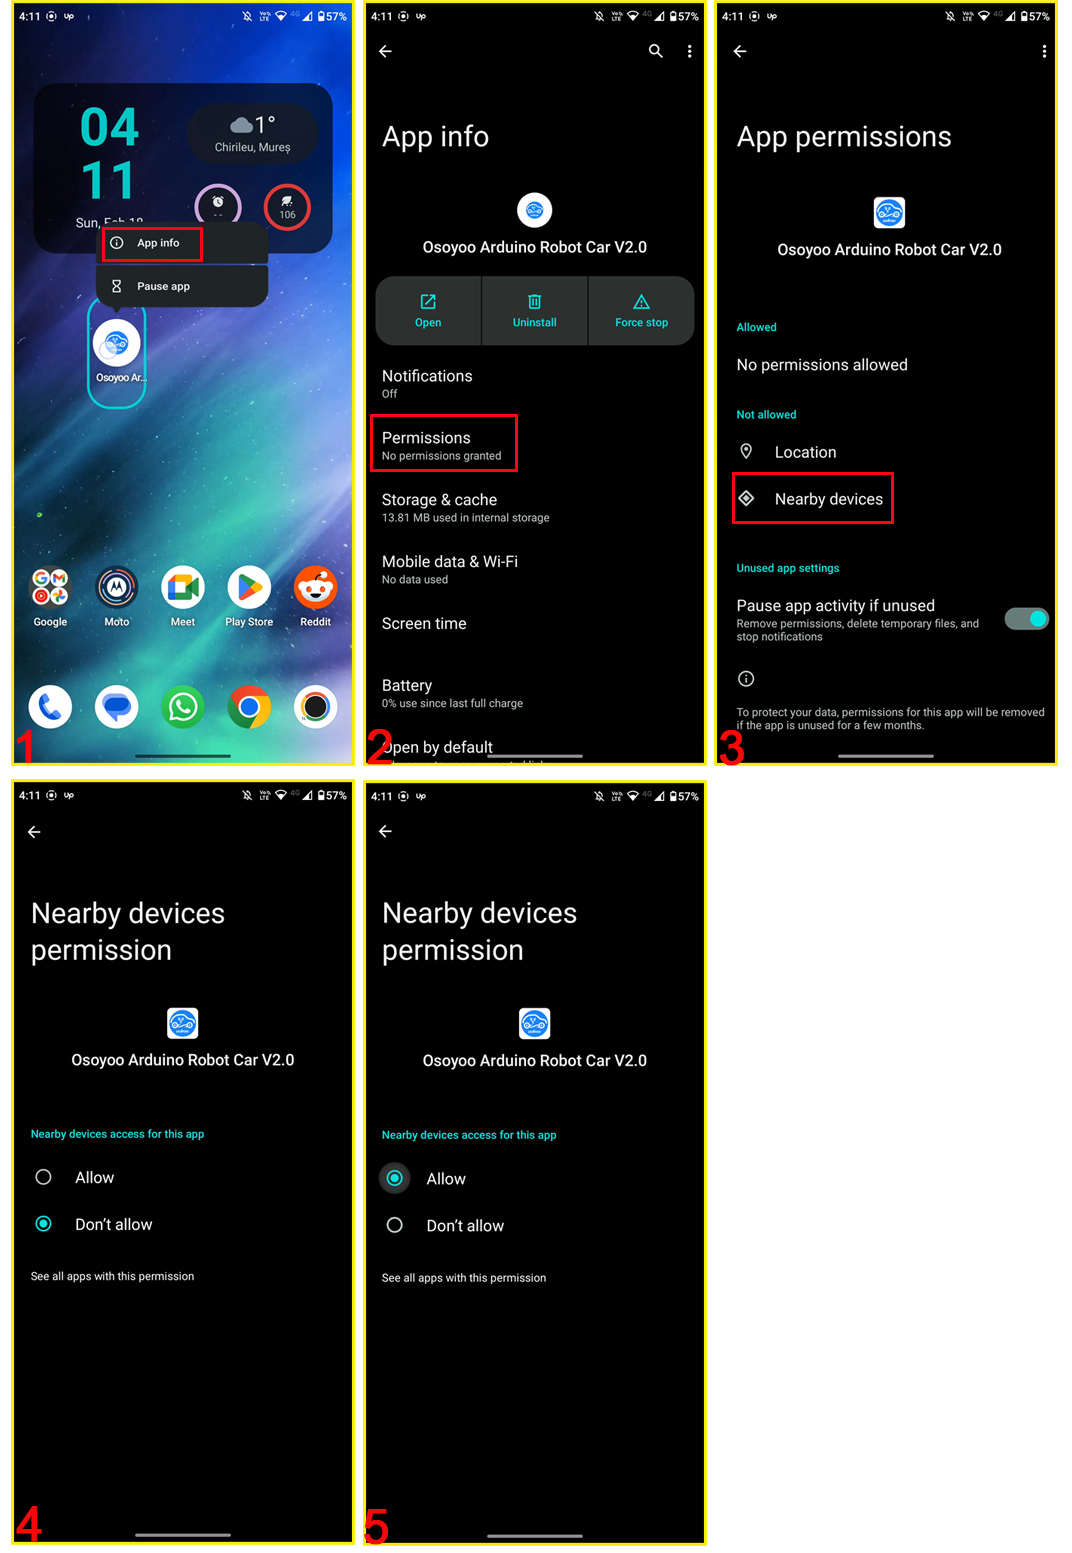
Note: For Android device, when you click BT search button and get the following error pop, Please follow the next steps: 1. long-press the APP inco, then click “APP info” 2. click “Permissions” 3.click “Nearby device”, then change the option as “Allow”
6Explanation of APP UI
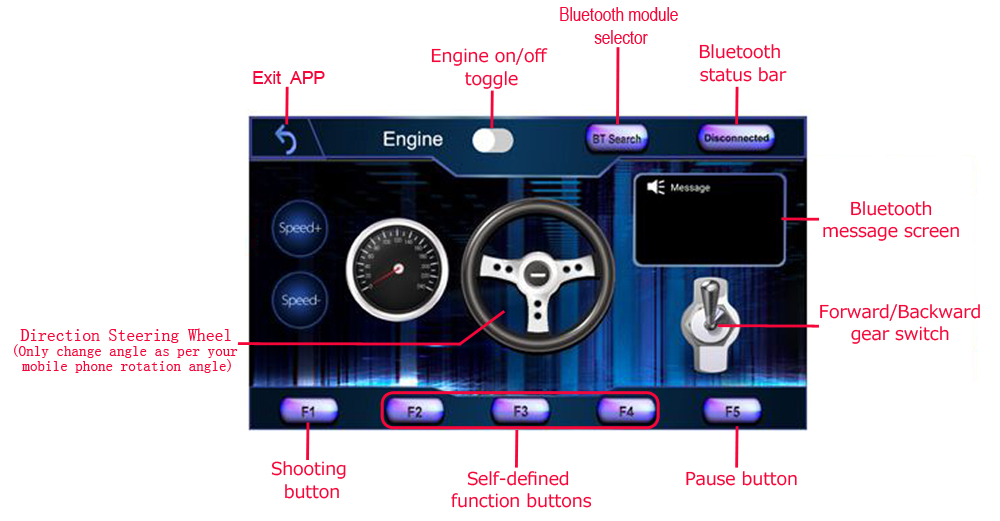
The OSOYOO Imitation Driving APP provides an intuitive driving interface that simulates the controls of a real vehicle. Before operating the robot, familiarize yourself with the functions of each control element.
Bluetooth Search
Tap BT Search to scan for nearby Bluetooth Low Energy (BLE) devices.
A list of available OSOYOO robot devices will appear. Select your robot to establish a Bluetooth connection. Once connected successfully, the connection status changes from Connect to Connected.
Note: The robot can only be controlled after a successful Bluetooth connection has been established.
Engine Switch
The Engine switch simulates the ignition switch of a real vehicle.
OFF (White): The robot stops immediately, and all driving controls are disabled.
ON (Red): The robot is ready to drive, and all motion control functions become available.
Gear Selector
The Gear Selector controls the robot’s driving direction, similar to the transmission selector in a real car.
D (Drive): Move the robot forward.
R (Reverse): Move the robot backward.
For a realistic driving experience, always select the appropriate gear before steering.
Function Buttons (F1–F5)
The app provides five customizable function buttons (F1–F5) for user-defined features. In this lesson, only F5 is used.
F5 – Pause :Press F5 to stop the robot. You need to press Engine switch to make the robot move again.
Virtual Steering Wheel
You can control the robot direction by touch the virtual steering wheel or rotate your device
The virtual steering wheel works together with your device’s built-in motion sensors to simulate real vehicle steering.
As you rotate your phone, the steering wheel in the app rotates accordingly, and the robot changes direction in real time.
For example:
Rotate the phone clockwise / Touch Steering Wheel to clockwise → The robot turns left.
Rotate the phone counterclockwise / Touch Steering Wheel to counterclockwise → The robot turns right.
The steering wheel and gear selector work together, just like driving a real car.
For example, when reversing into a parking space on your right, first select Reverse (R), then rotate the steering wheel to the right. This mirrors the steering behavior of a real vehicle and provides a more immersive driving experience.
Speed +
Tap Speed + to increase the robot’s driving speed.
Multiple taps gradually increase the motor speed to the desired level.
Speed –
Tap Speed – to reduce the robot’s driving speed.
Use this control for more precise maneuvering or when operating in confined spaces.
Exit
Tap Exit to close the OSOYOO Imitation Driving APP.
Note: Exiting the application does not automatically power off the robot. If the robot is still moving, stop it before closing the app or turn off the robot’s power switch.
7Test the Car
Now you can put the car onto the ground, turn on the power. Put your robot car onto the ground and turn on the switch. Open OSOYOO imitation driving Robot APP, Click BT Search button and find the bluetooth you have paired. Turn on Engine toggle, click Speed+ to make the robot speed up as the robot car is very slow at first. When you rotate your mobile phone angle, your car will change direction.
8 Troubleshooting
1. Cannot Find ESP32
Check:
Bluetooth module inserted correctly
Battery power on
Module LED flashing
2. Bluetooth Connects but Robot Does Not Move
Verify:
D4/D5 wiring
Motor wiring
Program uploaded correctly
3. Steering Response Is Delayed
Possible causes:
Weak Bluetooth signal
Low battery voltage
Phone running background applications
4. Upload Failed
If Arduino IDE reports upload errors:
Disconnect the Bluetooth module.
Upload the sketch again.
Reinstall the module after programming completes.
5. Question:
My Robot Car power is ON, but the D13 LED does not blink and my iPhone APP can not find BLE device name and my Android Phone does not find the BLE address in Arduino IDE? Answer:
This problem happens when initializing of ESP32 does not complete properly. You need press the EN button in the ESP32 for 10 seconds, turn off power for 5 seconds and turn on battery again. Then Robot Car will try to initialize ESP32 BLE again. Once you see the D13 LED blink 3 times, you can use APP to connect it.