


If you take a look at DS18B20 datasheet, you’ll find it’s a pretty interesting and complex device.
- The sensor can be powered with a 3.0V-5.5V power supply, so a 5V rail from a standard Basic board will work just fine for that.
- It can measure temperatures from -55C (-67F) to +125C (257F), which is perfect for general usage at home.
- +- 0.5C accuracy, temperatures can be measured in 0.5C, 0.25C, 0.125C or 0.0625C increments.
- Multiple such sensors can be connected do a single (!) data line, meaning we could control more than one sensor with just a single wire.
- Supports upper and lower temperature alerts
I suggest to browse through the data sheet for more details. It’s very detailed and it’s impressive how much is crammed into that small package.
Wiring
The wiring is really straightforward. Since we are using the module, it already has a pull-up resistor on the board, thus we do not need any additional parts.
The DS18B20 temperature sensor supports receiving power via the data pin (search for “parasite power” in the data sheet if you want to learn more), but we’re going to power the sensor with Basic board’s 5V rail, as it’s simpler that way.
- Left pin is GROUND pin
- Middle pin is VCC pin
- Right pin is SIGNAL pin
And so we connect pins accordingly:
- Left pin (GROUND) -> GND pin on Basic board
- Middle pin (VCC) -> 5V pin on Basic board
- Right pin (SIGNAL) -> Digital pin 3 on Basic board (could be any other digital pin).
Note that we’re using a digital pin for input, that’s because the sensor returns digital values.
Code
If you’ve read the datasheet, you’ll quickly learn that using the sensor is not as simple as writing a few lines of code. But we’re in luck, because there are two libraries that are going to help us and make it easier.
Libraries
The first library is called OneWire (download directly from author or from Github). What it does is allows us to communicate with 1-wire devices, such as the DS18B20 temperature sensor we’re using.
The second library we’ll use is called “Dallas Temperature Control Library” (download directly from author or from Github). It provides convenient calls to control the sensor and is intended to use with the exact DS18B20 sensor.
Download both libraries and extract them into your sketchbook/libraries folder. That will allow us to directly include them in our Basic board program.
Program code
Our goal with this program is to simply measure the temperature synchronously using one temperature sensor (though the library provides tools for asynchronous measurements as well as measurements using multiple sensors, should you be interested in that).
Here’s the complete program code, let’s take a look at it piece by piece.
#include
#include

// Sensor input pin
#define DATA_PIN 3
// How many bits to use for temperature values: 9, 10, 11 or 12
#define SENSOR_RESOLUTION 9
// Index of sensors connected to data pin, default: 0
#define SENSOR_INDEX 0

OneWire oneWire(DATA_PIN);
DallasTemperature sensors(&oneWire);
DeviceAddress sensorDeviceAddress;

void setup() {
  Serial.begin(9600);

  sensors.begin();
  sensors.getAddress(sensorDeviceAddress, 0);
  sensors.setResolution(sensorDeviceAddress, SENSOR_RESOLUTION);
}


void loop() {
  sensors.requestTemperatures();
  // Measurement may take up to 750ms

  float temperatureInCelsius = sensors.getTempCByIndex(SENSOR_INDEX);
  float temperatureInFahrenheit = sensors.getTempFByIndex(SENSOR_INDEX);

  Serial.print("Temperature: ");
  Serial.print(temperatureInCelsius, 4);
  Serial.print(" Celsius, ");
  Serial.print(temperatureInFahrenheit, 4);
  Serial.println(" Fahrenheit");
}
We begin by setting up OneWire and DallasTemperature. DeviceAddress will be needed to directly address a specific sensor in our sensor array. But we have only one sensor, so that won’t matter too much.
Setup function is pretty simple as well. sensors.begin() initializes the sensor. With sensors.setResolution(address, resolution) we can change the resolution of a sensor. The sensor can output values in 9, 10, 11 or 12 bits. Lower resolution means faster measurements:
- 9 bits: increments of 0.5C, 93.75ms to measure temperature;
- 10 bits: increments of 0.25C, 187.5ms to measure temperature;
- 11 bits: increments of 0.125C, 375ms to measure temperature;
- 12 bits: increments of 0.0625C, 750ms to measure temperature.
sensors.requestTemperatures() will request the sensor to start the measurement. The measurement does not happen instantly, it may take up to 750ms to get the result. Since we are doing synchronous measurements, the processor will simply wait for the result before continuing.
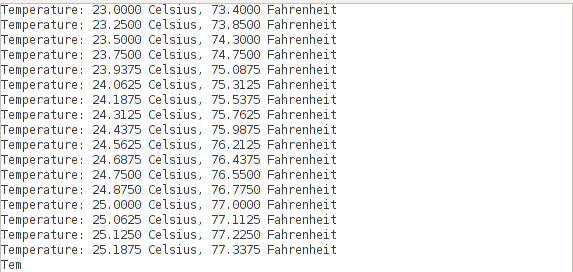
sensors.getTempCByIndex(index) and sensors.getTempFByIndex(index) calculate temperatures in Celsius and Fahrenheit respectively. The sensor actually is calibrated to work in Celsius, so Fahrenheit values are coverted from Celsius by the library. Both return float values, which may be readily used in other program logic. In this case we simply print them out in the Serial Monitor.
Here’s the result in high resolution (SENSOR_RESOLUTION = 12):
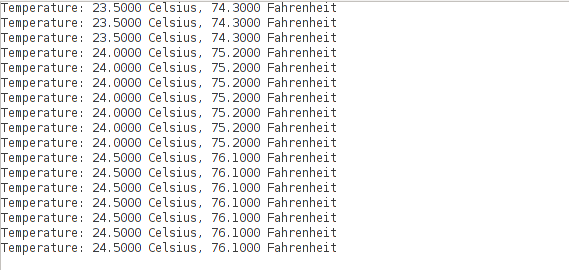
And here’s the result in lower resolution (SENSOR_RESOLUTION = 9):
Further reading
If you’re interested to learn more about this, here are some extra resources:
TEST OK :
HARDWARE :
Osoyoo UNO Board (Fully compatible with Arduino UNO rev.3) x 1
DS18B20 temperature sensor x 1
Breadboard x 1
Jumpers
USB Cable x 1
PC x 1
Pin Definitions :
Left pin (GROUND) -> GND pin on Arduino board
Middle pin (VCC) -> 5V pin on Arduino board
Right pin (SIGNAL) -> Digital pin 3 on Arduino board (could be any other digital pin).
Mixly source :
#include
#include
OneWire oneWire_4(4);
DallasTemperature sensors_4(&oneWire_4);
DeviceAddress insideThermometer;
float ds18b20_4_getTemp(int w) {
sensors_4.requestTemperatures();
if(w==0) {return sensors_4.getTempC(insideThermometer);}
else {return sensors_4.getTempF(insideThermometer);}
}
void setup()
{
Serial.begin(9600);
sensors_4.getAddress(insideThermometer, 0);
sensors_4.setResolution(insideThermometer, 9);
}
void loop()
{
Serial.print(“Temperature :”);
Serial.print(ds18b20_4_getTemp(0));
Serial.print(“℃, ”);
Serial.print(ds18b20_4_getTemp(1));
Serial.println(“Fahrenheit”);
delay(1000);
}
Update :
//Right pin (SIGNAL) -> Digital pin 3 on Arduino board (could be any other digital pin).
Right pin (SIGNAL) -> Digital pin 4 on Arduino board (could be any other digital pin).