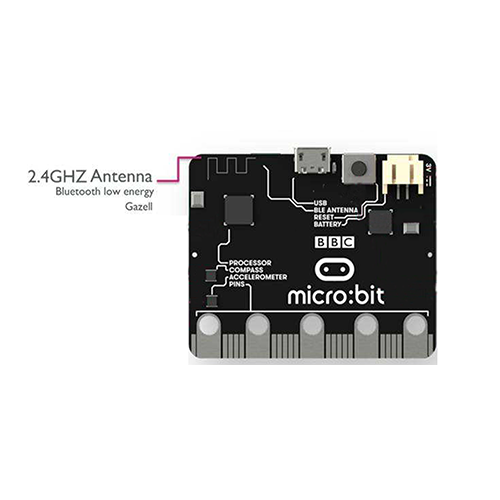
Nrf51822 is a BLE (Bluetooth Low Energy) module allows micro:bit to send and receive Bluetooth signals. We can use the built-in bluetooth module to communicate with the mobile phone’s APP, thereby using the APP to control external devices connected to the micro:bit control board.
1 x BBC micro:bit board
1 x Micro USB cable
1 x 9V battery
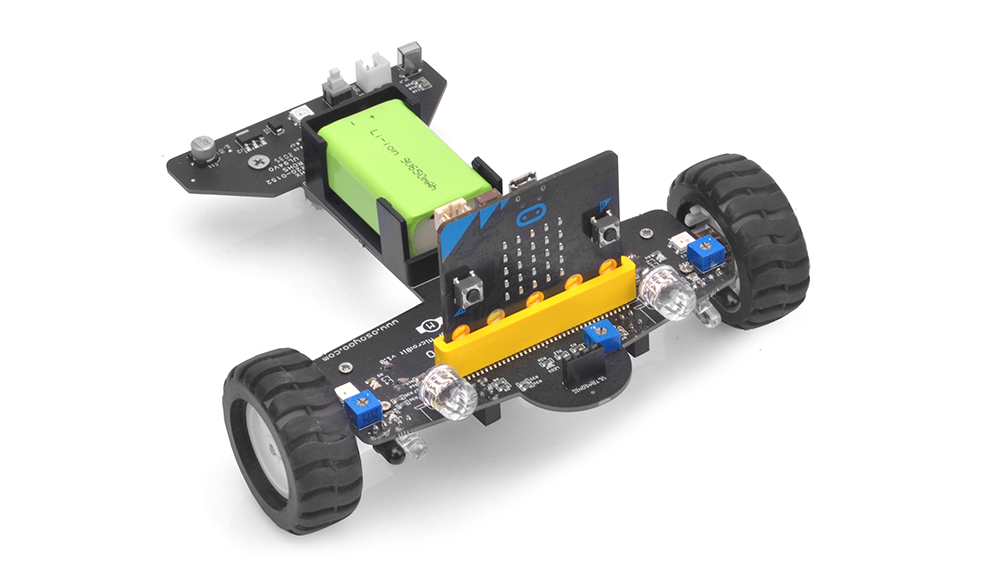
1 x OSOYOO photon robot
1 x Android smartphone or tablet
Bluetooth® is a wireless technology standard for exchanging data over short distances (using short-wavelength UHF radio waves in the ISM band from 2.4 to 2.485 GHz[3]) from fixed and mobile devices, and building personal area networks (PANs). We can use Bluettoth to connect multiple devices which resolves the difficulty of simultanuous data transmission.
Block
Analyse
Examples
From Bluetooth category
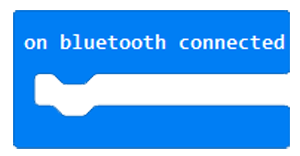
On Bluetooth Connected block starts an event handler which in this case will run when something connects to your micro:bit using Bluetooth.
From Bluetooth category
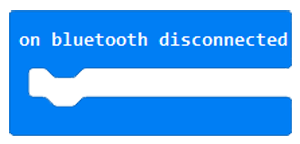
On Bluetooth Disconnected block starts an event handler which in this case will run when a device which is connected to your micro:bit over Bluetooth disconnects.
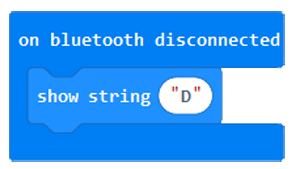
You could use this event handler to display a letter “D” on the micro:bit LED grid so you know that the Bluetooth connection has been closed.
From control category
Raise an event in the event bus.
From control category
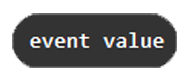
Get the value of the last event executed on the bus.
From control category
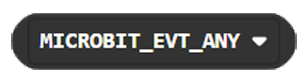
Return a code representing the type of the event (button click, device gesture, and so on).
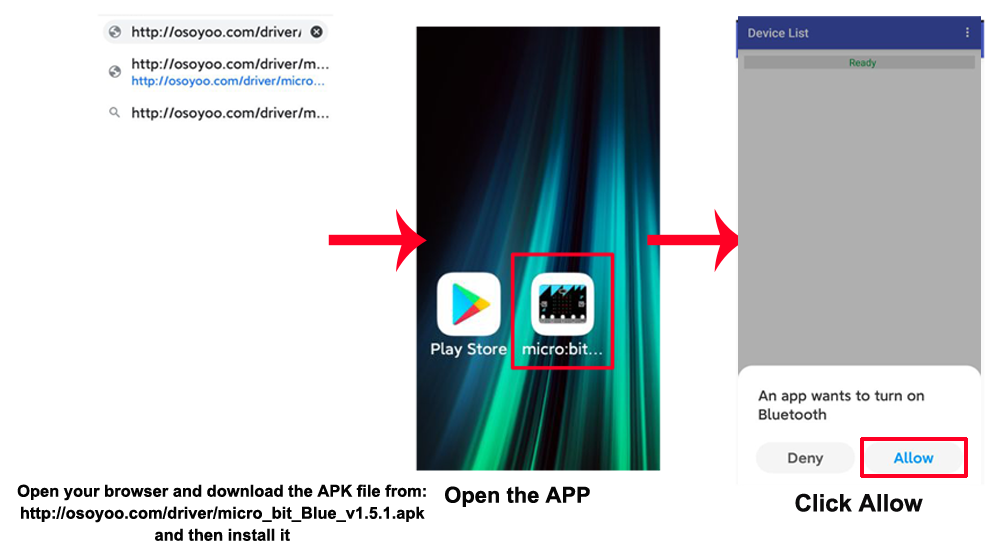
Before programming, you need to install the Bluetooth APP to your phone. (This app only support Android)
1) Open your phone browser and download the APP apk file from: http://osoyoo.com/driver/micro_bit_Blue_v1.5.1.apk, and then install the APP in your phone. (As the APP from google play removes some functions and can’t control the robot, we test this V1.5.1 version APP to control the robot)
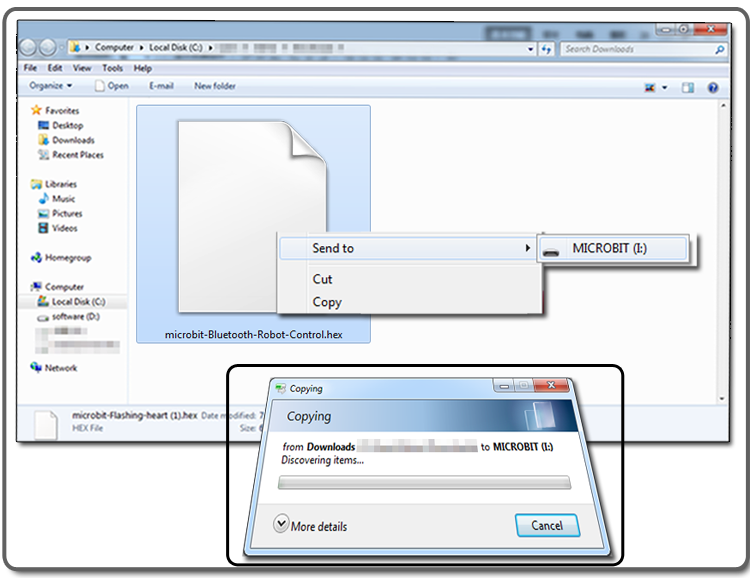
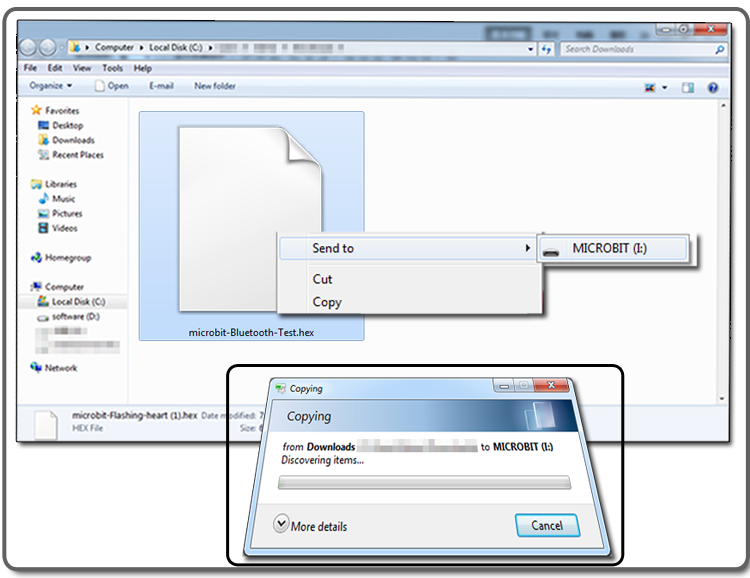
2) Please downlaod the bluetooth test code in your computer. Connect the micro:bit with the computer through USB cable, and the computer will pop up a U disk and send the download file(.hex)to your micro:bit.
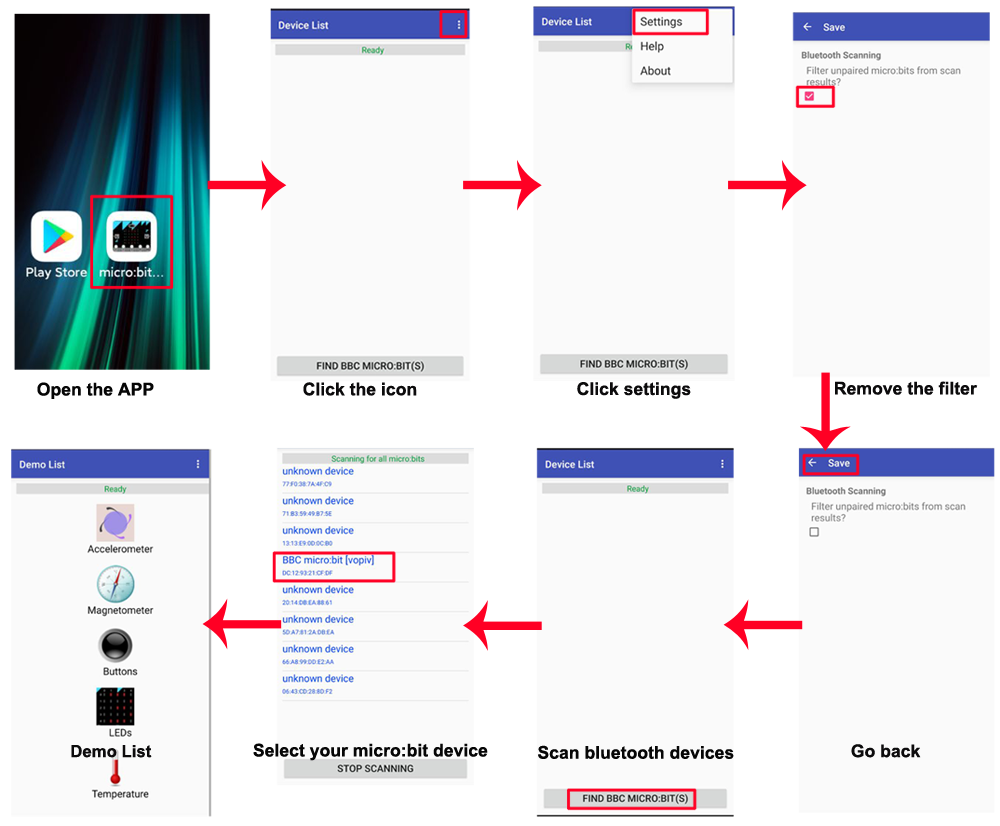
3) Pair micro:bit board with your phone as following:
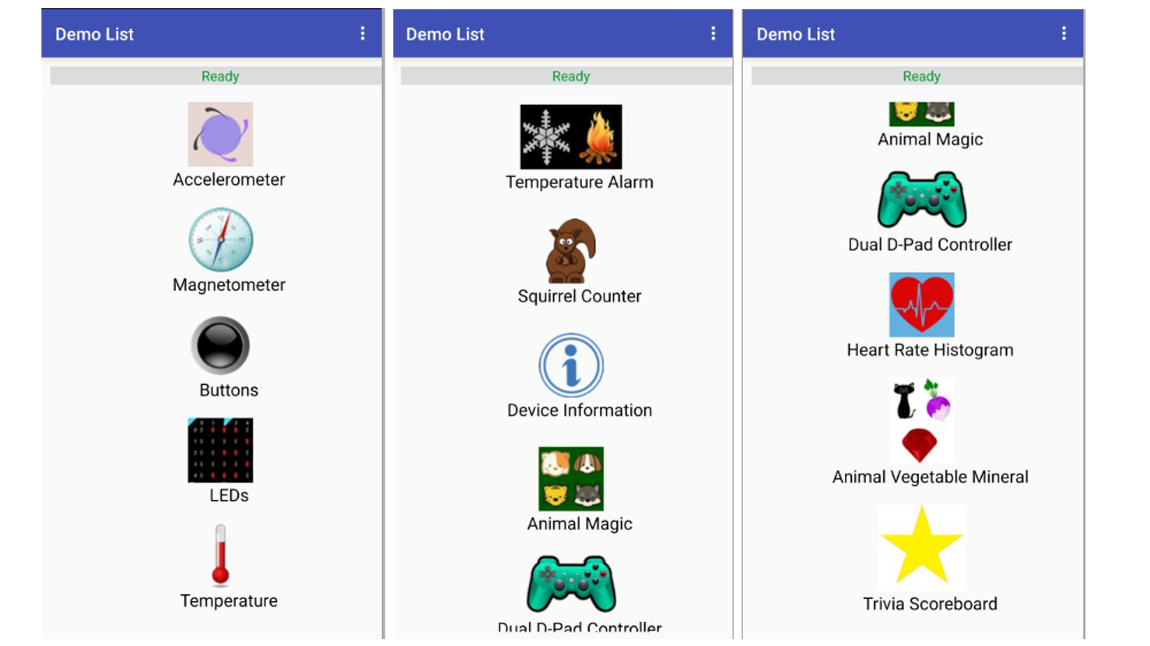
4) You can test the function such as “Accelerometer”, “LEDs”, “Temperature”, ” Device Information” and Animal Magic” after upload the test code.
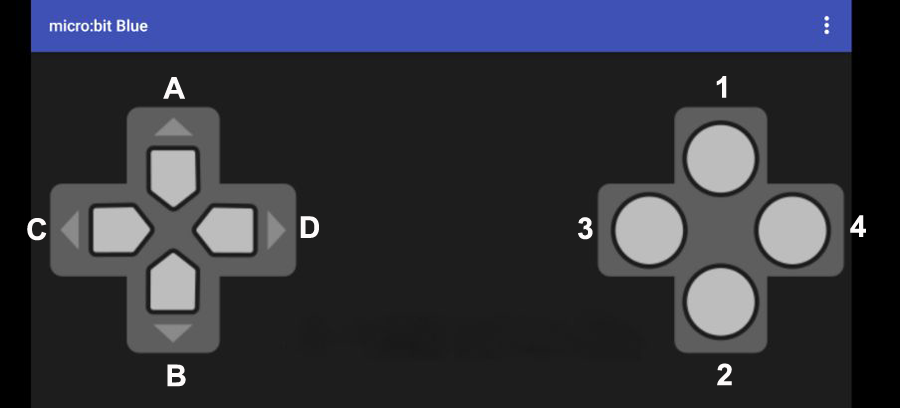
In this project, we’ll use “Dual D-Pad Controller” function from APP to control OSOYOO robot car. Let’s begin to program.
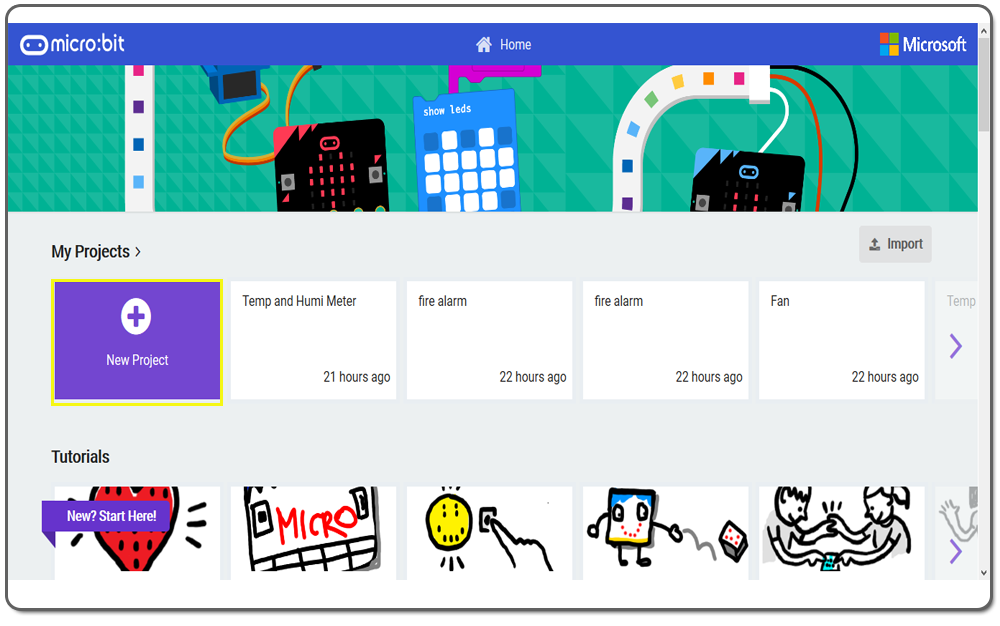
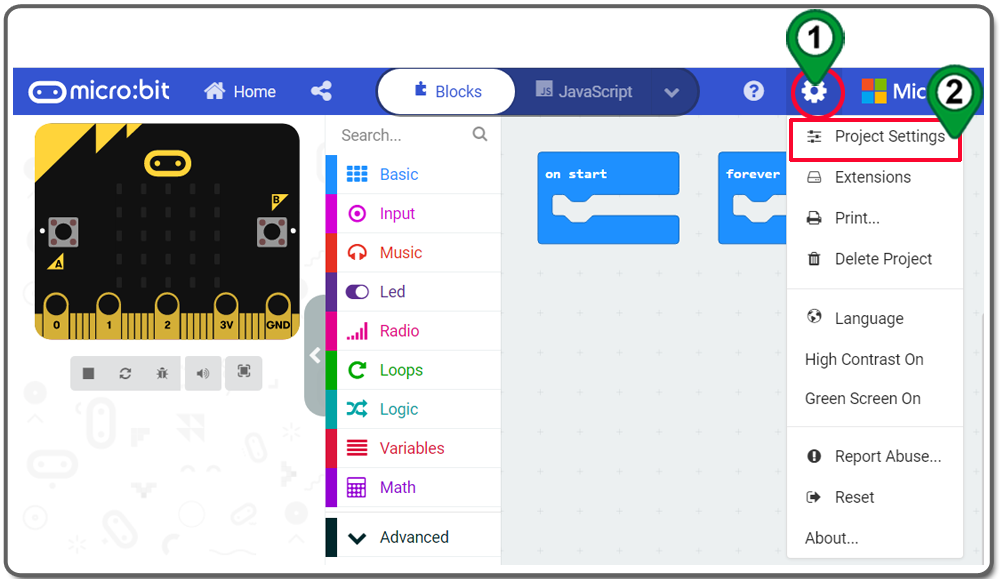
Step 1: To connect with micro:bit, we should first pair then connect, Click the icon on the top right: More… ->Project Setting,
Step 2: check the first option “No Pairing Required: Anyone can connect via Bluetooth”
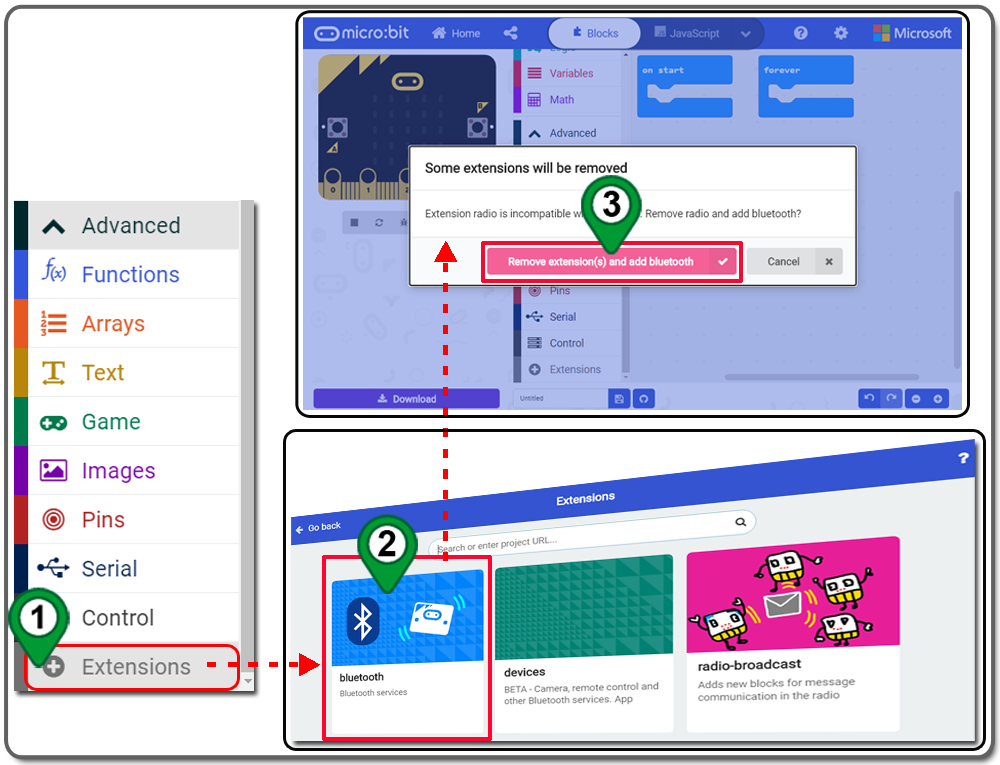
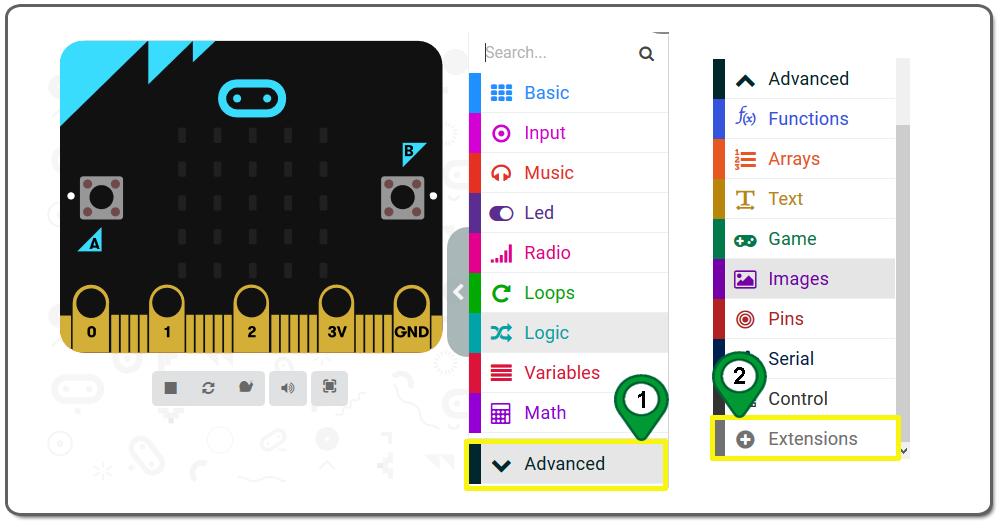
Step 3.In the Editor controls, click on the Advanced button and then Extensions as following figure.
Step 4. In the Extensions page , you can see the Bluetooth package and click it to add the package, you will see a pop up window, and click “Remove extensions and add bluetooth. (Note: If you don’t see the bluetooth package the first of Extensions page, please enter “bluetooth” in search textbox and then search it.)
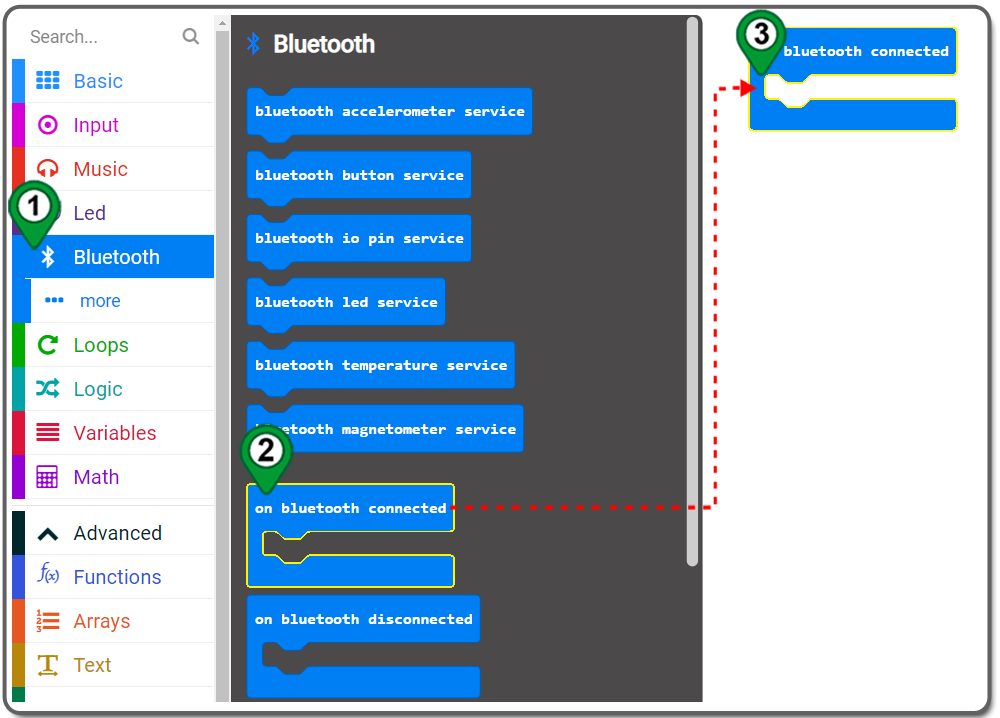
Step 5. Please remove the on start and forever block. Click on the Bluetooth category and then click the on bluetooth connected block as following:
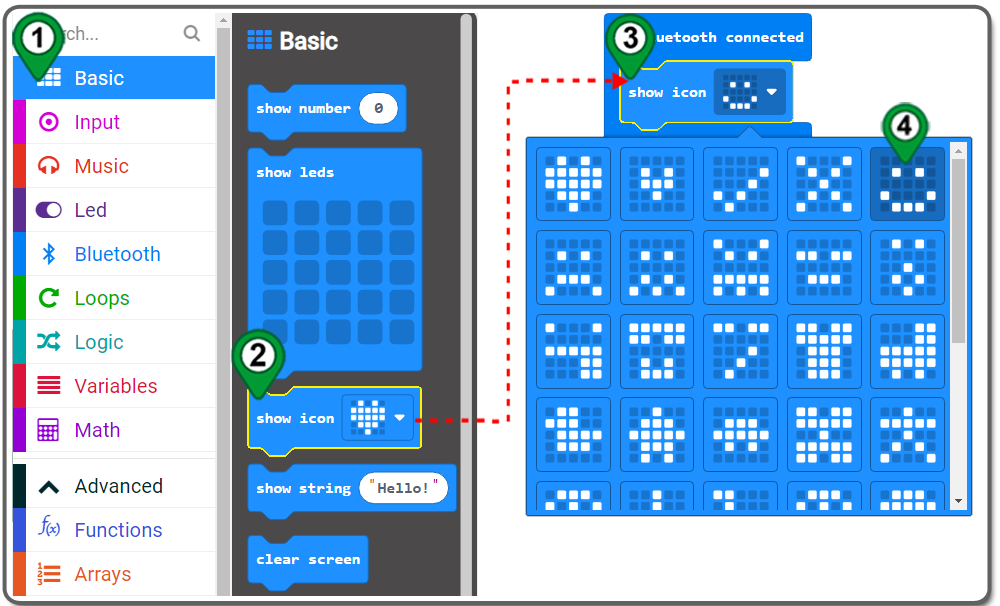
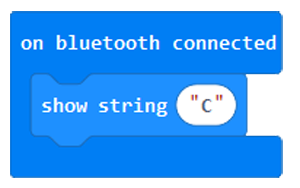
Step 6. Click on the Basic category, then drag the show icon block and drop it inside the on bluetooth connected block ,and choose the icon from the drop-down menu as following figure.
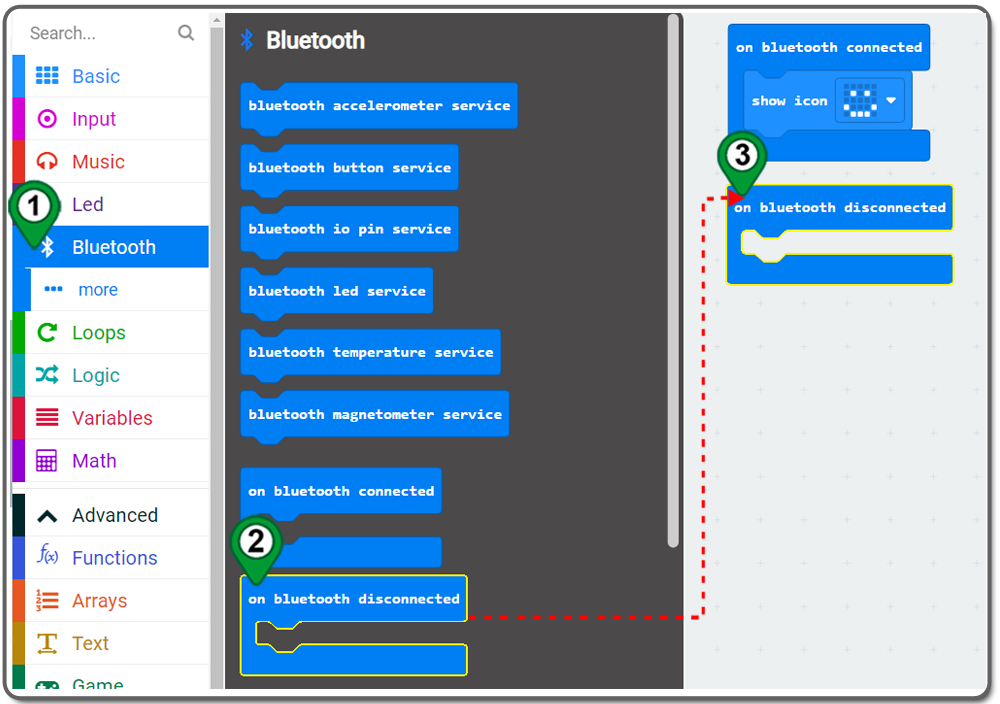
Step 7. Click on the Bluetooth category again and then click the on bluetooth disconnected block as following:
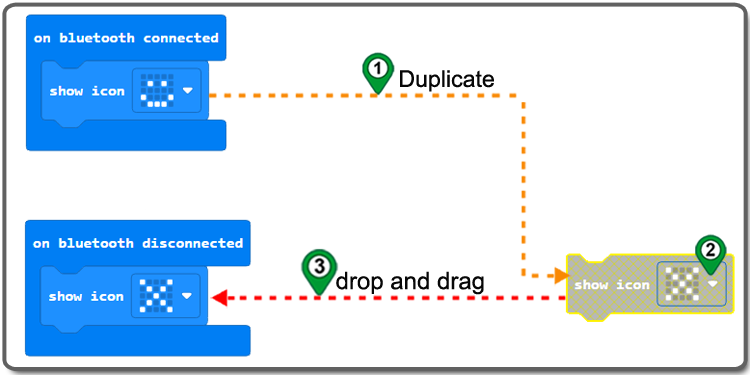
Step 8. Duplicate the show icon block and drop it inside the on bluetooth disconnected block ,and choose the icon from the drop-down menu as following figure.
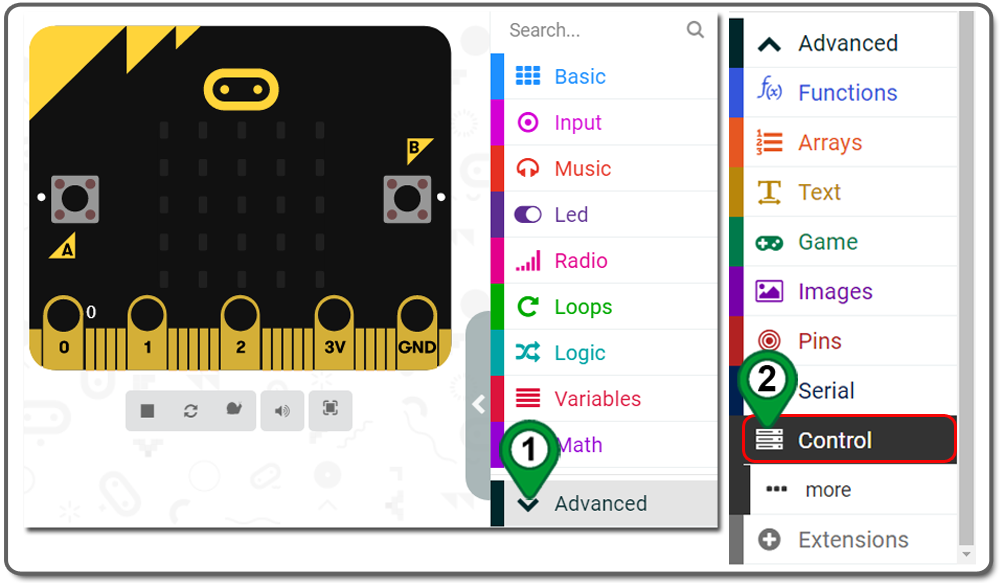
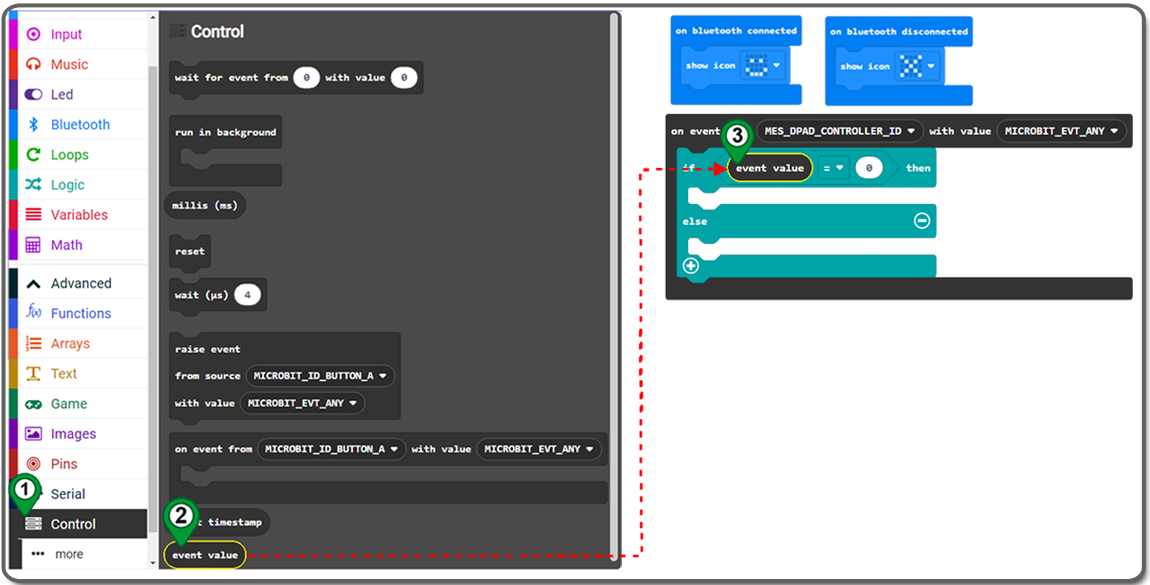
Step 9.In the Editor controls, click on the Advanced button and then Control as following:
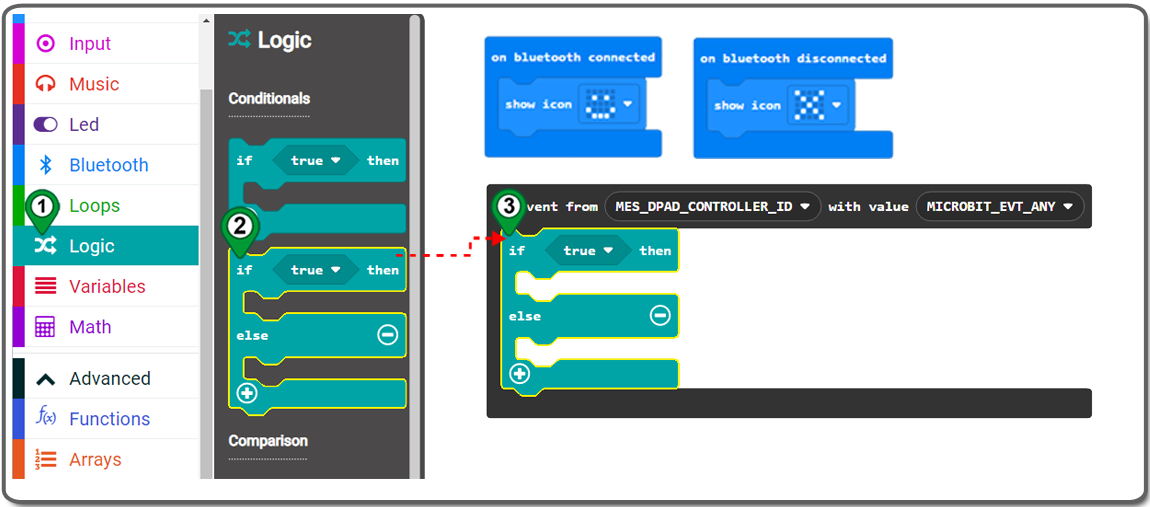
Step 10. Click on the Controlcategory, then drag the on event from block and choose MES_DPAD_CONTROLLER_ID and MICROBIT_EVT_ANY from the drop-down menu as following figure.
Step 11. Click on the Logic category and then click the if then else block, and then Drag inside on event from block as following:
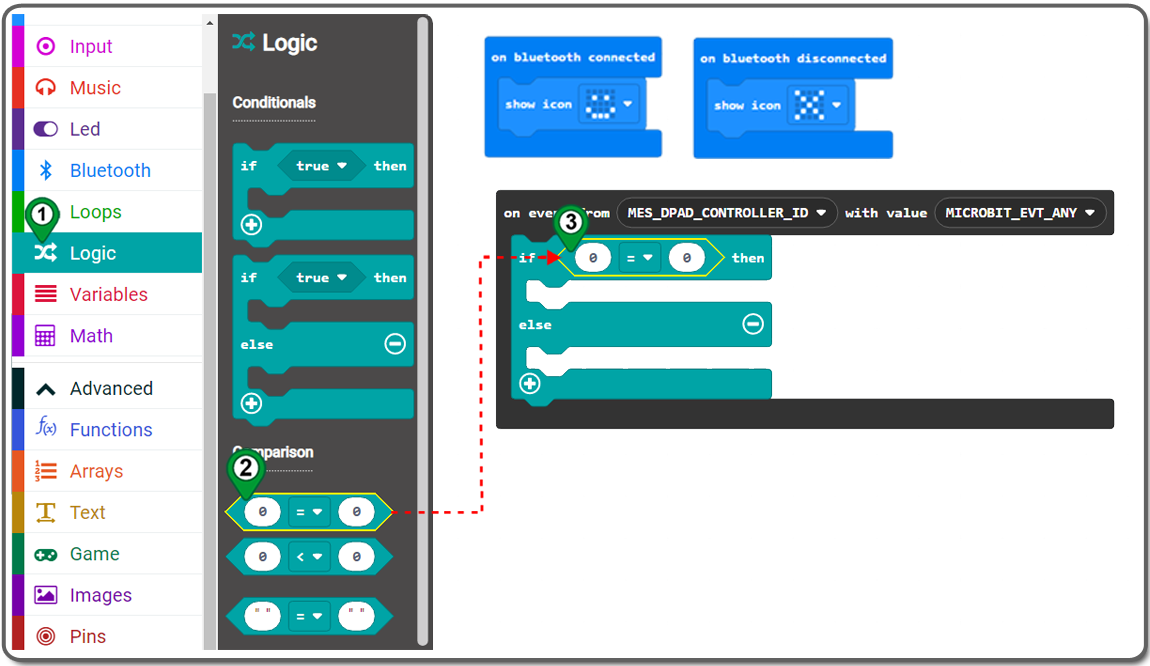
Step 12. Click on the Logic category again. Under the Comparison section, drag “0 = 0” blocks over, and place it on the placeholder of the if-then-else block as following:
Step 13.Click on the Controlcategory and drag and drop the event value block and place it on the first placeholder of the Comparison block
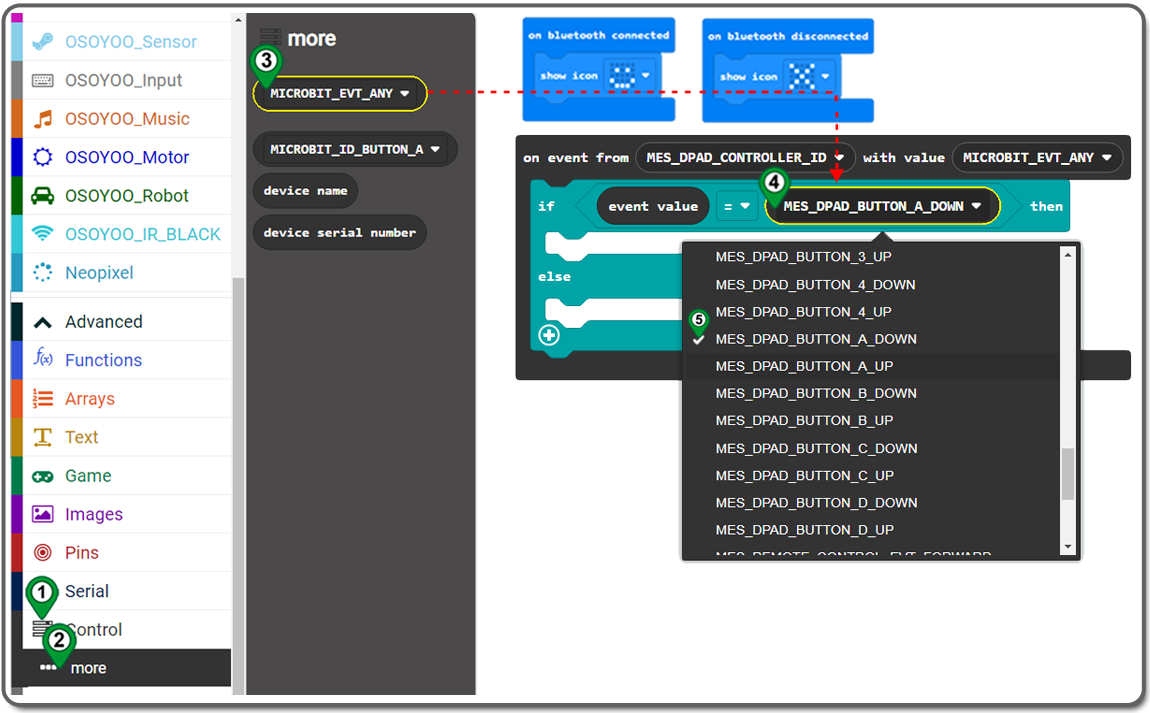
Step 14.Click on the Controlcategory then more, and drag and drop the MICROBIT_EVT_ANY block and place it on the second placeholder of the Comparison block, then select MES_DPAD_BUTTON_A_DOWN.
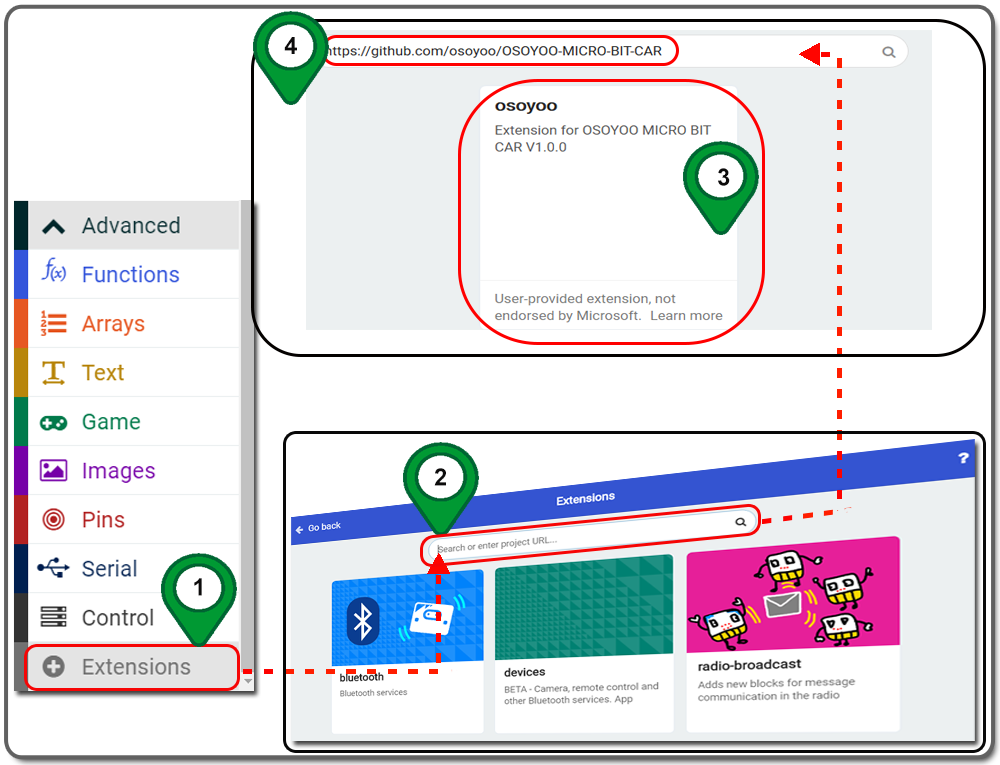
Step 15. Enter Extensions page , enter project URL “https://github.com/osoyoo/OSOYOO-MICRO-BIT-CAR ” in the Search textbox and click on the Search button. The page will show you all the matching extensions based on your search string. Now, click on osoyoo to add it into your project .
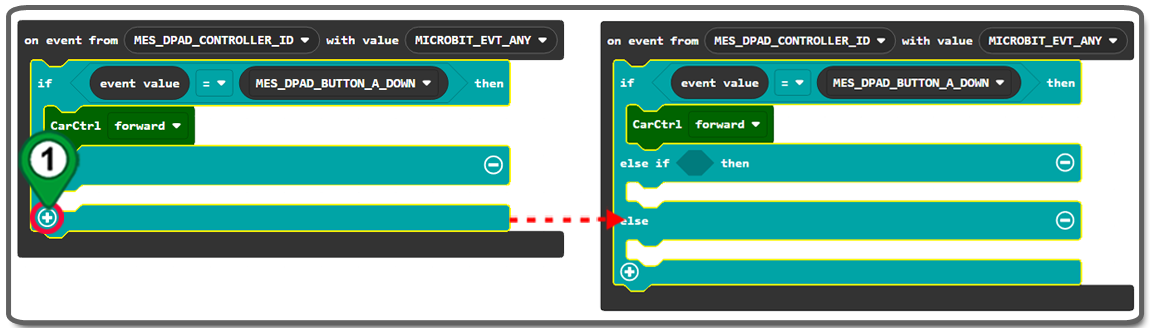
Step 16. Click OSOYOO_Robot category, and Drag and drop CarCtrl block over and place it inside the “then” section of the if-then-else block, and change the direction to forward.
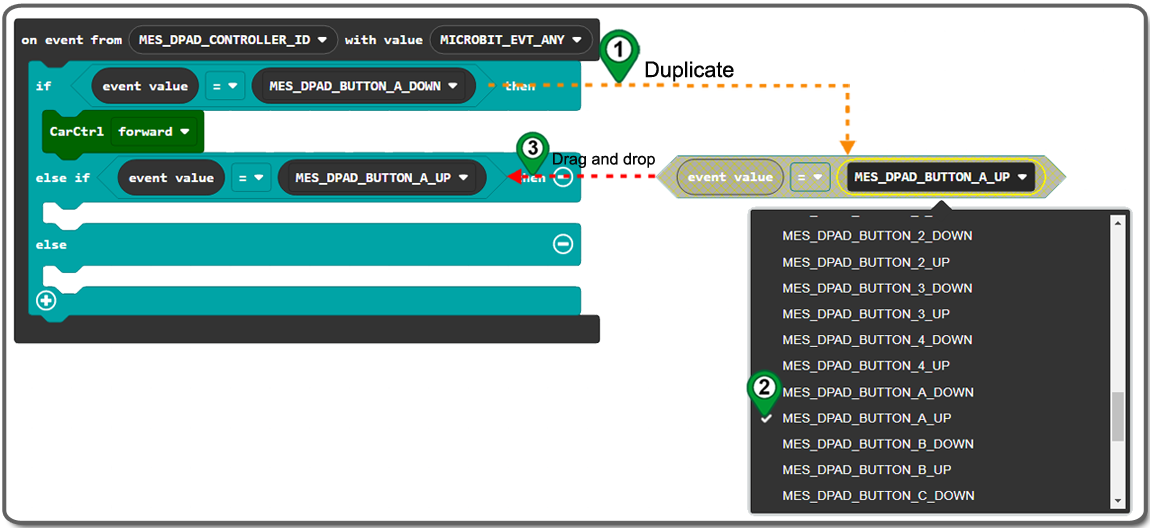
Step 17. Click “+” to add an else section as following:
Step 18.DuplicateComparisonblock and change MES_DPAD_BUTTON_A_DOWN to MES_DPAD_BUTTON_A_up, and then place it on the second if sectionas following picture:
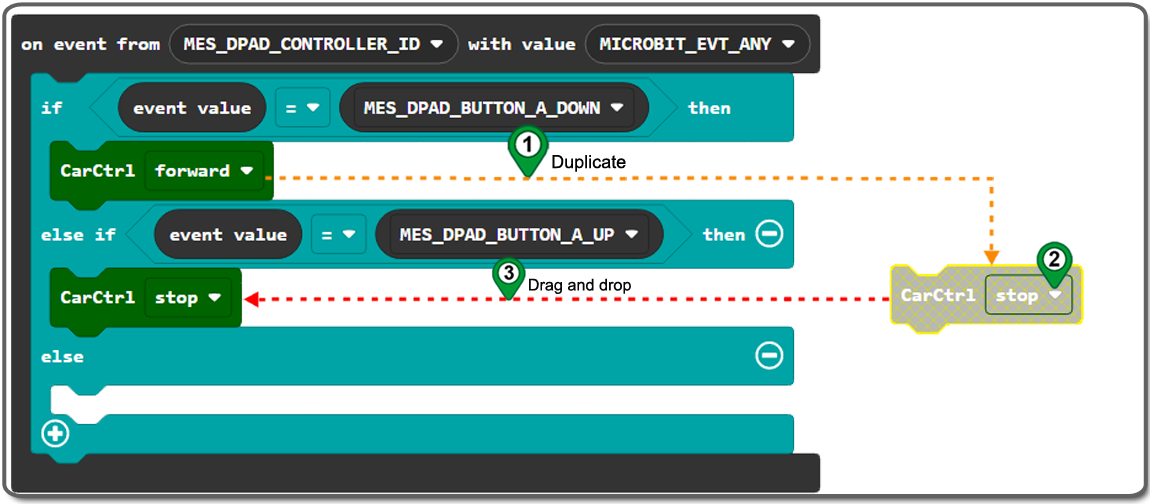
Step 19.DuplicateCarCtrlblock and change the direction to Stop, and then place it on the second then sectionas following picture:
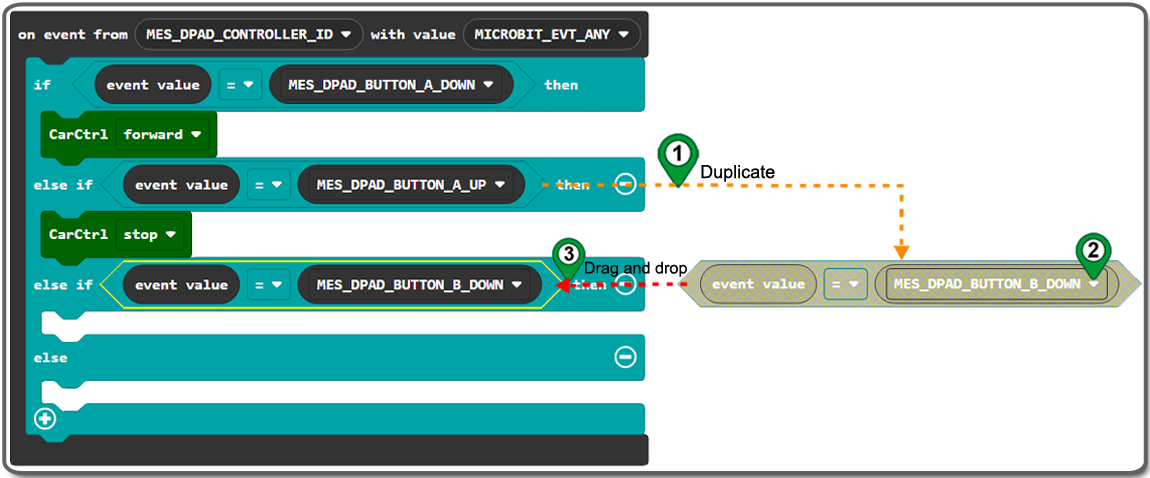
Step 20.Click “+” to add an else section, and duplicateComparisonblock and change MES_DPAD_BUTTON_A_up to MES_DPAD_BUTTON_B_down, and then place it on the third if sectionas following picture:
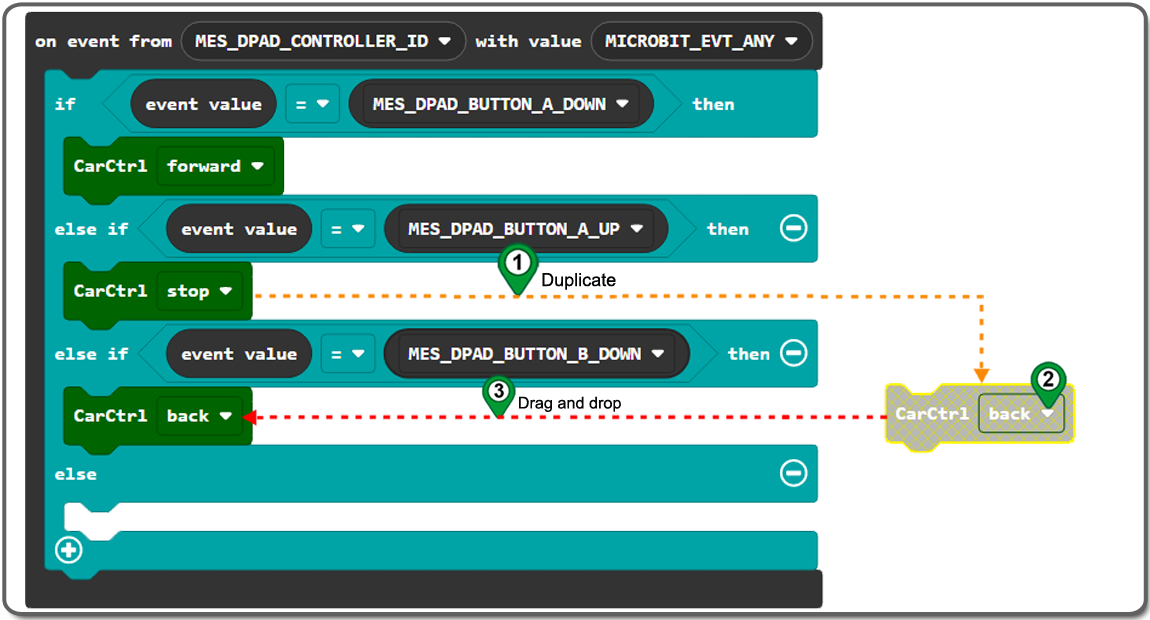
Step 21.DuplicateCarCtrlblock and change the direction to Back, and then place it on the third then sectionas following picture:
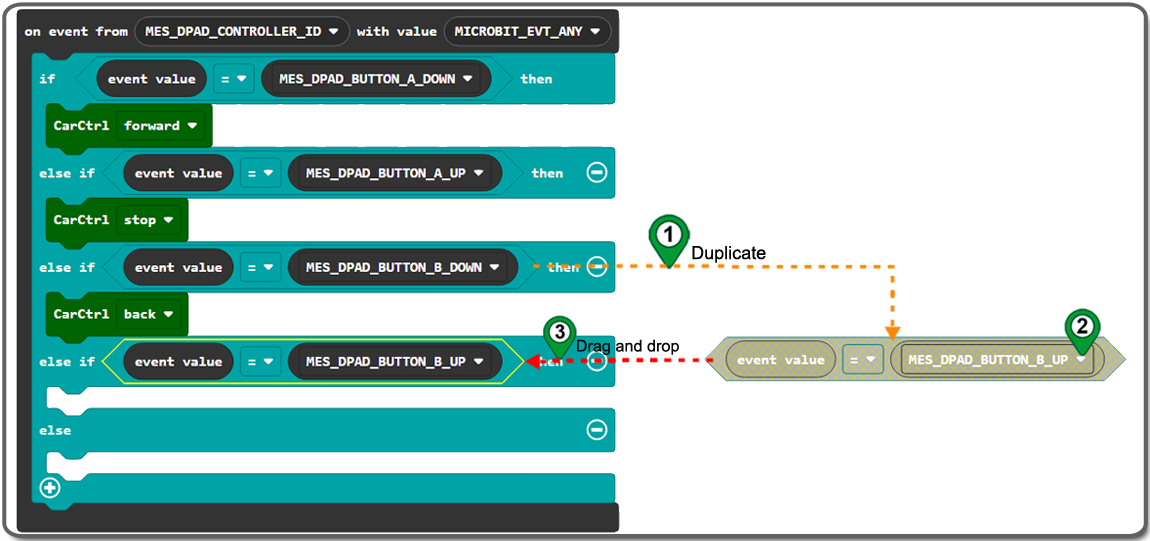
Step 22.Click “+” to add an else section, and duplicateComparisonblock and change MES_DPAD_BUTTON_B_Down to MES_DPAD_BUTTON_B_up, and then place it on the fourth if sectionas following picture:
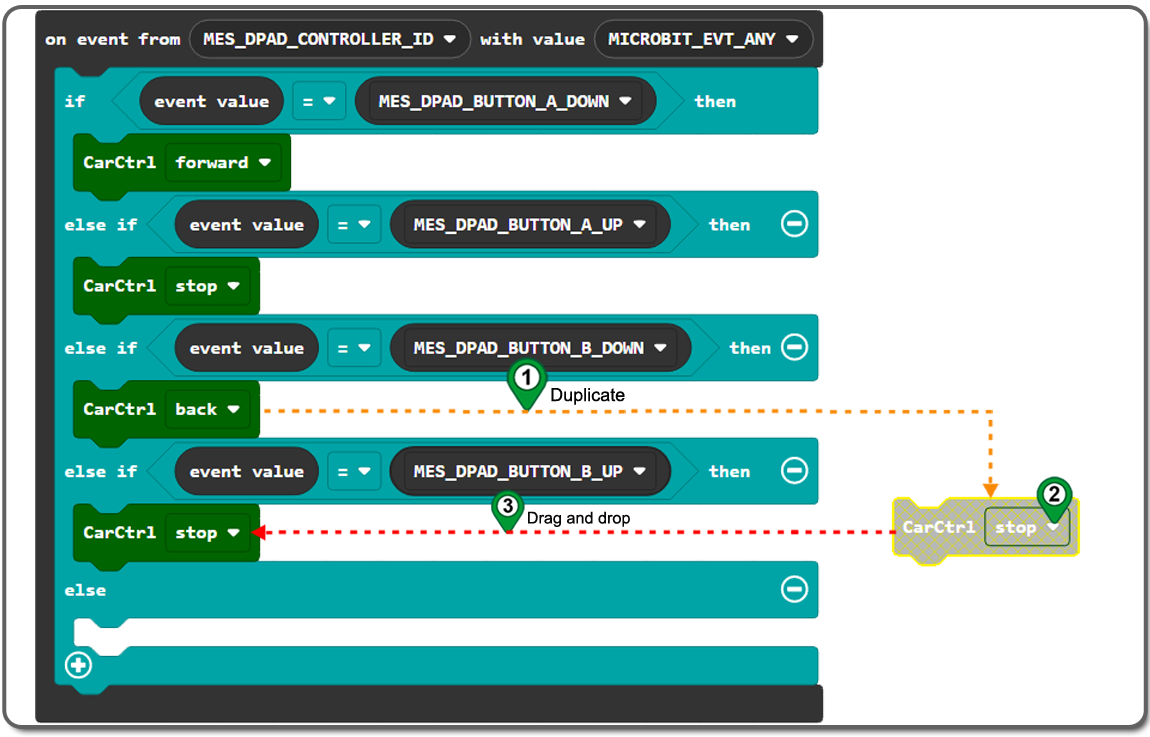
Step 23.DuplicateCarCtrlblock and change the direction to stop, and then place it on the fourth then sectionas following picture:
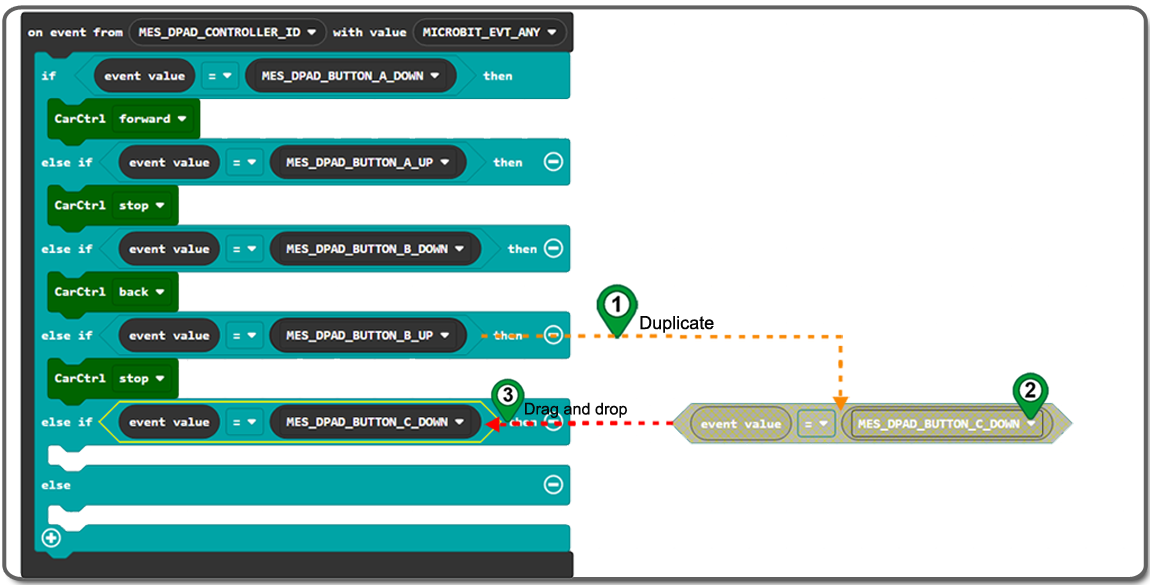
Step 24.Click “+” to add an else section, and duplicateComparisonblock and change MES_DPAD_BUTTON_B_up to MES_DPAD_BUTTON_C_down, and then place it on the fifth if sectionas following picture:
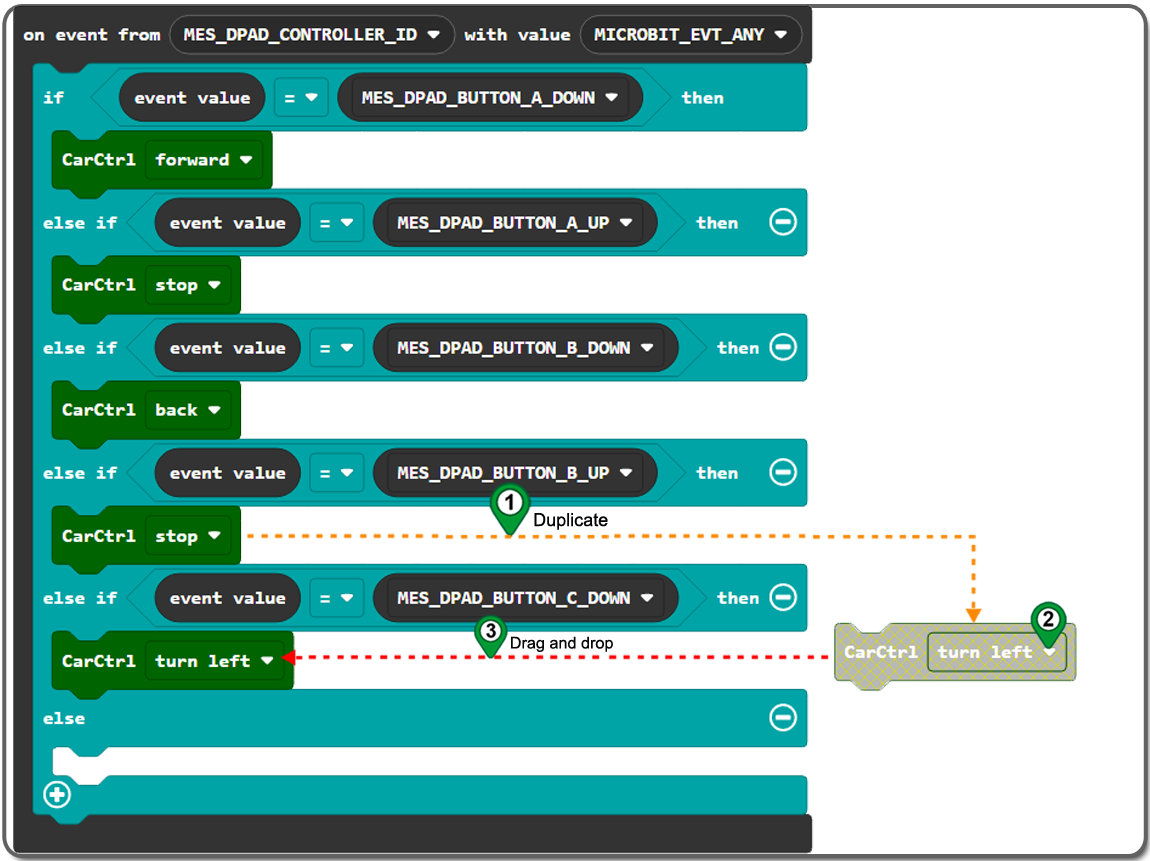
Step 25.DuplicateCarCtrlblock and change the direction to Turn left, and then place it on the fifth then sectionas following picture:
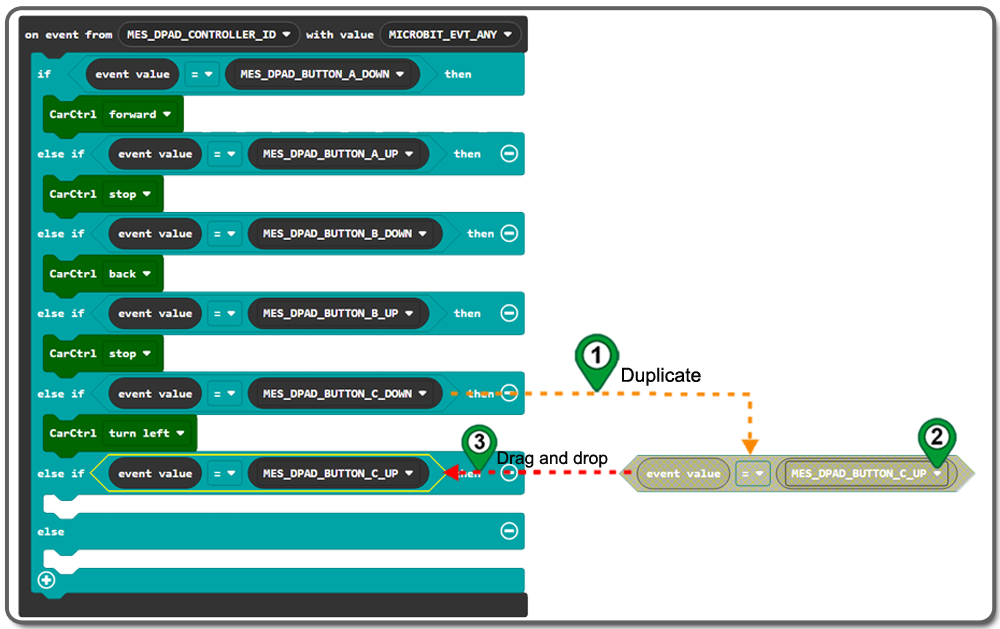
Step 26.Click “+” to add an else section, and duplicateComparisonblock and change MES_DPAD_BUTTON_C_Down to MES_DPAD_BUTTON_C_up, and then place it on the sixth if sectionas following picture:
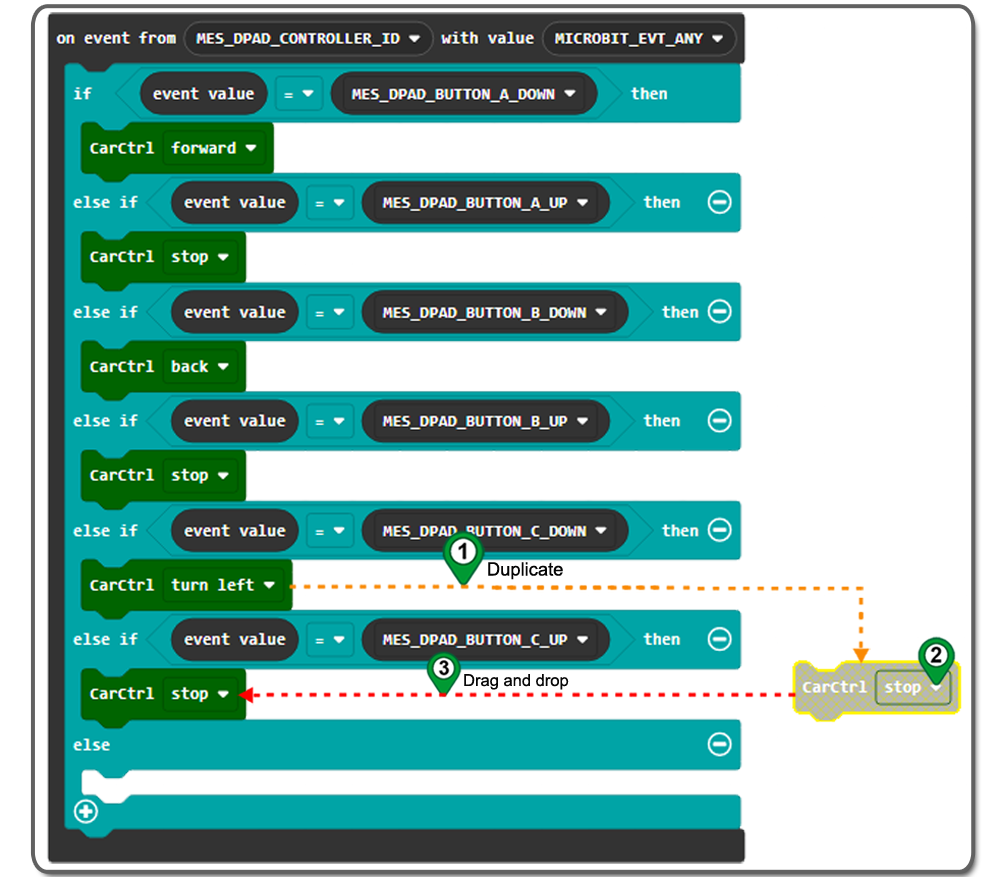
Step 27.DuplicateCarCtrlblock and change the direction to stop, and then place it on the sixth then sectionas following picture:
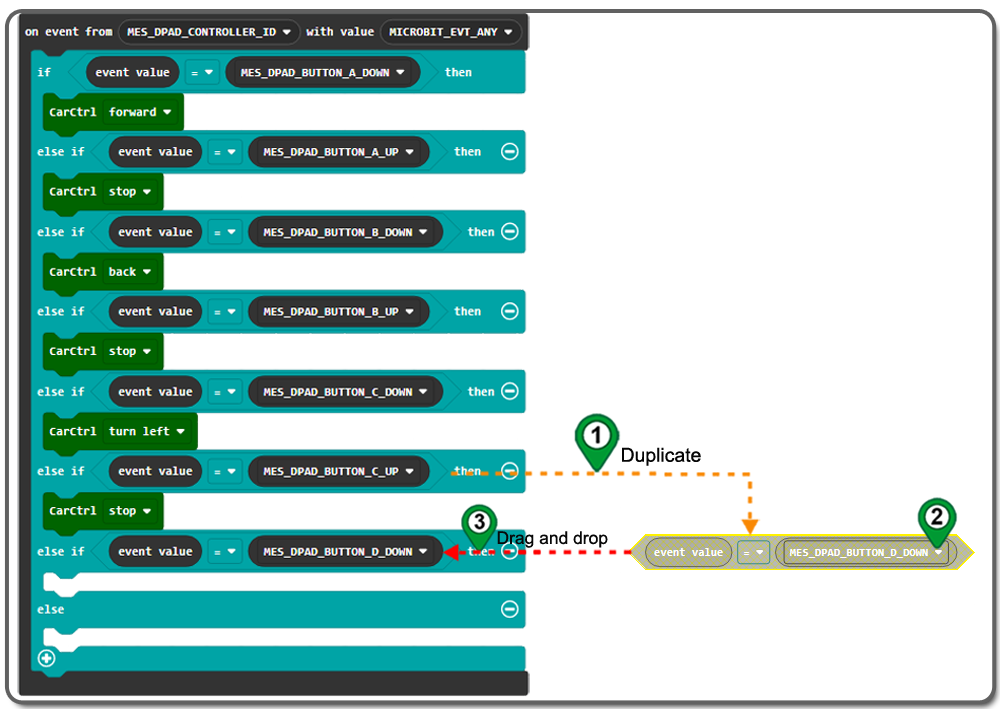
Step 28.Click “+” to add an else section, and duplicateComparisonblock and change MES_DPAD_BUTTON_C_up to MES_DPAD_BUTTON_D_down, and then place it on the seventh if sectionas following picture:
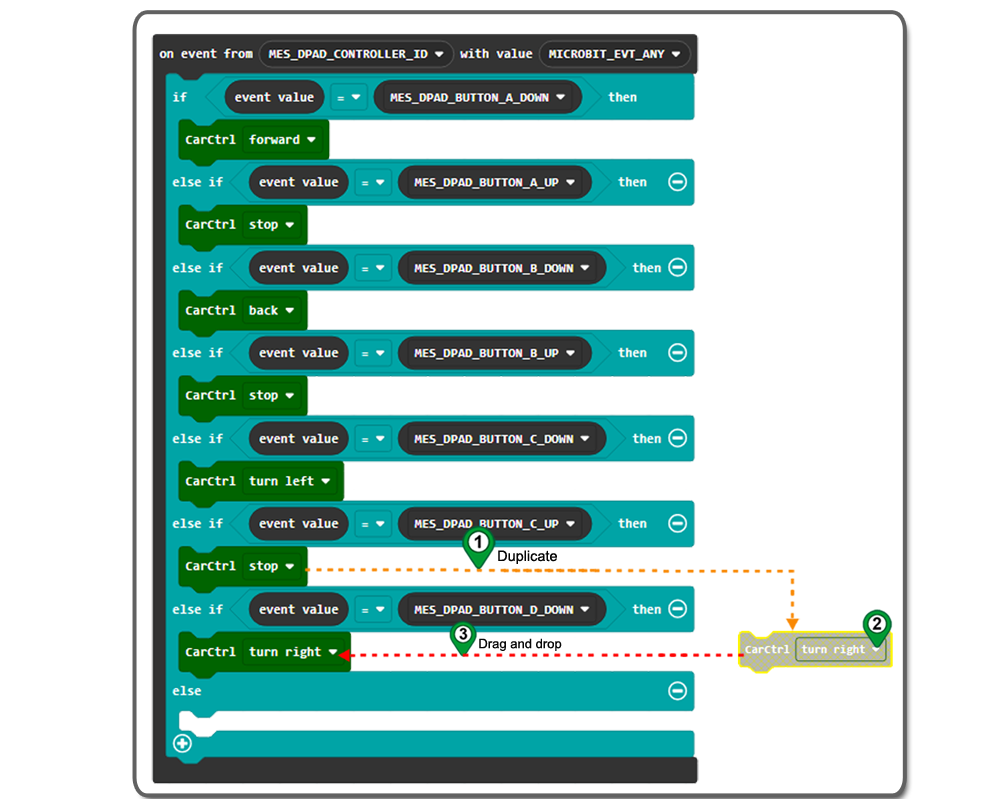
Step 29.DuplicateCarCtrlblock and change the direction to Turn right, and then place it on the seventh then sectionas following picture:
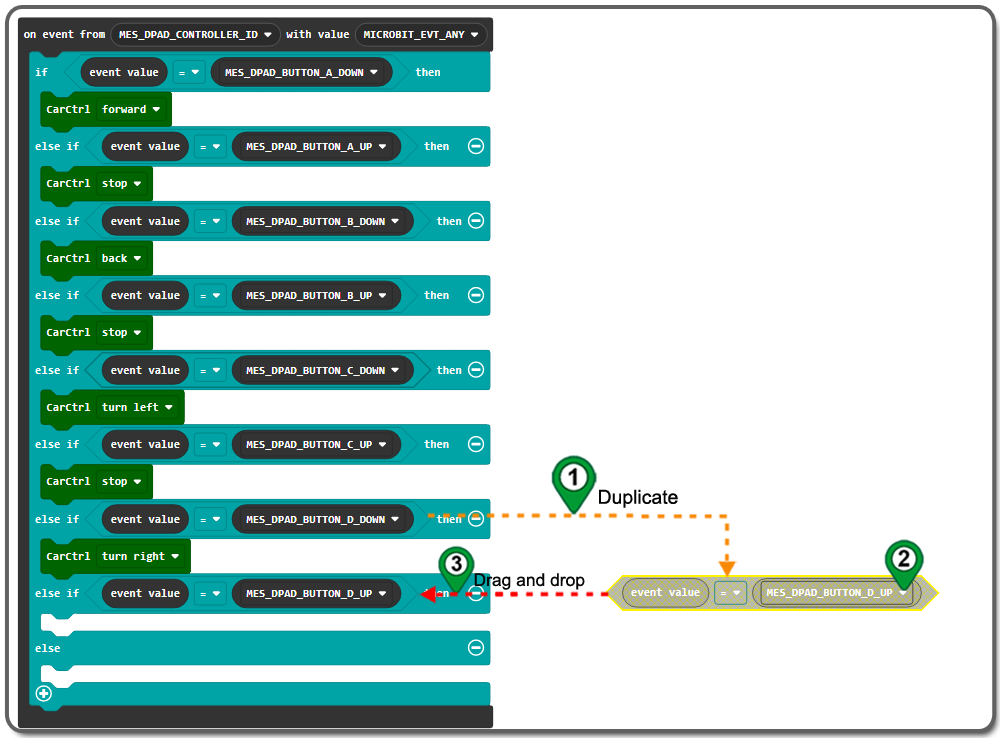
Step 30.Click “+” to add an else section, and duplicateComparisonblock and change MES_DPAD_BUTTON_D_Down to MES_DPAD_BUTTON_D_up, and then place it on the eighth if sectionas following picture:
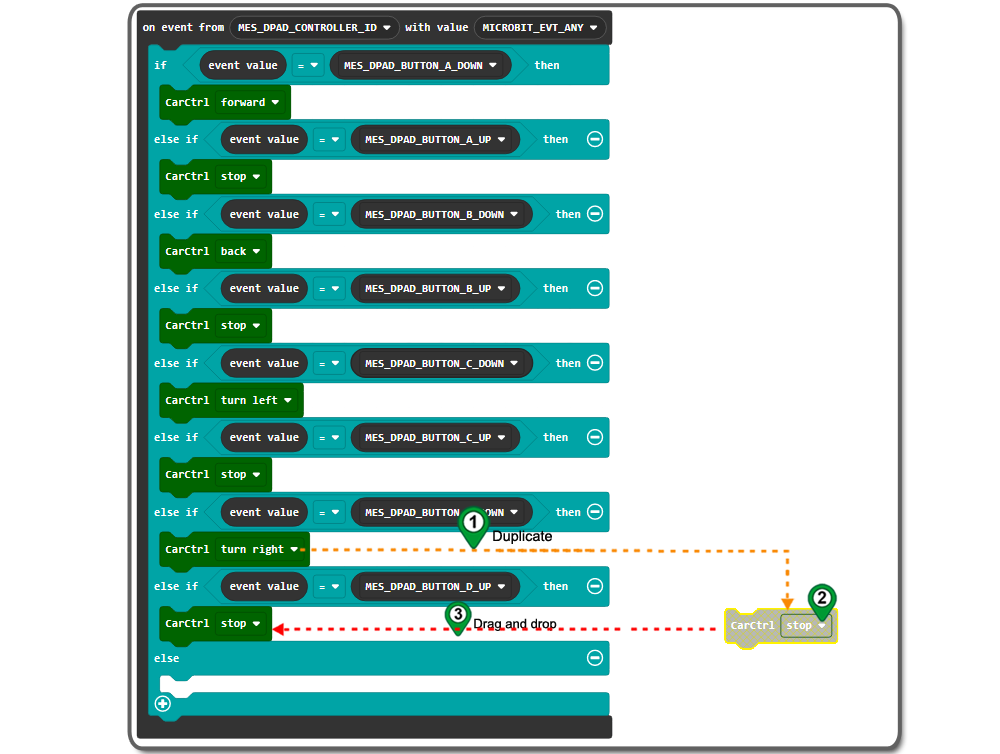
Step 31.DuplicateCarCtrlblock and change the direction to stop, and then place it on the eighth then sectionas following picture:
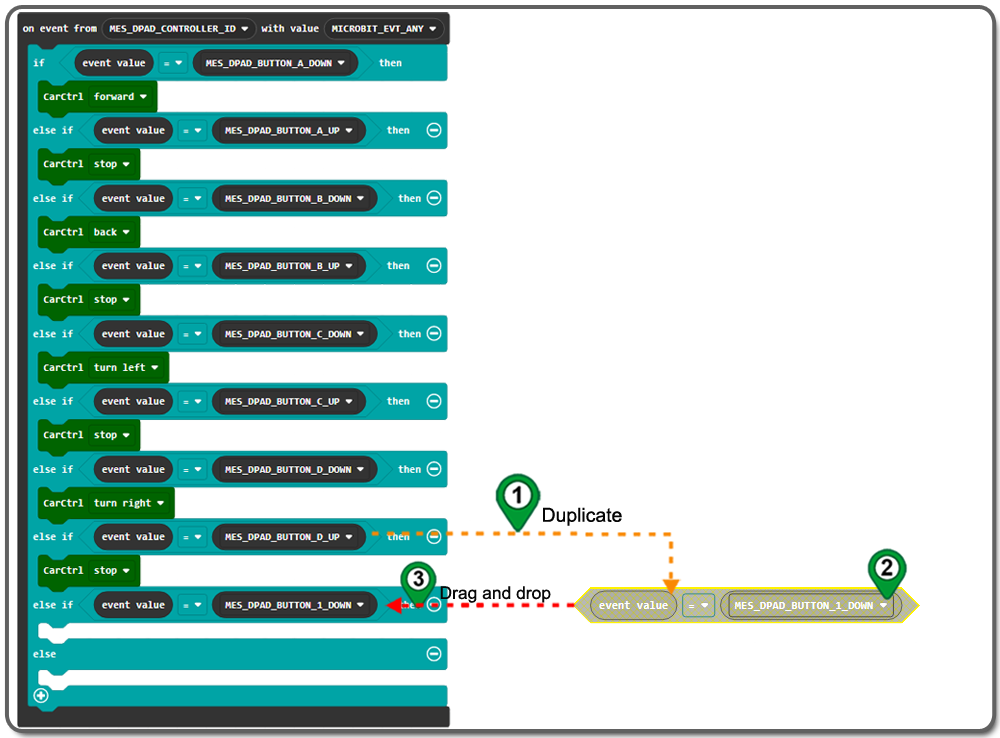
Step 32.Click “+” to add an else section, and duplicateComparisonblock and change MES_DPAD_BUTTON_D_up to MES_DPAD_BUTTON_1_down, and then place it on the ninth if sectionas following picture:
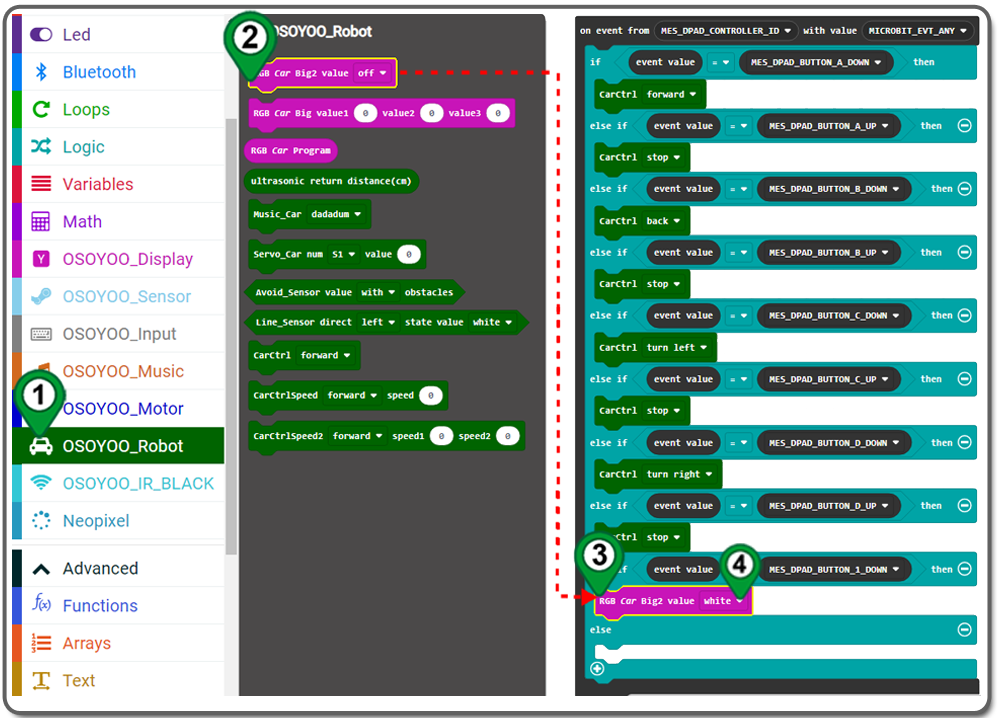
Step 33.Click on the OSOYOO_Robot category. Drag RGB Car Big2 value off block and place it inside the ninth then section, set white (as you like) from drop-down menu.
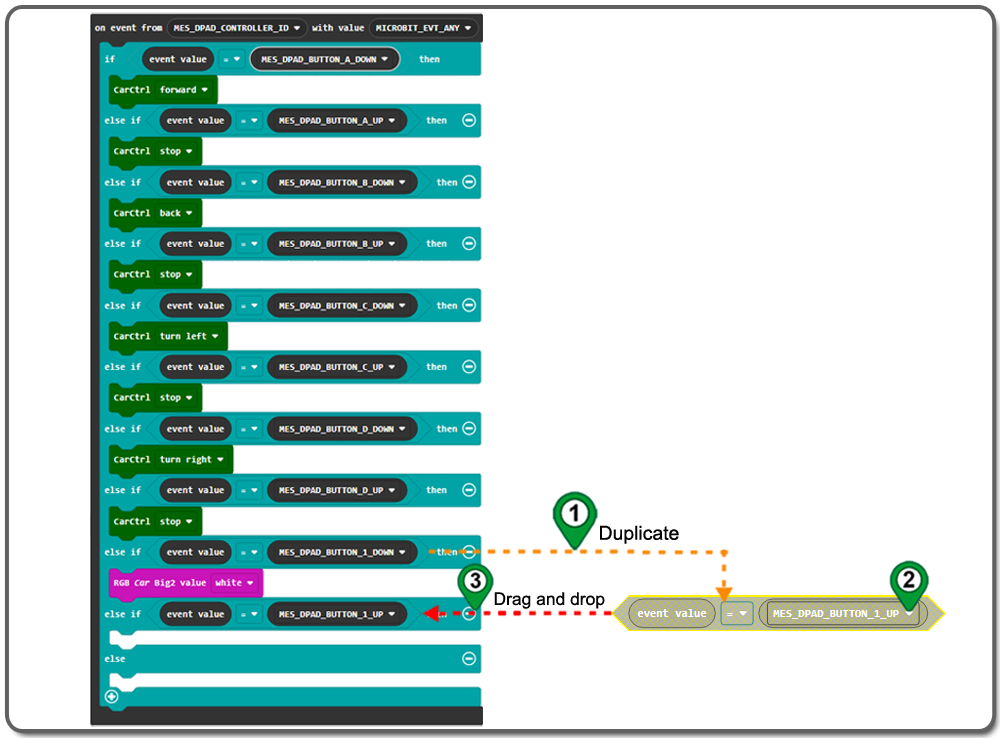
Step 34.Click “+” to add an else section, and duplicateComparisonblock and change MES_DPAD_BUTTON_1_Down to MES_DPAD_BUTTON_1_up, and then place it on the tenth if sectionas following picture:
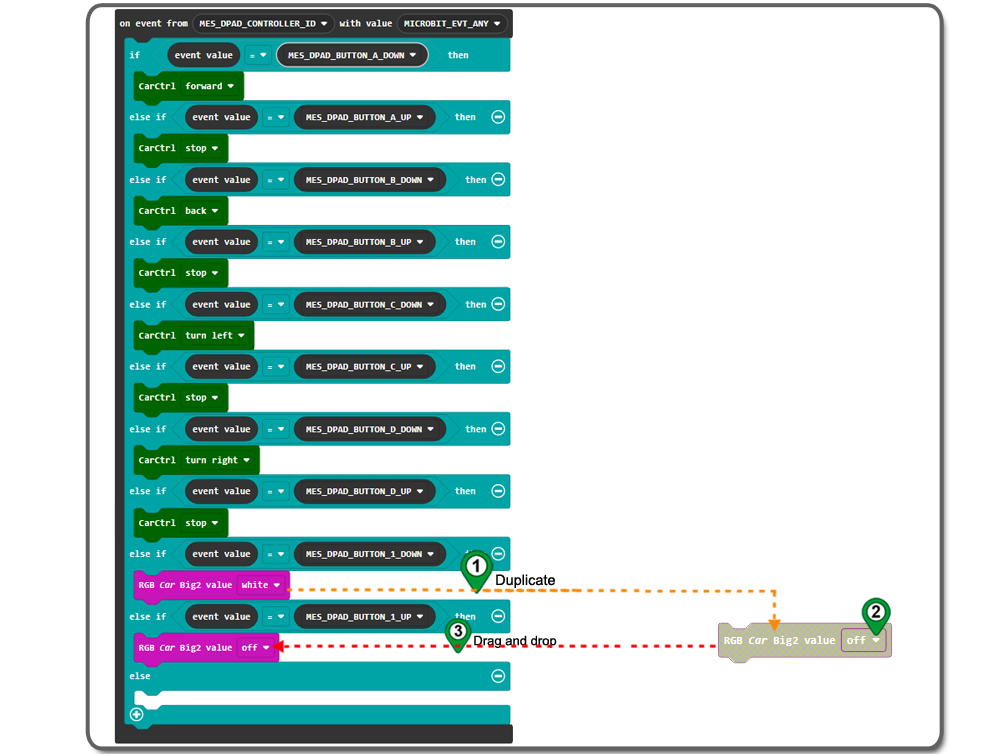
Step 35.DuplicateRGB Car Big2 valueblock and change the color to off, and then place it on the tenth then sectionas following picture:
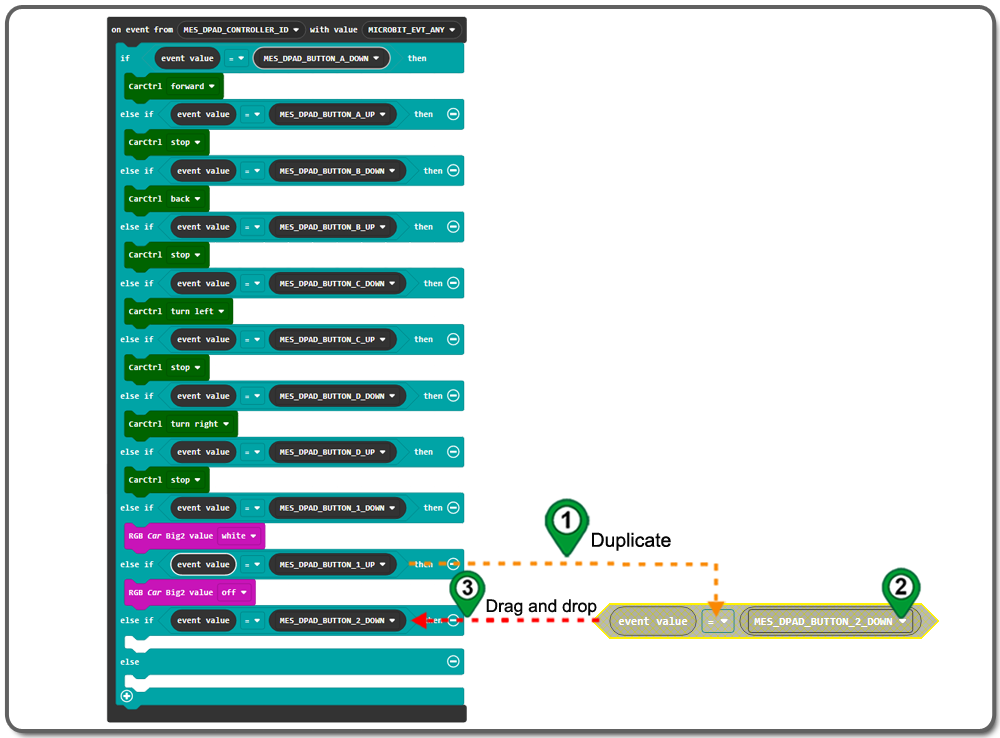
Step 36.Click “+” to add an else section, and duplicateComparisonblock and change MES_DPAD_BUTTON_1_up to MES_DPAD_BUTTON_2_down, and then place it on the eleventh if sectionas following picture:
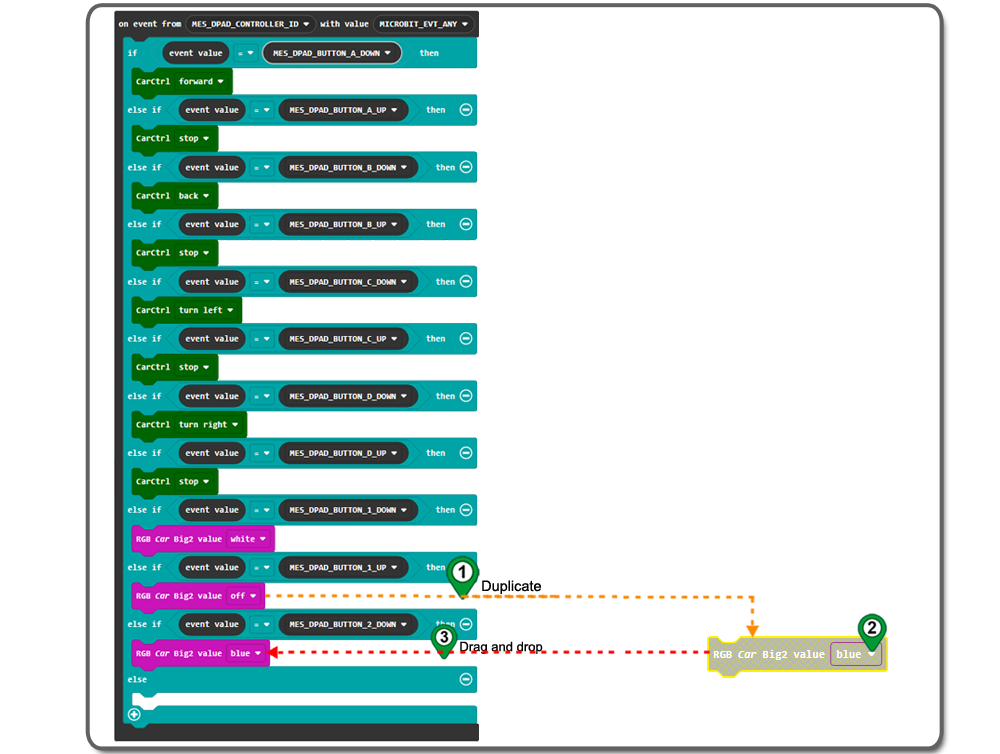
Step 37.DuplicateRGB Car Big2 valueblock and change the color to blue, and then place it on the eleventh then sectionas following picture:
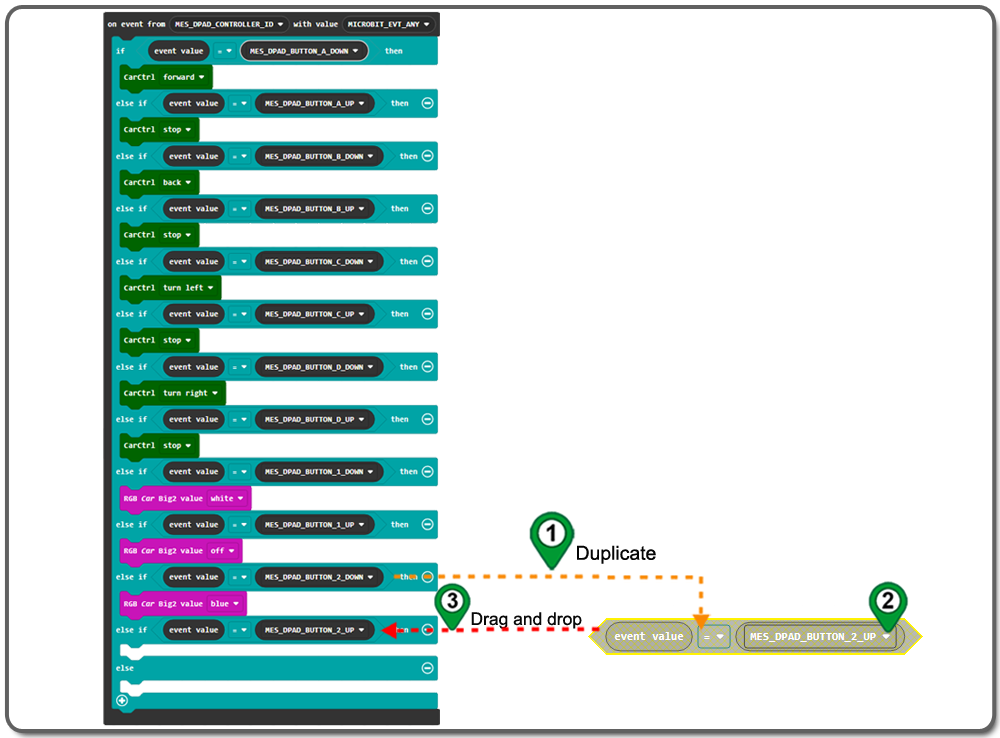
Step 38.Click “+” to add an else section, and duplicateComparisonblock and change MES_DPAD_BUTTON_2_Down to MES_DPAD_BUTTON_2_up, and then place it on the twelfth if sectionas following picture:
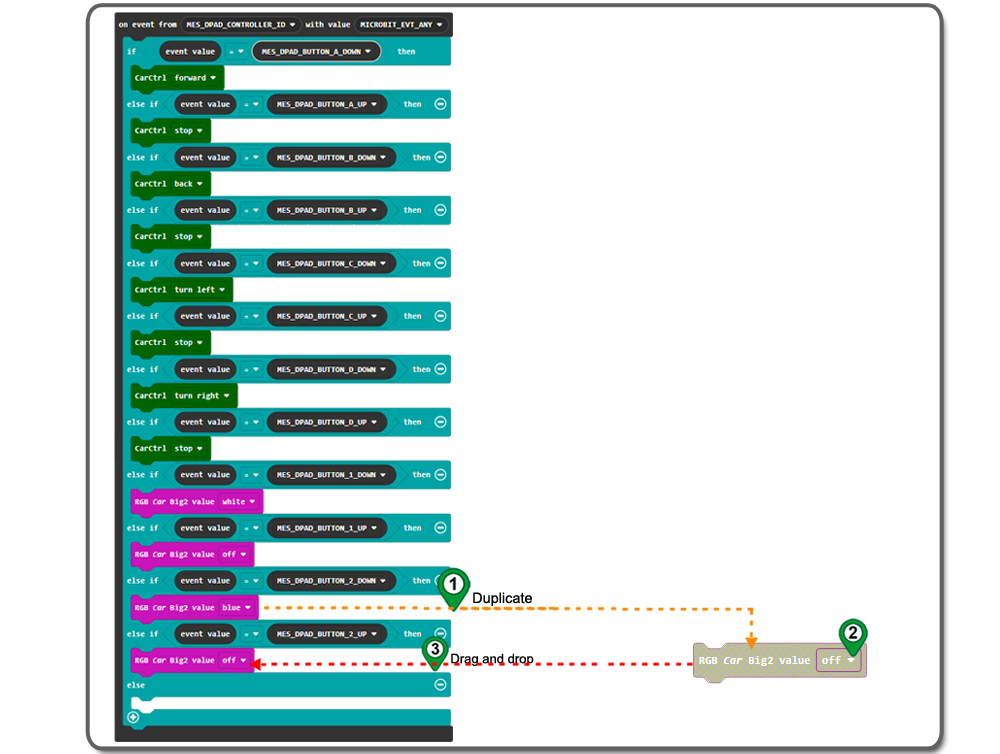
Step 39.DuplicateRGB Car Big2 valueblock and change the color to off, and then place it on the twelfth then sectionas following picture:
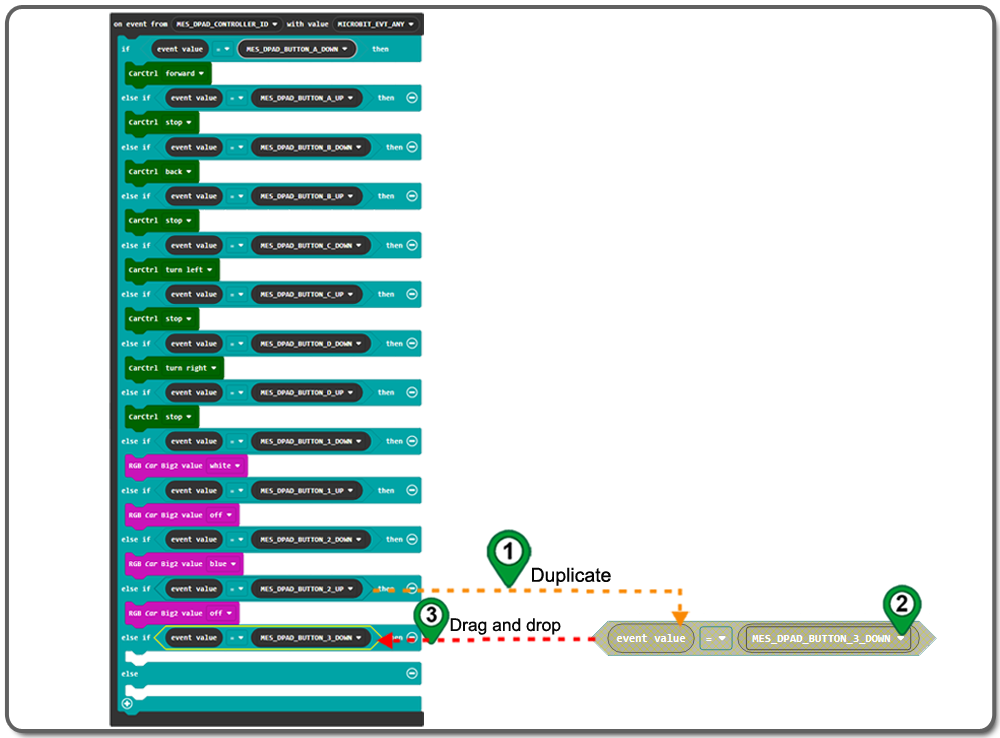
Step 40.Click “+” to add an else section, and duplicateComparisonblock and change MES_DPAD_BUTTON_2_up to MES_DPAD_BUTTON_3_down, and then place it on the thirteenth if sectionas following picture:
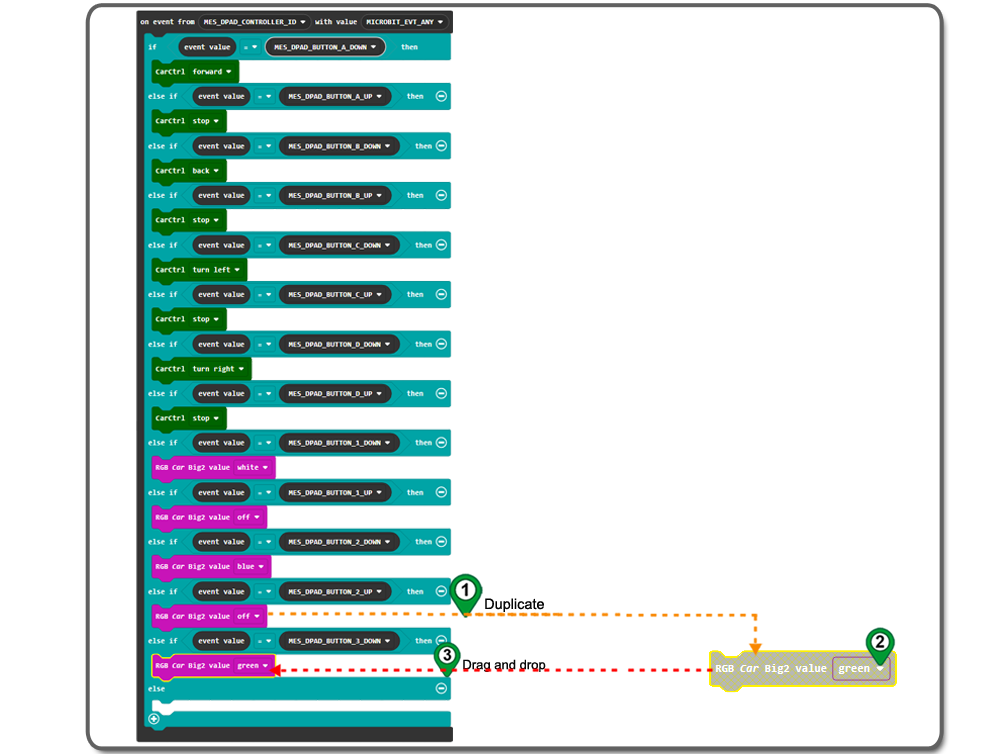
Step 41.DuplicateRGB Car Big2 valueblock and change the color to green, and then place it on the thirteenth then sectionas following picture:
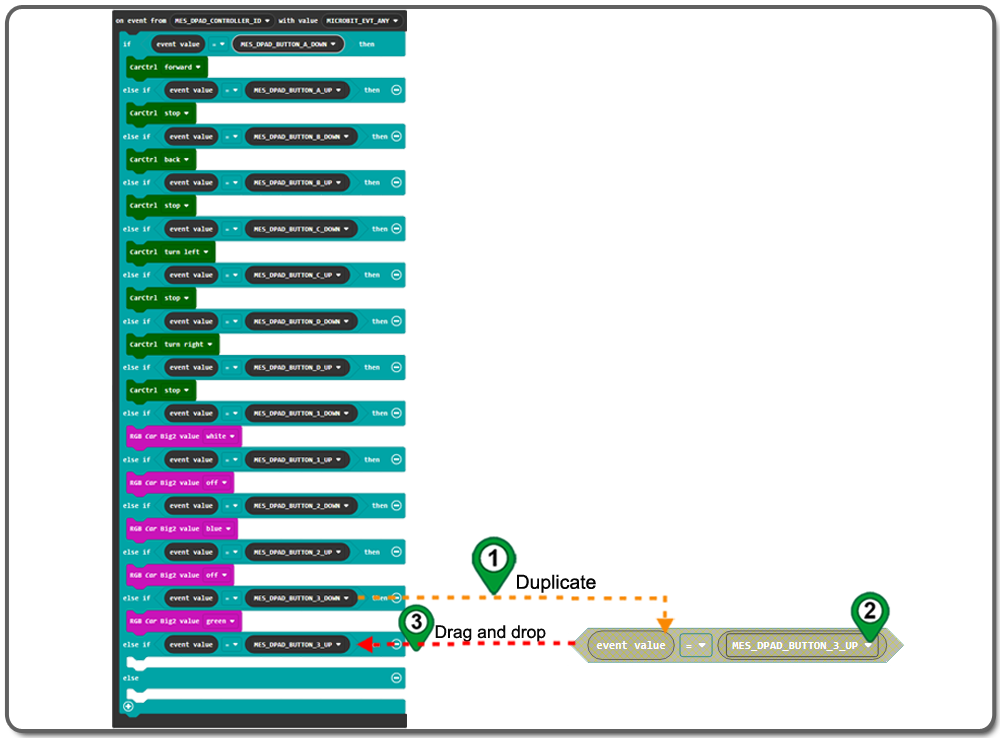
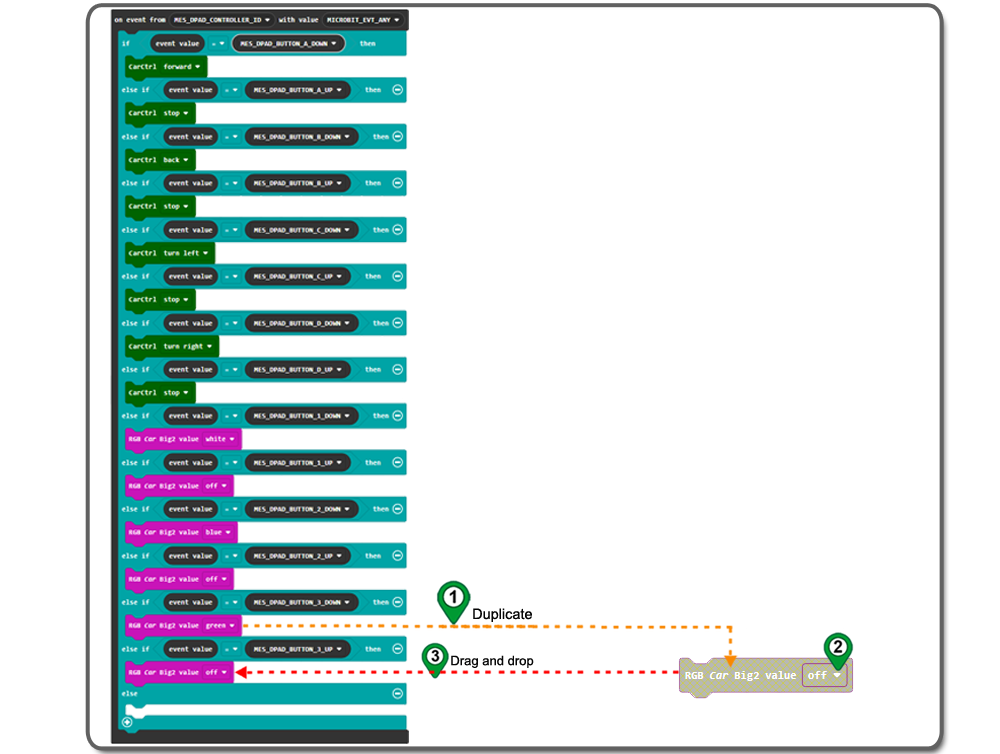
Step 42.Click “+” to add an else section, and duplicateComparisonblock and change MES_DPAD_BUTTON_3_Down to MES_DPAD_BUTTON_3_up, and then place it on the fourteenth if sectionas following picture:
Step 43.DuplicateRGB Car Big2 valueblock and change the color to off, and then place it on the fourteenth then sectionas following picture:
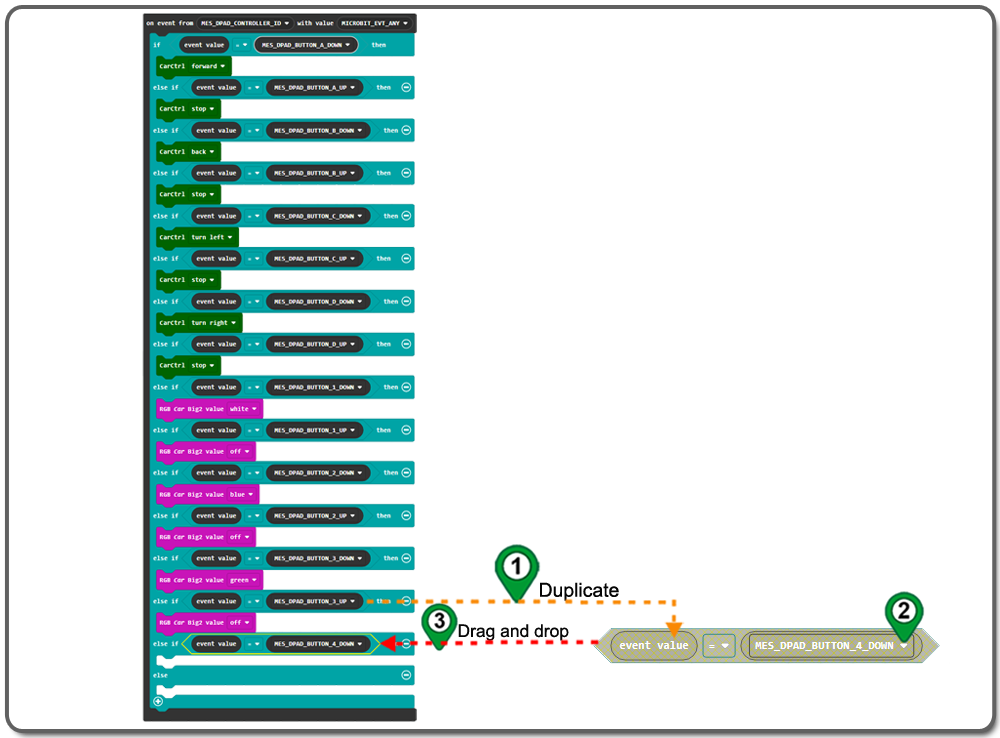
Step 44.Click “+” to add an else section, and duplicateComparisonblock and change MES_DPAD_BUTTON_3_up to MES_DPAD_BUTTON_4_down, and then place it on the fifteenth if sectionas following picture:
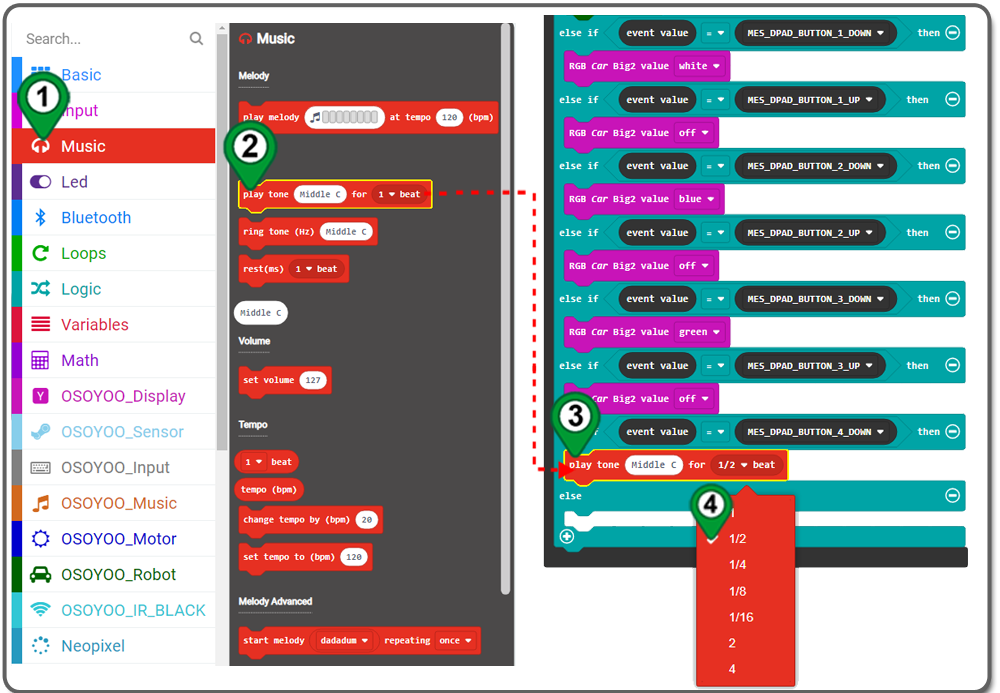
Step 45. Click on the Music category. Then drag the Play tone for beat block over, and drop it on the fifteenth then section. and select Middle C as tone, 1/2 as beat
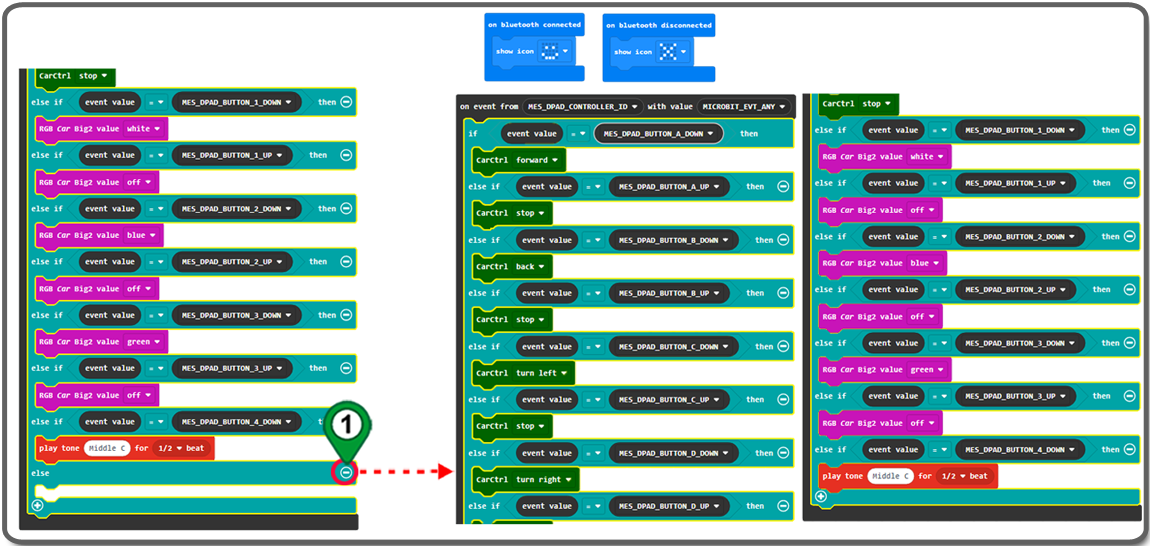
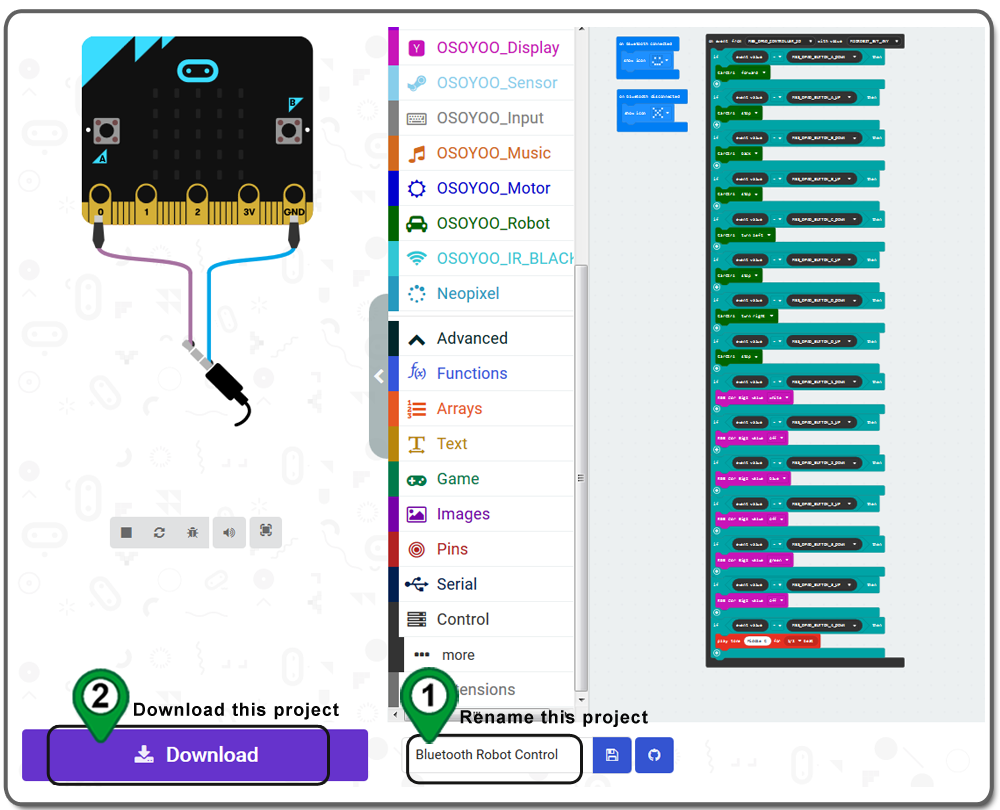
Step 46. Click “-” to remove an else section, and the whole code as following:
Step 47. Rename this project and download the hex file as following
Step A)Connect the micro:bit with the computer through USB cable, and the computer will pop up a U disk and send the download file(.hex)to your micro:bit.
Step B)Insert the micro:bit main board and install a 9v battery into the battery box.
Step C)Turn the POWER switch ON. Putting the car on the floor, Pair with your phone, and open Dual D-Pad Controller in APP to control the robot
“Smile” is displayed on Bluetooth connection, and “X” is displayed on Bluetooth disconnection.
The buttons on the left of the control panel control the movement of the car, and the buttons on the right of the control panel control the headlights and horns of the car.


 Step 2: check the first option “No Pairing Required: Anyone can connect via Bluetooth”
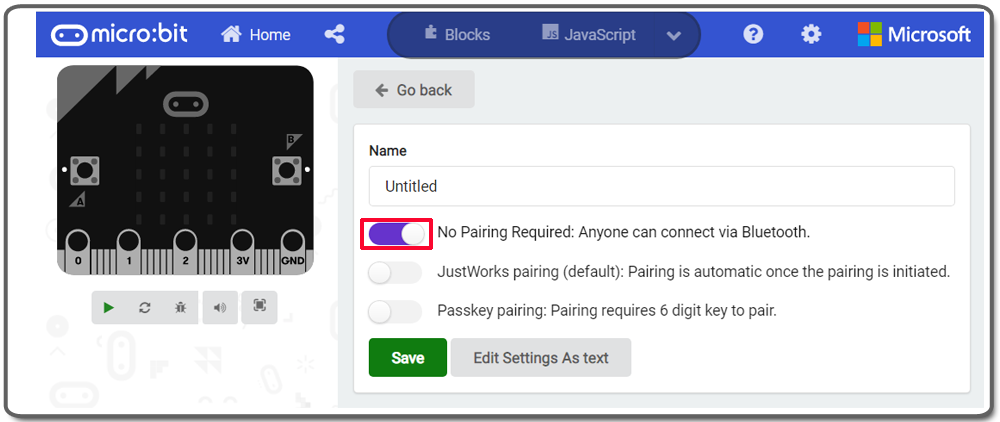
 Step 4. In the Extensions page , you can see the Bluetooth package and click it to add the package, you will see a pop up window, and click “Remove extensions and add bluetooth. (Note: If you don’t see the bluetooth package the first of Extensions page, please enter “bluetooth” in search textbox and then search it.)