Objective
NodeMCU is a powerful affordable Wifi MCU which supports Arduino IDE. However, NodeMCU has limited PWM ports and current output. In many robotic and IoT applications , we need to control many servos through IoT devices (i.e cell phone APP), how to do such projects?
PCA9685 is a PWM module which can be controlled by MCU through I2C port. PWM is the signal to drive servo and NodeMCU has I2C port.
In this project, we will show how NodeMCU use I2C to control a Servo which is connected to PCA9685 PWM port.
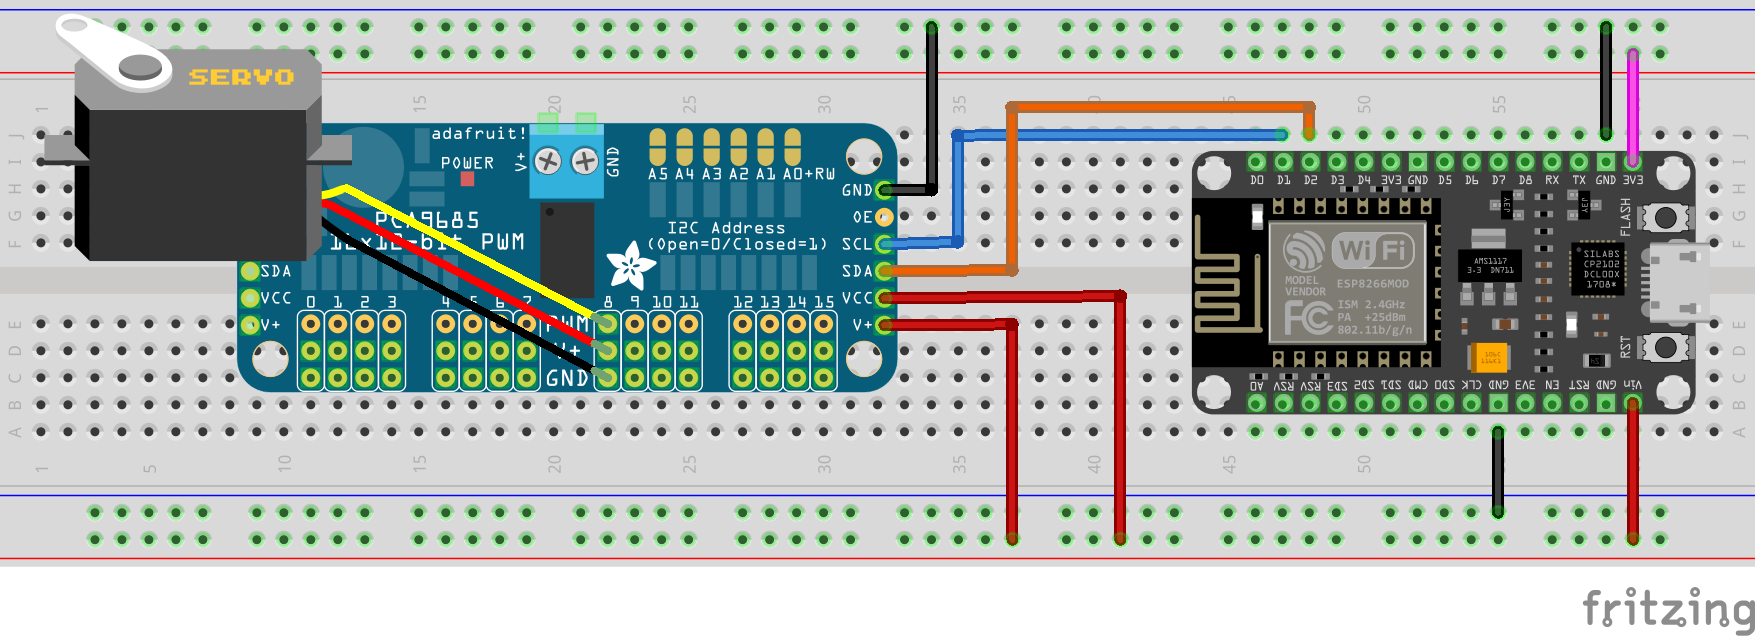
Hardware Connection Graph

Fritzing File Download: https://osoyoo.com/driver/nodemcu/nodemcu-pca9685.fzz
Software Download :
Software Installation:
Prerequisite:
You need to configure NodeMCU in your Arduino IDE before running the program. If you haven’t done this, please read following tutorial:
https://osoyoo.com/2023/02/23/getting-started-with-nodemcu-using-arduinoide/
You also need to download HCPA9685.zip file from https://osoyoo.com/driver/nodemcu/HCPA9685.zip , then import this zip file to Arduino IDE ->Sketch-> Include Library -> Add Zip file
Software Installation:
Download the sketch code from : https://osoyoo.com/driver/nodemcu/nodemcu-pca9685.zip
Open the nodemcu-pca9685.ino file in Arduino IDE, change line 14,15, replace SSID and Password to match your home Wifi setting.
Then upload the sketch code to Arduino IDE, you will see the IP address of your NodeMCU board(in follow example, IP address is 192.168.1.81).

Write down the Arduino IP address in a paper, you need to set it to your APP later
APP Installation and Setting
Download OSOYOO IoT APP by searching OSOYOO iot udp robot car app from Apple Store(iPhone/iPad) or Google Play Store(Android device)

1)Open APP, click Setting button in upper right corner
2)keep default port number 8888 without changing
3)Use the NodeMCU IP address to replace default IP 192.168.1.255 (in our example, set it to 192.168.1.81)
4)Click Save button to save the changes you just made
5)Click Back Arrow to go back APP front UI

Test
You can move the top slider to rotate the servo.


