Para conectar nuestras Cosas a Internet, necesitamos seleccionar algún protocolo de comunicación de Internet para que los diferentes dispositivos de Internet puedan hablar entre ellos. Algunos protocolos IoT comúnmente utilizados son HTTP, MQTT, etc.
En esta lección, aprenderemos como usar el protocolo HTTP y como hacer un simple servidor web HTTP con Osoyoo MEGA-IoT shield y el micro-controlador MEGA2560 y mostrar una página web “Hello World!” al navegador remoto. La página web también muestra el voltaje de entrada del pin A0 que es detectado por las funciones analogRead() de Arduino.
OSOYOO Placa MEGA2560 x 1
OSOYOO Tarjeta de ampliación MEGA-IoTx 1
Cable USB x 1
Cable puente macho-macho x 1
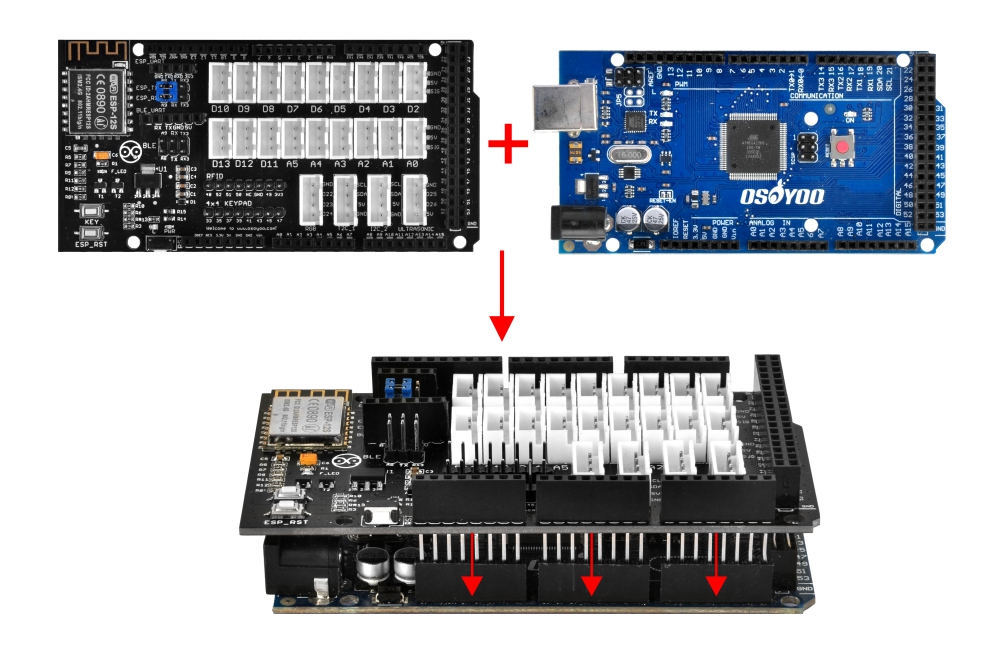
1).Por favor, conecte la tarjeta de extensión OSOYOO MEGA-IoT en la tarjeta OSOYOO MEGA2560.
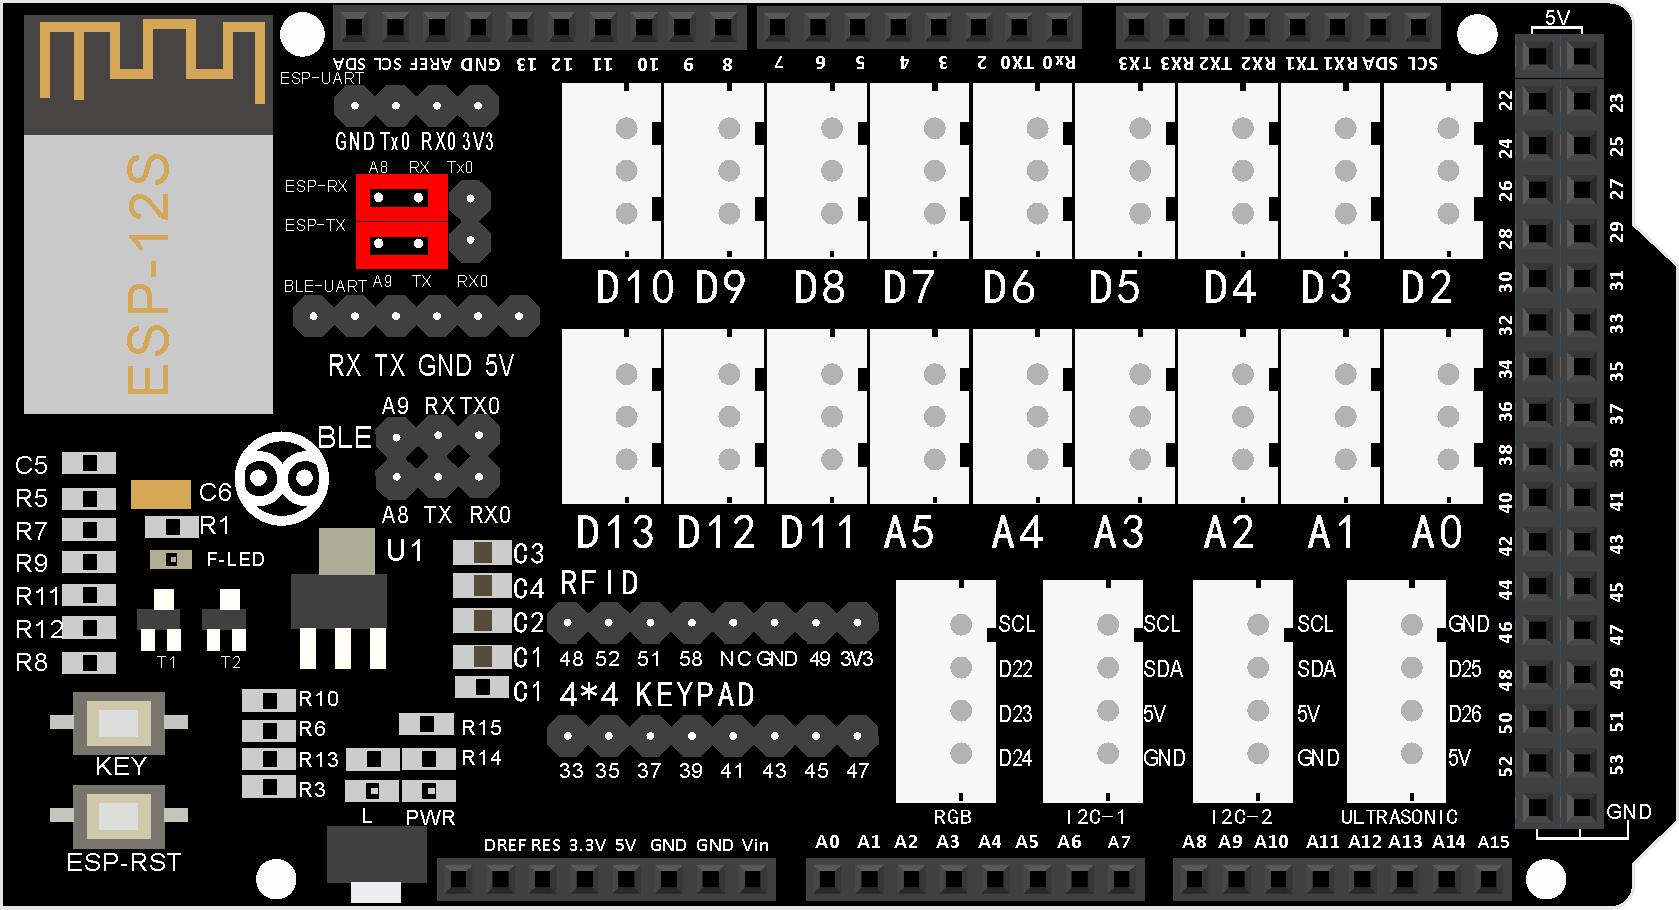
2) Utilice el puente Cap para conectar ESP8266 RX con A8, TX con A9)
Instalación del software:
Aviso: Apague la batería o desconecte el adaptador de corriente cuando cargue el código de sketch en su tarjeta OSOYOO MEGA2560.
Paso 2: La extensión OSOYOO MEGA-IoT tiene los pines TX/RX conectados por defecto a los pines A9/A8. Por lo tanto, en el código de su sketch, necesitamos utilizar el Puerto Serial de Software para comunicarnos con el ESP8266 (estableciendo A9 como TX y A8 como RX en el objeto SoftwareSerial). Primero, necesitamos descargar la biblioteca WiFiEsp-master desde el siguiente enlace: https://osoyoo.com/driver/WiFiEsp-master.zip
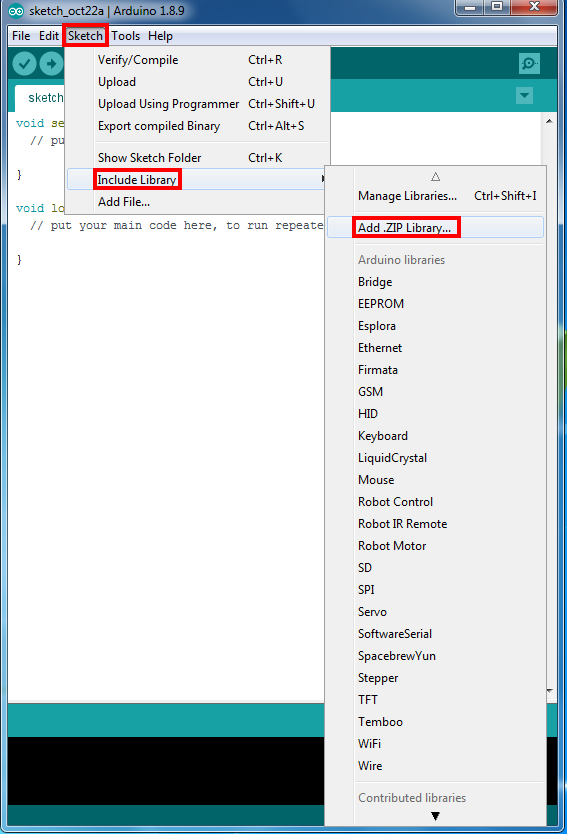
Paso 3: Abra el IDE -> Sketch -> Incluir Biblioteca -> Añadir Biblioteca en Zip para cargar los archivos zip anteriores en el IDE de Arduino.
Paso 4: Después de instalar la biblioteca anterior, por favor descargue el código principal desde el siguiente enlace. Descomprima el archivo zip descargado “lesson3.zip”, y encontrará una carpeta llamada “smarthome-lesson3”. https://osoyoo.com/driver/smarthome/smarthome-lesson3.zip
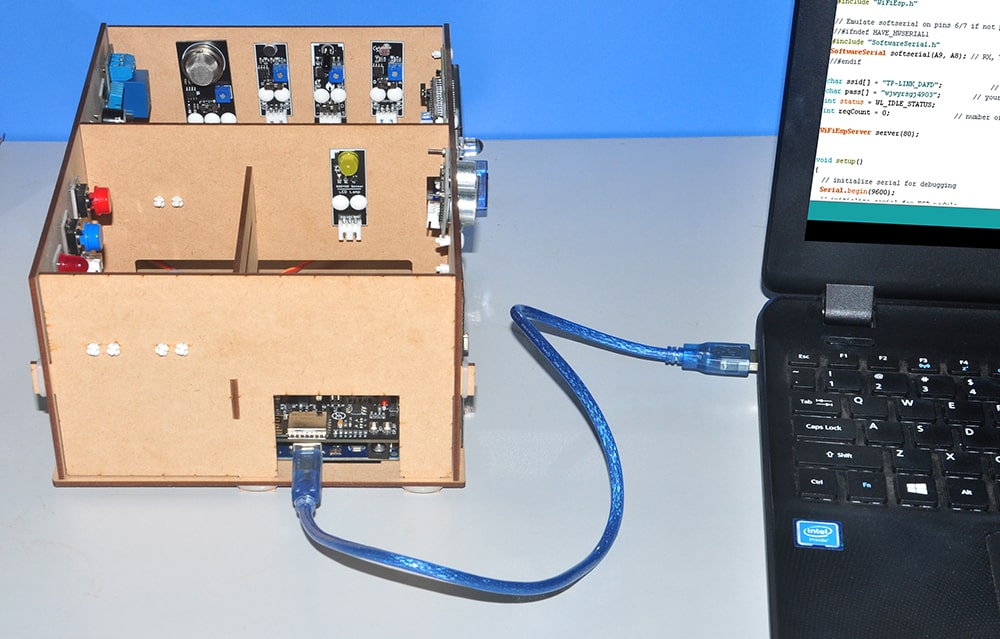
Paso 5: Una vez completadas las operaciones anteriores, conecte la placa OSOYOO MEGA2560 al PC con el cable USB.
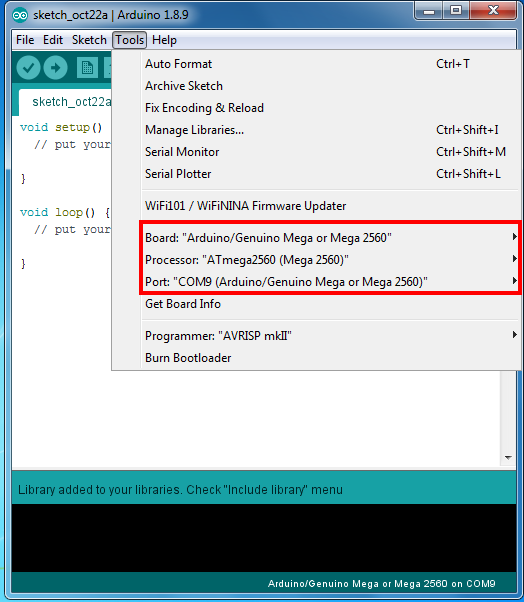
Paso 6: Abra el IDE y elija el tipo de placa y el tipo de puerto correspondientes a su proyecto.
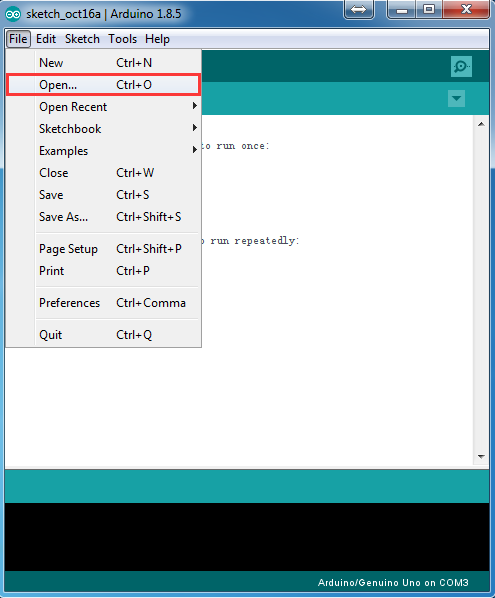
Paso 7: IDE: Pulsa archivo -> pulsa Abrir -> elige código “smarthome-lesson3”, carga el sketch en tu placa.
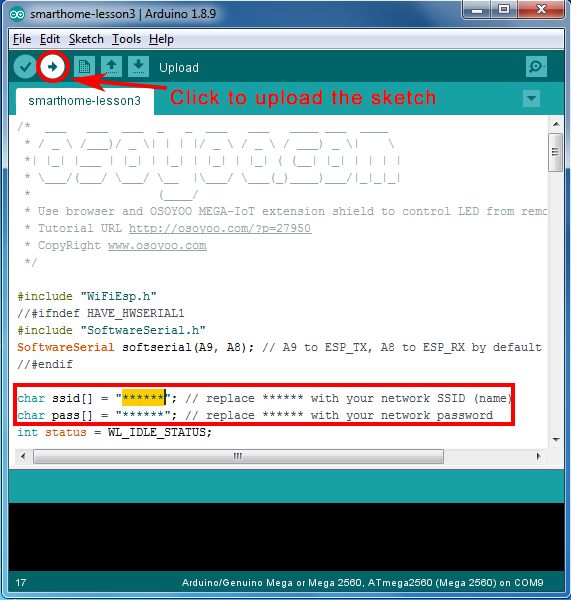
Nota: En el sketch, busque las siguientes líneas:
char ssid[] = "******"; // your network SSID (name)
char pass[] = "******"; // your network password
Por favor, reemplace los ****** con su SSID y contraseña wifi correctos, de lo contrario su proyecto no podrá conectarse a Internet.
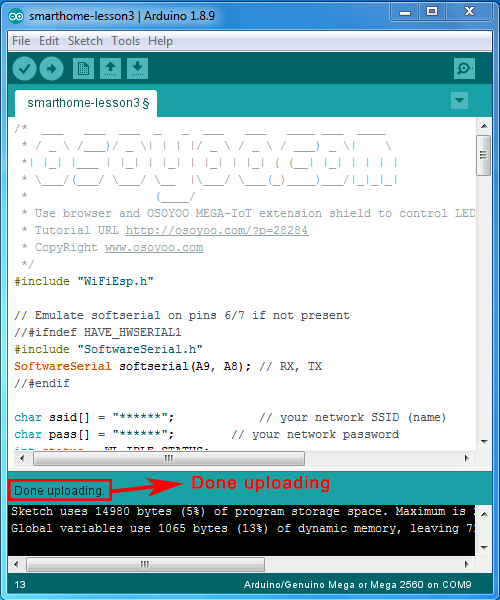
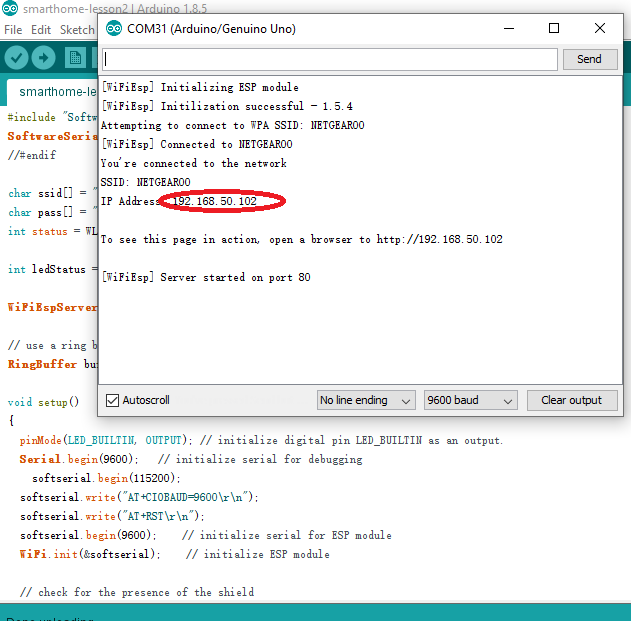
Después de cargar el sketch en el IDE, abra el monitor serie en la esquina superior derecha del IDE, y verá el siguiente resultado:
Desde el monitor serie, usted puede ver la dirección IP de su tarjeta MEGA2560 en el círculo rojo (en la imagen anterior, 192.168.50.102).
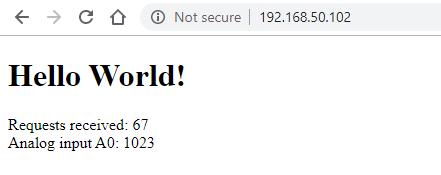
A continuación, utilice su navegador para visitar el sitio web http://mega2560-ip-address (in above case, http://192.168.50.102), verá el siguiente resultado:
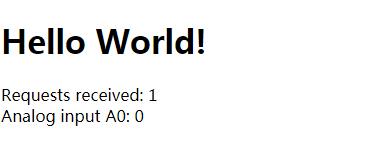
El resultado anterior también muestra el voltaje de entrada del pin A0 a través de la función analogRead(0) en la línea 94. analogRead() puede leer el voltaje de entrada 0-5V y devolver un valor entre 0 y 1023 que representa el voltaje.
Si conectamos A0 a GND mediante un cable puente, la entrada analógica A0: muestra 0
Si conectamos A0 a 5V mediante un cable puente, la entrada analógica A0: muestra 1023.
Solución de problemas
A veces, cuando se ejecuta el proyecto lesson3, ESP8266 podría tener problemas de inicialización con MEGA2560 A8, A9 pines y esto causa WifiESP error de inicialización que muestra en el monitor serie como sigue:
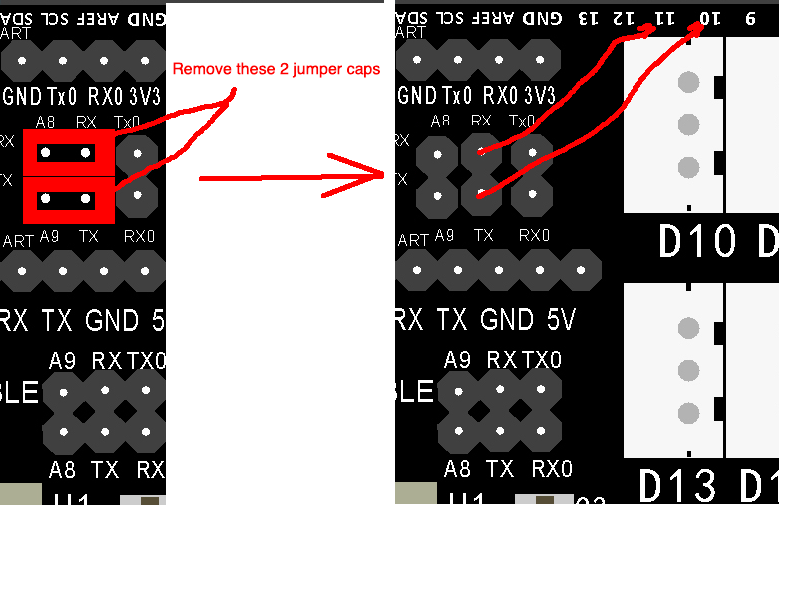
Para resolver el problema, tenemos que utilizar el pin estable D10,D11 para inicializar ESP8266 y luego cambiar de nuevo a A8,A9.
Para ello, por favor haga como por los siguientes pasos:
Paso 1) Retire las tapas de puente en A8/ESP_RX y A9/ESP_TX, a continuación, utilice dos cables de puente hembra-macho conectar ESP_RX a D11 y ESP_TX a D10,
véase la siguiente imagen:
Por encima de cambio de circuito utilizará D10, D11 en lugar de A8, A9 para conectar ESP8266 puerto serie porque MEGA2560 A8,A9 no es tan estable como D10,D11.
Paso 2) Ahora necesitamos cambiar ligeramente algo de código del archivo de boceto de la Lección 3, línea 15:
Original line 15 is : SoftwareSerial softserial(A9, A8); // RX, TXPlease change above line to: SoftwareSerial softserial(10, 11); // RX, TX
Paso 3) Carga el sketch al IDE y el Initializing normalmente pasará y mostrará
[WiFiEsp] Initilization successful - 1.5.4 SSI
Esto significa que su chip ESP8266 se ha conectado a su MEGA2560. Entonces su OSOYOO Advanced Board for MEGA2560 Board seguirá conectando su wifi SSID y Serial Monitor le dirá la dirección IP.
Una vez que el procedimiento anterior se ha hecho. En realidad se puede hacer retroceder la conexión ESP8266 a A8,A9 igual que el estado original, y cambiar la línea 15 a : SoftwareSerial softserial(A9, A8); // RX, TX
Ahora carga el sketch original de la Lección 3, funcionará .
I am getting this error on the serial monitor:
[WiFiEsp] Initializing ESP module
[WiFiEsp] >>> TIMEOUT >>>
[WiFiEsp] >>> TIMEOUT >>>
[WiFiEsp] >>> TIMEOUT >>>
[WiFiEsp] >>> TIMEOUT >>>
[WiFiEsp] >>> TIMEOUT >>>
[WiFiEsp] Cannot initialize ESP module
[WiFiEsp] >>> TIMEOUT >>>
[WiFiEsp] No tag found
WiFi shield not present
Hi Cbales!
I’m running into the same problem but I am sure I have the jumpers right.
What did you end up doing exactly?
Do I need a third jumper on Tx0 and Rx0 or something?
This is the message I am getting – what could I be doing wrong. I checked to make sure the ssid and password are correct and the pins are entered correctly.
[WiFiEsp] Initializing ESP module
[WiFiEsp] >>> TIMEOUT >>>
[WiFiEsp] >>> TIMEOUT >>>
[WiFiEsp] >>> TIMEOUT >>>
[WiFiEsp] >>> TIMEOUT >>>
[WiFiEsp] >>> TIMEOUT >>>
[WiFiEsp] Cannot initialize ESP module
[WiFiEsp] >>> TIMEOUT >>>
[WiFiEsp] No tag found
WiFi shield not present
// Emulate softserial on pins 6/7 if not present
//#ifndef HAVE_HWSERIAL1
#include “SoftwareSerial.h”
SoftwareSerial softserial (10, 11); // RX, TX
//#endif
char ssid[] = “vodafone3418”; // your network SSID (name)
char pass[] = “RJSPSB7TVU78R8”; // your network password
int status = WL_IDLE_STATUS;
int reqCount = 0; // number of requests received
WiFiEspServer server(80);
void setup()
{
// initialize serial for debugging
Serial.begin(9600);
// initialize serial for ESP module
softserial.begin(115200);
softserial.write(“AT+CIOBAUD=9600\r\n”);
softserial.write(“AT+RST\r\n”);
softserial.begin(9600);
// initialize ESP module
WiFi.init(&softserial);
// check for the presence of the shield
if (WiFi.status() == WL_NO_SHIELD) {
Serial.println(“WiFi shield not present”);
// don’t continue
while (true);
}
// attempt to connect to WiFi network
while ( status != WL_CONNECTED) {
Serial.print(“Attempting to connect to WPA SSID: “);
Serial.println(ssid);
// Connect to WPA/WPA2 network
status = WiFi.begin(ssid, pass);
}
Serial.println(“You’re connected to the network”);
printWifiStatus();
// start the web server on port 80
server.begin();
}
void loop()
{
// listen for incoming clients
WiFiEspClient client = server.available();
if (client) {
Serial.println(“New client”);
// an http request ends with a blank line
boolean currentLineIsBlank = true;
while (client.connected()) {
if (client.available()) {
char c = client.read();
Serial.write(c);
// if you’ve gotten to the end of the line (received a newline
// character) and the line is blank, the http request has ended,
// so you can send a reply
if (c == ‘\n’ && currentLineIsBlank) {
Serial.println(“Sending response”);
// send a standard http response header
// use \r\n instead of many println statements to speedup data send
client.print(
“HTTP/1.1 200 OK\r\n”
“Content-Type: text/html\r\n”
“Connection: close\r\n” // the connection will be closed after completion of the response
“Refresh: 20\r\n” // refresh the page automatically every 20 sec
“\r\n”);
client.print(“\r\n”);
client.print(“\r\n”);
client.print(“Hello World!\r\n”);
client.print(“Requests received: “);
client.print(++reqCount);
client.print(“\r\n”);
client.print(“Analog input A0: “);
client.print(analogRead(0));
client.print(“\r\n”);
client.print(“\r\n”);
break;
}
if (c == ‘\n’) {
// you’re starting a new line
currentLineIsBlank = true;
}
else if (c != ‘\r’) {
// you’ve gotten a character on the current line
currentLineIsBlank = false;
}
}
}
// give the web browser time to receive the data
delay(10);
// close the connection:
client.stop();
Serial.println(“Client disconnected”);
}
}
void printWifiStatus()
{
// print the SSID of the network you’re attached to
Serial.print(“SSID: “);
Serial.println(WiFi.SSID());
// print your WiFi shield’s IP address
IPAddress ip = WiFi.localIP();
Serial.print(“IP Address: “);
Serial.println(ip);
// print where to go in the browser
Serial.println();
Serial.print(“To see this page in action, open a browser to http://“);
Serial.println(ip);
Serial.println();
}
y ya esta . Y ademas quitar los jumpers y conectar lo de un cable macho hembra a los dos pines que te dice .
The wifi module works when I do the troubleshooting steps for connecting to 10, 11. However, when I try to roll back to the A8, A9 it is not working.
can anyone help by showing a picture of how the cables should be connected to A8, A9 — do i use the pnp jumpers or do i use the regualr jumper cables. Please help.
// Emulate softserial on pins 6/7 if not present
//#ifndef HAVE_HWSERIAL1
#include “SoftwareSerial.h”
SoftwareSerial softserial(10, 11); // RX, TX
//SoftwareSerial softserial(A9, A8); // RX, TX
//#endif
char ssid[] = “TEST”; // your network SSID (name)
char pass[] = “0001234”; // your network password
int status = WL_IDLE_STATUS;
int reqCount = 0; // number of requests received
WiFiEspServer server(80);
void setup()
{
// initialize serial for debugging
Serial.begin(9600);
// initialize serial for ESP module
softserial.begin(115200);
softserial.write(“AT+CIOBAUD=9600\r\n”);
softserial.write(“AT+RST\r\n”);
softserial.begin(9600);
// initialize ESP module
WiFi.init(&softserial);
// check for the presence of the shield
if (WiFi.status() == WL_NO_SHIELD) {
Serial.println(“WiFi shield not present”);
// don’t continue
while (true);
}
// attempt to connect to WiFi network
while ( status != WL_CONNECTED) {
Serial.print(“Attempting to connect to WPA SSID: “);
Serial.println(ssid);
// Connect to WPA/WPA2 network
status = WiFi.begin(ssid, pass);
}
Serial.println(“You’re connected to the network”);
printWifiStatus();
// start the web server on port 80
server.begin();
}
void loop()
{
// listen for incoming clients
WiFiEspClient client = server.available();
if (client) {
Serial.println(“New client”);
// an http request ends with a blank line
boolean currentLineIsBlank = true;
while (client.connected()) {
if (client.available()) {
char c = client.read();
Serial.write(c);
// if you’ve gotten to the end of the line (received a newline
// character) and the line is blank, the http request has ended,
// so you can send a reply
if (c == ‘\n’ && currentLineIsBlank) {
Serial.println(“Sending response”);
// send a standard http response header
// use \r\n instead of many println statements to speedup data send
client.print(
“HTTP/1.1 200 OK\r\n”
“Content-Type: text/html\r\n”
“Connection: close\r\n” // the connection will be closed after completion of the response
“Refresh: 20\r\n” // refresh the page automatically every 20 sec
“\r\n”);
client.print(“\r\n”);
client.print(“\r\n”);
client.print(“Hello World!\r\n”);
client.print(“Requests received: “);
client.print(++reqCount);
client.print(“\r\n”);
client.print(“Analog input A0: “);
client.print(analogRead(0));
client.print(“\r\n”);
client.print(“\r\n”);
break;
}
if (c == ‘\n’) {
// you’re starting a new line
currentLineIsBlank = true;
}
else if (c != ‘\r’) {
// you’ve gotten a character on the current line
currentLineIsBlank = false;
}
}
}
// give the web browser time to receive the data
delay(10);
// close the connection:
client.stop();
Serial.println(“Client disconnected”);
}
}
void printWifiStatus()
{
// print the SSID of the network you’re attached to
Serial.print(“SSID: “);
Serial.println(WiFi.SSID());
// print your WiFi shield’s IP address
IPAddress ip = WiFi.localIP();
Serial.print(“IP Address: “);
Serial.println(ip);
// print where to go in the browser
Serial.println();
Serial.print(“To see this page in action, open a browser to http://“);
Serial.println(ip);
Serial.println();
}
but the serial monitor shows me the following message:
[WiFiEsp] >>> TIMEOUT >>>
[WiFiEsp] >>> TIMEOUT >>>
[WiFiEsp] >>> TIMEOUT >>>
[WiFiEsp] >>> TIMEOUT >>>
[WiFiEsp] Cannot initialize ESP module
[WiFiEsp] >>> TIMEOUT >>>
[WiFiEsp] No tag found
WiFi shield not present


I am getting this error on the serial monitor:
[WiFiEsp] Initializing ESP module
[WiFiEsp] >>> TIMEOUT >>>
[WiFiEsp] >>> TIMEOUT >>>
[WiFiEsp] >>> TIMEOUT >>>
[WiFiEsp] >>> TIMEOUT >>>
[WiFiEsp] >>> TIMEOUT >>>
[WiFiEsp] Cannot initialize ESP module
[WiFiEsp] >>> TIMEOUT >>>
[WiFiEsp] No tag found
WiFi shield not present
Does this mean that my ESP shield is bad?
Nevermind. I solved the problem. The diagram showing the jumper cap connection is not very descriptive.
Hi Cbales!
I’m running into the same problem but I am sure I have the jumpers right.
What did you end up doing exactly?
Do I need a third jumper on Tx0 and Rx0 or something?
Check if your hotspot name and password are correct
Nevermind Cbales:
I had some bent pins on the board.
This is the message I am getting – what could I be doing wrong. I checked to make sure the ssid and password are correct and the pins are entered correctly.
[WiFiEsp] Initializing ESP module
[WiFiEsp] >>> TIMEOUT >>>
[WiFiEsp] >>> TIMEOUT >>>
[WiFiEsp] >>> TIMEOUT >>>
[WiFiEsp] >>> TIMEOUT >>>
[WiFiEsp] >>> TIMEOUT >>>
[WiFiEsp] Cannot initialize ESP module
[WiFiEsp] >>> TIMEOUT >>>
[WiFiEsp] No tag found
WiFi shield not present
tienes que descargarte la carpeta que te dan de wifiESP-master.zip y adjuntarla a la librería . Y después , cambiar el código a :
/* ___ ___ ___ _ _ ___ ___ ____ ___ ____
* / _ \ /___)/ _ \| | | |/ _ \ / _ \ / ___) _ \| \
*| |_| |___ | |_| | |_| | |_| | |_| ( (__| |_| | | | |
* \___/(___/ \___/ \__ |\___/ \___(_)____)___/|_|_|_|
* (____/
* Use browser and OSOYOO MEGA-IoT extension shield to control LED from remote browser
* Tutorial URL http://osoyoo.com/?p=28284
* CopyRight http://www.osoyoo.com
*/
#include “WiFiEsp.h”
// Emulate softserial on pins 6/7 if not present
//#ifndef HAVE_HWSERIAL1
#include “SoftwareSerial.h”
SoftwareSerial softserial (10, 11); // RX, TX
//#endif
char ssid[] = “vodafone3418”; // your network SSID (name)
char pass[] = “RJSPSB7TVU78R8”; // your network password
int status = WL_IDLE_STATUS;
int reqCount = 0; // number of requests received
WiFiEspServer server(80);
void setup()
{
// initialize serial for debugging
Serial.begin(9600);
// initialize serial for ESP module
softserial.begin(115200);
softserial.write(“AT+CIOBAUD=9600\r\n”);
softserial.write(“AT+RST\r\n”);
softserial.begin(9600);
// initialize ESP module
WiFi.init(&softserial);
// check for the presence of the shield
if (WiFi.status() == WL_NO_SHIELD) {
Serial.println(“WiFi shield not present”);
// don’t continue
while (true);
}
// attempt to connect to WiFi network
while ( status != WL_CONNECTED) {
Serial.print(“Attempting to connect to WPA SSID: “);
Serial.println(ssid);
// Connect to WPA/WPA2 network
status = WiFi.begin(ssid, pass);
}
Serial.println(“You’re connected to the network”);
printWifiStatus();
// start the web server on port 80
server.begin();
}
void loop()
{
// listen for incoming clients
WiFiEspClient client = server.available();
if (client) {
Serial.println(“New client”);
// an http request ends with a blank line
boolean currentLineIsBlank = true;
while (client.connected()) {
if (client.available()) {
char c = client.read();
Serial.write(c);
// if you’ve gotten to the end of the line (received a newline
// character) and the line is blank, the http request has ended,
// so you can send a reply
if (c == ‘\n’ && currentLineIsBlank) {
Serial.println(“Sending response”);
// send a standard http response header
// use \r\n instead of many println statements to speedup data send
client.print(
“HTTP/1.1 200 OK\r\n”
“Content-Type: text/html\r\n”
“Connection: close\r\n” // the connection will be closed after completion of the response
“Refresh: 20\r\n” // refresh the page automatically every 20 sec
“\r\n”);
client.print(“\r\n”);
client.print(“\r\n”);
client.print(“Hello World!\r\n”);
client.print(“Requests received: “);
client.print(++reqCount);
client.print(“\r\n”);
client.print(“Analog input A0: “);
client.print(analogRead(0));
client.print(“\r\n”);
client.print(“\r\n”);
break;
}
if (c == ‘\n’) {
// you’re starting a new line
currentLineIsBlank = true;
}
else if (c != ‘\r’) {
// you’ve gotten a character on the current line
currentLineIsBlank = false;
}
}
}
// give the web browser time to receive the data
delay(10);
// close the connection:
client.stop();
Serial.println(“Client disconnected”);
}
}
void printWifiStatus()
{
// print the SSID of the network you’re attached to
Serial.print(“SSID: “);
Serial.println(WiFi.SSID());
// print your WiFi shield’s IP address
IPAddress ip = WiFi.localIP();
Serial.print(“IP Address: “);
Serial.println(ip);
// print where to go in the browser
Serial.println();
Serial.print(“To see this page in action, open a browser to http://“);
Serial.println(ip);
Serial.println();
}
y ya esta . Y ademas quitar los jumpers y conectar lo de un cable macho hembra a los dos pines que te dice .
I’m running into the same problem. The pins are OK.
What shall I do ?
Hi gents
I get the same problem and jumpers seem to be ok
How did you solve yours?
The wifi module works when I do the troubleshooting steps for connecting to 10, 11. However, when I try to roll back to the A8, A9 it is not working.
can anyone help by showing a picture of how the cables should be connected to A8, A9 — do i use the pnp jumpers or do i use the regualr jumper cables. Please help.
I’ll reply you by email
Hi David,
I havent received the reply yet.
Thanks
have you sent it yet?
The mailbox prompts that the mail was delivered successfully
can someone help me!
Hi everyone i´m trying to start wifi ESP with the following code
/* ___ ___ ___ _ _ ___ ___ ____ ___ ____
* / _ \ /___)/ _ \| | | |/ _ \ / _ \ / ___) _ \| \
*| |_| |___ | |_| | |_| | |_| | |_| ( (__| |_| | | | |
* \___/(___/ \___/ \__ |\___/ \___(_)____)___/|_|_|_|
* (____/
* Use browser and OSOYOO MEGA-IoT extension shield to control LED from remote browser
* Tutorial URL http://osoyoo.com/?p=28284
* CopyRight http://www.osoyoo.com
*/
#include “WiFiEsp.h”
// Emulate softserial on pins 6/7 if not present
//#ifndef HAVE_HWSERIAL1
#include “SoftwareSerial.h”
SoftwareSerial softserial(10, 11); // RX, TX
//SoftwareSerial softserial(A9, A8); // RX, TX
//#endif
char ssid[] = “TEST”; // your network SSID (name)
char pass[] = “0001234”; // your network password
int status = WL_IDLE_STATUS;
int reqCount = 0; // number of requests received
WiFiEspServer server(80);
void setup()
{
// initialize serial for debugging
Serial.begin(9600);
// initialize serial for ESP module
softserial.begin(115200);
softserial.write(“AT+CIOBAUD=9600\r\n”);
softserial.write(“AT+RST\r\n”);
softserial.begin(9600);
// initialize ESP module
WiFi.init(&softserial);
// check for the presence of the shield
if (WiFi.status() == WL_NO_SHIELD) {
Serial.println(“WiFi shield not present”);
// don’t continue
while (true);
}
// attempt to connect to WiFi network
while ( status != WL_CONNECTED) {
Serial.print(“Attempting to connect to WPA SSID: “);
Serial.println(ssid);
// Connect to WPA/WPA2 network
status = WiFi.begin(ssid, pass);
}
Serial.println(“You’re connected to the network”);
printWifiStatus();
// start the web server on port 80
server.begin();
}
void loop()
{
// listen for incoming clients
WiFiEspClient client = server.available();
if (client) {
Serial.println(“New client”);
// an http request ends with a blank line
boolean currentLineIsBlank = true;
while (client.connected()) {
if (client.available()) {
char c = client.read();
Serial.write(c);
// if you’ve gotten to the end of the line (received a newline
// character) and the line is blank, the http request has ended,
// so you can send a reply
if (c == ‘\n’ && currentLineIsBlank) {
Serial.println(“Sending response”);
// send a standard http response header
// use \r\n instead of many println statements to speedup data send
client.print(
“HTTP/1.1 200 OK\r\n”
“Content-Type: text/html\r\n”
“Connection: close\r\n” // the connection will be closed after completion of the response
“Refresh: 20\r\n” // refresh the page automatically every 20 sec
“\r\n”);
client.print(“\r\n”);
client.print(“\r\n”);
client.print(“Hello World!\r\n”);
client.print(“Requests received: “);
client.print(++reqCount);
client.print(“\r\n”);
client.print(“Analog input A0: “);
client.print(analogRead(0));
client.print(“\r\n”);
client.print(“\r\n”);
break;
}
if (c == ‘\n’) {
// you’re starting a new line
currentLineIsBlank = true;
}
else if (c != ‘\r’) {
// you’ve gotten a character on the current line
currentLineIsBlank = false;
}
}
}
// give the web browser time to receive the data
delay(10);
// close the connection:
client.stop();
Serial.println(“Client disconnected”);
}
}
void printWifiStatus()
{
// print the SSID of the network you’re attached to
Serial.print(“SSID: “);
Serial.println(WiFi.SSID());
// print your WiFi shield’s IP address
IPAddress ip = WiFi.localIP();
Serial.print(“IP Address: “);
Serial.println(ip);
// print where to go in the browser
Serial.println();
Serial.print(“To see this page in action, open a browser to http://“);
Serial.println(ip);
Serial.println();
}
but the serial monitor shows me the following message:
[WiFiEsp] >>> TIMEOUT >>>
[WiFiEsp] >>> TIMEOUT >>>
[WiFiEsp] >>> TIMEOUT >>>
[WiFiEsp] >>> TIMEOUT >>>
[WiFiEsp] Cannot initialize ESP module
[WiFiEsp] >>> TIMEOUT >>>
[WiFiEsp] No tag found
WiFi shield not present