


Objective
In this lesson, we will introduce the basic concept of MQTT protocol. We will also use Raspberry Pi board and NodeMCU controller to make a demo MQTT network and exchange data between different clients installed in NodeMCU and Raspberry Pi.
Parts and Accessories
Raspberry Pi 3 or Raspberry Pi 4 computer board x 1 pc
OSOYOO NodeMCU controller board x 1 pc
About MQTT
Internet of Things ,abbreviated as IoT, is a very popular technology which can connect different sensors, actuators and smart devices into a network and exchange data among each other.
Engineers have developed many kinds of communication protocol to transfer data in IoT network. Some of these protocols include HTTP/HTTPS which are commonly used for web server, UDP which are usually used in Email transfer. In recent years, MQTT protocol becomes more and more dominant in IoT communication technology because its light weight data size, safe and efficient features.
There are many detailed MQTT tutorial and implementation solutions in the Internet. However, if you are an IoT beginner, those materials might be too complicated to be understood in short time.
In this tutorial, we try to simply the learning curve of MQTT by using a free open source software called Mosquitto to demonstrate MQTT protocol in an understandable way for beginners.
MQTT Basic Architecture
The MQTT structure is quite simple: MQTT network must have one server called Broker and multiple Clients(at least 2 clients). Following picture shows our sample MQTT topology structure which use a Raspberry Pi, NodeMCU or other computer as a broker and use NodeMCU as one of clients.
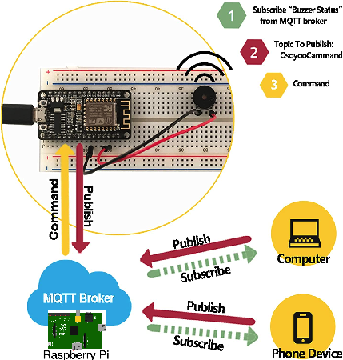
Broker is the middle server to manage security and data exchange among client devices.
In order to get data from Broker, a client must subscribe a topic in Broker server. When another client publish a message to a Broker with a topic, all clients who subscribed the same topic under the same broker will get the message.
Remark:
Broker and Clients are software concept which means Broker and Clients can be either in same hardware or distributed in different devices. For example, we can run a Broker server in Raspberry Pi and also run a client software in the same Raspberry Pi. In such cases, both broker and client are in the same hardware. However, in most of real application, Clients device are separated from Broker hardware.
Example:
Client A subscribed Topic “office temperature” in Broker at IP address 192.168.1.224
Client B subscribed Topic “office humidity” in Broker at IP address 192.168.1.220
Client C subscribed Topic “office temperature” in Broker at IP address 192.168.1.224
Client D subscribed Topic “office temperature” in Broker at IP address 192.168.1.101
Client E subscribed Topic “warehouse humidity” in Broker at IP address 192.168.1.224
Now another Client X send a message “23.5 degree” under the topic “office temperature” to broker IP address 192.168.1.224
What will happen?
Answer: Only Client A and Client C will get the message “23.5 degree” from Client X because only these two clients subscribed topic “office temperature” in 192.168.1.224 broker.
In summary, in order to get message, client must subscribe same topic under same broker.
Install MQTT broker and client in Raspberry Pi
Implement MQTT through Mosquitto
There are many free online MQTT broker provide such as hiveMQ, Eclipse, Flespi etc. In this tutorial, we’d like to guide user to implement the most popular MQTT software called Mosquitto.
Why Mosquitto?
- Mosquitto provide both Broker software and client software. They are open-source and absolutely free. So it is a good choice for beginner to learn MQTT at little cost.
- Mosquitto software can be implemented in Windows, MacBook and Linux computers which can give good flexibilities.
- Mosquitto has a lot of online resources which is good for beginners to learn
In this section, we will deploy Mosquitto MQTT broker in Raspberry Pi computer which runs Linux OS. Raspberry Pi is a credit-card-size low-cost Single Board Computer. If you don’t have Raspberry Pi computer board, you can use similar linux command to install Mosquitto on a Ubuntu or Debian OS computer(not necessarily Raspberry Pi), if you want to install Mosquitto in Windows or MacBook computer, please go to https://mosquitto.org/download/ for more information.
Installations steps:
1)Run following 3 commands through Raspberry Pi shell terminal:
sudo apt-get update
sudo apt-get upgrade
sudo apt-get install mosquitto mosquitto-clients
That is it! You have installed Mosquitto MQTT broker and client software in your Rasbperry Pi board!
Basic Test of Mosquitto MQTT subscribe and publish
Now please run following command to Subscribe a topic called test
mosquitto_sub -t test -h localhost
Your terminal shows as following:

Above command is waiting for message of topic “test”.
Now we need to open another terminal window and run following command:
mosquitto_pub -t test -h localhost -m "hello world!"
Above command will publish a message “hello world!” under topic “test” to broker in localhost.
After command is executed, please go back to the subscribe window, you will see “hello world” message , see following picture:

Congrats! You have successfully sent your first MQTT message between two clients.
Access Broker through IP Address:
You may noticed that the broker is called localhost which means your own computer broker is in the same computer of clients. Normally we will use IP address to access Broker so that other external client can access our Broker server.
Firstly, you need to know your Raspberry Pi broker IP address.
You have many way to get IP address, I prefer using hostname -I command as following picture:

In above example, our Raspberry Pi board IP address is 192.168.1.224
Now let’s use 192.168.1.224 instead of localhost to subscribe topic test, the command is:
mosquitto_sub -t test -h 192.168.1.224
Now you can open another new terminal window and run:
mosquitto_pub -t test -h 192.168.1.224 -m "hello world!"
You will get same result as localhost sub/pub commands.
Trouble Shooting if you have Connection Refused Error when sub/pub message from external IP access:
In some Raspberry Pi old version OS or Windows system, when use external IP address to replace localhost and run mosquitto_sub -t test -h xxx.xxx.xxx.xxx command, they might give you Connection Refused Error .
Normally the problem is caused by authentication problem. The simple solution of this problem is to allow anonymous access access in config file.
you can use nano basic.conf command to create a basic.conf file, then add following two lines
listener 1883
allow_anonymous true
If you don’t want to use nano make the above conf file , it can also be downloaded to Raspberry Pi command : wget https://osoyoo.com/driver/nodemcu/basic.conf
Now you need to terminal old broker server by following command:
sudo service mosquitto stop
Then run following command to restart mosquitto with basic configure file which allows anonymous access.
mosquitto -c simple.conf
then run subscription command
mosquitto_sub -t test -h 192.168.1.224
open another new terminal window and run:
mosquitto_pub -t test -h 192.168.1.224 -m "hello world!"
Your subscription client will see “hello world”
Using NodeMCU board to Test Mosquitto software
Prerequisite:
You need to know some basic knowledge about Arduino programming IDE for ESP8266 and install ESP8266 Board package in the IDE . If not , please read this: https://osoyoo.com/?p=5353
Arduino Library for MQTT:
Please download pubsubclient library zip file from https://osoyoo.com/wp-content/uploads/samplecode/pubsubclient.zip
Then Click Arduino IDE File ->Sketch ->Include Library ->Add .Zip Library , then upload pubsubclient.zip to IDE.
Before running NodeMCU, first we subscribe a topic osoyoo_pub in Raspberry Pi with following command:
mosquitto_sub -t osoyoo_pub -h 192.168.1.224
you will see following:

Your Rasberry Pi mosquitto client is waiting for message from NodeMCU which will publish a topic “osoyoo_pub”
Download and Run Sketch file
1)Please download the Arduino Sketch from https://osoyoo.com/driver/espmqtt.zip , unzip the file and use Arduino IDE to open the espmqtt.ino file.
2)Replace line 13, 14 with your Wifi SSID name and Password.
const char *mqtt_broker = "192.168.1.224"; // Replace 192.168.1.224 with your Broker IP address
const char *topic_pub = "osoyoo_pub"; // osoyoo_pub is the topic to publish
3)Replace Line 16 with your Mosquitto Broker IP address:
const char *mqtt_broker = "192.168.1.224"; // Replace 192.168.1.224 with your Broker IP address
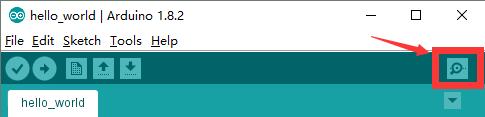
Load the sketch to NodeMCU board, then open Serial monitor:
Now you will see:
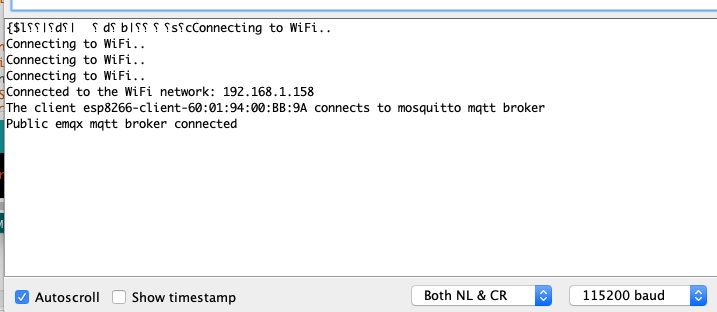
Above result shows your NodeMCU IP address (in my case, 192.168.1.158) .
NodeMCU publish message test result:
Please read line 55 ,
client.publish(topic_pub, "Message From OSOYOO NodeMCU!");
In line 55, NodeMCU actually published a message Message From OSOYOO NodeMCU! , the topic “osoyoo_pub” is defined in line 17.
Now please go back to your Raspberry Pi subscription client window, you will see the client has received message “Message From OSOYOO NodeMCU!”

NodeMCU subscribe message test
In the line 56 , the sketch code subscribed a topic “osoyoo” (defined in line 18)
client.subscribe(topic);
In line 58 to 65, a callback function will print incoming message which matches “osoyoo” topic.
now let us publish an “osoyoo” topic message in Raspberry Pi by typing following command:
mosquitto_pub -t osoyoo -h 192.168.1.224 -m "hello world!"
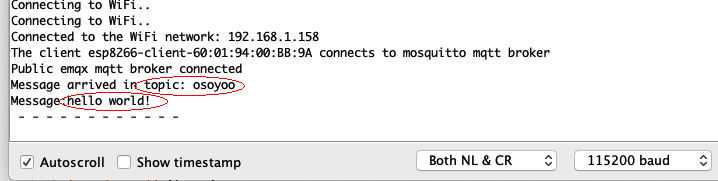
Above command will send message “hello world!” to NodeMCU which subscribed topic “osoyoo”
Let’s go back to Arduino Serial monitor, you will see an incoming hello world! message is printed in the Serial monitor as following:
Above examples have demonstrate how NodeMCU send and receive message through MQTT broker. In actual industry applications, MQTT brokers will have more advanced features and functions to manage security, client control etc. Client software might be more complicated than our sample code and Broker configuration is also complex as well. But the basic ideas are still the same, subscribe topics in Broker and then publish message under a topic.
If you have any question about OSOYOO NodeMCU products, feel free to contact us or leave comments here.
In next lesson, we will connect a sensor to NodeMCU and send sensor data to another Moquitto client software.


