Welcome to the fourth lesson of OSOYOO 2WD Robot Car Starter Kit!
In this lesson, we will introduce how to control the car by the mobile APP through Bluetooth.
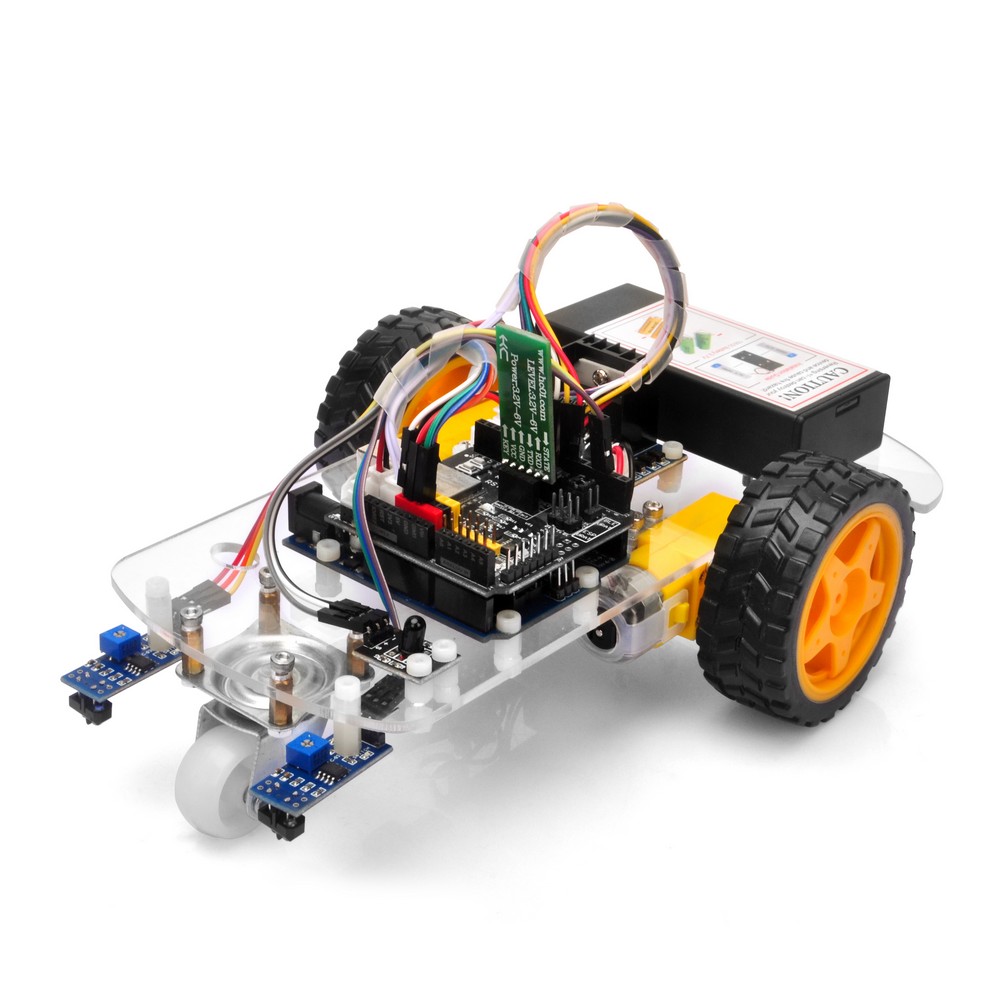
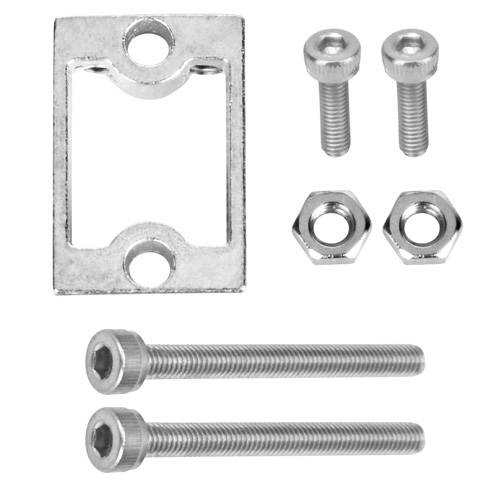
Hardware Installation
Step 1: Install the smart car basic framework as per Lesson 1 . If you have already completed installation in Lesson 1 , please remove all wires on Osoyoo basic board.
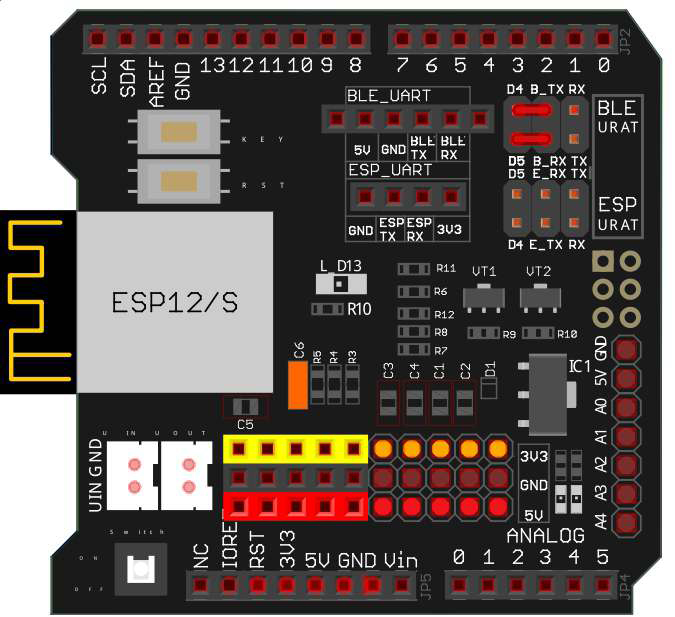
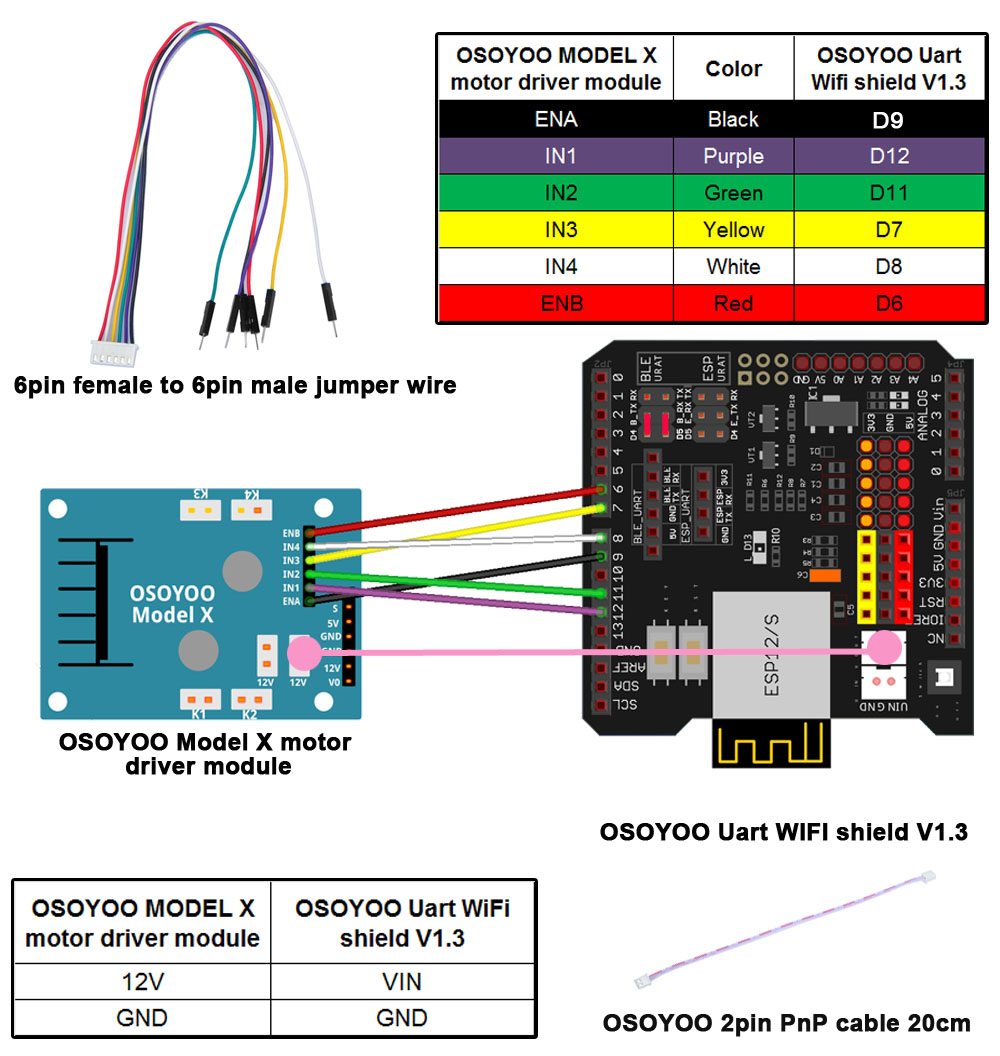
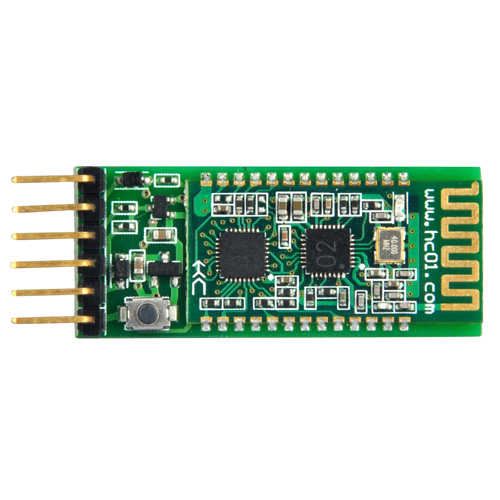
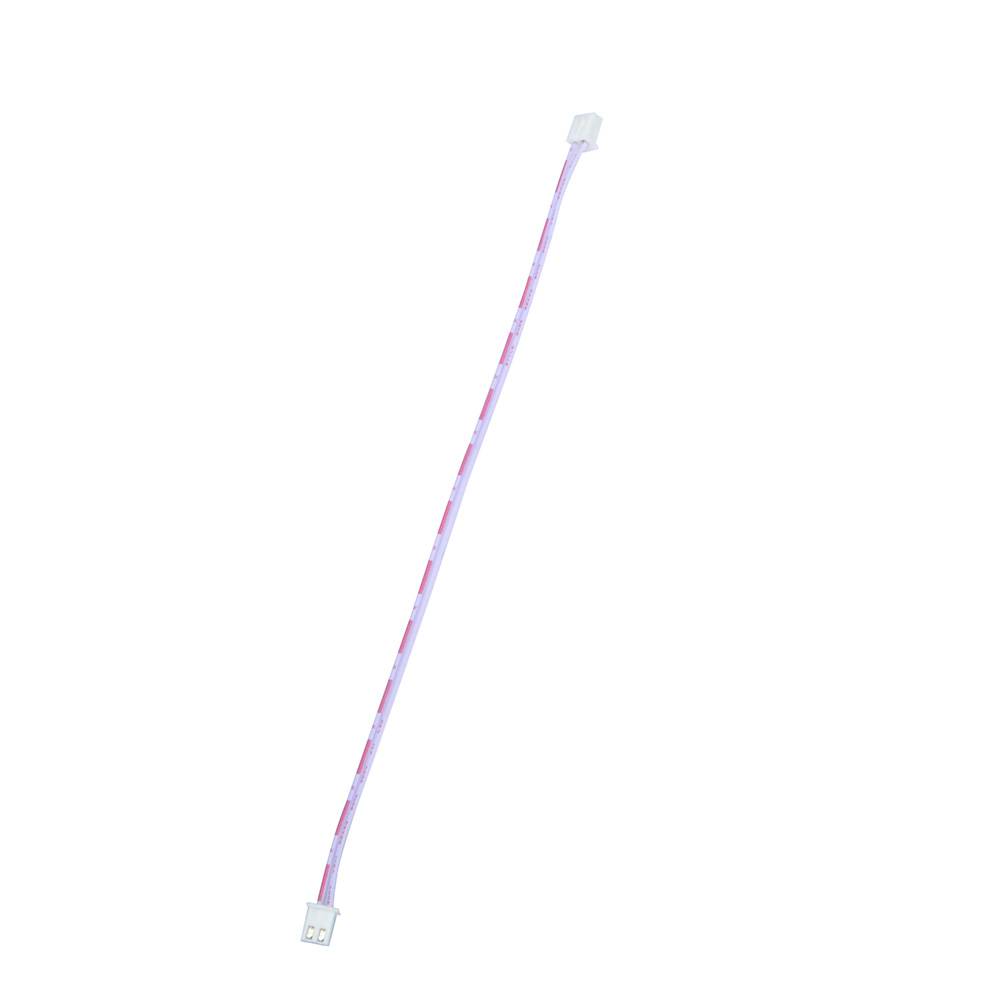
Step 2: Connect Bluetooth TX/RX ports to D4,D5 with jumper caps
BLE UART:
D4 – B_TX
D5 – B_RX
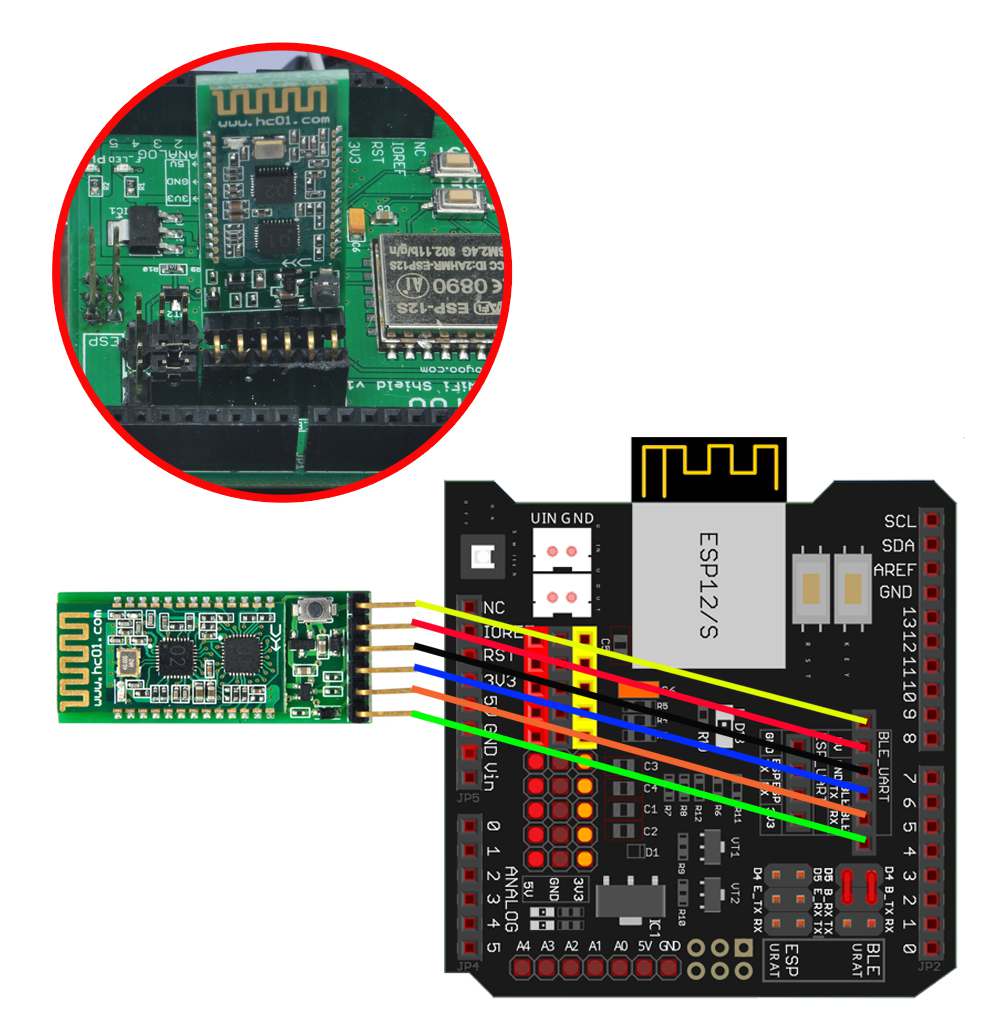
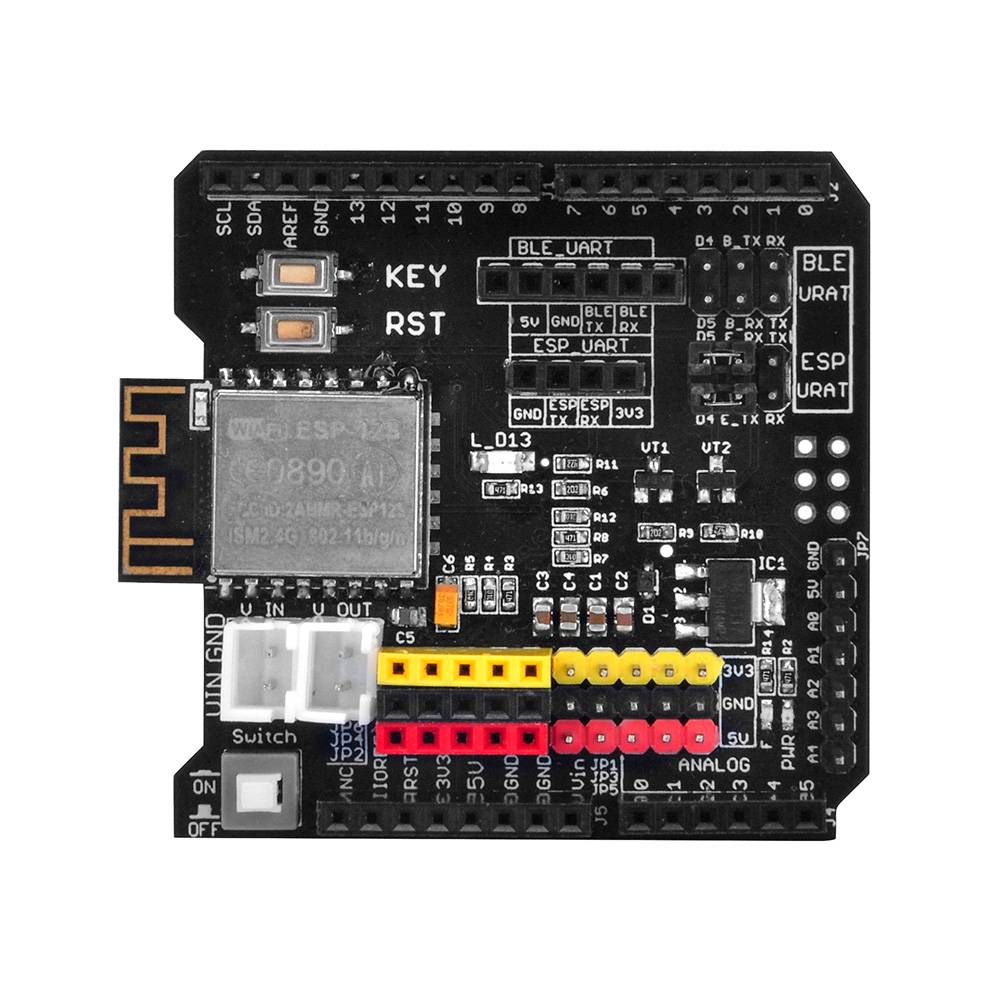
Step 3: Insert Bluetooth Module into OSOYOO UART Wi-Fi shield V1.3 Bluetooth slot as following graph:
Note: Our OSOYOO Uart Wi-Fi shield V1.3 are connected BLE URAT TX/RX ports to D4,D5 with jumper caps by default. If you find the Bluetooth TX/RX ports is not connected to D4,D5, you need to use a jumper cap or jumper wire to connect B-TX to D4 and B-RX to D5.
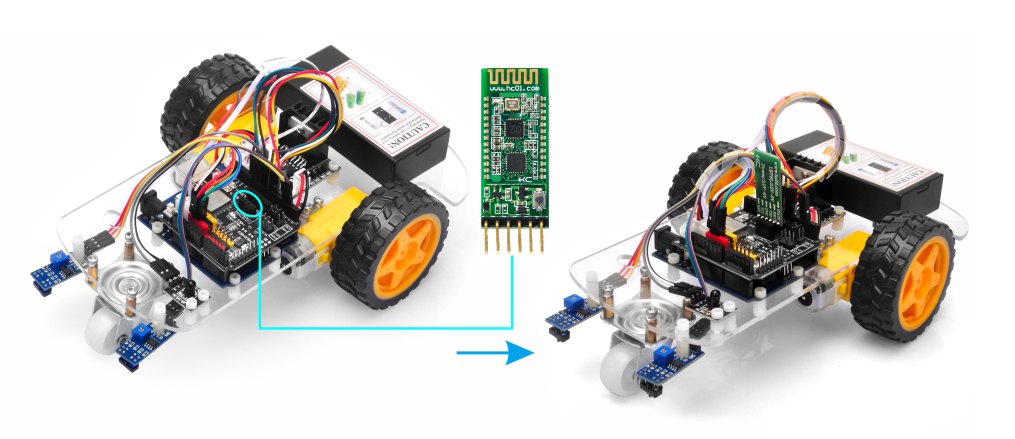
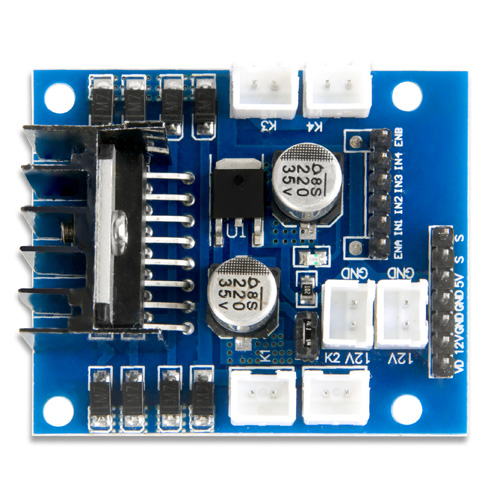
Step 4: Connect OSOYOO MODEL X motor driver module and OSOYOO Uart Wi-Fi shield V1.3 as following graph:
Remember the following tips to restore your motor control system to lesson 1:
If your last project is lesson 1,2,3,4, your motor control system is same as Lesson 1, no need to do anything.
If your last project is lesson 5,6, you need to change ENA wire from D3 to D9, keep wiring in D6,D7,D8,D11,D12 at same position and remove all other wires in OSOYOO Uart Wi-Fi shield V1.3.
I suggest you run the sketch code in Lesson 1 and make sure motor connection is correct. This is very important for next steps.
More information about this module please refer to:
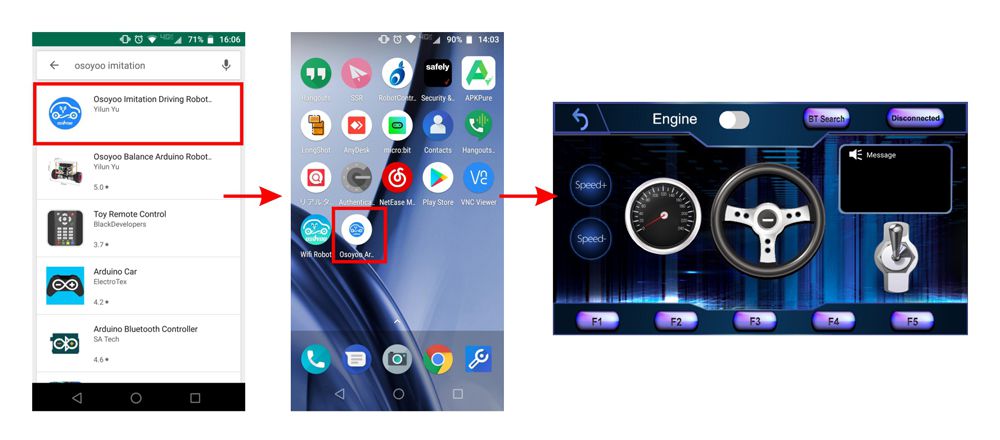
search “OSOYOO imitation driving” in
Google Play Google Play or Apple APP store
(Note: If you can not find this APP in Google Play,
you can directly download the APP from following link: https://osoyoo.com/test/mockdrive.apk)
Step 1: Install APP into your mobile phone:
Android Device: Install APP on Android device as following
In Google Play Store search APP name “OSOYOO imitation driving”, download the APP as following and install it in your smartphone
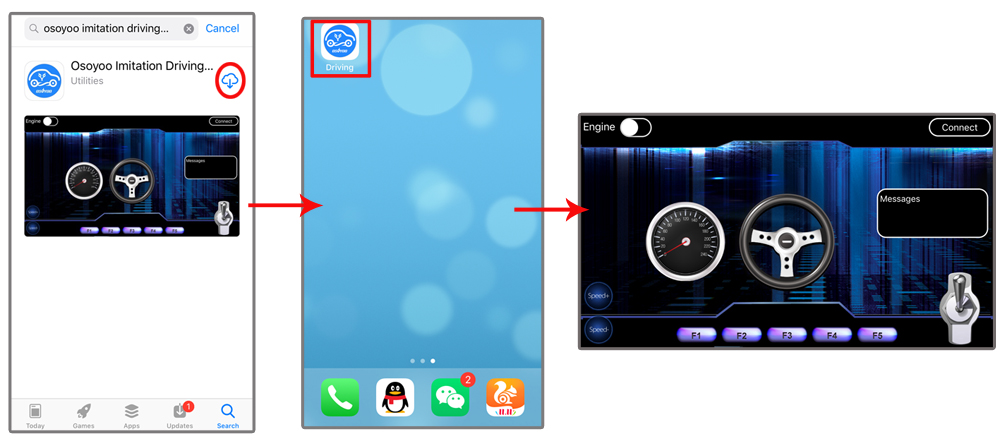
Apple iOS Device: Install APP on Apple IOS device as following
In Apple APP store search APP name “OSOYOO imitation driving”, download the APP as following and install it in your smartphone
Step 2: Download and install sketch code from https://osoyoo.com/driver/2wd/lesson4.zip. Unzip this file, and you will see a folder called lesson4. Open IDE → click file → click Open → choose code “lesson4.ino” in lesson4 folder, load the code into your board:
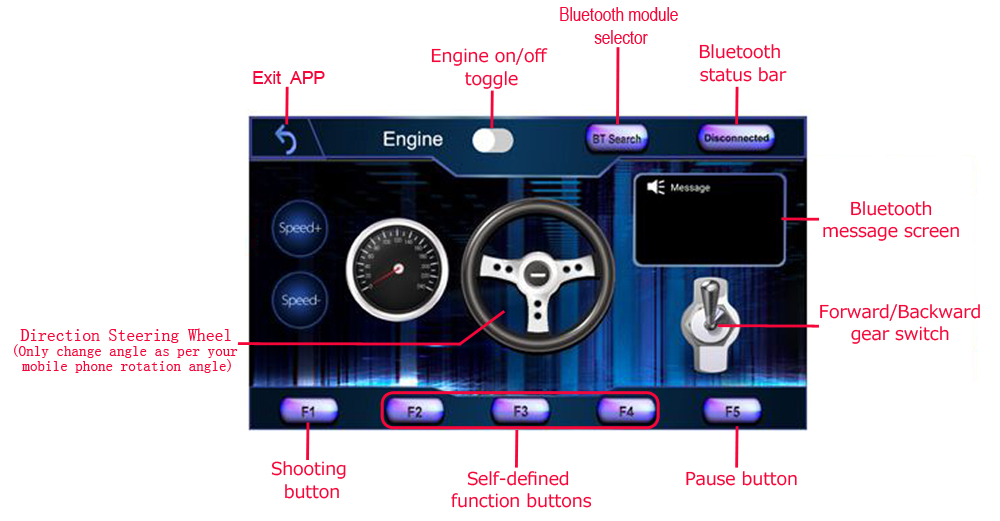
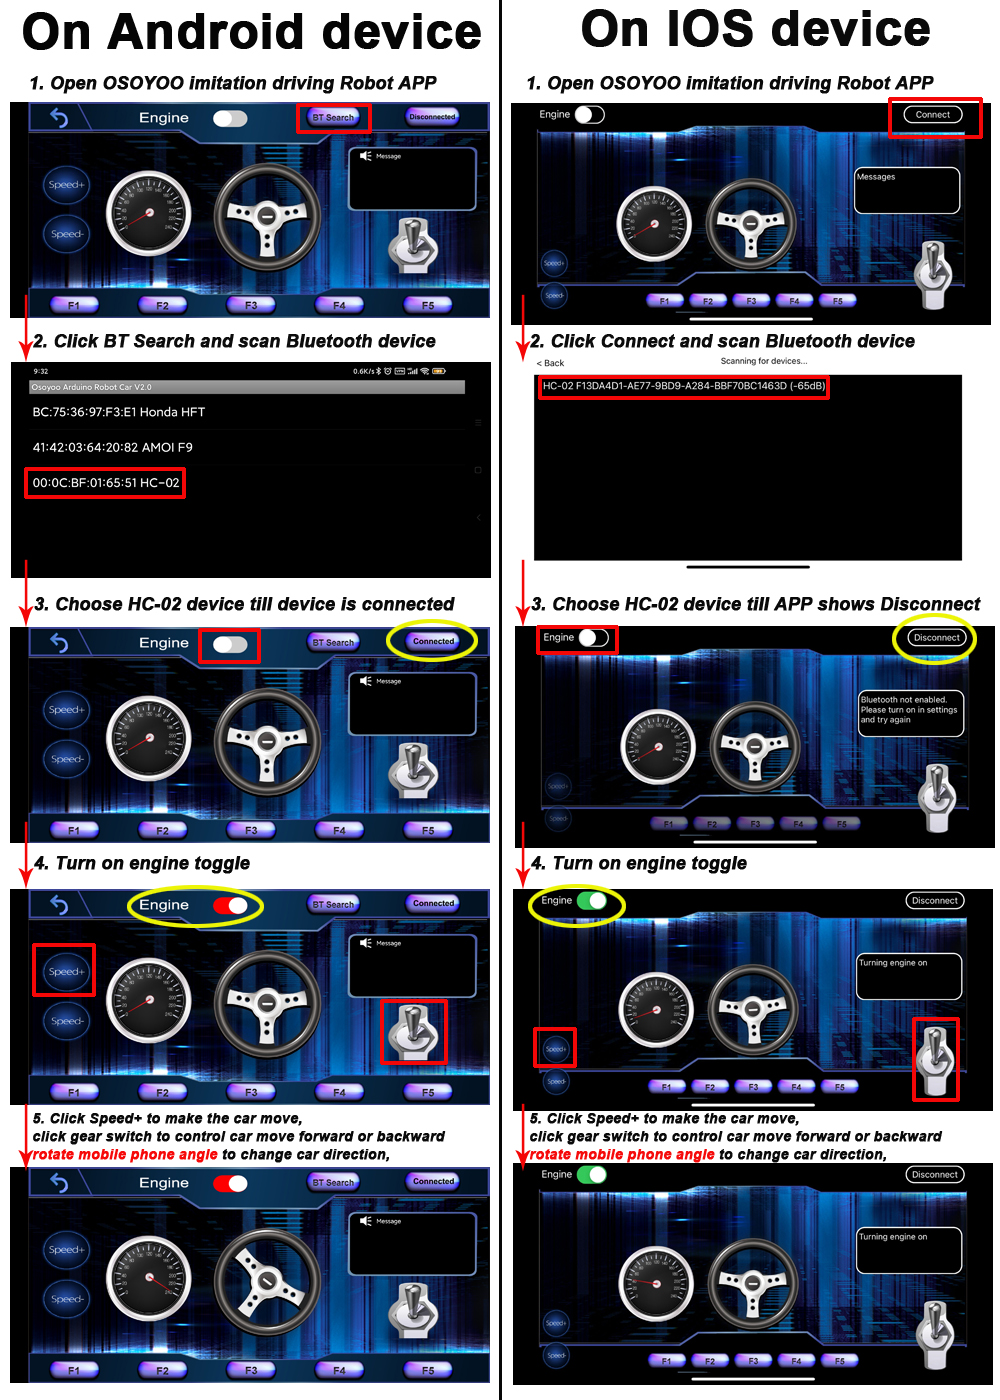
EXPLANATION OF APP GUI
Connect HC-02 Bluetooth in Android phone. There is a BT Search button in Android APP: When click this button, you will see a Bluetooth device list which has been paired with your APP. Select HC-02 device to connect the car. Once HC-02 is connected, Bluetooth Status will change from Disconnected to Connected. You can only control your car when Bluetooth is connected.
Connect HC-02 Bluetooth in iPhone/iPad, simply click Connect button, a HC-02 device will show up in a pop-up list. Click that HC-02 device will connect a Bluetooth module to your iPhone. Then the Connect button will change name to Disconnect.
Engine toggle : When Engine toggle is set to OFF (white), the car will stop and all buttons in the APP will be disabled. When Engine toggle is set to ON (red), the car will start to move. All other movement control buttons will activate.
Forward/Backward gear switch: This gear switch can control the car is moving ahead or reverse like real car gear.
F1,F2,F3,F4,F5 customized button. In this lesson, we only use F5 which pause the car movement. The difference between F5 and Engine OFF button is that Engine OFF button when touched, all other buttons will be disabled. You should toggle Engine button again to enable other button. On the other hand, when F5 is clicked, the car will stop, but all other buttons are still active. Even you do not touch any button just change your cell phone angle position(like you move the steering wheel), the car will move again.
Direction Steering Wheel : When you rotate your mobile phone angle, the steering wheel will change angle as per your mobile phone rotation angle. This will make your car change direction. For example, when the steering wheel make clockwise rotation, the car will move to the left. Remember, the steering and Forward/Backward gear should work together same as you are driving a real car. For example, when you want to back your car to a right side packing lot, you need to set Gear to R position and rotate your steer to count-clockwise direction.
Speed+: Make the robot car speed up
Speed-: Make the robot car slow down
Connect APP to HC-02 Bluetooth Module
Connect with Android device:
If you use an Android device and have not paired a Bluetooth module with your cell phone, please pair the Bluetooth module first before open the APP. In your cell phone Setting→Bluetooth, find a Bluetooth device called HC02, pair it with password 1234. After Bluetooth HC02 device is paired, open the APP. Click BT Search Button to connect APP to HC02 device.
Connect with iOS device: If you use iOS device, simply open the APP, click Connect button, you will see a Bluetooth list, select the HC02 device .
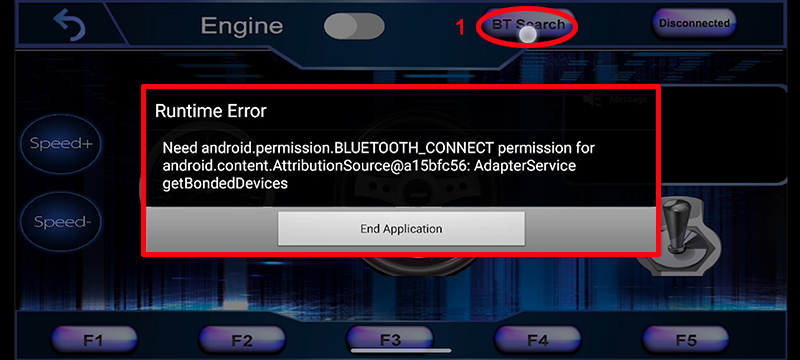
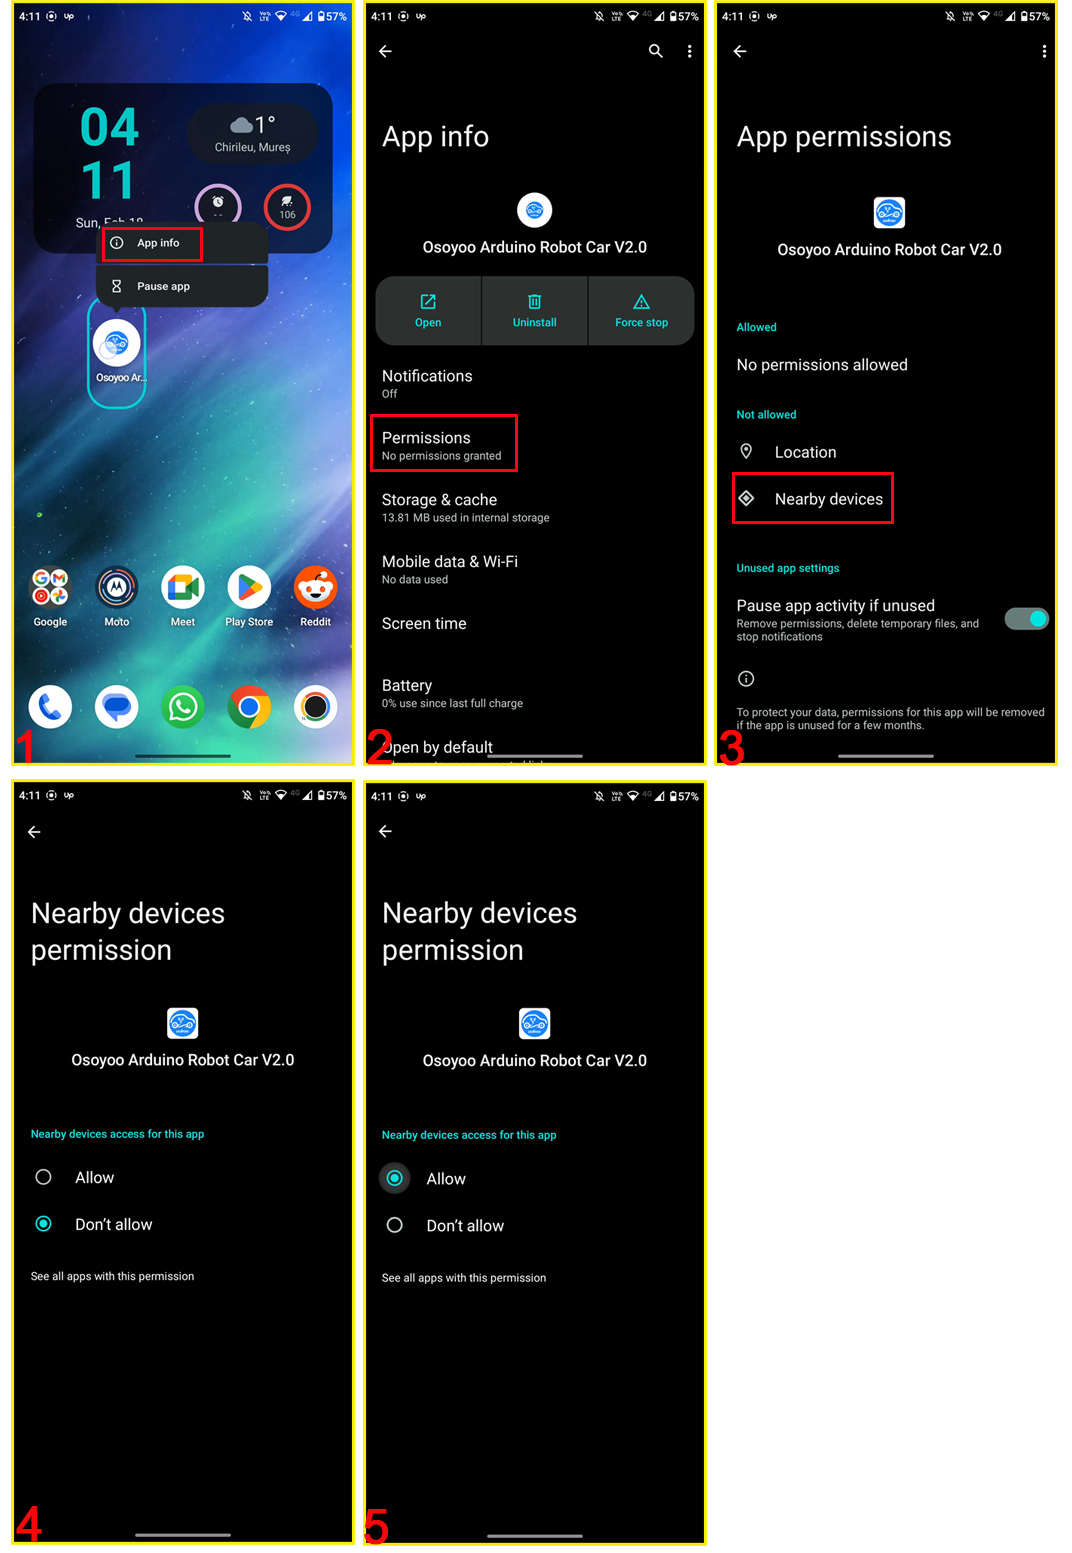
Note: For Android device, when you click BT search button and get the following error pop, Please follow the next steps: 1. long-press the APP inco, then click “APP info” 2. click “Permissions” 3.click “Nearby device”, then change the option as “Allow” (To learn more about settings, you can visit the video:https://osoyoo.com/picture/V2.1_Arduino_Robot_Car/Lesson7/APP.mp4
Drive your Robot Car
Now that you have installed your hardware and software for this lesson, let’s drive our car!
Step 1) Put your robot car on the ground and turn on the battery switch.
Step 2) Go to your mobile phone -> Settings -> Bluetooth settings and search for a Bluetooth device called HC-02. Pair it with the code 1234.
Step 3) Open the OSOYOO imitation driving Robot APP, click the “BT Search” button, and find the Bluetooth device you have paired.
Step 4)Turn on the Engine toggle and click Speed+ to increase the speed of the robot car, as it is very slow at first. When you rotate your mobile phone, the car will change direction.
Enjoy driving!
Testing
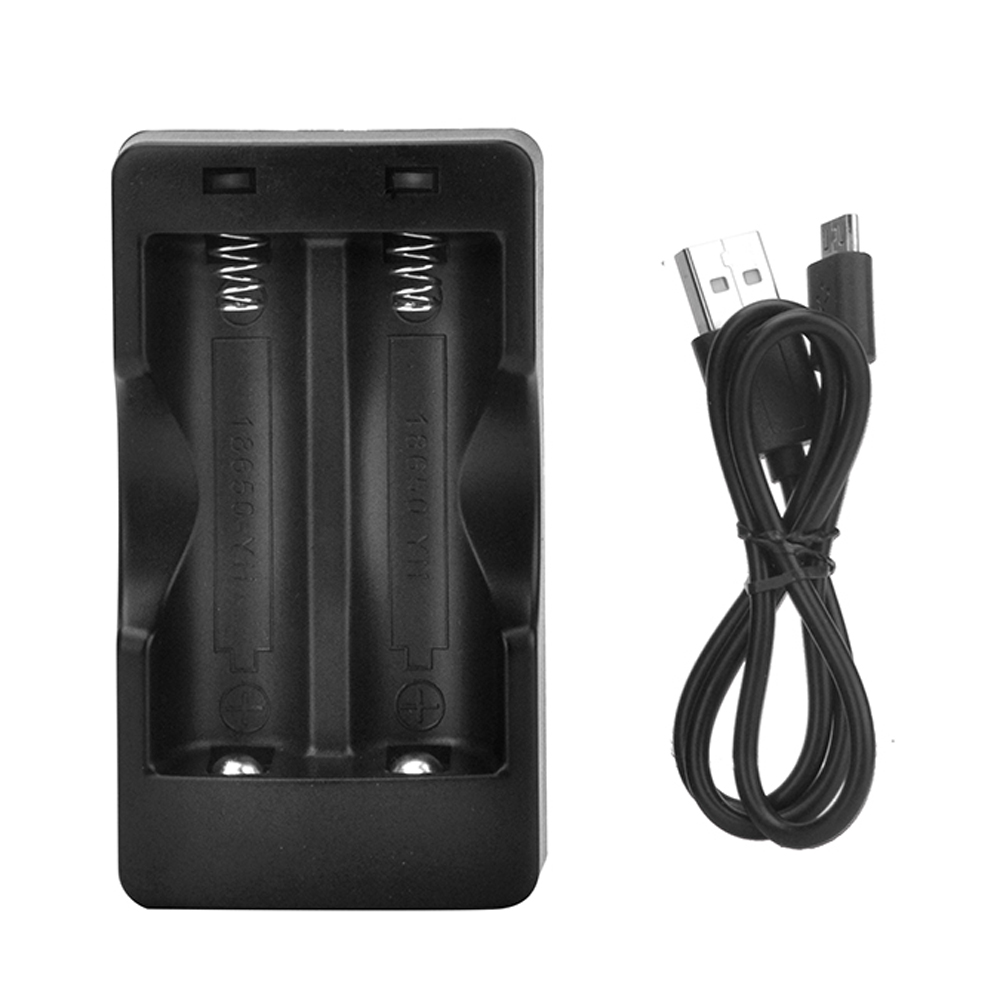
Step 1) Turn on the switch on the battery box
Put 2 fully-charged 18650 battery into battery box (check the box instruction and make sure polar direction is correct). Open the power switch in the battery box.
Step 2) Turn on bluetooth of your phone
Please turn on bluetooth of your phone which you have installed APP and scan bluetooth (different bluetooth module will scan different bluetooth name), click connect and enter password “1234” or “0000” if no change:
Step 3) Open app>> select bluetooth mode>> then you can controller the robot car through bluetooth: