In this led blink tutorial,we will use an Arduino board with an external led.
Hardware Required
OSOYOO basic Board
LED
200 ohm resistor
Connection:
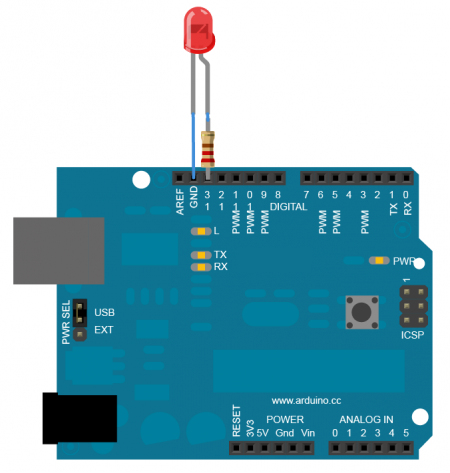
Connect one end of the resistor to the digital pin correspondent to the LED_BUILTIN constant. Connect the long leg of the LED (the positive leg, called the anode) to the other end of the resistor. Connect the short leg of the LED (the negative leg, called the cathode) to the GND. In the diagram below we show an UNO board that has D13 as the LED_BUILTIN value.
The value of the resistor in series with the LED may be of a different value than 220 ohm; the LED will lit up also with values up to 1K ohm
Upload the sketch
Copy the demo code to your sketch, then upload to Arduino board.You will see the LED blink every second.
#define LED 13 //connect LED to digital pin13
void setup() {
 // initialize the digital pin13 as an output.
 pinMode(LED, OUTPUT);
}

void loop() {
 digitalWrite(LED, HIGH);   // set the LED on
 delay(500);               // for 500ms
 digitalWrite(LED, LOW);   // set the LED off
 delay(500);
}
Reference:
You can get more info about the LED:https://osoyoo.com/2017/05/05/led-basic-blue-5mm/


