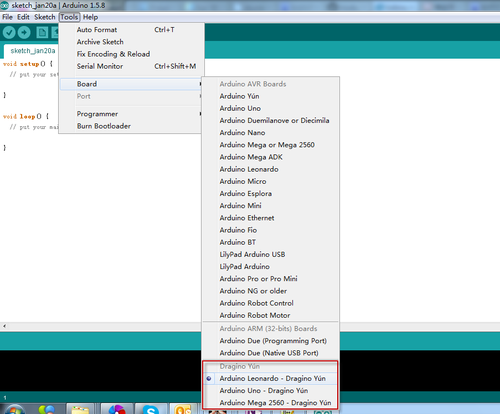
User can’t upload sketch via WiFi, instead, User has to upload sketch to DUE use the via the DUE native USB port. (board and port both select: Arduino Due(Native USB port))
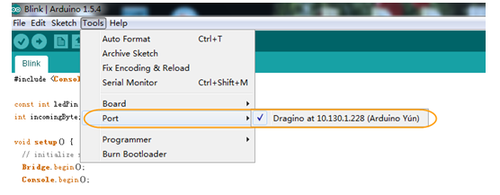
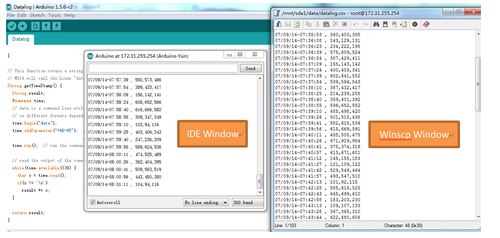
DUEとYun Shield間のブリッジは機能します。シリアルモニターで結果を確認するためにコンソールを使用する場合は注意してください。ユーザーはArduino Due USBポートではなく、Yun Shieldポートを選択する必要があります。
#include "Console.h" //use Console class for Arduino IDE debug over WiFi, similar to Serial class,
String name;void setup(){// Initialize Console and wait for port to open:
Bridge.begin();
Console.begin();// Wait for Console port to connectwhile(!Console);
Console.println("Hi, what's your name?");//Data flow: Arduino --> Yun Shield --> Arduino IDE}void loop(){if(Console.available()>0){char c = Console.read();//read the next char received, data flow: IDE --> Yun Shield--> Arduino// look for the newline character, this is the last character in the stringif(c =='\n'){//print text with the name received
Console.print("Hi ");
Console.print(name);
Console.println("! Nice to meet you!");
Console.println();// Ask again for name and clear the old name
Console.println("Hi, what's your name?");
name ="";// clear the name string}else{// if the buffer is empty Cosole.read() returns -1
name += c;// append the read char from Console to the name string}}}
// include all Libraries needed:#include "Process.h" //Process lib use to call Linux Commands in Yun Shield#include "Console.h" //Console lib, used to show debug info in Arduino IDE#include "passwords.h" // contains my passwords, see below/*
NOTE: passwords.h is not included with this repo because it contains my passwords.
You need to create it for your own version of this application. To do so, make
a new tab in Arduino, call it passwords.h, and include the following variables and constants:
#define APIKEY "foo" // replace your pachube api key here
#define FEEDID “0000” // replace your feed ID
#define USERAGENT "my-project" // user agent is the project name
*/// set up net client info:constunsignedlong postingInterval =60000;//delay between updates to xively.comunsignedlong lastRequest =0;// when you last made a request
String dataString ="";void setup(){// start console:
Bridge.begin();
Console.begin();while(!Console);// wait for Network Serial to open
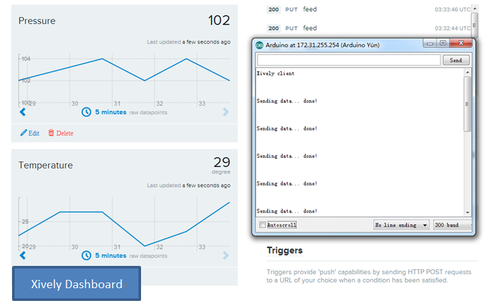
Console.println("Xively client");// Do a first update immediately
updateData();
sendData();
lastRequest = millis();}void loop(){// get a timestamp so you can calculate reading and sending intervals:long now = millis();// if the sending interval has passed since your// last connection, then connect again and send data:if(now - lastRequest >= postingInterval){
updateData();
sendData();
lastRequest = now;}}void updateData(){// convert the readings to a String to send it:
dataString ="Temperature,";
dataString += random(10)+20;// add pressure:
dataString +="\nPressure,";
dataString += random(5)+100;}// this method makes a HTTP connection to the server:void sendData(){// form the string for the API header parameter:
String apiString ="X-ApiKey: ";
apiString += APIKEY;// form the string for the URL parameter:
String url ="https://api.xively.com/v2/feeds/";
url += FEEDID;
url +=".csv";// Send the HTTP PUT request, form the linux command and use Process Class to send this command to Yun Shield// Is better to declare the Process here, so when the// sendData function finishes the resources are immediately// released. Declaring it global works too, BTW.
Process xively;
Console.print("\n\nSending data... ");
xively.begin("curl");
xively.addParameter("-k");
xively.addParameter("--request");
xively.addParameter("PUT");
xively.addParameter("--data");
xively.addParameter(dataString);
xively.addParameter("--header");
xively.addParameter(apiString);
xively.addParameter(url);
xively.run();
Console.println("done!");
#include "FileIO.h" //FileIO class allow user to operate Linux file system#include "Console.h" //Console class provide the interactive between IDE and Yun Shieldvoid setup(){// Initialize the Console
Bridge.begin();
Console.begin();
FileSystem.begin();while(!Console);// wait for Serial port to connect.
Console.println("Filesystem datalogger\n");}void loop (){// make a string that start with a timestamp for assembling the data to log:
String dataString;
dataString += getTimeStamp();
dataString +=" , ";// read three sensors and append to the string:for(int analogPin =0; analogPin <3; analogPin++){int sensor = analogRead(analogPin);
dataString += String(sensor);if(analogPin <2){
dataString +=",";// separate the values with a comma}}// open the file. note that only one file can be open at a time,// so you have to close this one before opening another.// The USB flash card is mounted at "/mnt/sda1" by default
File dataFile = FileSystem.open("/mnt/sda1/data/datalog.csv", FILE_APPEND);// if the file is available, write to it:if(dataFile){
dataFile.println(dataString);
dataFile.close();// print to the serial port too:
Console.println(dataString);}// if the file isn't open, pop up an error:else{
Console.println("error opening datalog.csv");}
delay(15000);//Write every 15 seconds}// getTimeStamp function return a string with the time stamp// Yun Shield will call the Linux "date" command and get the time stamp
String getTimeStamp(){
String result;
Process time;// date is a command line utility to get the date and the time // in different formats depending on the additional parameter time.begin("date");time.addParameter("+%D-%T");// parameters: D for the complete date mm/dd/yy// T for the time hh:mm:ss time.run();// run the command// read the output of the commandwhile(time.available()>0){char c =time.read();if(c !='\n')
result += c;}return result;}
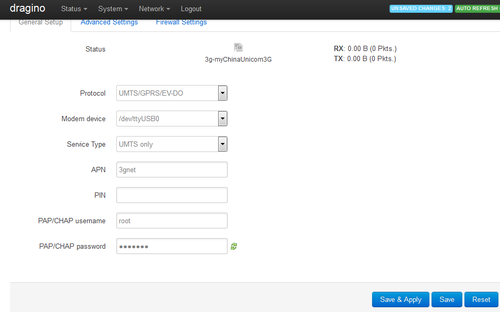
When configure 3G info, we have to choose the right ttyUSB port for dial up. If it possible you can’t see the ttyUSB port , especially in the Yun Shield v2.x version, becasue there is more than one USB device there. We can use the lsusb command to get the usb info. as below, we can see the 3G module we have here has the info 05c6:9090.
root@dragino-162124:~# lsusb
Bus 001 Device 001: ID 1d6b:0002 Linux Foundation 2.0 root hub
Bus 001 Device 002: ID 058f:6254 Alcor Micro Corp. USB Hub
Bus 001 Device 003: ID 058f:6366 Alcor Micro Corp. Multi Flash Reader
Bus 001 Device 004: ID 05c6:9090 Qualcomm, Inc.
What is the difference between the official Arduino Yun and the Yun Shield?
ハードウェアの側面
The Arduino Yun and the Yun Shield have the same CPU, Memory size and RAM size for the Linux system. The Arduino Yun is an integrated Linux and MCU part. The Yun Shield is designed as a shield which can be used with existing Arduino boards.
The system structure セクションでは、Yun Shieldの動作原理を詳しく説明しています。ユーザーがYun Shieldが自分のボードと互換性があるかどうかまだ不明な場合、または互換性に問題がある場合は、[email protected]にボード情報を送信してください。当社のサポートチームが確認し、チェックします。
Programmer Type : linuxgpio
Description : Use the Linux sysfs interface to bitbang GPIO lines

avrdude: Calibrating delay loop... calibrated to 49 cycles per us
avrdude: AVR device initialized and ready to accept instructions

Reading | ################################################## | 100% 0.00s

avrdude: Device signature = 0x1e9801
avrdude: Expected signature for ATmega32U4 is 1E 95 87
Double check chip, or use -F to override this check.
        Programmer Type : linuxgpio
        Description     : Use the Linux sysfs interface to bitbang GPIO lines

avrdude: Calibrating delay loop... calibrated to 48 cycles per us
avrdude: AVR device not responding
avrdude: initialization failed, rc=-1
        Double check connections and try again, or use -F to override
        this check.


avrdude done.  Thank you.
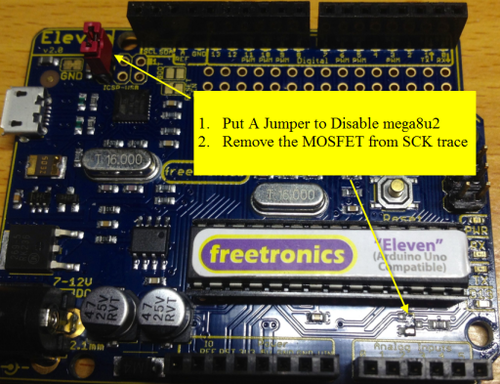
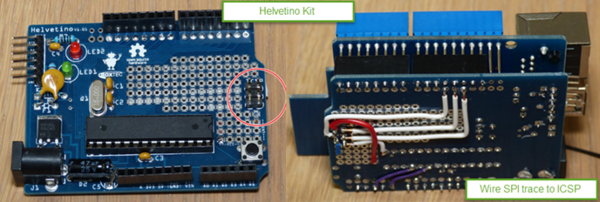
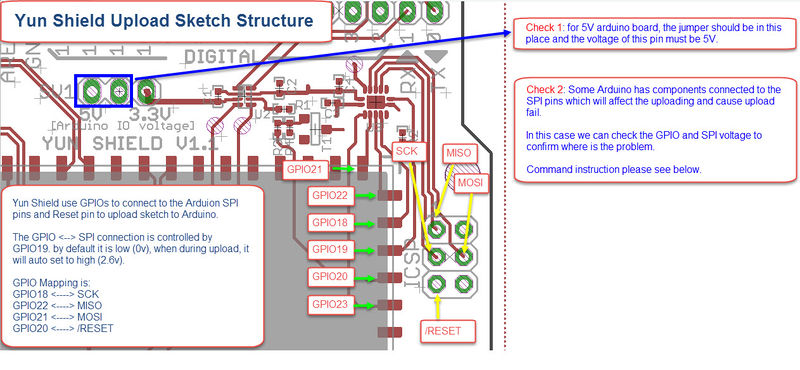
Please check if the SPI connection between them is clean and doesn’t have other components hooked onto it. Some components may interfere with the SPI connection.
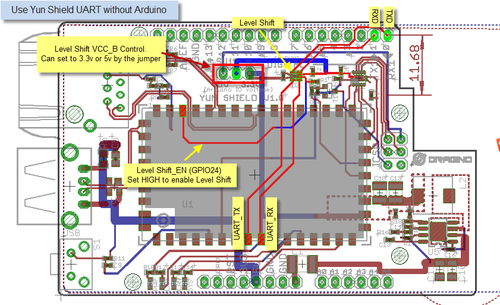
echo 1>/sys/class/gpio/gpio19/value // enable level shift , GPIO19 will be 2.6v
echo 18>/sys/class/gpio/export //export gpio 18
echo "high">/sys/class/gpio/gpio18/direction // set direction to out and set level to high .. GPIO18 will be 2.6V
echo "1">/sys/class/gpio/gpio18/value // set this GPIO to high, SPI_SCK should be high in the ICSP header.
echo "0">/sys/class/gpio/gpio18/value // set this GPIO to low, SPI_SCK should be low in the ICSP header.
echo 21>/sys/class/gpio/export //export gpio 21
echo "high">/sys/class/gpio/gpio21/direction // set direction to out and set level to high GPIO21 will be 2.6V
echo "1">/sys/class/gpio/gpio21/value // set this GPIO to high, SPI_MOSI should be high in the ICSP header.
echo "0">/sys/class/gpio/gpio21/value // set this GPIO to low, SPI_MOSI should be low in the ICSP header.
echo 22>/sys/class/gpio/export //export gpio 22
echo "high">/sys/class/gpio/gpio22/direction // set direction to out and set level to high GPIO22 will be 2.6V
echo "1">/sys/class/gpio/gpio22/value // set this GPIO to high, SPI_MISO should be high in the ICSP header.
echo "0">/sys/class/gpio/gpio22/value // set this GPIO to low, SPI_MISO should be low in the ICSP header.
echo 20>/sys/class/gpio/export //export gpio 20
echo "high">/sys/class/gpio/gpio20/direction // set direction to out and set level to high GPIO20 will be 2.6V
echo "1">/sys/class/gpio/gpio20/value // set this GPIO to high, /RESET should be low in the ICSP header.
echo "0">/sys/class/gpio/gpio20/value // set this GPIO to low, /RERST should be high in the ICSP header.
Note: After export all the GPIOs, Yun Shield won’t be able to upload sketch to Arduino unless reboot the device. デバッグケーススタディ
以下は、UNOクローンボードに接続する際にこの問題を解決するためのケーススタディです。
1/ Yun ShieldにSSH接続し、以下のコマンドを使用してSPI接続を有効にします。
echo 19 > /sys/class/gpio/export     //export gpio 19
echo "high" > /sys/class/gpio/gpio19/direction   // set direction to out and set level to high
echo 1 > /sys/class/gpio/gpio19/value // to set high
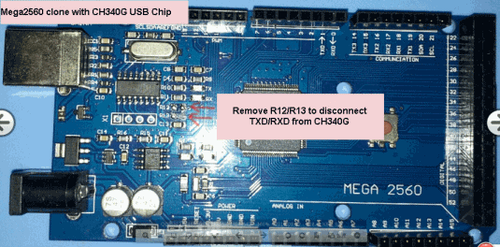
Arduino doesn’t work with Arduino IDE without YunShield
Yun Shield Web UIには、オプションがあります。ブートローダーをアップロードin the sensor page. When this option is uncheck, the Yun Shild will ignore the Arduino bootloader when uploading the Sketch. so the Arduino won’t have bootloader after upload. In this case, if user remove the Yun Shield and use the Arduino with Arduino IDE directly, it won’t work. So user need to check upload bootloader if want to use the Arduino seperate with the Arduino IDE