VIDEO
正規のオンライン小売業者:
紹介
このレッスンでは、Raspberry Piを使用してIIC(時にはI2Cとも呼ばれる)1602 LCDを制御する方法を紹介します。
ハードウェアの準備
1 * Raspberry Pi
数本のジャンパーワイヤー
注:このレッスンでは、PC上のPuTTyを介してRaspberry Piをリモートで制御します。Raspberry Piの設定方法については、レッスン1:Raspberry Piの入門をご覧ください。
動作原理
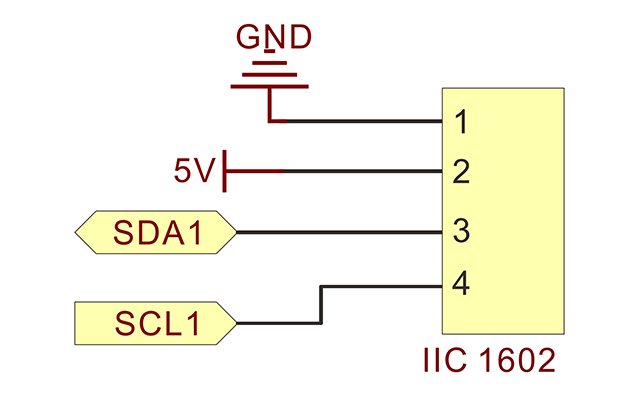
この1602 LCDディスプレイは、16(各行)x 2(行)の文字を表示できます。一般的に、LCD 1602には並列ポートがあり、多くのGPIOピンを占有します。この1602 LCDは、PCF8574PCF8574 ICチップを使用したI2C通信インターフェイスを備えています。これは、データ表示を2本のワイヤーで実現できることを意味します。
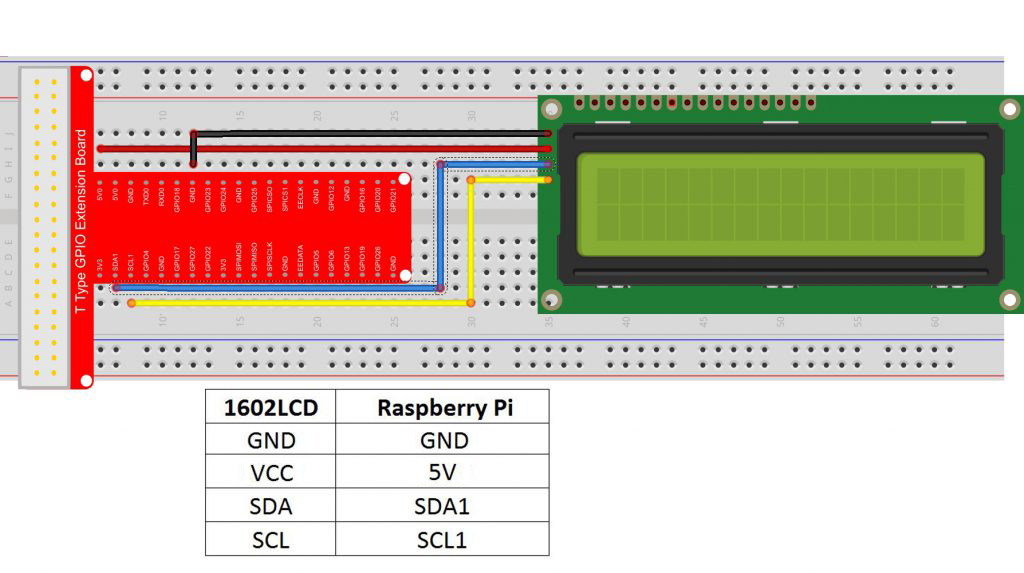
IIC 1602 LCDをPiに配線するには、以下の接続図に従ってください。
注:SDA 1はBCM 2、SCL 1はBCM 3です。GPIO#の詳細については、レッスン2を読んでください。これらの2つのピンは通常、外部デバイスとのシリアルデータの交換に使用されます。
ハードウェアの設定:
サンプルコード
IIC 1602 LCDを使用するには、まずI2Cポートを有効にする必要があります。以下の手順に従ってください。
1) IICをオープンする
sudo nano /boot/config.txt
/boot/config.txtファイルを開き、コード行「dtparam = i2c_arm」を見つけ、その行の前に#記号があるかどうかを確認し、それをコメント解除します(この行の前の#を削除します)。そして、行の最後が「on」であることを確認し、最終的にコードは次のようになります:
Ctrl + Xを押し、修正したファイルを保存するために「Y」と入力してください。
2) モジュールをロードする
sudo nano /etc/modules
/etc/modulesファイルを開き、以下の2行を追加します。
i2c-bcm2708
Ctrl + Xを押し、修正したファイルを保存するために「Y」と入力してください。
3) i2c pythonライブラリとsmbusをインストールする
sudo apt-get install -y python-smbus i2c-tools
今すぐPiを再起動します
reboot
4) 次のコマンドを入力してライブラリが正常にインストールされたかを確認します。
lsmod | grep i2c
正常にインストールされた場合、端末は以下のようなメッセージを表示します。そうでない場合は、前述の手順を繰り返してください。
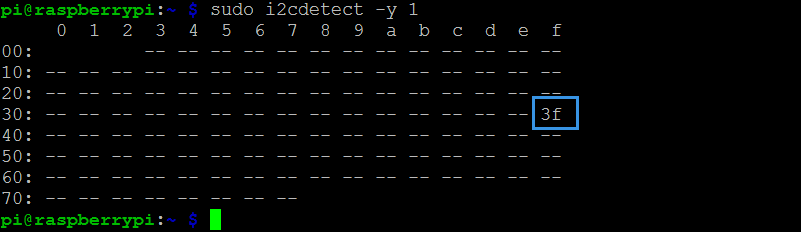
5) i2c 検出を使用して i2c バスに接続されているコンポーネントを確認する
sudo i2cdetect -y 1
または古い Raspberry Pi のポート 0
sudo i2cdetect -y 0
コマンドを実行すると、下記のような表が表示され、接続されているデバイスがあればそのアドレスが表示されます。以下では、デバイスがi2cバスに接続され、そのアドレスが0x3fを使用していることが分かります。
注意:上記のコードライン5はLCD I2Cアドレスを定義するためのものです。LCDが正しく表示されない場合は、0x3fの値を0x27に変更する必要があるかもしれません。
:
1) 次のターミナルコマンドを入力して、サンプルコードをダウンロードします。
cd ~
sudo wget http://osoyoo.com/driver/pi3_start_learning_kit_lesson_13/i2c1602_lcd.c
サンプルコードファイルをカスタマイズする場合は、次のコマンドを入力してソースコードを編集することができます。sudo nano i2c1602_lcd.c
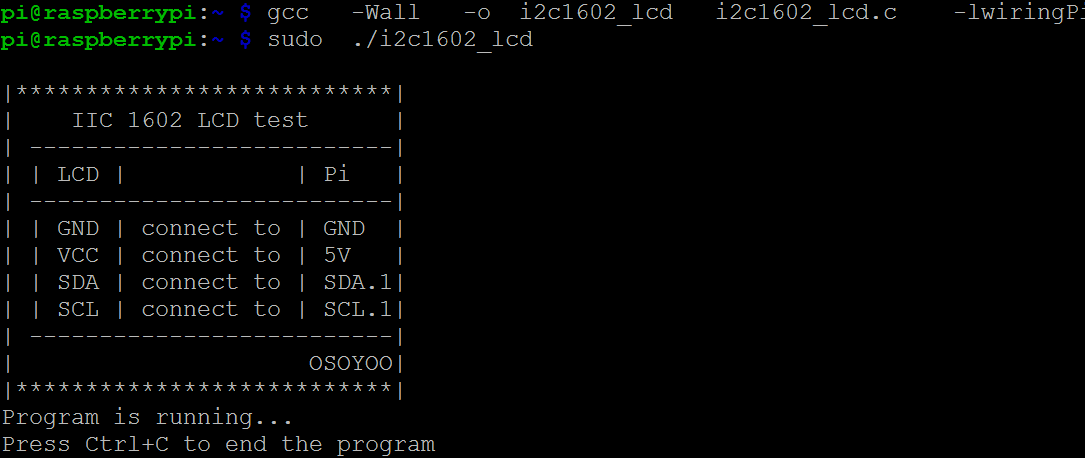
2)コードをコンパイルします。
gcc -Wall -o i2c1602_lcd i2c1602_lcd.c -lwiringPi
3) プログラムを実行します。
sudo ./i2c1602_lcd
プログラムを実行すると、ターミナルにメッセージが表示され、同時にLCD画面にもメッセージが表示されます。
注意:LCDのコントラストは、LCDの裏側にあるポテンショメーターを時計回りまたは反時計回りに回して、文字がはっきり表示されるまで調整できます。
C 言語のソースコードとコメント:
#include < stdio.h>
#include < wiringPi.h>
#include < wiringPiI2C.h>
#include < string.h>
int LCDAddr = 0x3f;//I2c address of LCD, some LCD i2c address might be 0x27
int BLEN = 0;//1--open backlight.0--close backlight
int fd;//linux file descriptor
//send an  16 bits data to LCD buffer
void write_word(int data){
    int temp = data;
    if ( BLEN == 1 )
        temp |= 0x08;
    else
        temp &= 0xF7;
    wiringPiI2CWrite(fd, temp);
}
//send control command to lcd
void send_command(int comm){
    int buf;
    // Send bit7-4 firstly
    buf = comm & 0xF0;
    buf |= 0x04;            // RS = 0, RW = 0, EN = 1
    write_word(buf);
    delay(2);
    buf &= 0xFB;            // Make EN = 0
    write_word(buf);
    // Send bit3-0 secondly
    buf = (comm & 0x0F)
    buf |= 0x04;            // RS = 0, RW = 0, EN = 1
    write_word(buf);
    delay(2);
    buf &= 0xFB;            // Make EN = 0
    write_word(buf);
}
//send character to lcd
void send_data(int data){
    int buf;
    // Send bit7-4 firstly
    buf = data & 0xF0;
    buf |= 0x05;            // RS = 1, RW = 0, EN = 1
    write_word(buf);
    delay(2);
    buf &= 0xFB;            // Make EN = 0
    write_word(buf);
    // Send bit3-0 secondly
    buf = (data & 0x0F)
    buf |= 0x05;            // RS = 1, RW = 0, EN = 1
    write_word(buf);
    delay(2);
    buf &= 0xFB;            // Make EN = 0
    write_word(buf);
}
//initialize the lcd
void init(){
    send_command(0x33); // Must initialize to 8-line mode at first
    delay(5);
    send_command(0x32); // Then initialize to 4-line mode
    delay(5);
    send_command(0x28); // 2 Lines & 5*7 dots
    delay(5);
    send_command(0x0C); // Enable display without cursor
    delay(5);
    send_command(0x01); // Clear Screen
    wiringPiI2CWrite(fd, 0x08);
}
//clear screen
void clear(){
    send_command(0x01); //clear Screen
}
//Print the message on the lcd
void write(int x, int y, char data[]){
    int addr, i;
    int tmp;
    if (x < 0) x = 0; if (x > 15) x = 15;
    if (y < 0) y = 0; if (y > 1)  y = 1;
    // Move cursor
    addr = 0x80 + 0x40 * y + x;
    send_command(addr);

    tmp = strlen(data);
    for (i = 0; i < tmp; i++){
        send_data(data[i]);
    }
}
void print_info()
{
    printf("\n");
    printf("|***************************|\n");
    printf("|    IIC 1602 LCD test      |\n");
    printf("| --------------------------|\n");
    printf("| | LCD |            | Pi   |\n");
    printf("| --------------------------|\n");
    printf("| | GND | connect to | GND  |\n");
    printf("| | VCC | connect to | 5V   |\n");
    printf("| | SDA | connect to | SDA.1|\n");
    printf("| | SCL | connect to | SCL.1|\n");
    printf("| --------------------------|\n");
    printf("|                     OSOYOO|\n");
    printf("|***************************|\n");
    printf("Program is running...\n");
    printf("Press Ctrl+C to end the program\n");
}
int main(){
    //init I2C, assign a buffer handler to variable fd
    fd = wiringPiI2CSetup(LCDAddr);
    init();
    print_info();
    write(0, 0, "Hi man.Welcome ");
    write(0, 1, "to osoyoo.com");
    delay(3000);
    clear();
    while(1){
        write(0,0,"This is Lesson13");
        write(0,1,"IIC LCD Test");
        delay(1000);
    }
    return 0;
}
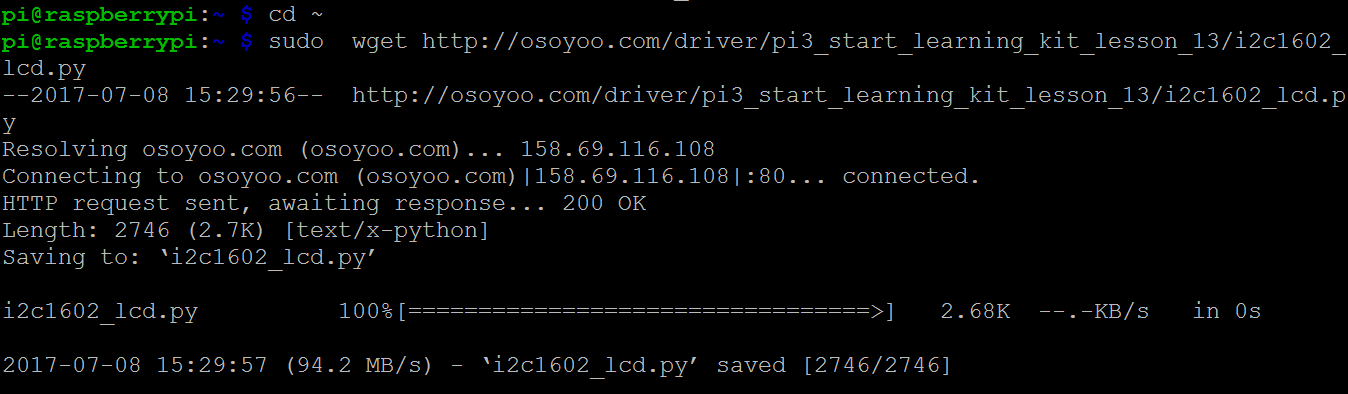
1) 次のコマンドを入力して、osoyooからPythonコードをダウンロードします。
cd ~
sudo wget http://osoyoo.com/driver/pi3_start_learning_kit_lesson_13/i2c1602_lcd.py
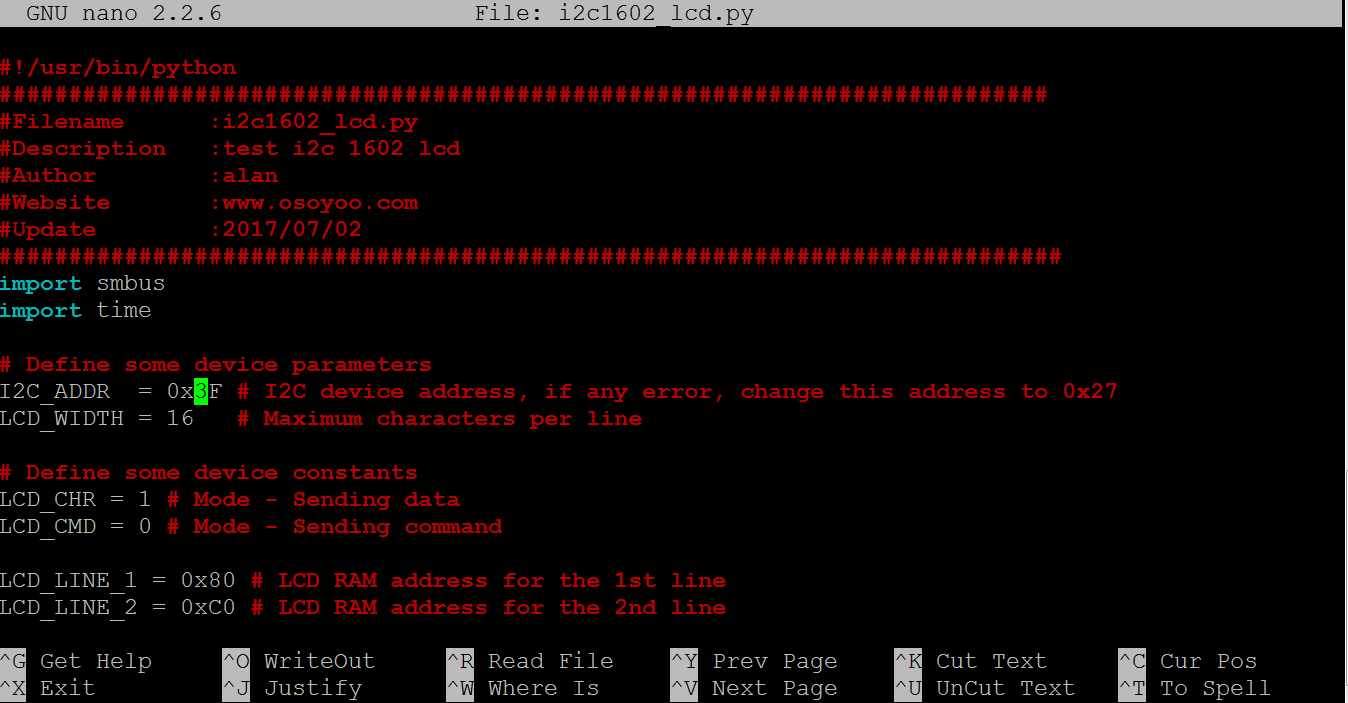
ターミナルで次のコマンドを入力して、i2c1602_lcd.pyファイルを開きます。
sudo nano i2c1602_lcd.py
以下のようなコードラインを検索し、アドレスを正しいI2Cアドレスに変更します。この例では、I2Cアドレスは0x3Fです。
2) プログラムを実行します。
sudo python ./i2c1602_lcd.py
3)実行結果
プログラムを実行すると、ターミナルにメッセージがコードとして表示され、同時にLCD画面にもメッセージが表示されます。
注意:LCDのコントラストは、文字がはっきり表示されるまでポテンショメーターを時計回りまたは反時計回りに回して調整できます。
Pythonのサンプルコード解析:
import smbus
import time

# Define some device parameters
I2C_ADDR  = 0x3F # I2C device address, if any error, change this address to 0x27
LCD_WIDTH = 16   # Maximum characters per line

# Define some device constants
LCD_CHR = 1 # Mode - Sending data
LCD_CMD = 0 # Mode - Sending command

LCD_LINE_1 = 0x80 # LCD RAM address for the 1st line
LCD_LINE_2 = 0xC0 # LCD RAM address for the 2nd line
LCD_LINE_3 = 0x94 # LCD RAM address for the 3rd line
LCD_LINE_4 = 0xD4 # LCD RAM address for the 4th line

LCD_BACKLIGHT  = 0x08  # On
#LCD_BACKLIGHT = 0x00  # Off

ENABLE = 0b00000100 # Enable bit

# Timing constants
E_PULSE = 0.0005
E_DELAY = 0.0005

#Open I2C interface
#bus = smbus.SMBus(0)  # Rev 1 Pi uses 0
bus = smbus.SMBus(1) # Rev 2 Pi uses 1

def lcd_init():
 # Initialise display
 lcd_byte(0x33,LCD_CMD) # 110011 Initialise
 lcd_byte(0x32,LCD_CMD) # 110010 Initialise
 lcd_byte(0x06,LCD_CMD) # 000110 Cursor move direction
 lcd_byte(0x0C,LCD_CMD) # 001100 Display On,Cursor Off, Blink Off
 lcd_byte(0x28,LCD_CMD) # 101000 Data length, number of lines, font size
 lcd_byte(0x01,LCD_CMD) # 000001 Clear display
 time.sleep(E_DELAY)

def lcd_byte(bits, mode):
 # Send byte to data pins
 # bits = the data
 # mode = 1 for data
 #        0 for command

 bits_high = mode | (bits & 0xF0) | LCD_BACKLIGHT
 bits_low = mode | ((bits<<4) & 0xF0) | LCD_BACKLIGHT

 # High bits
 bus.write_byte(I2C_ADDR, bits_high)
 lcd_toggle_enable(bits_high)

 # Low bits
 bus.write_byte(I2C_ADDR, bits_low)
 lcd_toggle_enable(bits_low)

def lcd_toggle_enable(bits):
 # Toggle enable
 time.sleep(E_DELAY)
 bus.write_byte(I2C_ADDR, (bits | ENABLE))
 time.sleep(E_PULSE)
 bus.write_byte(I2C_ADDR,(bits & ~ENABLE))
 time.sleep(E_DELAY)

def lcd_string(message,line):
 # Send string to display

 message = message.ljust(LCD_WIDTH," ")

 lcd_byte(line, LCD_CMD)

 for i in range(LCD_WIDTH):
   lcd_byte(ord(message[i]),LCD_CHR)

def main():
 # Main program block

 # Initialise display
 lcd_init()

 while True:

   # Send some test
   lcd_string("Created by         <",LCD_LINE_1)
   lcd_string("Osoyoo.com        <",LCD_LINE_2) time.sleep(3) # Send some more text lcd_string("> Tutorial Url:",LCD_LINE_1)
   lcd_string("> https://osoyoo.com",LCD_LINE_2)

   time.sleep(3)

if __name__ == '__main__':

 try:
   main()
 except KeyboardInterrupt:
   pass
 finally:
   lcd_byte(0x01, LCD_CMD)


The LCD backlight consumes quite a lot of power. Whats the function to turn off the backlight?
You can turn around the Potentiometer at the back of LCD to adjust LCD backlight
Thats for adjusting contrast. am talking about turning the backlight off from code.
In C language code, Line 6:
“int BLEN = 0;//1–open backlight.0–close backlight”
In Python code,
“LCD_BACKLIGHT = 0x08 # On
#LCD_BACKLIGHT = 0x00 # Off”
Please change “0x08” to “0x00”