Introduction
If you have worked in an office before, you are probably aware of those RFID cards or Tags that would unlock specific doors depending on your access.
In this tutorial we will learn what RFID is, how it works and how to make an Arduino based RFID door lock. You can watch the following video or read the written tutorial below for more details.
Of course this project could be interfaced to open doors, switch on a relay, light up an LED, or anything else you can think of. Keep in mind that there is a lot more you can do with these, like read more information from the card (the Cards used have around 1K of memory), as well as write or replace some information on the Card or Tag.
https://osoyoo.com/picture/Arduino_IOT_W5100/other/rfid.jpg
Preparations
Hardware
- OSOYOO Basic board (Fully compatible with Arduino UNO rev.3) x 1
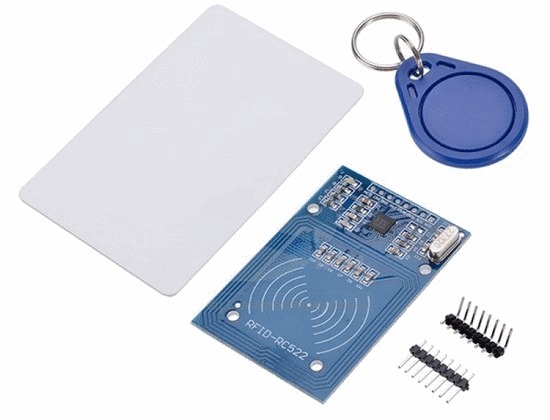
- RFID RC522 Module x 1
- Jumpers
- USB Cable x 1
- PC x 1
Software
- Arduino IDE (version 1.6.4+)
About RFID RC522 Module
What is RFID?
Radio-Frequency Identification (RFID) is the use of radio waves to read and capture information stored on a tag attached to an object. A tag can be read from up to several feet away and does not need to be within direct line-of-sight of the reader to be tracked.
RFID tags are used in many industries, for example, an RFID tag attached to an automobile during production can be used to track its progress through the assembly line; RFID-tagged pharmaceuticals can be tracked through warehouses; and implanting RFID microchips in livestock and pets allows for positive identification of animals.
How does a RFID system work?
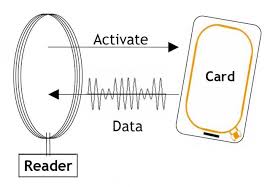
A RFID system is made up of two parts: a tag or label and a reader. RFID tags or labels are embedded with a transmitter and a receiver. The RFID component on the tags have two parts: a microchip that stores and processes information, and an antenna to receive and transmit a signal. The tag contains the specific serial number for one specific object.
To read the information encoded on a tag, a two-way radio transmitter-receiver called an interrogator or reader emits a signal to the tag using an antenna. The tag responds with the information written in its memory bank. The interrogator will then transmit the read results to an RFID computer program.
Specifications
- MFRC522 chip based board
- Operating frequency: 13.56MHz
- Supply Voltage: 3.3V
- Current: 13-26mA
- Read Range: Approx 3cm with supplied card and fob
- SPI Interface
- Max Data Transfer Rate: 10Mbit / s
- Dimensions: 60mm × 39mm
Library download
Here’s the library you need for this project:
- Download the RFID library here created by miguelbalboa
- Unzip the RFID library
- Install the RFID library in your Arduino IDE
- Restart your Arduino IDE
Examples
DumpInfo
Overhere we will show a simple example on how to use the MFRC522 RFID reader.
Pin wiring
| Pin |
Wiring to OSOYOO Basic board |
| SDA |
Digital 10 |
| SCK |
Digital 13 |
| MOSI |
Digital 11 |
| MISO |
Digital 12 |
| IRQ |
unconnected |
| GND |
GND |
| RST |
Digital 9 |
| 3.3V |
3.3V |
Caution: You must power this device to 3.3V!
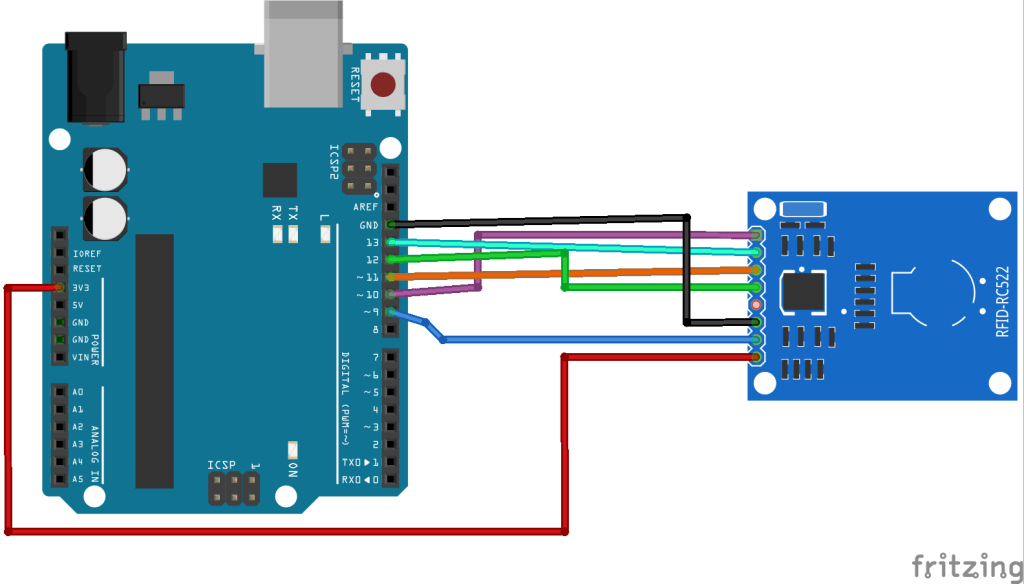
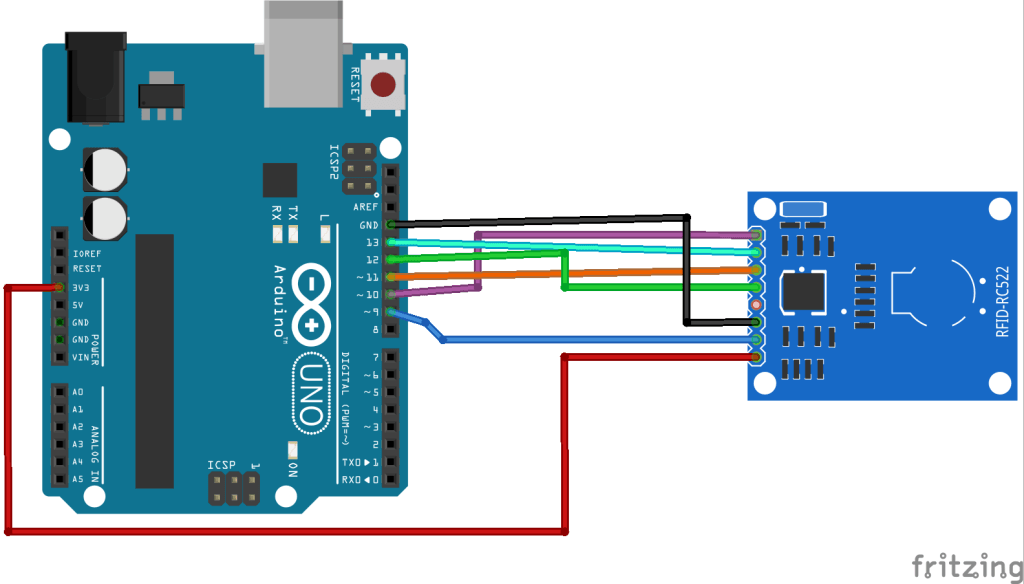
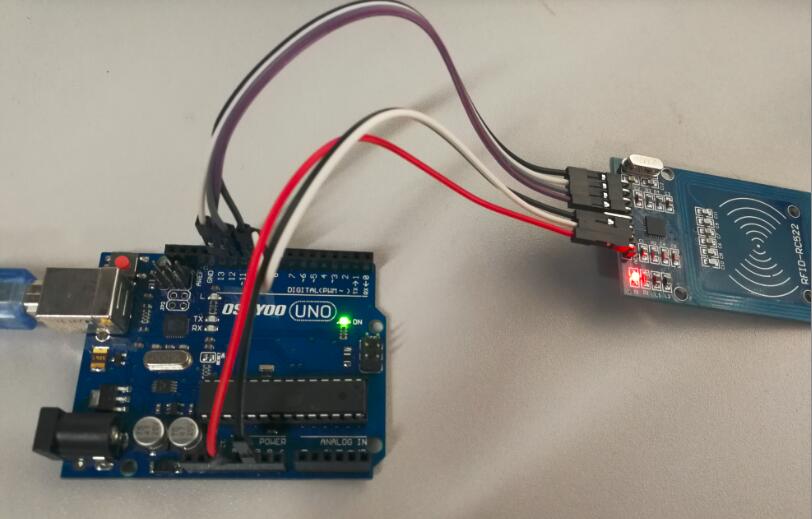
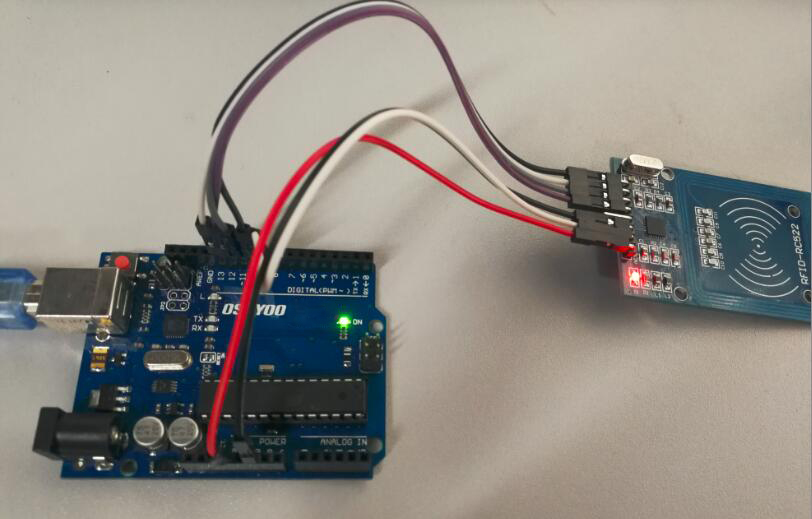
Connection
Build the circuit as below:
Code Program
After above operations are completed, connect the OSOYOO Basic board to your computer using the USB cable. The green power LED (labelled PWR) should go on.Open the Arduino IDE and choose corresponding board type and port type for you project. Go to File > Examples > MFRC522 > DumpInfo and upload the code. This code will be available in your Arduino IDE (after installing the RFID library).
#include <SPI.h>
#include <MFRC522.h>

#define RST_PIN         9          // Configurable, see typical pin layout above
#define SS_PIN          10         // Configurable, see typical pin layout above

MFRC522 mfrc522(SS_PIN, RST_PIN);  // Create MFRC522 instance

void setup() {
	Serial.begin(9600);		// Initialize serial communications with the PC
	while (!Serial);		// Do nothing if no serial port is opened (added for Arduinos based on ATMEGA32U4)
	SPI.begin();			// Init SPI bus
	mfrc522.PCD_Init();		// Init MFRC522
	mfrc522.PCD_DumpVersionToSerial();	// Show details of PCD - MFRC522 Card Reader details
	Serial.println(F("Scan PICC to see UID, SAK, type, and data blocks..."));
}

void loop() {
	// Look for new cards
	if ( ! mfrc522.PICC_IsNewCardPresent()) {
		return;
	}
	// Select one of the cards
	if ( ! mfrc522.PICC_ReadCardSerial()) {
		return;
	}
	// Dump debug info about the card; PICC_HaltA() is automatically called
	mfrc522.PICC_DumpToSerial(&(mfrc522.uid));
}
Running Result
Then, open the serial monitor.
Approximate the RFID card or the keychain to the reader. Let the reader and the tag closer until all the information is displayed.

This is the information that you can read from the card, including the card UID that is highlighted in yellow. The information is stored in the memory that is divided into segments and blocks as you can see in the previous picture.
Troubleshooting
- I don’t get input from reader or WARNING: Communication failure, is the MFRC522 properly connected?
- Check your connection, see Pin Layout .
- Check voltage. Most breakouts work with 3.3V.
- SPI only works with 3.3V, most breakouts seem 5V tollerant, but try a level shifter.
- SPI do not like long connections. Try shorter connections.
- SPI do not like prototyping boards. Maybe try a soldered connections.
- According to reports #101, #126 and #131, there may be a problem with the soldering on the MFRC522 breakout. You could fix this on your own.
- Sometimes I get timeouts or sometimes tag/card does not work.
- Try other side of the antenna.
- Try to decrease distance between MFRC522.
- Increase antenna gain per firmware:
mfrc522.PCD_SetAntennaGain(mfrc522.RxGain_max);
- Use better power supply.
- Hardware may be corrupted, most products are from china and sometimes the quality is really poor. Contact your seller.
- My tag/card doesn’t work.
- Distance between antenna and token too large (>1cm).
- You got the wrong type PICC. Is it really 13.56 MHz? Is it really a Mifare Type A?
- NFC tokens are not supported. Some may work.
- Animal RFID tags are not supported. They use a different frequency (125 kHz).
- Hardware may be corrupted, most products are from china and sometimes the quality is really poor. Contact your seller.
- Newer versions of Mifare cards like DESFire/Ultralight maybe not work according to missing authentification, see security or different protocol.
- Some boards bought from chinese manufactures do not use the best components and this can affect the detection of different types of tag/card. In some of these boards, the L1 and L2 inductors do not have a high enough current so the signal generated is not enough to get Ultralight C and NTAG203 tags to work, replacing those with same inductance (2.2uH) but higher operating current inductors should make things work smoothly. Also, in some of those boards the harmonic and matching circuit needs to be tuned, for this replace C4 and C5 with 33pf capacitors and you are all set. (Source: Mikro Elektronika)
- My mobile phone doesn’t recognize the MFRC522 or my MFRC522 can’t read data from other MFRC522
- Card simmulation is not supported.
- Communication with mobile phones is not supported.
- Peer to peer communication is not supported.
- I need more features.
- If software: code it and make a pull request.
- If hardware: buy a more expensive like PN532 (supports NFC and many more, but costs about $15)


Everything works fine, and consistently with the the *keychain tag*, but it will never recognize the card supplied (by osoyoo). Bad card? Bad IC? Something I need to do?