Introduction:
MQTT is an open source and simple Internet of Things(IOT) protocol which is
deployed in many IOT devices. MQTT client devices can send message to each other
through MQTT broker(server) and make IOT application easy and simple.
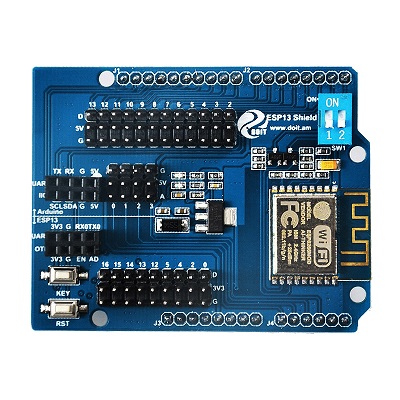
Osoyoo MQTT WiFi Shield is designed to turn your Arduino UNO
board into a simple MQTT client.
Objective of this tutorial:
In this tutorial, we will tell you how to configure MQTT broker information in
this WIFI Shield. Then we will use another MQTT client (browser) to talk with
our OSOYOO Basic board. We will send “Hello Arduino!” message from remote MQTT
client to UNO, turn on in LED which connected to UNO board, and then
response message “Welcome!” to remote client.
Configure WIFI hotspot and MQTT broker information:
Step 1)Connect the MQTT shield to UNO board, then power OSOYOO Basic board with USB
cable.
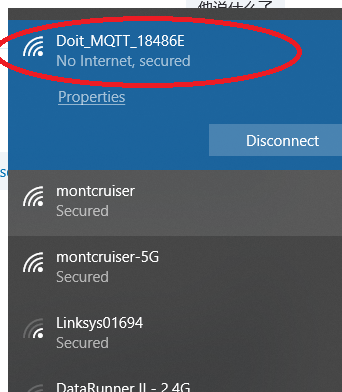
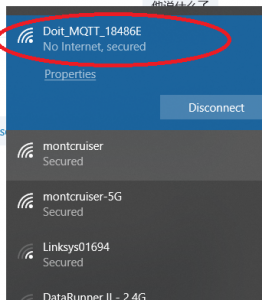
Step 2)Search your PC wifi hotspots, and connect your PC to a wifi hotspot looks
like “Doit_MQTT_XXXXXX” (XXXXX is a number id), wifi password(key) is 12345678
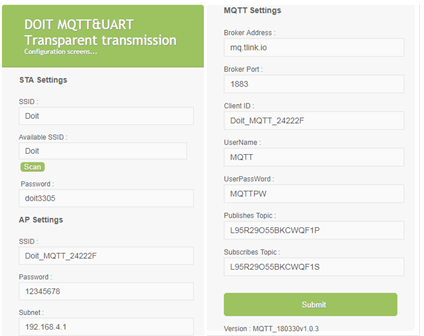
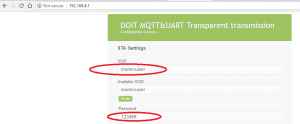
Step 3)Use your PC browser to visit http://192.168.4.1 you will see
following WiFi/MQTT configure page:
If your web page does not show above MQTT setting fields, it means your WIFI Shield firmware is wrong, you need burn MQTT firmware into the the wifi shield by reading following article: https://osoyoo.com/2018/04/25/how-to-burn-the-mqtt-firmware-for-wifi-shield/
STA setting:
SSID: fill your local wifi hotspot name
Password: fill your local wifi password
AP setting :
Please leave all the setting as default value, no need change anything
MQTT setting:
Broker Address: fill your mqtt broker url/ip address, we suggest you use google to search free MQTT broker, you will find many free server such as broker.hivemq.com or broker.mqttboard.com etc
Broker Port: fill your mqtt broker port, we suggest you use
default value 1883
Client ID: fill your mqtt client ID, you can leave it blank
UserName: fill your mqtt user name or leave it blank if you
don’t have any.
UserPassword: fill your mqtt password or leave it blank if you
don’t have password
Publish Topic: fill your MQTT topic which you want to publish
your message. We suggest you use a unique topic id to avoid conflick
Subscribe Topic:fill your MQTT topic which you want to receive
your message. We suggest you use a unique topic id to avoid conflick
After you have filled above fields, click Submit button to effect the change.
Special Notes: After submit, the configuration page url will be no more as
http://192.168.4.1. If you want to find the new
configuration page ip/url to change MQTT setting, you need login to your wifi router control panel/dashboard, then go to client list
and lookup the ip address of a DHCP client looks like Doit_MQTT_XXXXXX .
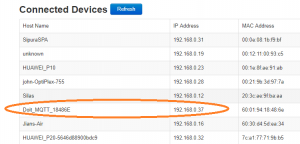
For example, If the IP for client Doit_MQTT_XXXX is 192.168.0.22, then the new config url is http://192.168.0.22
Test MQTT data exchange:
Now we will load some Arduino sketch into UNO board to test our MQTT wifi
shield.
There is a small switch in the shield (one side is ON, another side is 1,2).
Remember, everytime before we load sketch file to UNO, we
need turn the switch to 1,2 position, otherwise Sketch can not be loaded into
Arduino. After we have loaded sketch, we must set switch back to ON position
otherwise MQTT shield can not talk to UNO board.
Step 1: Set Switch to 1,2 Position.
Step 2: Download following sketch code from https://osoyoo.com/driver/mqtt_wifi_shield_test.ino,
then copy above code to Arduino IDE and load them into Arduino hardware.
Step 3: Set Switch back to ON position.
Step 4: Use any MQTT client to send MQTT message (i.e , you can visit
http://www.hivemq.com online mqtt client),
remember the mqtt broker server url/ip, publish topic,subscribe topic must match
your MQTT wifi shield configuration setting
Step 5: in mqtt client software, publish a message “Hello Arduino!” (publish
topic must match your wifi shield subscribe topic), your LED connected to D13
will be turned on and your MQTT client will receive a message “hi, LED is turned
on” from Arduino wifi shield.
Step 6: In mqtt client software, publish another message “Good Bye!”, your LED
connected to D13 will be turned off and your MQTT client will receive a message
“hi, LED is turned off” from Arduino wifi shield.