概述
上一课中我们介绍如何用Console Cable远程登录Pi,本课将在上一课基础上,通过Console Cable远程登录Pi后在命令行模式下,配置wifi网络。
所需物料
Raspberry Pi Zero/W or Pi2/Pi3(焊接好排针)
Console Cable
USB转Micro USB电源线
5V/2A or 5V/2.5A USB电源适配器(可选)
Config WiFi
登录Pi
参考lesson 3登录远程Pi
To scan for WiFi networks, use the command sudo iwlist wlan0 scan

This will list all available WiFi networks, along with other useful information
At the prompt, enter the following command:
sudo nano /etc/network/interface
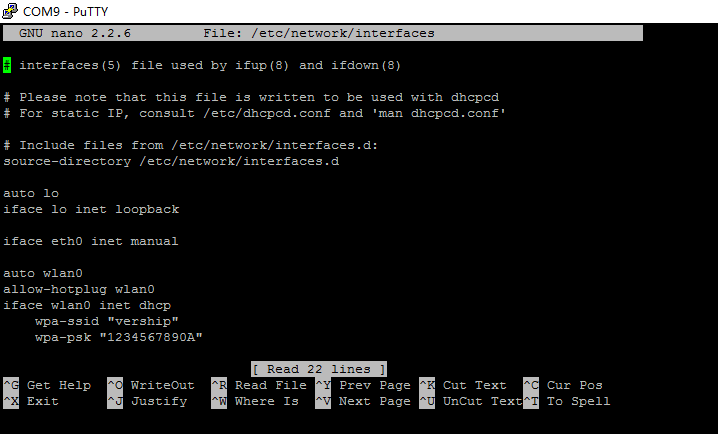
In the nano text editor, you’ll see something like this:
# interfaces(5) file used by ifup(8) and ifdown(8)

# Please note that this file is written to be used with dhcpcd
# For static IP, consult /etc/dhcpcd.conf and 'man dhcpcd.conf'

# Include files from /etc/network/interfaces.d:
source-directory /etc/network/interfaces.d

auto lo
iface lo inet loopback

iface eth0 inet manual

allow-hotplug wlan0
iface wlan0 inet manual
    wpa-conf /etc/wpa_supplicant/wpa_supplicant.conf

allow-hotplug wlan1
iface wlan1 inet manual
    wpa-conf /etc/wpa_supplicant/wpa_supplicant.conf
That’s the very basic configuration that governs your Pi’s Ethernet connect (indicated by the eth0 portion). We need to add on a very minor bit to enable the Wi-Fi dongle. Use the arrow keys to move down below the existing entry and add the following lines:
auto lo

iface lo inet loopback
iface eth0 inet dhcp

allow-hotplug wlan0
auto wlan0

iface wlan0 inet dhcp
        wpa-ssid "wifi-ssid"
        wpa-psk "wifi-password"
wifi-ssid:wifi’s name
wifi-password:wifi’s password
Once you’ve annotated the file, press CTRL+X to save the file and exit the nano editor. At the prompt again, enter the following command:
sudo reboot
When the device finishes rebooting, it should automatically connect to the Wi-Fi node.
At the command prompt, enter the following command to check if the wifi is connected:
ifconfig wlan0
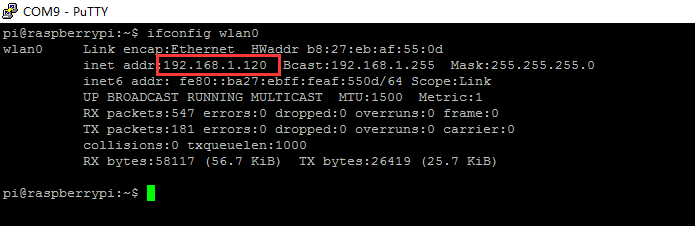
可以看到pi已经连接上了wifi,并且分配到一个IP(192.168.1.120)


