Introduction:
In previous lesson 1 and lesson 2 , we have introduced how to install Blynk APP in your cell phone and run sketch to connect Things(sensors, actuators) to internet. In following diagram, you can see a Blynk Server between Cell phone APP and Arduino.

This server is very important because it is the bridge to exchange control signal and data between APP and those Things in Arduino.
By default, Blynk Server is operated by Blynk company and also called Blynk Cloud.
Blynk Cloud server makes our programming and setting very simple and easy. However, it has some weakness:
- Blynk company needs to hire engineers to maintain this server, so it can only provide very limited free service. After that, you need buy so-called Energy from Blynk company to make your project running.
- Blynk Cloud is a remote server which might have some delay on your IoT project.
Fortunately Blynk has provided another solution for users to solve these problems. In order to attract more people to make IoT project based on Blynk platform , they opened their java server code to public for free. So we can install the Blynk Server to your local computer and no need buy Energy to use their server. Since the server is installed locally in your home or office LAN, the IoT reaction speed is much faster than WAN server.
In this Lesson, we will teach students how to install Blynk local Server and setup APP and Arduino sketch code to make them working in Blynk Local Server.
Install Blynk local server on Windows
1)Download Blynk local server from https://osoyoo.com/driver/blynk/blynk-server.jar
2)In Windows search bar , type cmd to open command windows
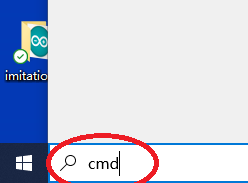
3)After open the command window, go to the fold where blynk-server.jar file is saved.
Run following command to start the local Blynk server:
java -jar ./blynk-server.jar -dataFolder ./Blynk &
you will see following result:

Now your local Blynk server has been successfully installed and running in your Windows. In above picture, we can see our local server IP is 192.168.0.37, pleas write down your server IP address for later use.
You can see from the result that you can visit the admin page of Blynk Server url:
https://your_windows_ip_address:9443/admin
We will teach you how to access the admin page later.
Install Blynk local server on Apple Macbook Computer
1)Download Blynk local server from https://osoyoo.com/driver/blynk/blynk-server.jar
2)Open MacBook terminal window,
Run following command to start the local Blynk server:
java -jar ./blynk-server.jar -dataFolder ./Blynk &
you will see following result:

Now your local Blynk server has been successfully installed and running in your Macbook. In above picture, we can see our local server IP is 192.168.0.37, pleas write down your server IP address for later use.
You can visit the admin page of Blynk Server url:
https://your_macbook_ip_address:9443/admin
user name: [email protected]
password : admin
Install Blynk local server on Raspberry Pi or similar Linux computer
1)Open your Pi shell terminal or use SSH to connect Raspberry Pi remote terminal
2)Download Blynk local server by following command
wget http://osoyoo.com/driver/blynk/blynk-server.jar
2)Run following command to start the local Blynk server:
java -jar ./blynk-server.jar -dataFolder ./Blynk &
The java server will start in one or two minutes, then you will see following result:

Now your local Blynk server has been successfully installed and running in your Raspberry Pi. In above picture, we can see our local server IP is 192.168.0.37, pleas write down your server IP address for later use.
You can visit the admin page of Blynk Server url:
https://your_RaspberryPi_ip_address:9443/admin
Hardwares in this lesson
We will do same Hardware installation as Lesson 1
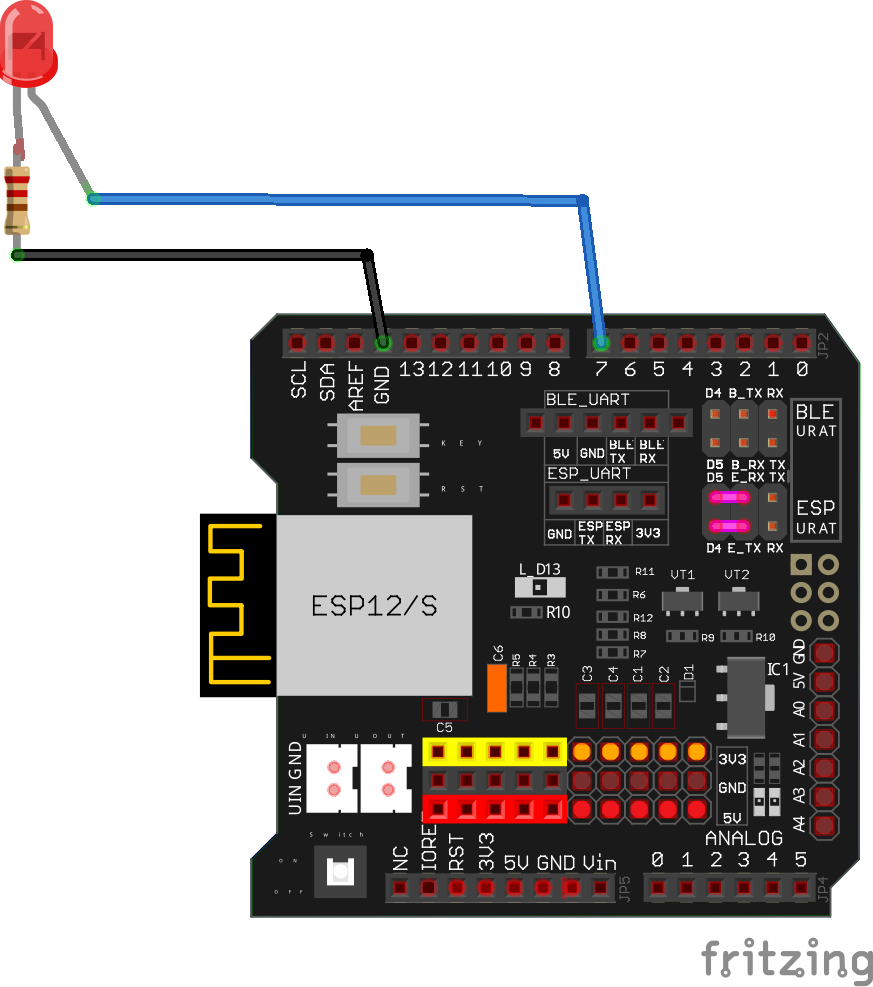
LED connects to D9, Make sure you have connected D4 to E_TX and D5 to E_RX with jumper caps , See pink lines in above picture.
Software Installation and Configuration:
1)If you haven’t install Blynk Library, check Lesson 1.
2) Create a Blynk Account for your local Blynk Server
In Lesson 1, you might have already installed an Blynk account. However, that account is only for Blynk Cloud. We need to create a new account for our local server.
i) Click Create new Account in Blynk APP

2)Input your email and password, then click Server Setting button. Switch server from Blynk to CUSTOM, write your local server IP address in the IP field. Leave default port 9443 unchanged as following:
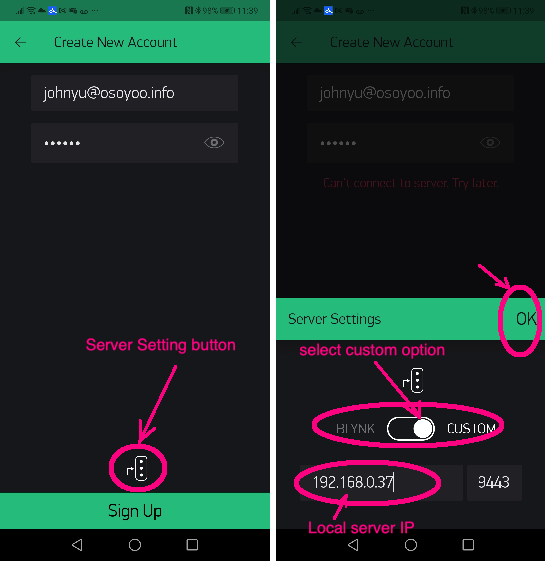
Click OK to finish Local Server setting. Then Click Sign UP to connect Server.
If your Local Blynk is running and IP address setting is correct, you will a welcome page, just click Cool! Got it and go to New Project UI.
Otherwise APP will show Can’t connect to Server, Try later…
Then Add a new project in The APP. You will see following UI:
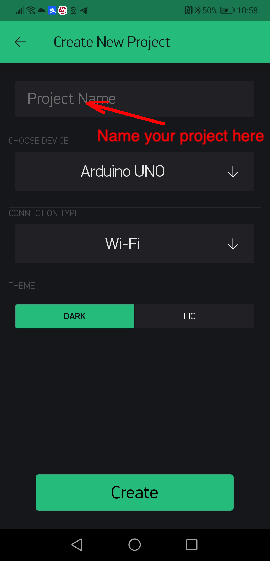
You can name your Project as Lesson 3 and select UNO , then Click Create, you will see:
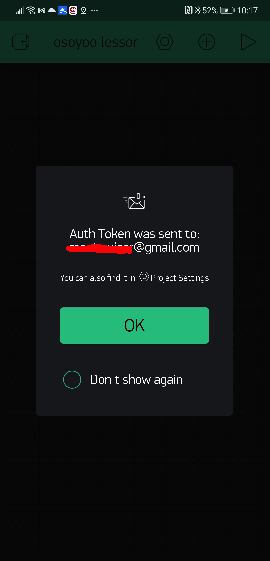
Although above page shows server has emailed you a Token, but we did not set SMTP email service in our local Server, so we will not get any token email. I will teach you how to get local server token for this project later.
Now you entered Lesson 3 project setting UI, you can do same thing as lesson 1, add a button Widget as following:

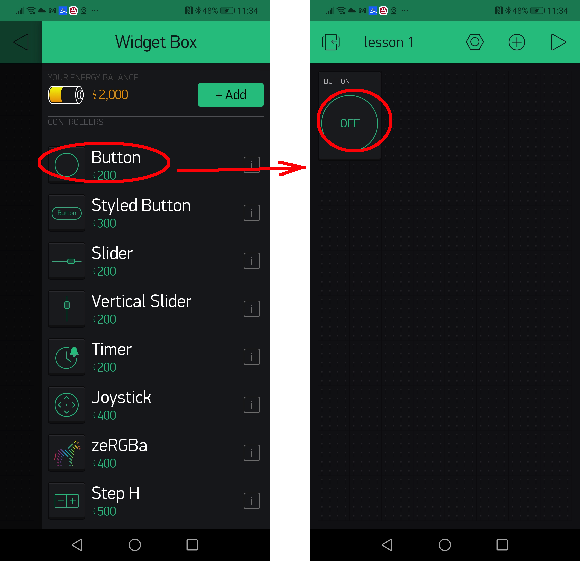
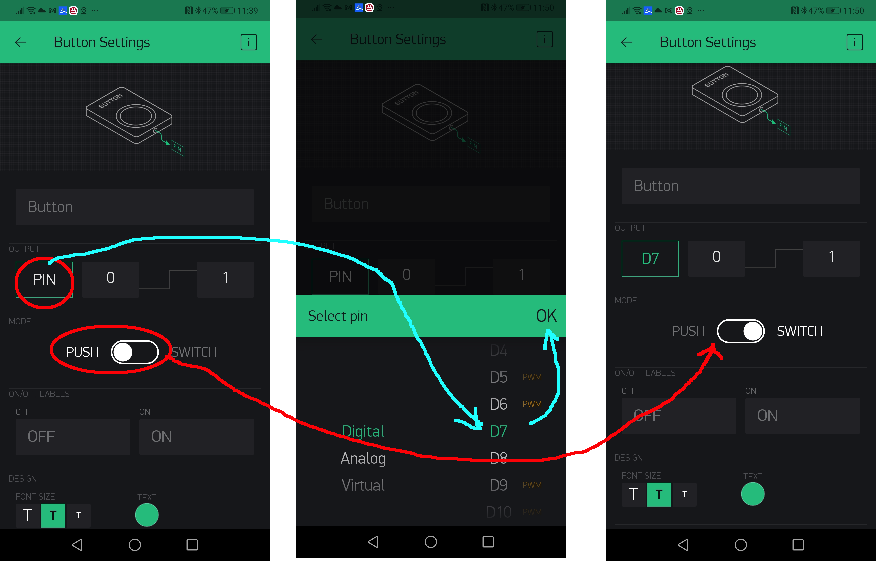
Same as Lesson 1, you can set Button property to D7 as following:
Now your APP lesson 3 project setting is completed. You can click ← to go back APP home.
3.Get your Token code
You have two ways to get your Blynk token:
1)Get token from your APP as following:
Or
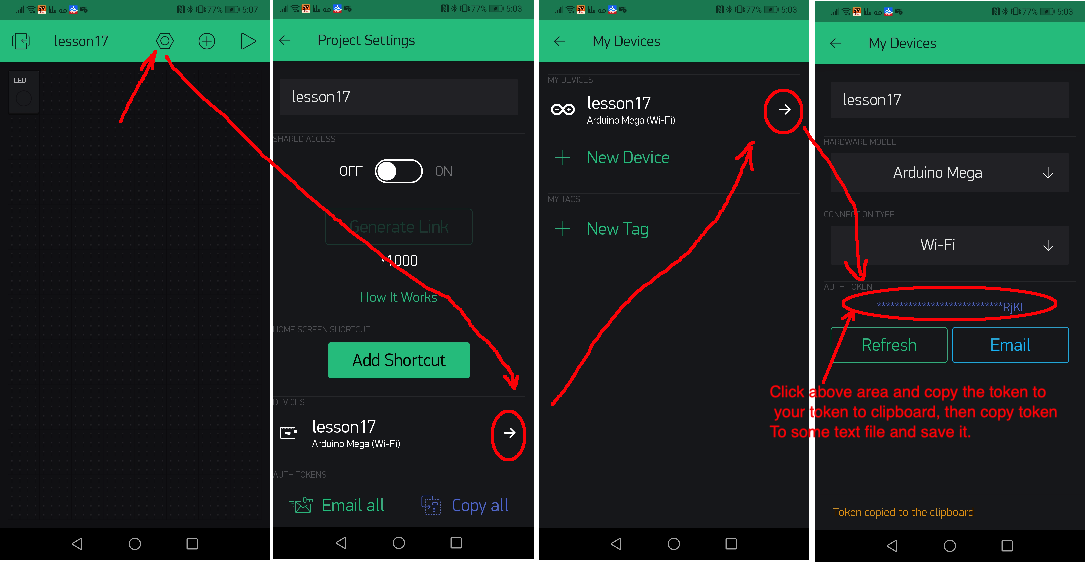
2)Visit your local Server control panel and find your Auth Token
Please open your browser and visit following url:
https://your_server_ip:9443/admin
your_server_ip is the IP address of your local Blynk server.
Above https:// url default certificate is self-signed. It will therefore be considered unreliable. You will have to accept the alert message displayed by your internet browser. If you are using Google Chrome browser, You will see following alert:
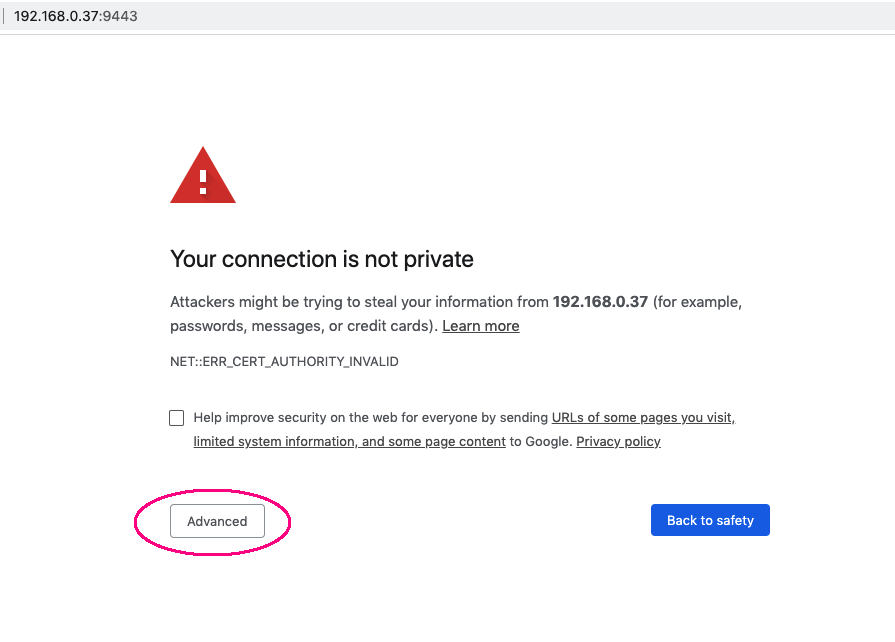
Click Advanced, then select proceed to the unsafe IP as following:

You will go to Server login page, please use user name [email protected] and password admin to login to control panel.
then please click Users:
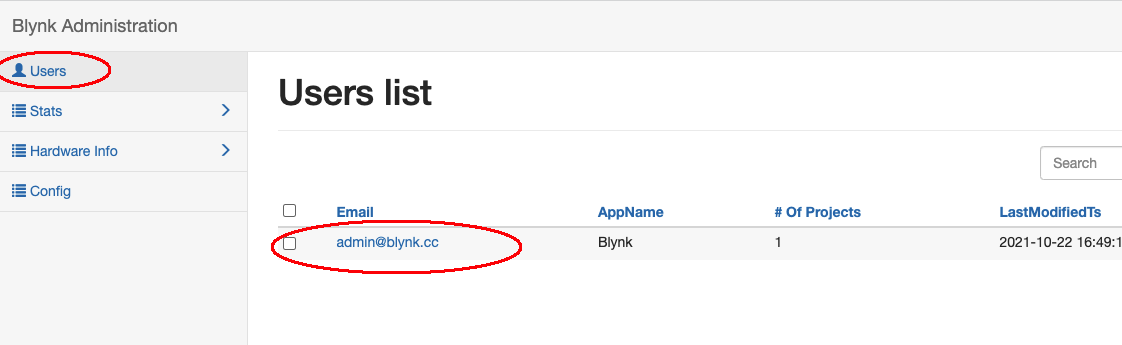
Click the email account you just created, then you will find the Token which just assigned for your project:
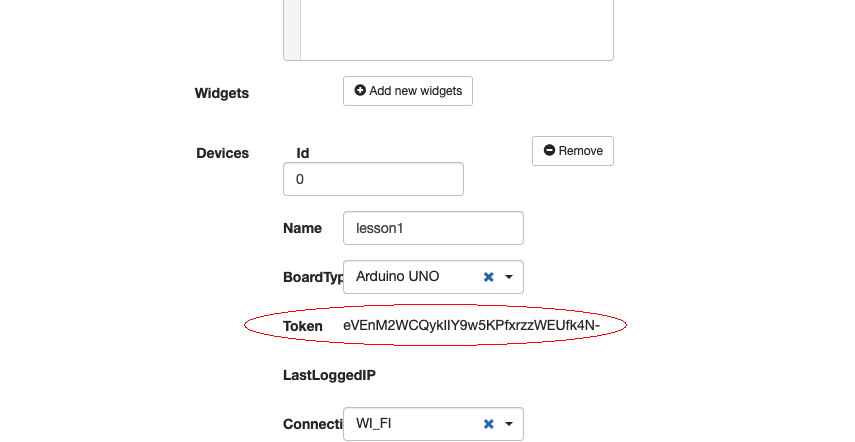
Record this token, we will use it in our Sketch.
6. Install Sketch
Download Blynk-lesson1 sketch from https://osoyoo.com/driver/blynk/blynk-iot-lesson3/blynk-lesson3.zip, unzip the file you will see blink-lesson1 folder. Please enter the folder and open blynk-lesson3.ino file into your IDE.
Same as lesson 1, You need replace line 19 to 25 with your own Blynk token n wifi ssid and password.
You also need to replace line 26 with your local Blynk Server IP addresss:
char auth[] = "***"; // Your local Blynk Server Token

// Your WiFi credentials.
// Set password to "" for open networks.
char ssid[] = "***"; // your wifi SSID
char pass[] = "***"; // your wifi password
char server_ip[]="192.168.0.37"; // your local Blynk Server IP address
After changing the token and wifi password, upload code to IDE and open your Serial monitor as following:
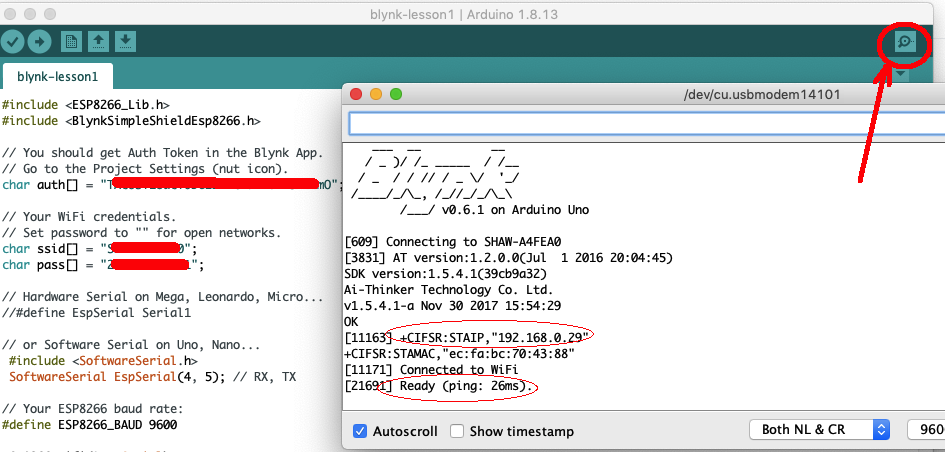
If your WIFI Password and Blynk token setting is correct, you will see your IP address. The last line will show “Ready” which means your mainboard has connected to Blynk Cloud Server.
7. Run The Project
Now go back to APP , click the ►Play button, your UI will go to running status. In the upper-right corner, you can find an board icon (see blue circle area), this means your mainboard has been detected by Blynk cloud server. If failed to connect Blynk, this icon will show some alert sign.
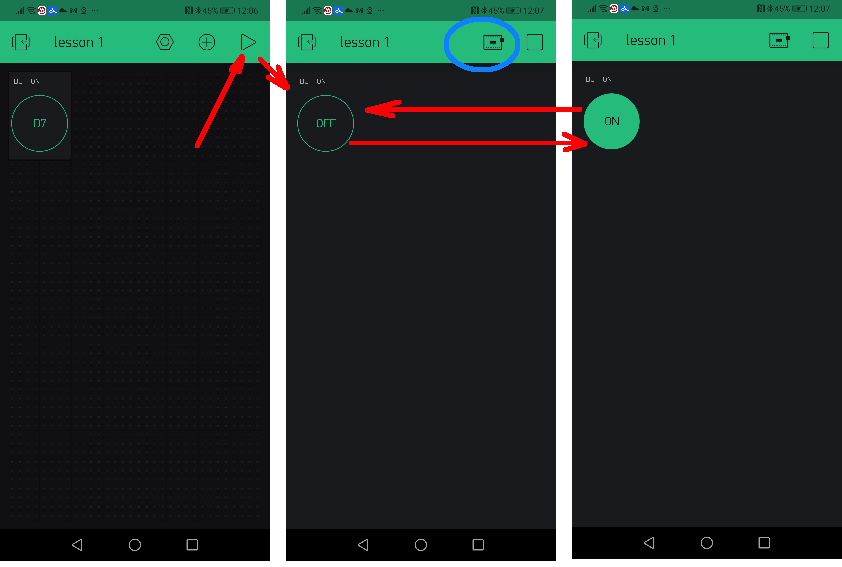
Now you can click the button. Each click will toggle OFF to ON and ON to OFF. Your remote LED in D7 pin will also turn ON and OFF according to your button status.


