Buy one piece NodeMCU development board from following link:
| Buy from US |
Buy from UK |
Buy from DE |
Buy from IT |
Buy from FR |
Buy from ES |
Buy from JP |
 |
 |
 |
 |
 |
 |
 |
Buy three piece NodeMCU development board from following link:
| Buy from US |
Buy from UK |
Buy from DE |
Buy from IT |
Buy from FR |
Buy from ES |
Buy from JP |
|
|
|
|
|
|
|
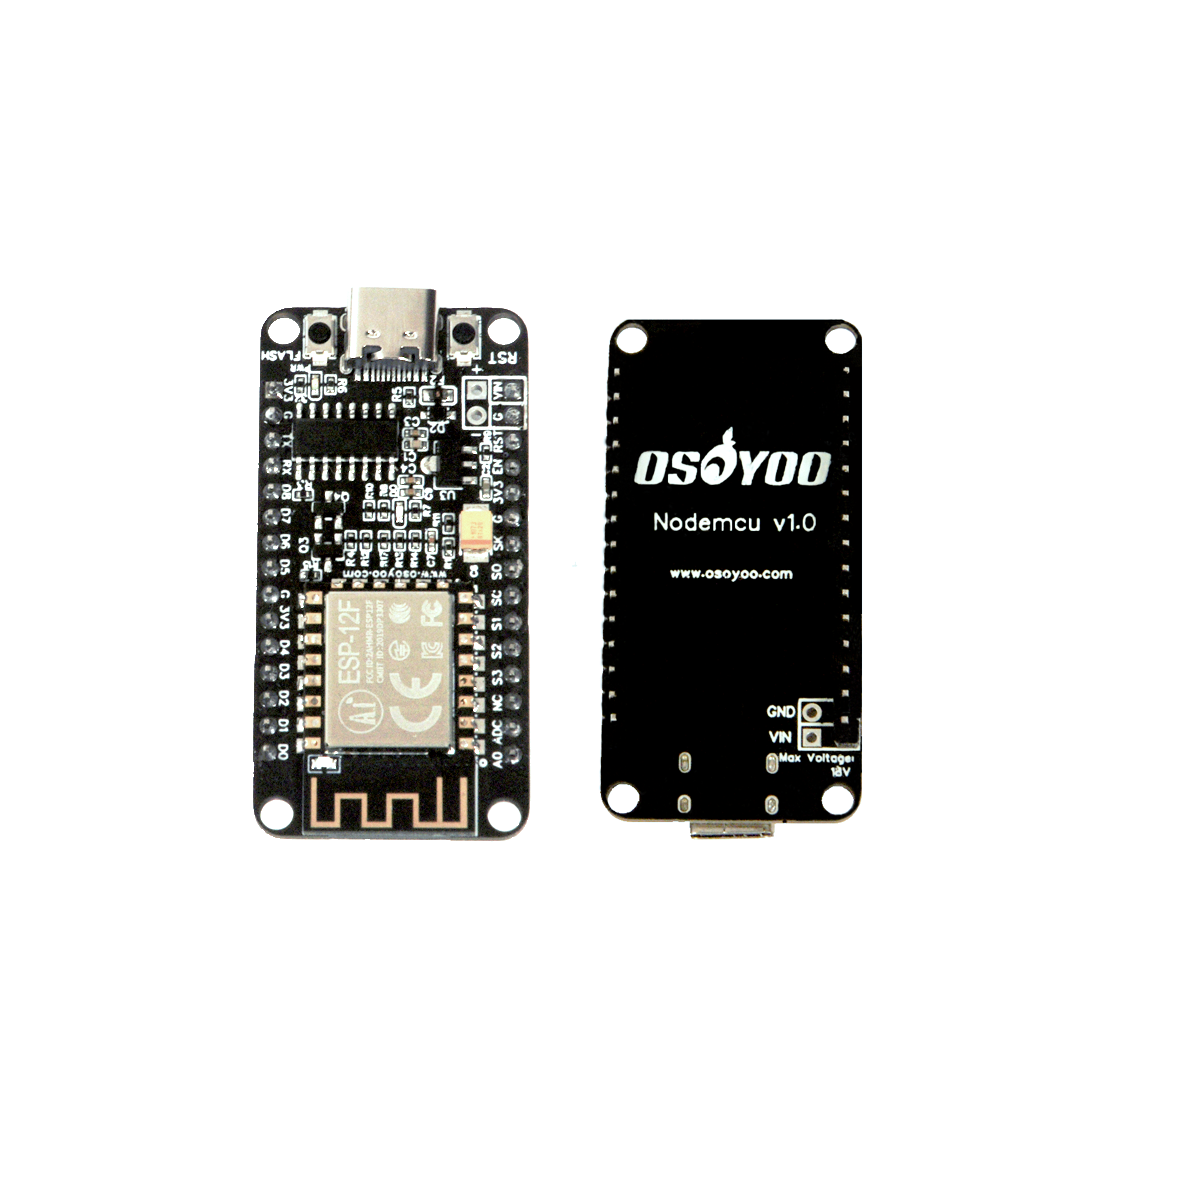 DescriptionThe OSOYOO NodeMCU development board is based on ESP8266, features WiFi connectivity, onboard USB to UART converter and keys. All pins of the ESP-12F module can be connected via expansion headers, allowing you to connect the board to other peripherals and to generate PWM, I2C, SPI, and UART serial communications.Thanks to its large open source developer community, a large number of libraries for this popular microcontroller is available. This open-source board supports development in various ways such as Lua/AT commands/MicroPython/Arduino/IOT source code, etc. Greatly speed up your IOT application developing process.
Features
- Open-source
- Arduino-like hardware
- WI-FI enabled
- Status LED
- Type C USB port
- Reset/Flash buttons
- Interactive and Programmable
- Low cost
- USB to UART converter
- GPIO pins
SPECIFICATIONS
- WIFI module: ESP-12F
- Processor: ESP8266
- Built-in Flash Memory/SRAM: 4 MB / 64 KB
- Clock Speed:80 MHz
- USB to Serial convert chip:CH340C
- USB – Type C port for power, programming and debugging
- Antenna: Onboard PCB antenna
- Peripheral interface: UART/SPI/I2C/SDIO/GPIO/ADC/PWM
- WiFi protocol: IEEE 802.11 b/g/n
- Frequency range: 2.4G ~ 2.5G (2400M ~ 2483.5M)
- Serial port baud rate configuration: 1200/2400/4800/9600/19200/38400/57600/74800/115200 bps
- WiFi operation current: continuous transmission operation: ≈70mA (200mA MAX), deep sleep mode: <3mA
- Serial WiFi transmission rate: 110-460800bps
- WIFI mode: Station / SoftAP / SoftAP+Station
- Power supply: 5V
- Logic level: 3.3V
- Input Voltage:4.5-18V
- Dimensions: 52mm x 26mm
APPLICATIONSThe NodeMCU suit for IOT applications such as:
- Smart home
- Intelligent building
- Industrial automation
- Wearable devices
- IP camera
- Intelligent agriculture
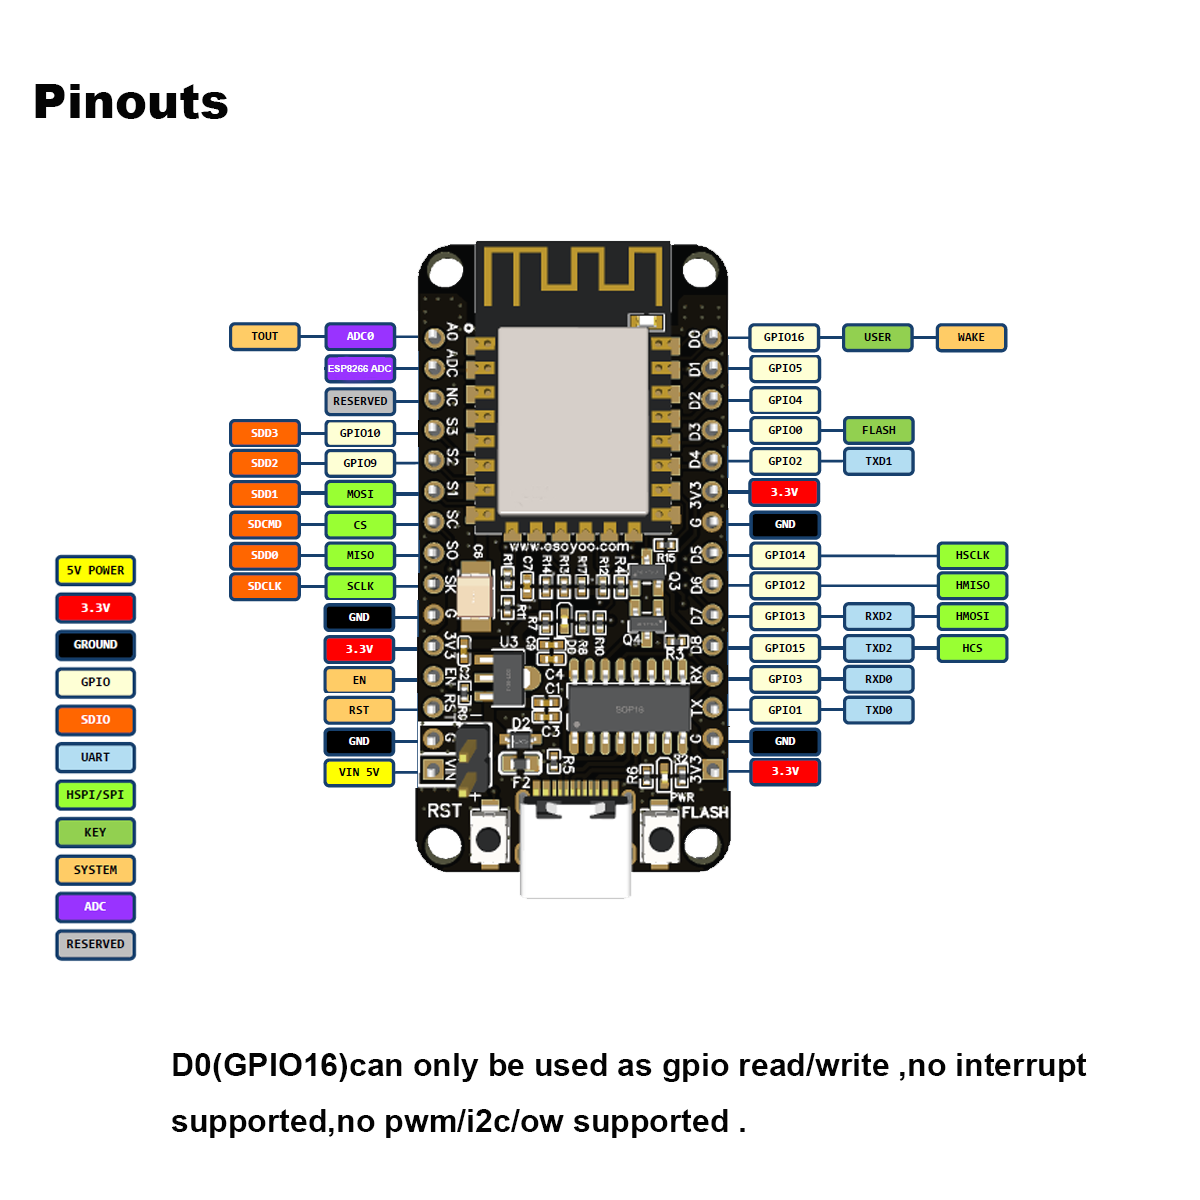 Power Pins
There are four power pins. VIN pin and three 3.3V pins.
VIN 5v can be used to directly supply the NodeMCU/ESP8266 and its peripherals. Power delivered on VIN is regulated through the onboard regulator on the NodeMCU module –you can also supply 5V regulated to the VIN pin.
3.3V pins are the output of the onboard voltage regulator and can be used to supply power to external components.
GND are the ground pins of NodeMCU/ESP8266
GPIO Pins
NodeMCU/ESP8266 has 17 GPIO pins which can be assigned to functions such as I2C, I2S, UART, PWM, IR Remote Control, LED Light and Button programmatically. Each digital enabled GPIO can be configured to internal pull-up or pull-down, or set to high impedance. When configured as an input, it can also be set to edge-trigger or level-trigger to generate CPU interrupts.
ADC Channel
The NodeMCU is embedded with a 10-bit precision SAR ADC. The two functions can be implemented using ADC. Testing power supply voltage of VDD3P3 pin and testing input voltage of TOUT pin. However, they cannot be implemented at the same time.
UART Pins
NodeMCU/ESP8266 has 2 UART interfaces (UART0 and UART1) which provide asynchronous communication (RS232 and RS485), and can communicate at up to 4.5 Mbps. UART0 (TXD0, RXD0, RST0 & CTS0 pins) can be used for communication. However, UART1 (TXD1 pin) features only data transmit signal so, it is usually used for printing log.
SPI Pins
NodeMCU/ESP8266 features two SPIs (SPI and HSPI) in slave and master modes. These SPIs also support the following general-purpose SPI features:
- 4 timing modes of the SPI format transfer
- Up to 80 MHz and the divided clocks of 80 MHz
- Up to 64-Byte FIFO
SDIO Pins NodeMCU/ESP8266 features Secure Digital Input/Output Interface (SDIO) which is used to directly interface SD cards. 4-bit 25 MHz SDIO v1.1 and 4-bit 50 MHz SDIO v2.0 are supported.
Control Pins
They are used to control the NodeMCU/ESP8266. These pins include Chip Enable pin (EN), Reset pin (RST) and WAKE pin.
EN: The ESP8266 chip is enabled when EN pin is pulled HIGH. When pulled LOW the chip works at minimum power.
RST: RST pin is used to reset the ESP8266 chip.
WAKE: Wake pin is used to wake the chip from deep-sleep.
USB TO SERIAL CONVERTER – CH340
Incorporated into each NodeMCU is a USB to Serial Converter. The official design is based on the CP2102 chipset and offers the best compatibility. Genuine boards use the CP2102 chipset including the officially licensed NodeMCU modules. The other common USB to Serial Converter used is the CH340 which is common on the lower-priced modules including the OSOYOO NodeMCU v1.0. Other designs may use drivers including the FTDI chipset, but those designs are rare.
Depending on the Operating System you are using with the NodeMCU, the appropriate driver must be installed. Generally, Windows 10 immediately recognizes the CP2102 chipset while the CH340 may require separate installation.
WCH maintain and update the drivers for the CH340 on a regular basis. Versions of the driver are also available for Windows, Mac, Linux, and Android. Visit their CH340 Driver Download page. You are always best to visit the original manufacturer to ensure you are receiving the most recent versions of the driver.
We have experienced situations where both CP2102 and CH340 devices have not functioned or been recognized as expected. The solution was as simple as uninstalling the old driver and installing the most recent version.
HOW TO WRITE CODES FOR NODEMCU?
After setting up ESP8266 with Node-MCU firmware, let’s see the IDE (Integrated Development Environment) required for the development of NodeMCU.
NodeMCU with ESPlorer IDE
Lua scripts are generally used to code the NodeMCU. Lua is an open-source, lightweight, embeddable scripting language built on top of C programming language.
For more information about how to write Lua script for NodeMCU refer to Getting started with NodeMCU using ESPlorerIDE
NodeMCU with Arduino IDE
Here is another way of developing NodeMCU with a well-known IDE i.e. Arduino IDE. We can also develop applications on NodeMCU using the Arduino development environment. This makes it easy for Arduino developers than learning a new language and IDE for NodeMCU.
For more information about how to write Arduino sketch for NodeMCU refer toGetting started with NodeMCU using ArduinoIDE
The difference in using ESPlorer and Arduino IDE
Well, there is a programming language difference we can say while developing an application for NodeMCU using ESPlorer IDE and Arduino IDE.
We need to code in C\C++ programming language if we are using Arduino IDE for developing NodeMCU applications and Lua language if we are using ESPlorer IDE.
Basically, NodeMCU is Lua Interpreter, so it can understand Lua script easily. When we write Lua scripts for NodeMCU and send/upload it to NodeMCU, then they will get executes sequentially. It will not build a binary firmware file of code for NodeMCU to write. It will send Lua script as it is to NodeMCU to get executed.
In Arduino IDE when we write and compile code, the ESP8266 toolchain in the background creates a binary firmware file of code we wrote. And when we upload it to NodeMCU then it will flash all NodeMCU firmware with newly generated binary firmware code. In fact, it writes the complete firmware.
That’s the reason why NodeMCU not accept further Lua scripts/code after it is getting flashed by Arduino IDE. After getting flashed by Arduino sketch/code it will be no more Lua interpreter and we got an error if we try to upload Lua scripts. To again start with Lua script, we need to flash it with NodeMCU firmware.
Since Arduino IDE compiles and upload/writes complete firmware, it takes more time than ESPlorer IDE.
FAQ
You can list you question here or contact with [email protected] for technology support.
When I connect stuff to some of the pins, the NodeMCU stops working. Whats up with that?
The ESP8266 uses some of the pins as ‘boot mode’ pins so on boot they must be set to certain values:
- CH_PD (EN) should be always pulled high (it will disable the entire module if low)
- RST should be always pulled high (it will disable the entire module if low)
- GPIO 0 sets whether the bootloader is active, it must be pulled HIGH during power up/reset for the user program to run. If its pulled LOW, it will activate the bootloader. The built-in red LED on #0 pulls it up
- GPIO 2 must be pulled high on power up/reset.
- GPIO 15 must be pulled low on power up/reset.
My NodeMCU board keeps crashing and resetting, whats up with that?
The most common reason for crashes is power failure. Make sure you’re powering the NodeMCU with a good ~5V power supply, and if you’re using a USB-Serial cable, that its plugged into the mainboard of your computer or through a powered hub!
I can’t seem to find the Serial port on my computer for the NodeMCU?
Don’t forget to install the Serial port driver(CP2104 driver / CH340 driver) or your computer, they are required!
I can’t get Lua to respond to my commands
Make sure your terminal software is sending correct line endings! The default PuTTY settings may be wrong when trying to talk to Lua on an ESP8266. Lua expects CRLF “\r\n” line endings, and apparently PuTTY defaults to just LF “\n”!
Reference
ESP8266 Datasheet & Other Documents: http://www.esp8266.com/wiki/doku.php
NodeMCU-firmware: https://github.com/nodemcu/nodemcu-firmware
NodeMCU office website: http://www.nodemcu.com/
NodeMCU Documentation: https://nodemcu.readthedocs.io/en/master/
ESP12F document website:https://docs.ai-thinker.com/en/esp8266
Windows flash tool: https://github.com/nodemcu/nodemcu-flasher
Linux flash tool: https://github.com/espressif/esptool
ESPlorer GUI: https://github.com/4refr0nt/ESPlorer


