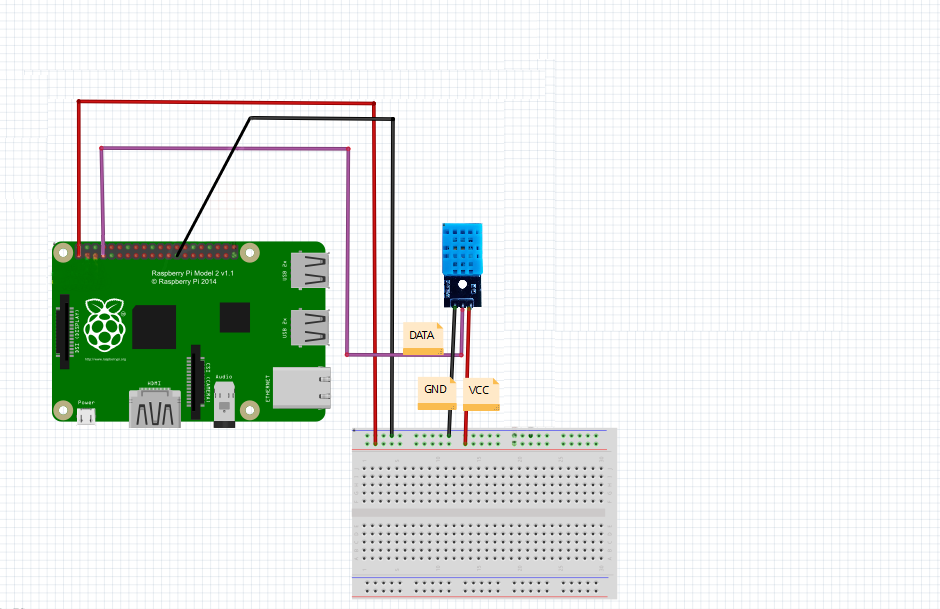
Circuit:-
Holding the DHT11 towards you (the one with grid), the left pin is connected to VCC (pin 1).The data pin is next after VCC and is connected to
(pin 7).Next pin is NC(no connection).Finally the last pin is connected to GND(pin 25).
Software:-
WiringPi which uses C like Arduino language is used to read the sensor value. WiringPi is maintained under GIT for ease of change tracking.If you do not have GIT installed, then under any of the Debian releases, you can install it with-
sudo apt-get install git-core
To obtain WiringPi using GIT:
git clone git://git.drogon.net/wiringPi
If you have already used the clone operation for the first time, then
cd wiringPi
git pull origin
Will fetch an updated version then you can re-run the build script below.
To build/install there is a new simplified script:
cd wiringPi
Create and Open temp_rh_sensor.c file.
sudo nano temp_rh_sensor.c
Open the below link and copy the code to temp_rh_sensor.c file and press Ctrl + X key,then press Y to save file.
https://osoyoo.com/driver/temp_rh_sensor.c
Also You can input below command to download the temp_rh_sensor.c file directly.
sudo wget http://osoyoo.com/driver/temp_rh_sensor.c
Compile the code as…
gcc -o sensor temp_rh_sensor.c -L/usr/local/lib -lwiringPi
Now execute it…
sudo ./sensor
[ Humidity = 87.0 % Temperature = 32.2 *C (90.0 *F) ]