


Robot Tank Car Chassis
| Buy from US |
Buy from UK |
Buy from DE |
Buy from IT |
Buy from FR |
Buy from ES |
 |
 |
 |
 |
 |
 |
Robot Tank Car Electronic Parts Kit
| Buy from US |
Buy from UK |
Buy from DE |
Buy from IT |
Buy from FR |
Buy from ES |
|
|
|
|
|
|

In this tutorial, we will use tank car kit V2.1 to make a simple remote controlled smart car. Once the car installation is completed, we will use a Infrared Remote to control the car movements including go forward, go back, left turn and right turn.

TR300 tank car chassis x1 +Acrylic board chassis x1
OSOYOO UNO R3 board fully compatible with Arduino x1
OSOYOO V1.3 WIFI shield x1
OSOYOO Model X motor driver x1
OSOYOO Battery box x 1
OSOYOO Voltage meter x1
IR remote controller and receiver x1
18650 batteries(3.7V) x 2
some screws and jumper wires

Step 1: Install the smart car basic frame work as per Tank car Lesson 1(2) . If you have already completed installation in Lesson 1 , just keep it as is.
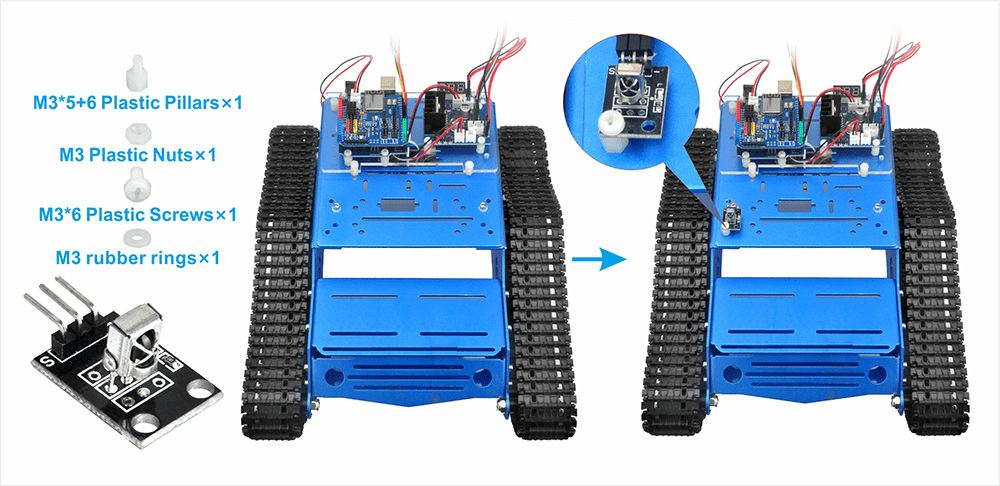
Step 2: Add an IR receiver module onto the car. Install the IR receiver module with 1pcs M3*5+6 plastic pillars, M3 plastic nuts,M3*6 plastic and M3 rubber rings at the front of chassis.
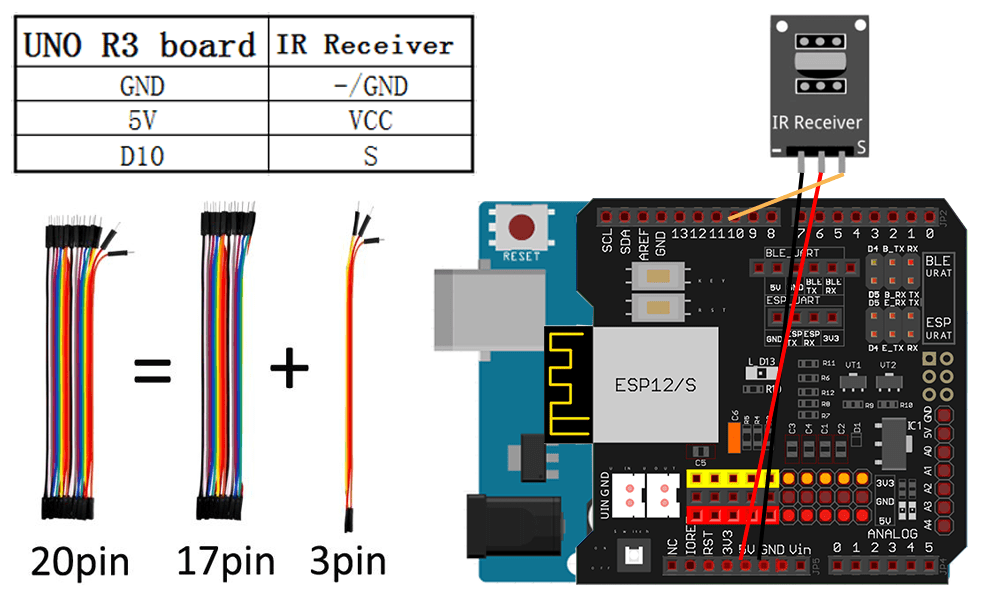
Step 3: Connect the S pin in IR receiver to D10 pin in UNO board, GND to GND, VCC to 5V, as the following photo (Remember : DO NOT remove any existing wires installed in Lesson 1 )

Step 1: Install latest Arduino IDE (If you have Arduino IDE version after 1.1.16, please skip this step)Download Arduino IDe from https://www.arduino.cc/en/Main/Software?setlang=en , then install the software.
Step2 :Download Lesson One sample code from https://osoyoo.com/driver/TR300_tank/arduino_tank_carV2.0/tankcarV2.0-lesson2.zip , unzip the download zip file , you will see a folder called tankcarV2.0-lesson2.ino.
Note:Please make sure you have installed the IRremote library.
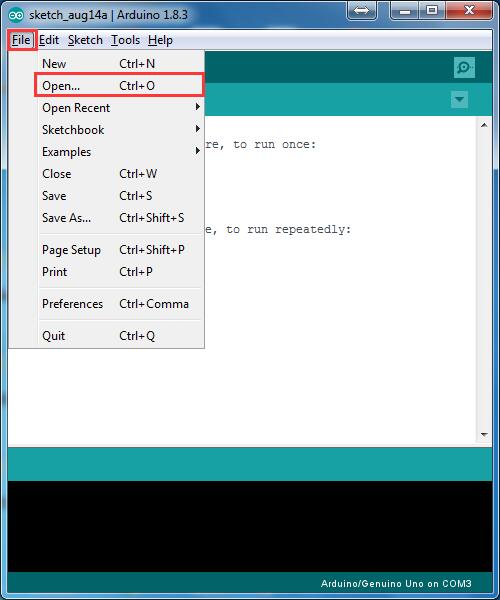
Step 3: Connect Arduino UNO to PC with USB cable, Open Arduino IDE -> click file -> click Open -> choose code “tankcarV2.0-lesson2.ino” in folder, load the code into arduino.(Notice: Shut off your battery or Unplug your power adapter when upload sketch code to Arduino.)
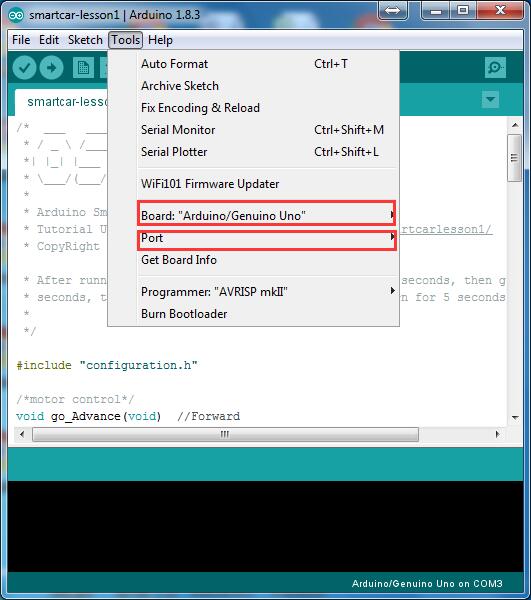
Step 4: Choose corresponding board/port for your project, upload the sketch to the board.

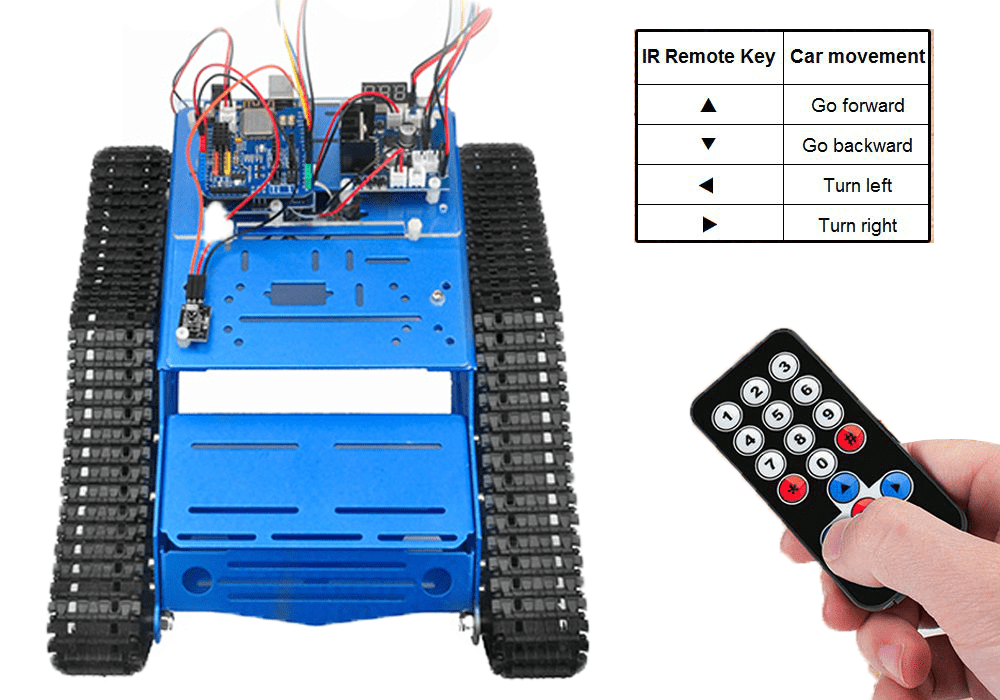
Press IR controller keys to control the car movements as per following instruction table:
Trouble shooting:
Some user found that this IR remote does not work. The reason might be the IR remote sends different button code which does not match our sample code. In order to solve this problem. Please take following steps:
Step A) Get the IR code of each button in your IR remote.
Download code from this link.
upload above sketch into your Arduino and open the serial monitor in your upper-right corner.
press the ◄ ► ▲ ▼ “OK” button in your remote, you will see their IR code as following picture:
Write down the IR code of your control buttons ◄ ► ▲ ▼ “OK” button,

STEP B)replace the IR code in lesson 2 sketch file:
Open your Lesson 2 code again, then you will see following lines define the IR command of each button:
#define IR_ADVANCE 24 //code from IR controller “▲” button
#define IR_BACK 82 //code from IR controller “▼” button
#define IR_RIGHT 90 //code from IR controller “>” button
#define IR_LEFT 8 //code from IR controller “<” button
#define IR_STOP 28 //code from IR controller “OK” button
#define IR_turnsmallleft 13 //code from IR controller “#” button
Please change the value of each button in above lines to match the code from
Step A). If you don’t know how to change, just
Send Email to us and give us the code of each button from
Step A), I can help you to change the code and email new sketch file to you.
Above method can also allow you to use other IR sending device (i.e TV remote, DVD remote, air conditioner remote etc) to control the car. Just use Step A) to get the key code of your remote and change the sketch file in Step B), it will work.


