


Objective
In this lesson, we will introduce the basic concept of UDP protocol. We will also use NodeMCU controller and a mobile phone APP to make a demo UDP data transfer between NodeMCU and Mobile Phone APP.
In the sample project, we will use OSOYOO UDP robot control APP to send UDP packet to NodeMCU. Each key button in the APP button will send a specific UDP message, NodeMCU program will display the message(from APP) to the Serial monitor of Arduino IDE. By using this program to analyze the message of OSOYOO UDP APP, you can actually design your own Arduino or Raspberry Pi wifi control robot project using OSOYOO UDP APP.
Hardware for this project
- A cell phone which has Android or iOS APP
- OSOYOO NodeMCU controller board x 1 pc
About UDP
UDP is a low-level Internet protocol which is often used in one way data transfer, i.e email. Sender device just need to tell UDP software the receiver’s IP address and port number, then the data will be packed inside a packet and sent to receiver device through internet. Since UDP is a low level protocol, it does not have any security and safety organism. Engineers normally deploy safety features into higher level applications over UDP.
Software need for this UDP project
Prerequisite:
You need to know some basic knowledge about Arduino programming IDE for ESP8266 and install ESP8266 Board package in the IDE . If not , please read this: https://osoyoo.com/?p=5353
Download and run Arduino Sketch for this project
1)Please download and unzip the sketch file from following link: https://osoyoo.com/driver/nodemcu/udp/nodemcu-udp.zip
2)Double click nodemcu-udp.ino file to open the sketch file
3)Replace line 15, 16 with your own wifi ssid and password
const char* ssid = "***"; //replace *** with your wifi ssid
const char* password = "***"; //replace *** with your wifi password
5)Upload the code to Arduino board, then open Arduino Serial monitor in the upper right corner.
Now please set your Baud Rate to 115200
you will see NodeMCU IP address as following:

Above result shows your NodeMCU IP address (in my case, 192.168.1.158) , NodeMCU is now waiting for UDP message at port 8888
Download OSOYOO UDP APP
First make sure your cell phone is connect to Internet through same Wifi network as your NodeMCU.
Searching OSOYOO Iot udp APP from Apple Store(iPhone/iPad) or Google Play Store(Android device), then download the red APP
Open that APP and press F1 key in the APP, you will see your Arduino IDE Serial monitor will show following message:
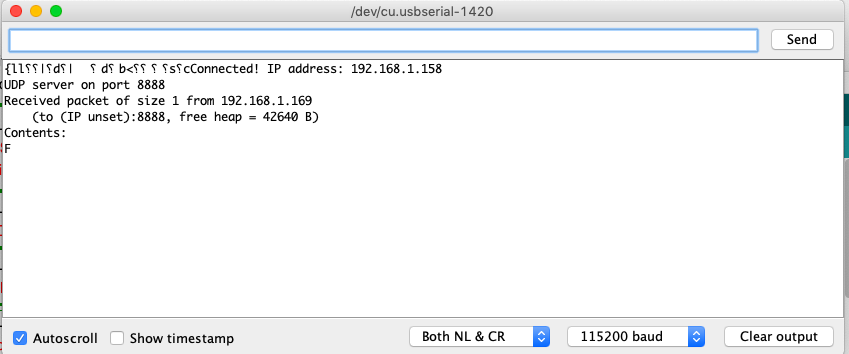
In above result, you can see that you got a UDP message “F” when APP F1 key is pressed.
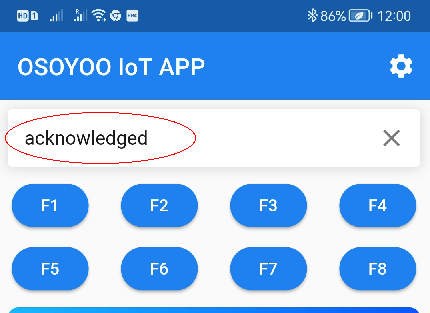
Now check your APP, you will see a message “acknowledged” is shown in APP. This is the UDP message sent from NodeMCU to your APP.
Now you can try to click other buttons of the APP and see what are the actually messages sent by these buttons.
You will see F2 message is “G”, F3 is “H”… and so on.
Question, Answer and Trouble Shooting
Question A: Why could OSOYOO IoT APP send message to NodeMCU without even knowing the IP address of the NodeMCU board?
Answer: OSOYOO IoT APP default destination IP is 192.168.1.255 which is a broadcasting IP address. Broadcasting means the APP will send UDP message to all device in the same Wifi Network.
So even we does not set destination IP address to NodeMCU IP, the NodeMCU can still get the message.
Question B: Can I change default sending destination IP address and Port Number of OSOYOO IoT APP?
Yes, you can! Osoyoo IoT APP default IP is 192.168.1.255 and default port is 8888. If you need to change the setting,
For example, if our NodeMCU IP address is 192.168.0.8, here is the guide to make the change to 192.168.0.8:
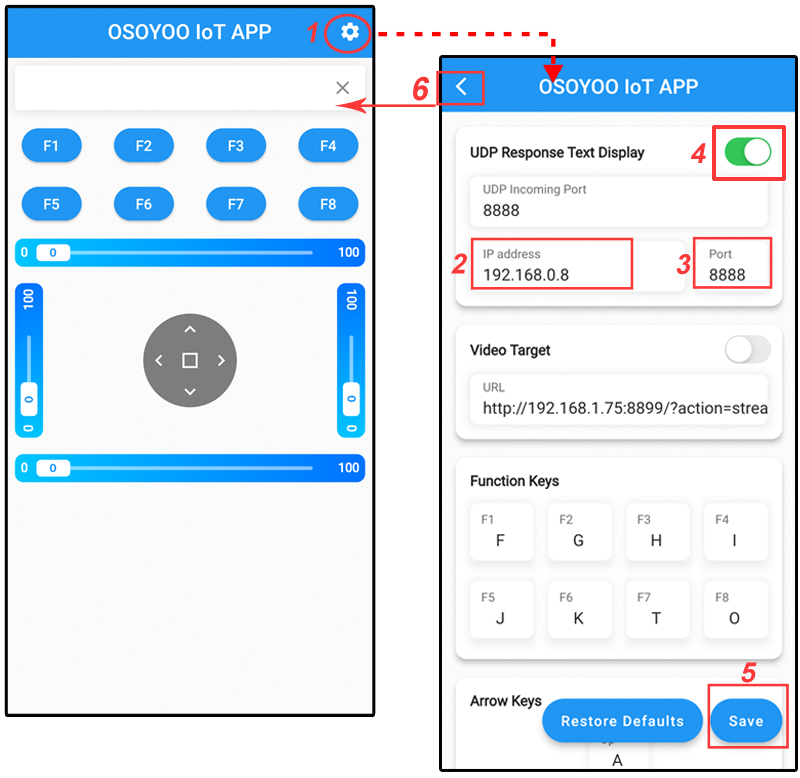
1)Open APP, click Setting button in upper right corner
2)Use 192.168.0.8 to replace default IP 192.168.1.255
3)keep default port number 8888 without changing
4)turn on the switch of UDP Response Text Display
5)Click Save button to save the changes you just made
6)Click Back Arrow to go back APP front UI
Question A: I touched my APP F1 key, but no message shows up in my NodeMCU serial monitor, why?
Sometimes, broadcasting IP Address is not necessarily 192.168.1.255, for example, if your NodeMCU IP address is 192.168.0.8, the wifi network broadcasting IP is 192.168.0.255.
So we suggest you replace 192.168.1.255 with 192.168.0.255 to match your network mask of NodeMCU. Of course you can directly set the NodeMCU IP as destination in APP.
If you have any question about OSOYOO NodeMCU products, feel free to contact us or leave comments here.
In next lesson, we will connect a sensor to NodeMCU and send sensor data to another Moquitto client software.


