In this lesson, we will install the most important framework in the tank car and program the car to do some simple movements. If you have passed the test movement in this lesson, it means Arduino UNO board, voltage meter,motor control driver module, motors, batteries,chassis and wire connections between these parts are all functioning well.
As your experiments in future lessons are all based on frame work of Lesson 1 and lesson 2, it is very important to test the installation and sample code in this Lesson properly.
Parts and Devices:
Name and QTY
Picture
Screw Model and QTY
UNO R3 board and cable
http://kookye.com/?p=5909
ESP8266 wifi board
http://kookye.com/?p=5902
Bluetooth Model
http://kookye.com/?p=5912
Motor driver board
http://kookye.com/?p=5916
Tracking sensor
http://kookye.com/?p=7278
Servo motor SG90 with blade and screws
http://kookye.com/?p=5926
Ultrasonic sensor module
http://kookye.com/?p=5945
Buzzer sensor module
http://kookye.com/?p=5944
IR receiver
http://kookye.com/?p=5953
IR remote controller
http://kookye.com/?p=10258
Voltage meter
http://kookye.com/?p=5959
Mount holder for ultrasonic sensor
//
Battery box for 18650 3.7V
Both flat top and button top 18650 battery can be put inside the holder.
DC power connector with wires
//
8pin Jumper wires 20mm(female to female)
//
10pin Jumper wires 30mm(female to female)
//
III. Hardware Installation
I. Adjust the sensitivity of tracking sensor and Install the tracking sensor.
Before assemble the control board, we need to adjust the sensitivity of tracking sensor.
Connect expansion board to tracking sensor as the following graph. Put the expansion board on UNO R3 board and connect Arduino UNO to PC with USB cable.Then adjust the potentiometer on the tracking sensor with cross screwdriver until you get the best sensitivity status: the signal indicate LED light will turn on when sensor is above white ground, and the signal LED will turn off when the sensor is above black track.
II.Install electronic board on tank car chassis
(1)Install Arduino UNO,Expansion board,Driver board,Voltage meter and Buzzer Module on upper acrylic chassis with M3 x 10 philip’s head screws, Install IR receiver with M2.5*8 philip’s head screws.
Install the ultrasonic sensor on black acrylic board with M1.6*12 philips head screws, then install it on servo arm with philip’s head sharp screws.
(2) Assemble the Neccessary Components
Install the LED lights and tracking sensors on tank chassis;
Install the SG90 servo motor and ultrasonic sensor with M2.5*8 philip’s head screws.
Install the acrylic board on tank car chassis with PCB spacers.
Install the battery box on tank car chassis with M3*10 philip’s head screws.
(3)Connection Diagram
Connect Driver board K1 (or K2) and K3 (or K4) sockets to 2 motors as per the following graph.
Connect the 2 LED light to expansion board as per the following graph.
Connect the right and left tracking sensors as the following graph.
Connect the Uno board, battery box, Voltage Meter and driver board according below connection diagram.
Connect Voltage Meter to driver board as below connection diagram.
Connect buzzer sensor, IR receiver,Ultrasonic Sensor and SG90 servo motor to driver board as below connection diagram.
Connect D5,D6,D8,D9,D10,D12 Pins to driver board 6 control pins as per following graph (these pins are defined in sample code configuration.h file)
Now hardware installation is almost down, you need to put the 18650 batteries inside the holder.Both flat top and button top 18650 battery can be put inside the holder. The button top battery is recommend because it is easier to figure out positive pole of the battery.If you buy flat top battery, you must make sure the positive pole of the battery is put on the + side of the holder.if you make put battery on wrong direction, it will damage the car.Before we install 18650 batteries into the box, we need burn the sample code into Arduino First.
IV. Software Installation:
Step 1: Install latest Arduino IDE (If you have Arduino IDE version after 1.1.16, please skip this step)Download Arduino IDe from https://www.arduino.cc/en/Main/Software?setlang=en , then install the software.
Step2 :The SG90 Servo can rotate approximately 180 degrees. Firstly we make the servo motor go to 90 degree position(middle position), then manually adjust the ultasonic sensor to straight forward direction. Thus to make sure the ultrasonic module can rotate to the left 90 degrees and also can rotate to the right 90 degrees. Find the servo_adjust.zip file in Tutorial/Lesson2/Code or download the servo adjust program from link:
Download and unzip, then upload the code to Uno board using Arduino IDE, turn on the power switch on the battery box. the servo motor will go to 90 degree position(middle position), At this time, if the ultrasonic sensor is not facing front direction of the car, you need manually adjust the sensor to straight forward direction.
Step 3: Download the libraries from http://www.kookye.com/download/car/IRremote.zip open Arduino IDE -> click sketch -> Include Libraries->Add .zip Libraries -> choose zip file “IRremote.zip”-> Upload the .zip files
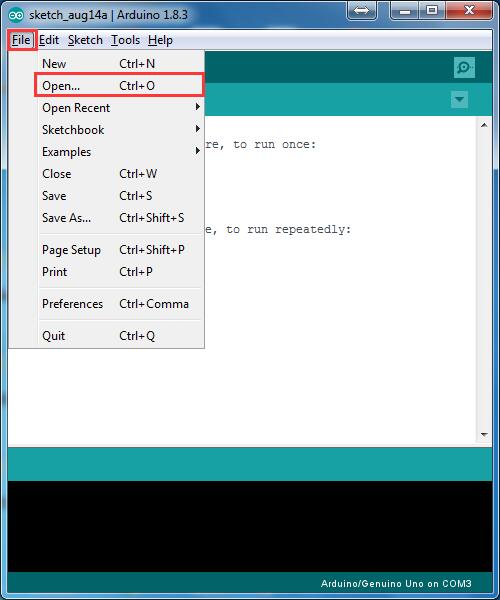
Step 5: Connect Arduino UNO to PC with USB cable, Open Arduino IDE -> click file -> click Open -> choose code “tank_robot_lesson2.ino” in tank_robot_lesson2 folder, load the code into arduino.
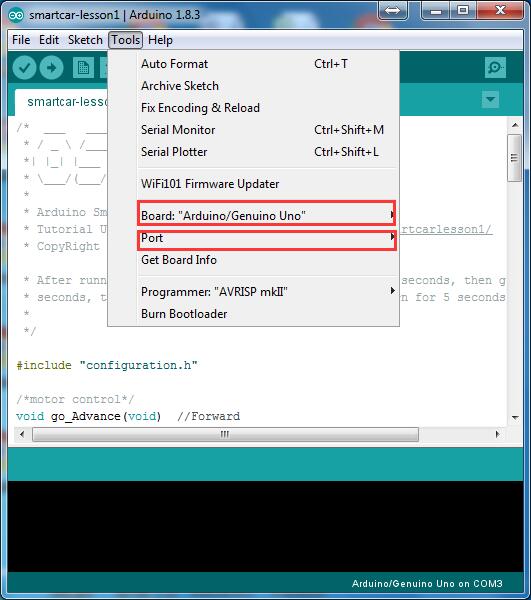
Step 6: Choose corresponding board/port for your project,upload the sketch to the board.
V. Testing :
Connect Arduino from PC, put 2 fully-charged 18650 battery into battery pox(check the box instruction and make sure polar direction is correct). Open the power switch in the box and open Arduino IDE, set the buat rate as 9600. You will find the information as follows:
welcome to use kookye tank robot car…
send :line follow/
send :LED on/
send :LED off/
send :servo/
send :distance/
send :buzzer/
send :go/
send :back/
send :stop/
When you put the car on the ground and send “line follow sensor”, the signal indicate LED light will turn on when sensor is above white ground, and the signal LED will turn off when the sensor is above black track.
When you send “turn on LED”, the LED light on car should turn on. “turn off LED”, the LED light should turn off.
When you send servo, the SG90 servo motor should move.
When you send buzzer, the buzzer should beep.
When you send go ahead, it should go forward;send go back,it should go backward;send stop,it should stop.
If the car does not move as per above mentioned result, you should check your wire connection, battery voltage(must over 7.2v).