This is a small buzzer for the LilyPad system. Use 2 I/O pins on the LilyPad main board and create different noises based on the different frequency of I/O toggling. Loud enough to hear inside a pocket but not obtrusively loud.
Please note: This is an inductive buzzer meaning that is will act as a short to ground if you are not actively driving it. We recommend you put both I/O pins to low (0V) when the buzzer is not used. Also, it’s come to our attention that washing these buzzers will damage them. Until we’ve figured out a solution to this, avoid washing any portion of your project that contains one of these buzzers.
LilyPad is a wearable e-textile technology developed by Leah Buechley and cooperatively designed by Leah and SparkFun. Each LilyPad was creatively designed to have large connecting pads to allow them to be sewn into clothing. Various input, output, power, and sensor boards are available. They’re even washable!
LilyPad Buzzer Dimensions:
- 20mm outer diameter
- Thin 0.8mm PCB
The Hardware preparetion:
- Alligator Test Leads
- USB Cable
- LilyPad USB board
- LilyPad Buzzer
Note: This example assumes you are using the latest version of the Arduino IDE on your desktop. If this is your first time using Arduino, please review our tutorial on installing the Arduino IDE.
If you have not previously installed an Arduino library, please check out our installation guide.
Connection
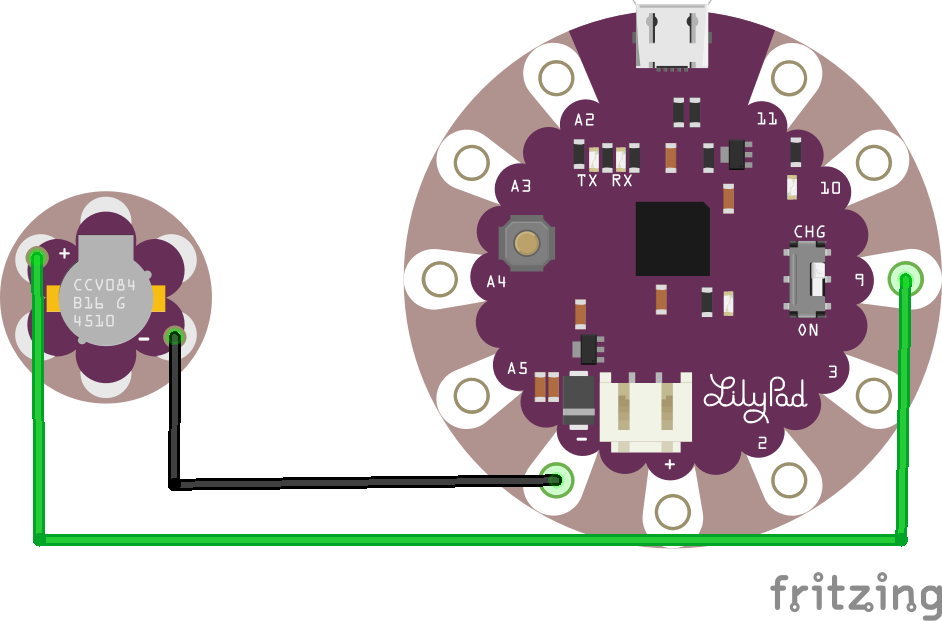
“-” to “-”
“+” to “9”
The LilyPad Buzzer has two sew tabs: Power (+) and Ground (-). Connect + to any digital I/O pin on a LilyPad Arduino and – to the – pin on the Arduino. To follow along with the code examples in this tutorial, connect the buzzer to a LilyPad Arduino as shown below. Alligator clips are useful for making temporary connections while prototyping until you are ready to sew the board into a project. When you are finished prototyping, replace the alligator clips with conductive thread traces.
Making Sounds
Inside the buzzer is a coil of wire and a small magnet. When current flows through this coil, it becomes magnetized and pulls towards the magnet, which makes a tiny “click”. When done thousands of times per second, the clicks create tones. We can use commands in Arduino to click the buzzer at specific frequencies, which we hear as different pitches. To create a musical note, we’ll need two things: a pitch and a duration.
A tone’s pitch is what we perceive when we think of a note as being very high (screams, forks scratching plates, etc.) versus very low (like earth-rumbling bass). The pitch of a tone is very closely related to the frequency played through a speaker. If we toggle a pin from HIGH-to-LOW then LOW-to-HIGH 440 times per second, for example, it produces a 440 Hz (hertz) frequency – a “middle A” pitch. Humans can hear frequencies ranging from 20 (low-pitch, bass) to 20,000 Hz (high-pitch, “ow, my ears”).
We can also program the duration of a tone – the length of time a pitch is played. In our program, we’ll use the delay function to set the duration. Playing a tone with Arduino is very easy. Just give it a pitch, and it will start toggling the output pin for you. Much like analog output, you can set it and forget it; the tone won’t stop playing until you tell it to.
– excerpt from The Digital Sandbox Arduino Companion
Playing Notes
Upload the following code to your LilyPad Arduino, making sure to select the correct LilyPad board from the drop down menu below. The LilyPad Arduino Simple, LilyPad Arduino, and LilyPad Development Board, and Development Board Simple all use a LilyPad ATmega 328. Choose LilyPad Arduino USB if using a LilyPad Arduino USB.
Don’t forget to select the Serial Port that your LilyPad is connected to.
// Which pin the buzzer is attached to
int buzzerPin = 9;

// Delay in milliseconds
int delayTime = 500;

// Notes and their frequencies
const int C = 1046;
const int D = 1175;
const int E = 1319;
const int F = 1397;
const int G = 1568;
const int A = 1760;
const int B = 1976;
const int C1 = 2093;
const int D1 = 2349;

void setup()
{
    // Set the buzzer pin as an OUTPUT
    pinMode(buzzerPin, OUTPUT);
}

void loop()
{
  // Use the tone() function to play each note in a scale
  tone(buzzerPin, C);
  delay(delayTime);
  tone(buzzerPin, D);
  delay(delayTime);
  tone(buzzerPin, E);
  delay(delayTime);
  tone(buzzerPin, F);
  delay(delayTime);
  tone(buzzerPin, G);
  delay(delayTime);
  tone(buzzerPin, A);
  delay(delayTime);
  tone(buzzerPin, B);
  delay(delayTime);
  tone(buzzerPin, C1);
  delay(delayTime);
  // Use noTone() to shut off the buzzer and delay to create a 'rest'
  noTone(buzzerPin);
  delay(delayTime);
}
Upload this code to your LilyPad Arduino and listen – the code plays a scale. To make the notes, we give the tone function two pieces of information – the pin the buzzer is attached to and the frequency we want to play –tone(pin, frequency). To make a note last a certain amount of time, we use a delay() in between notes. At the top of the sketch we created variables for musical notes with the frequency in hertz. To make a pause or rest, we can use the noTone() function followed by a delay.
Try using the tone() and noTone() functions to compose a simple song. One drawback of this code is that the sounds never stop. Next we’ll learn how to trigger sounds with an input so they are not constantly playing.
TIP:
When prototyping with the buzzer, sounds can get quite annoying, especially in large groups. Rather than unplugging or powering down your LilyPad Arduino to stop the sounds, we recommend unclipping an alligator clip from one side of the buzzer to quickly quiet it. For projects sewn together with conductive thread, stitch a LilyPad Slide Switch between the LilyPad Arduino pin and the positive side of the buzzer as a way to quickly toggle the sound ON/OFF while letting the rest of the code run.
Document


