Overview
In this python tutorial,we will show how to make a breathing light with a Raspberry Pi and a OSOYOO PWM HAT.
Note: This tutorial assumes that users are familiar with the Raspberry Pi and have a general knowledge base of Python. If you have unfamiliar with these items, as a starting point, we suggest setting up your Raspberry Pi, familiarizing yourself with the graphics user interface (GUI), and then learning the basics of Python. Below are resources to get you started:
Preperation
Hardware
- Raspberry Pi*1
- OSOYOO PWM HAT*1
- LED*1
- Power Supply
- Jumpers
Software
Install the Adafruit PCA9685 Library on your RPi
sudo pip3 install adafruit-circuitpython-pca9685
API documentation for this library can be found on Read the Docs.
For information on building library documentation, please check out this guide.
Configure your Pi to use I2C devices
To learn more about how to setup I2C with Raspbian, please take a minor diversion to this tutoria.
When you are ready to continue, enter the following commands to add SMBus support (which includes I2C) to Python:
sudo apt-get install python-smbus
sudo apt-get install i2c-tools
i2c-tools isn’t strictly required, but it’s a useful package since you can use it to scan for any I2C or SMBus devices connected to your board. If you know something is connected, but you don’t know it’s 7-bit I2C address, this library has a great little tool to help you find it. python-smbus is required, it adds the I2C support for python!
Don’t forget you must add kernel support for I2C by following this tutorial!
You can then detect if the HAT is found on the #1 I2C port with:\
This will search /dev/i2c-1 for all address, and if an Adafruit PWM/Servo HAT is properly connected and it’s set to its default address — meaning none of the 6 address solder jumpers at the top of the board have been soldered shut — it should show up at 0x40 (binary 1000000) as follows:
Once both of these packages have been installed, and i2cdetect finds the 0x40 I2C address, you have everything you need to get started accessing I2C and SMBus devices in Python.
Connection:
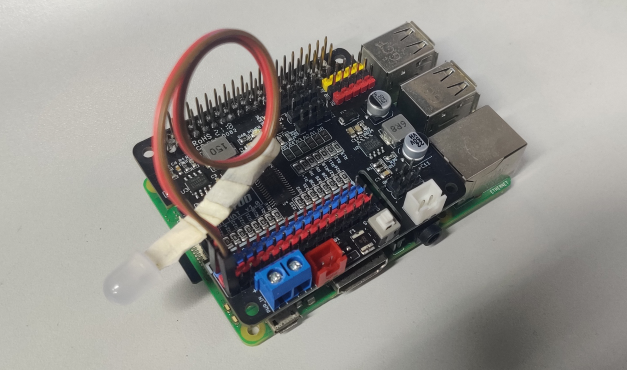
There’s no wiring needed to connect the HAT to the Pi. The example below shows the HAT attached to a Pi.
To dim an LED, wire it to the board as follows. Note: you don’t need to use a resistor to limit current through the LED as the HAT will limit the current to around 10mA.
- Connect LED cathode / shorter leg to HAT channel GND / ground.
- Connect LED anode / longer leg to HAT channel PWM.
Code Program
from board import SCL, SDA
import busio
# Import the PCA9685 module.
from adafruit_pca9685 import PCA9685
# Create the I2C bus interface.
i2c = busio.I2C(SCL, SDA)
# Create a simple PCA9685 class instance.
hat = PCA9685(i2c)
# Set the PWM frequency to 60hz.
hat.frequency = 60
# Set the PWM duty cycle for channel 0 to 0xffff (65535). duty_cycle is 16 bits to match other PWM objects
# but the PCA9685 will only actually give 12 bits of resolution.
led_channel = hat.channels[0]
# Increase brightness:
for i in range(0,0xffff,+30):
led_channel.duty_cycle = i
# Decrease brightness:
for i in range(0xffff, 0, -30):
led_channel.duty_cycle = i
Save the above code to a py file and run it, you will see that the LED connected to the PWM 0 interface will change from dark to light and then from light to dark until it turns off.
If you want the LED to keep looping, you can add a “while” command, like this:
from board import SCL, SDA
import busio
# Import the PCA9685 module.
from adafruit_pca9685 import PCA9685
# Create the I2C bus interface.
i2c = busio.I2C(SCL, SDA)
# Create a simple PCA9685 class instance.
hat = PCA9685(i2c)
# Set the PWM frequency to 60hz.
hat.frequency = 60
# Set the PWM duty cycle for channel 0 to 0xffff (65535). duty_cycle is 16 bits to match other PWM objects
# but the PCA9685 will only actually give 12 bits of resolution.
led_channel = hat.channels[0]
var = 1
while var == 1:# The condition will always be true and the loop will continue indefinitely
# Increase brightness:
for i in range(0,0xffff,+30):
led_channel.duty_cycle = i
# Decrease brightness:
for i in range(0xffff, 0, -30):
led_channel.duty_cycle = i
Add more LEDS
If you want to control more LEDs, you can add more channels to the code, and you can also try to make more changes to them.
Datasheet