RPi3/4/5 + Osoyoo 3.5インチ SPI スクリーン – Bookworm セットアップガイド (fbcp)Raspberry Pi OS Bookworm(2025年5月13日以前にリリースされたもの)
ハードウェア: Raspberry Pi 3B/3B+/4B/5/Zero 2W
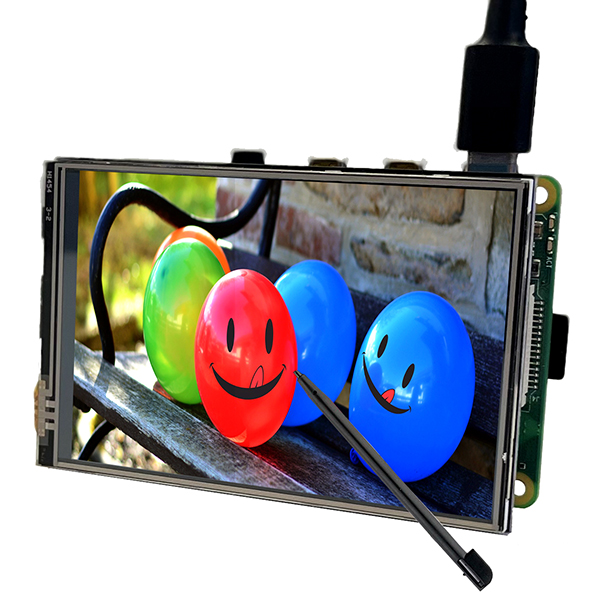
スクリーン: Osoyoo 3.5インチ SPI タッチスクリーン 480×320 ( モデル番号: 2022013800 )
システム: Raspberry Pi OS Bookworm (2025-05-13以前にリリースされたもの)
手法: fbcp (フレームバッファ・コピー)
バージョンに関する注意: このチュートリアルは、2025-05-13以前にリリースされた Bookworm システム用です。それ以降の Bookworm/Trixie システムについては、fbcp を使用しない更新版チュートリアルを使用してください。
1OSイメージの書き込み
デスクトップ版の Raspberry Pi OS (Bookworm バージョン) を TFカード/micro SDカードに書き込み、そのカードを Raspberry Pi に挿入します。
OSのダウンロードはこちらから: Raspberry Pi 公式サイト
重要: SDカードに十分な空き容量があることを確認してください(少なくとも16GB以上を推奨)。
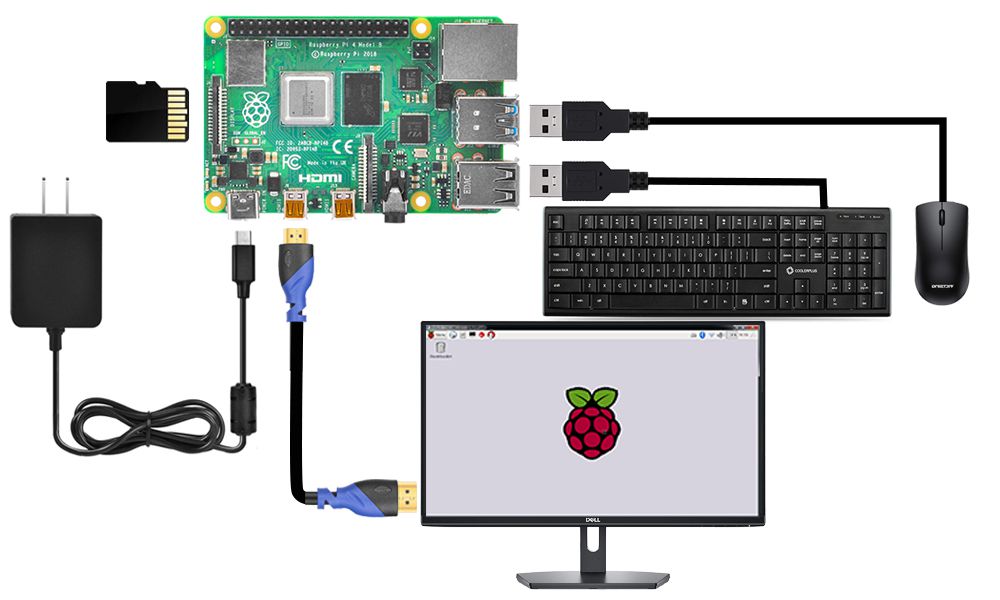
2HDMIモニタの接続
Raspberry Pi を HDMIモニタまたはテレビに接続します。キーボードとマウスを Raspberry Pi の USBポートに接続します。
警告: まだ 3.5インチ SPIスクリーンを取り付けないでください!
ドライバの設定が完了するまでは、画面は白く表示されるだけです。
4IPアドレスの取得
ターミナルを開き、以下のコマンドを入力してください:
hostname -I
注記: ステップ 7 の SSH 接続のために、この IP アドレスを書き留めておいてください。
5SPIスクリーン本体の取り付け
Raspberry Pi をシャットダウンし、HDMIモニタ、キーボード、マウスを取り外します。その後、3.5インチ SPIスクリーンを取り付けます。
ピンの整列: Raspberry Pi には 40 本のピンがありますが、LCD コネクタには 26 本のピンしかありません。
1 番ピンから正しく合うように確認して取り付けてください。
6電源投入
SPIスクリーンを取り付けた状態で Raspberry Pi の電源を入れます。
予想される動作: 最初、画面は白く表示されます。
これは正常です。緑色の LED が点滅し、システムが起動中であることを示します。
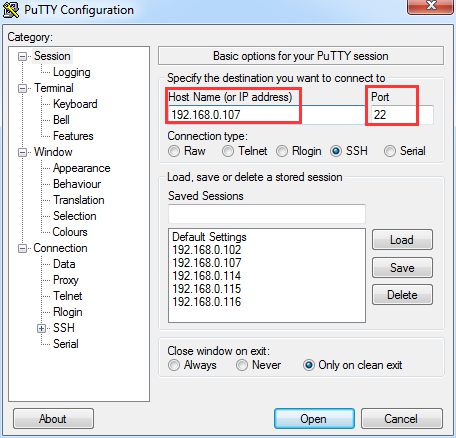
7SSHリモートアクセス
PuTTY (Windows) またはターミナル (Mac/Linux) を使用して、Raspberry Pi に SSH 接続します。
PuTTY ガイド
- ステップ 4 で確認した IP アドレスを入力します
- ポート: 22
- “Open” をクリックしてログインします
8fbcpのダウンロードとコンパイル
fbcpとは? fbcp は HDMI のフレームバッファを SPI スクリーンにコピーし、画面のミラーリングを可能にします。
SSH 経由で実行します:
sudo apt install libraspberrypi-dev -y
sudo apt-get install unzip cmake -y
sudo wget https://osoyoo.com/driver/osoyoo35b.zip
sudo unzip ./osoyoo35b.zip
sudo cp osoyoo35b.dtbo /boot/overlays/
sudo wget https://osoyoo.com/driver/Rpi-fbcp.zip
sudo unzip ./Rpi-fbcp.zip
cd rpi-fbcp/
sudo rm -rf build
sudo mkdir build
cd build
sudo cmake ..
sudo make -j4
sudo install fbcp /usr/local/bin/fbcp
注記: libraspberrypi-dev は、fbcp が GPU にアクセスするために必要です。RPi5 では fbcp は使用されません。
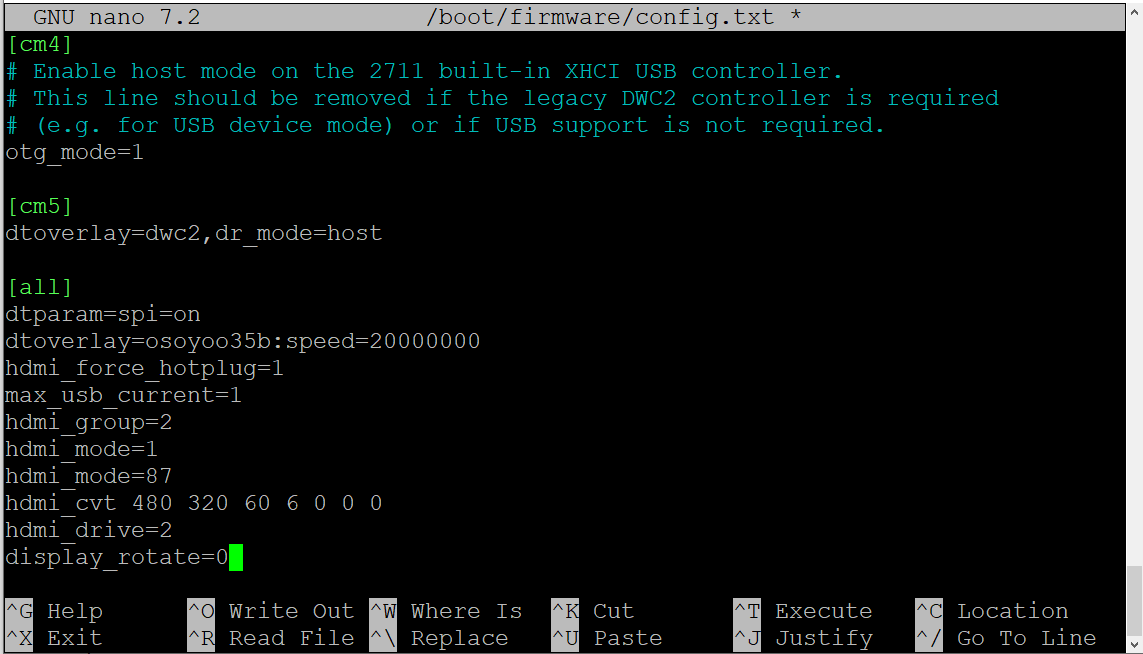
9config.txt の編集
sudo nano /boot/firmware/config.txt
9a. 以下の行をコメントアウトする:
最重要: 行頭に # を追加して KMS を無効にします。
#dtoverlay=vc4-kms-v3d
9b. ファイルの最後に追加する:
# ========== SPI Screen Configuration ==========
dtparam=spi=on
dtoverlay=osoyoo35b:speed=20000000
hdmi_force_hotplug=1
max_usb_current=1
hdmi_group=2
hdmi_mode=1
hdmi_mode=87
hdmi_cvt 480 320 60 6 0 0 0
hdmi_drive=2
display_rotate=2
保存: Ctrl+X を押し、次に Y、そして Enter を押します。
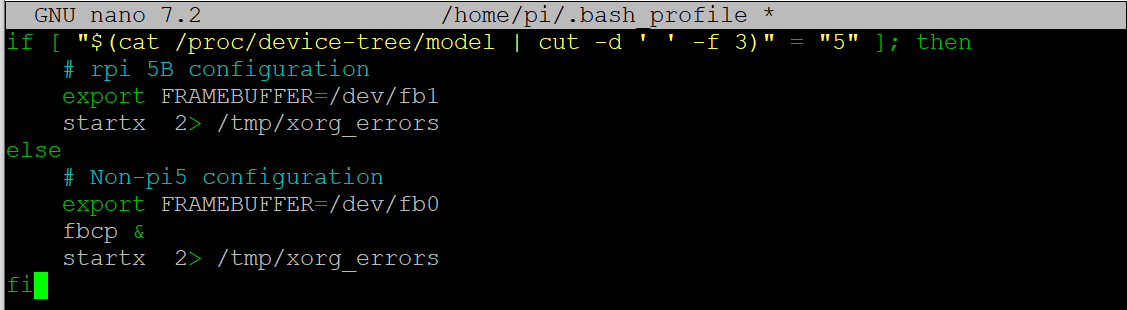
10自動起動の設定
10a. .bash_profile の構成
sudo nano ~/.bash_profile
以下のコードを追加します:
if [ "$(cat /proc/device-tree/model | cut -d ' ' -f 3)" = "5" ]; then
    # RPi 5B の設定
    export FRAMEBUFFER=/dev/fb1
    startx 2> /tmp/xorg_errors
else
    # Pi5 以外の設定 (RPi 3/4)
    export FRAMEBUFFER=/dev/fb0
    fbcp &
    startx 2> /tmp/xorg_errors
fi
動作の仕組み:
– RPi 5: 直接フレームバッファ (/dev/fb1) を使用し、fbcp は使いません
– RPi 3/4: fbcp を使用して HDMI を SPI スクリーンにコピーします
10b. 99-fbturbo.conf の構成 (存在する場合)
sudo nano /usr/share/X11/xorg.conf.d/99-fbturbo.conf
存在する場合は、内容が以下のようになっているか確認してください:
Section "Device"
    Identifier  "Allwinner A10/A13 FBDEV"
    Driver      "fbturbo"
    Option      "fbdev" "/dev/fb0"
    Option      "SwapbuffersWait" "true"
EndSection
11CLIオートログインの設定
sudo raspi-config nonint do_boot_behaviour B2
sudo raspi-config nonint do_wayland W1
sudo reboot
最重要項目: do_wayland W1 は Wayland から X11 へ切り替えます。SPI スクリーンは Wayland をサポートしていません!
再起動後: 画面にデスクトップが表示されるはずです。もし白いままの場合は、電源の抜き差しを試してください。
12タッチ操作の構成
デスクトップが表示されたら、SSH で接続してキャリブレーション ソフトウェアをインストールします:
sudo apt-get install xserver-xorg-input-evdev xinput-calibrator -y
sudo cp -rf /usr/share/X11/xorg.conf.d/10-evdev.conf /usr/share/X11/xorg.conf.d/45-evdev.conf
キャリブレーション設定の作成:
sudo nano /usr/share/X11/xorg.conf.d/99-calibration.conf
以下を追加します:
Section "InputClass"
    Identifier "calibration"
    MatchProduct "ADS7846 Touchscreen"
    Option "Calibration" "241 3854 3885 240"
    Option "SwapAxes" "1"
EndSection
再起動:
sudo reboot
トラブルシューティング
診断コマンド
# X Server のエラーを確認
cat /tmp/xorg_errors

# フレームバッファ・デバイスを確認
ls -l /dev/fb*

# fbcp が動作しているか確認 (RPi 3/4)
ps aux | grep fbcp

# SPI オーバーレイの確認
dmesg | grep -i osoyoo
よくあるエラー
エラー: 再起動後に画面が白いまま
解決策: 電源の抜き差しを試してください。config.txt に間違いがないか確認してください。
エラー: fbcp: コマンドが見つかりません
解決策: fbcp を再コンパイルしてください:
cd ~/rpi-fbcp/build && sudo make && sudo install fbcp /usr/local/bin/fbcp
エラー: タッチが効かない
解決策: 再キャリブレーションを行ってください: DISPLAY=:0 xinput_calibrator
ワンクリック セットアップ スクリプト
setup-spi-fbcp.sh として保存し、実行してください:
chmod +x setup-spi-fbcp.sh && ./setup-spi-fbcp.sh
#!/bin/bash
echo "=== RPi3/4/5 + Osoyoo 3.5 SPI Screen Setup (fbcp) ==="

sudo apt-get update
sudo apt install libraspberrypi-dev -y
sudo apt-get install -y unzip cmake
cd ~
sudo wget -q https://osoyoo.com/driver/osoyoo35b.zip
sudo unzip -o -q ./osoyoo35b.zip
sudo cp osoyoo35b.dtbo /boot/overlays/
sudo wget -q https://osoyoo.com/driver/Rpi-fbcp.zip
sudo unzip -o -q ./Rpi-fbcp.zip
cd rpi-fbcp/ && sudo rm -rf build && sudo mkdir build && cd build
sudo cmake .. && sudo make -j4 && sudo install fbcp /usr/local/bin/fbcp

cd ~
sudo sed -i 's/^dtoverlay=vc4-kms-v3d/#dtoverlay=vc4-kms-v3d/' /boot/firmware/config.txt

if ! grep -q "osoyoo35b" /boot/firmware/config.txt; then
    sudo tee -a /boot/firmware/config.txt > /dev/null << 'CONF' # ========== SPI Screen Configuration ========== dtparam=spi=on
dtoverlay=osoyoo35b:speed=20000000 hdmi_force_hotplug=1 max_usb_current=1 hdmi_group=2 hdmi_mode=1 hdmi_mode=87 hdmi_cvt 480 320 60 6 0 0 0 hdmi_drive=2 display_rotate=2 CONF fi cat > ~/.bash_profile << 'EOF' if [ "$(cat /proc/device-tree/model |
cut -d ' ' -f 3)" = "5" ]; then export FRAMEBUFFER=/dev/fb1 startx 2> /tmp/xorg_errors
else
    export FRAMEBUFFER=/dev/fb0
    fbcp &
    startx 2> /tmp/xorg_errors
fi
EOF

sudo raspi-config nonint do_boot_behaviour B2
sudo raspi-config nonint do_wayland W1

sudo apt-get install -y xserver-xorg-input-evdev xinput-calibrator
sudo cp -rf /usr/share/X11/xorg.conf.d/10-evdev.conf /usr/share/X11/xorg.conf.d/45-evdev.conf

sudo tee /usr/share/X11/xorg.conf.d/99-calibration.conf > /dev/null << 'EOF'
Section "InputClass"
    Identifier "calibration"
    MatchProduct "ADS7846 Touchscreen"
    Option "Calibration" "241 3854 3885 240"
    Option "SwapAxes" "1"
EndSection
EOF

echo "=== セットアップ完了。
再起動します... ==="
sleep 3 && sudo reboot
既知の制限事項
- 画面解像度は 480x320 固定です
- 一部のアプリは小さな画面ではみ出します
- 16ビットのカラー深度
- Wayland はサポートされていません
- fbcp により RPi 3/4 ではわずかな遅延が発生します
リファレンス チュートリアル
お使いの Raspberry Pi モデルと OS バージョンに一致するチュートリアルを選択してください:
Bookworm / Trixie RPi 4/5
Advanced • Trixie/Bookworm • 2025-10-01 以降
Advanced • Trixie/Bookworm • 2025-10-01 以降
どれを選べばよいかわかりませんか?
• Piモデルを確認する: cat /proc/device-tree/model
• OSバージョンを確認する: cat /etc/os-release
RPiのバージョンによる違い
| 特徴 |
RPi 3/4 |
RPi 5 |
| フレームバッファ |
/dev/fb0 |
/dev/fb1 |
| 手法 |
fbcp |
直接出力 |
| libraspberrypi-dev |
必要 |
不要 |
テクニカルサポート
ご不明な点やフィードバックがございましたら、チケットを送信してください。弊社のチームが通常 1〜2営業日 以内に回答いたします。お待ちいただきありがとうございます!
営業時間: 午前9時 〜 午後6時 GMT+8 (月曜日 〜 金曜日)
お問い合わせ先: [email protected]