概述
在本课中我们将学习如何用Raspberry Pi驱动有源蜂蜜器。
所用物料
1 * Raspberry Pi
1 * Breadboard
1 * Buzzer
Jumper wires
1 * T-Extension Board
1 * 40-Pin Cable
工作原理
蜂鸣器分为有源蜂蜜器和无源蜂蜜器,我们这里使用有源蜂鸣器。有源蜂鸣器和无源蜂蜜器的区别是,有源蜂鸣器有内置震荡源,只有通电就会响,而无源蜂蜜器不含内置的震荡源,需要一个方波信号才能驱动它。
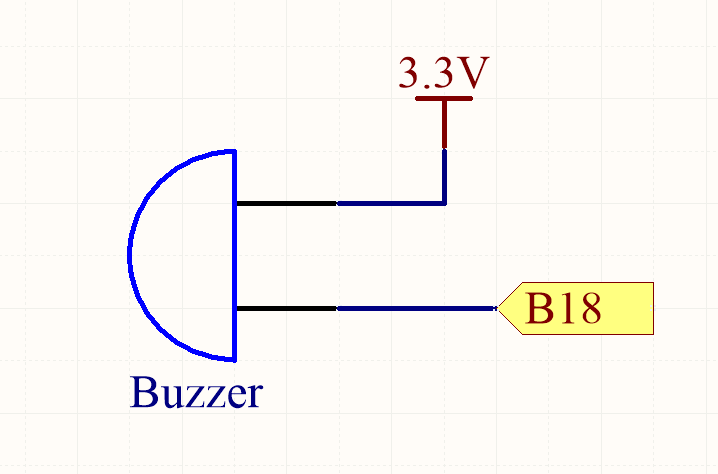
蜂蜜器有两个引脚,长的一个引脚是正极(阳极),短的一个脚是负极(阴极),下图是蜂鸣器的电气符号表示
 在本课中我们将蜂鸣器负极接到Raspberry Pi的GPIO 1(BCM_GPIO 18)上,正极接到3.3V上,如下图所示

实物连线图
还没画(o(╯□╰)o)
软件
如果你是C语言用户,请参考下面步骤。
1) 在/home/pi目录下新建一个.c源文件,名字随意(你开心就好)
cd ~
sudo nano buzzer.c
2) 编码
#include <wiringPi.h>
#include <stdio.h>
#include <stdlib.h>

#define BuzzerPin 1
首先要包含这个程序需要用到的头文件,将蜂鸣器接到GPIO1(BCM_GPIO18)口上。
for(;;){
        for(i=0;i<70;i++){
            //beep on
            digitalWrite(BuzzerPin, LOW);
            delay(3);
            //beep off
            digitalWrite(BuzzerPin,HIGH);
            delay(3);
        }
        delay(100);
            for(i=0;i<100;i++){
            //beep off
            digitalWrite(BuzzerPin, HIGH);
            delay(1);
            //beep on
            digitalWrite(BuzzerPin,LOW);
            delay(1);
        }
        //delay(100);
    }
在主循环中,通过两个for语句让蜂鸣器发出不同频率的声音。
完整的程序源码。可以在命令行运行下面命令获取
sudo wget http://osoyoo.com/driver/pi3_start_learning_kit_lesson_8/buzzer.c
3) 编译
gcc -Wall -o buzzer buzzer.c -lwiringPi
4) 运行程序
sudo ./buzzer
5) 最终结果
执行程序后,屏幕上会打印出蜂鸣器与GPIO的连接情况以及其他提示信息,同时,蜂鸣器发出不同声音。
对于python用户
1) 在/home/pi下新建一个.py脚本文件,文件名随意(你爱咋咋地)
cd ~
sudo nano buzzer.py
2) 编码
import RPi.GPIO as GPIO
import time

# Set #18 as buzzer pin
BuzzerPin = 18
首先导入程序运行依赖的软件模块,将蜂鸣器接到GPIO 1(BCM_GPIO 18)上
def setup():
    # Set the GPIO modes to BCM Numbering
    GPIO.setmode(GPIO.BCM)
    # Set BuzzerPin's mode to output,
    # and initial level to High(3.3v)
    GPIO.setup(BuzzerPin, GPIO.OUT, initial=GPIO.HIGH)
将BuzzerPin脚设置成输出模式,初始电平为高电平(3.3V)
def main():
    print_message()
    while True:
      GPIO.output(BuzzerPin, GPIO.LOW)
      time.sleep(0.3)
      GPIO.output(BuzzerPin, GPIO.HIGH)
      time.sleep(0.3)
在主循环中将BuzzerPin引脚电平不断切换,使蜂鸣器间歇性发声。
完整的代码,可以通过下面命令获取到
sudo wget http://osoyoo.com/driver/pi3_start_learning_kit_lesson_8/buzzer.py
3) 运行程序
sudo python ./buzzer.py
4) 最终结果
执行脚本,屏幕上会打印出蜂鸣器与GPIO连接信息,同时蜂鸣器发出哔哔的响声。


Why is there not more zerogpio? Fot python?
you can install zerogpio if you like. But we have never tested this library before. We feel RPI.gpio library is more friendly to beginner who has no library installation experience.
If you like to install zerogpio, check the link here:
https://gpiozero.readthedocs.io/en/latest/