概述
在本课中我们将学习如何利用Raspberry Pi驱动人体热释电红外传感器(Human Body Pyroelectric Infrared Sensor),并利用它制作一个报警器。
所需器件
1 * Raspberry Pi
1 * Breadboard
1 * 蜂鸣器
1 * PIR sensor
Several jumper wires
工作原理
PIR是一种非接触式检测人体或动物辐射的红外能量变化的传感器,PIR将红外能量变化转换为电压信号并输出。PIR能够感测波长在8和12um之间的红外线,不同温度的物体能够发射出波长不同的红外线,人体的温度通常为37℃左右,所以会发出波长10um左右的红外线,能够被PIR检测到,当PIR探测到这个波长的红外线后就产生一个电平信号。

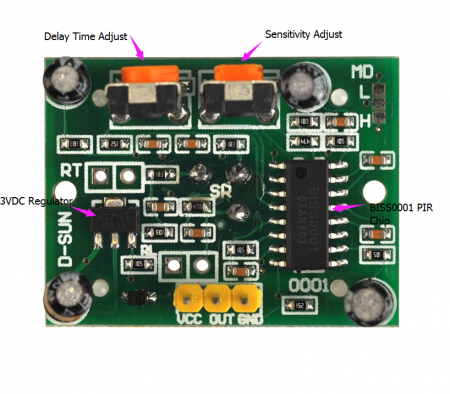
在本课中,我们使用的PIR模块,这个模块有3个引脚(VCC、OUT、GND),莫酷似上还有两个可调电阻,一个用于调节模块灵敏度,一个用于调节模块延迟反应时间

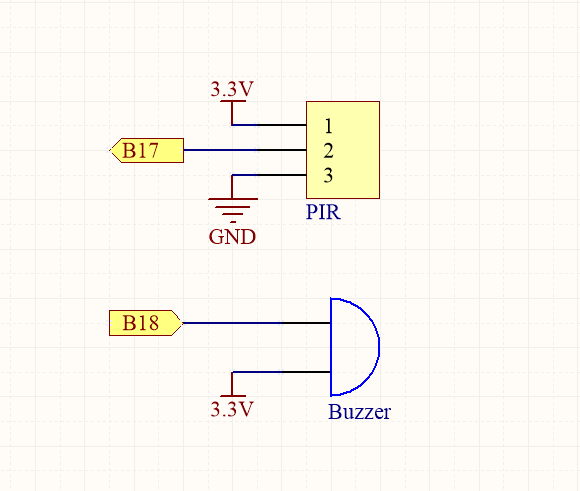
将PIR接到Pi上,同时在Pi上挂接一个蜂鸣器用于报警。

实物连接
软件
for C language user
1) 在/home/pi下新建一个.c源文件(文件名随意)
cd ~
sudo nano pirsensor.c
2) 往新建的文件中写入一下代码
#include
#include
#include

#define BuzzerPin     1
#define PIRPin       0

int main(void)
{
  // When initialize wiring failed, print messageto screen
  if(wiringPiSetup() == -1){
    printf("setup wiringPi failed !");
    exit(1);
  }

  pinMode(BuzzerPin, OUTPUT);
  pinMode(PIRPin,INPUT);

  printf("\n");
  printf("========================================\n");
  printf("|              Alarm                   |\n");
  printf("|    ------------------------------    |\n");
  printf("|        PIR connect to GPIO0          |\n");
  printf("|                                      |\n");
  printf("|        Buzzer connect to GPIO1       |\n");
  printf("|                                      |\n");
  printf("|                                OSOYOO|\n");
  printf("========================================\n");
  printf("\n");

  while(1){
    if(!(digitalRead(PIRPin))){
    digitalWrite(BuzzerPin, HIGH);
    printf("\n");
    printf("-------------------|\n");
    printf("|    no alarm...   |\n");
    printf("-------------------|\n");
    delay(1000);
    }
    else{
    digitalWrite(BuzzerPin, LOW);
    delay(500);
    printf("\n");
    printf("===================|\n");
    printf("|      alarm...    |\n");
    printf("===================|\n");
    }
  }

  return 0;
}
保存退出。
完整代码可以通过下面命令获取
wget http://osoyoo.com/driver/pi3_start_learning_kit_lesson_16/pirsensor.c
3) 编译
gcc -Wall -o pirsensor pirsensor.c -lwiringPi
4) 运行程序
sudo ./pirsensor
5) 最终结果
运行上面的程序,屏幕上会打印出PIR以及蜂鸣器与Pi的连接关系。在PIR前面晃动,蜂鸣器会响起,停止晃动,蜂蜜器停止响。
for python user
1) 在/home/pi下新建一个.py脚本文件,文件名随意(你爱咋咋地)
cd ~
sudo nano pirsensor.py
2) 编码
往新建文件中写入如下代码
import RPi.GPIO as GPIO
import time

# set BCM_GPIO 17(GPIO 0) as PIR pin
PIRPin = 17
# set BCM_GPIO 18(GPIO 1) as buzzer pin
BuzzerPin = 18

#print message at the begining ---custom function
def print_message():
    print ('==================================')
    print ('|              Alarm             |')
    print ('|     -----------------------    |')
    print ('|     PIR connect to GPIO0       |')
    print ('|                                |')
    print ('|     Buzzer connect to GPIO1    |')
    print ('|     ------------------------   |')
    print ('|                                |')
    print ('|                          OSOYOO|')
    print ('==================================\n')
    print ('Program is running...')
    print ('Please press Ctrl+C to end the program...')

#setup function for some setup---custom function
def setup():
    GPIO.setwarnings(False)
    #set the gpio modes to BCM numbering
    GPIO.setmode(GPIO.BCM)
    #set BuzzerPin's mode to output,and initial level to HIGH(3.3V)
    GPIO.setup(BuzzerPin,GPIO.OUT,initial=GPIO.HIGH)
    GPIO.setup(PIRPin,GPIO.IN)

#main function
def main():
    #print info
    print_message()
    while True:
        #read Sw520dPin's level
        if(GPIO.input(PIRPin)!=0):
            GPIO.output(BuzzerPin,GPIO.LOW)
            #time.sleep(0.5)
            print ('********************')
            print ('*     alarm!     *')
            print ('********************')
            print ('\n')
      time.sleep(1)
        else:
            GPIO.output(BuzzerPin,GPIO.HIGH)
            print ('====================')
            print ('=     Not alarm...  =')
            print ('====================')
            print ('\n')
      time.sleep(1)


#define a destroy function for clean up everything after the script finished
def destroy():
    #turn off buzzer
    GPIO.output(BuzzerPin,GPIO.HIGH)
    #release resource
    GPIO.cleanup()
#
# if run this script directly ,do:
if __name__ == '__main__':
    setup()
    try:
            main()
    #when 'Ctrl+C' is pressed,child program destroy() will be executed.
    except KeyboardInterrupt:
        destroy()
        pass
保存退出
3) 运行脚本
sudo python ./pirsensor.py
4) 最终结果
运行上面的脚本程序,屏幕上会打印出PIR以及蜂鸣器与Pi的连接关系。在PIR前面晃动,蜂鸣器会响起,停止晃动,蜂蜜器停止响。


The operating voltage of this PIR motion sensor is 5V to 20V. Better connect the VCC pin to 5V.
Hi, I’m a newbie to raspberry pi. I’m having difficulty with lesson 16. The buzzer is always on when I run the program. Everything is wired correctly. Can anyone advise how to test to see what’s wrong?
Hi, Please turn sensitivity adjustment and time delay adjustment of IR motion sensor according to the instruction. what’s more, the sensor will be affected by environment(such as sunshine, wind and so on)
Hi Elaine, I moved the VCC connection to 5v as suggested by amiya. Works perfectly now 🙂